20 Best EFFECT Plugins For Pro Tools 2024

https://integraudio.com/20-best-effect-plugins-pro-tools/ | integraudio.com
Contents show

20 Best Effect Plugins For Pro Tools 2024

1. Three-Body Technology Kirchhoff-EQ

More Info & Price (Trial Available)
The ultimate modern-looking parametric EQ plugin available nowadays.

Equalizers can be taunting to master properly, as they can inflict strange results in the process of tailoring the effect itself. One wrong twist or turn in a specific bandwidth, and your sound can go to crap instantly. This is one thing that Kirchhoff-EQ nails, and it’s all due to the incredible ease of use to set any parameters properly. 

Key Features:

Great processing
The tweaks you make inside the plugin will be reflected automatically in your sound, as expected. The incredible number of options and parameters to adjust can be overwhelming, but almost assuredly, it won’t be a problem to be loaded properly. If you use a 64-bit system, then you don’t need to worry about any lagging or slow-performance issues because Kirchhoff-EQ was tailored to work with 64-bits, independent of the DAW’s current working precision. If that’s not enough, you can also activate the “Double Double” mode to use 117 bits in total, with ultra-precision to deliver demanding results.

Filter types
There are 15 filter types included in this EQ, with the most common shapes included – like low pass, high pass, and notch, for instance – and also some unusual ones, such as the “Sword” (kind of like a bell shape, but with a sharper slope) and brick wall low and high pass.

Phase modes
You can set the phase in your track between some unique modes, such as “zero-latency,” “analogue,” “linear,” and “mixed.” However, if the “Dynamic Functions” option is activated for a specific filter band, it will work on a minimum-phase mode that won’t affect other bands besides the one you’re currently working on.

Unique threshold adjustment
The threshold is usually the control that sets the “limit” upon which an effect can act upon. Most options only go one way, but in Kirchhoff-EQ, things are done differently. You can have a two-way threshold control to configure simultaneously the part of your signal acting above or below the threshold mark. With this, you can raise the audio signal below the threshold mark and compress the same signal above that same mark, for instance.

Compatibility:

This plugin is available for macOS 10.9 or higher (64-bit only) and Windows 7 or higher (64-bit only). It runs in VST2, VST3, AAX, and AU plugin formats.

Summary:

Colorful EQs are inviting to mess with, mostly because they most assuredly will be utterly responsive to your tweaks. Kirchhoff-EQ works just like that, but with surprising features that can add up to its usage and make it truly unique if compared to similar plugins.

The two-way threshold and the multiple filter types are not mandatory elements to be included in an equalizer, but they are surprisingly effective in making it even more versatile.

Related Reading:

Top 14 Mastering Plugins For All Categories

2. FabFilter Pro-C 2 (CPU-Friendly Compressor For Mix & Master)

More Info & Price (Trial Available)

9 Best Parallel Compressor Plugins | integraudio.com

Visualize your compression by using the Fabfilter Pro-C 2.

Most compressors on the market don’t offer you that much visualization, where you can see precisely how the soundwave changes with your configurations. The Fabfilter series primarily focused on providing that visual experience, with their vast line of great mastering tools featuring extensive options to tweak your sample.

The Fabfilter Pro-C 2 is no exception, offering you 8 different compression styles, low and high-pass filters, audition triggering, and many more features that help you get the right sound for your song.

Key Features:

Compression Styles
Aside from offering the standard compressor experience, The Fabfilter Pro-C 2 gives you 8 different compression styles to choose from. The styles range from a Clean, overall sound to more personalized options that make mixing bus channels or vocals a better experience. For your EDM/Future Bass tracks, it’s best to use the Pumping style, which gives an added deep character to your kicks and bass lines.

Side-Chain LP and HP Filters
The low-pass and high-pass filters are great additions to the plugin because they allow you to cut off some excess frequencies that interfere with other elements in your song. When applying your side-chain to the sample, you might find that the bass is creating a solid pumping sound, which can be great for EDM, but the high frequencies might interfere with the sound you are looking to get, which the filters do a fantastic job at helping you achieve what you want.

Audition Triggering
It might be a bit harder for a new producer to hear exactly where the compression applies to their sample. To address that, FabFilter Pro-C 2 has an option called Audition Triggering. This option allows you to see where precisely the compression takes place and how much of it is applied to your sample. This action is all done on a large screen that shows your audio sample, helping you understand what compression does.

Side-Chain EQ
When you need to apply a pumping effect to your sound, the Pro-C 2 has your back with the added side-chain function. Side-chaining alters the sample volume to create a “wave” effect or sort of like a repeated “whip” effect. You can tweak how strong you want this effect to apply to your sample, and you can even cut off some unnecessary frequencies with the added low and high-pass filters.

Variable Knee
To avoid having a punchy compressor, you can use the variable knee option to tweak how the compressor will apply itself to the sample. A hard knee is best for drums because it keeps that punchy feeling, while the soft knee is probably best for melodies, especially in your chorus. Although, if you want to create an interesting effect, try applying the soft knee to your bass line to get a more ambient vibe.

Compatibility:

FabFilter Pro-C 2 is available for Windows XP or higher 32-bit and 64-bit and macOS 10.10 or higher 64-bit only. It comes in VST/3, AU, AAX, and AudioSuite formats.

Summary:

Fabfilter is an excellent compression plugin, especially for producers who don’t quite understand what compression does to their sample.

The additional 4x oversampling and auto gain and release options do a great job at helping you apply the compression in the best possible way.

Related Reading:

Top 10 FabFilter Plugins For Mixing & Mastering 

3. Devious Machines Pitch Monster (All-Round Pitch Shifter)

More Info & Price (Trial Available)

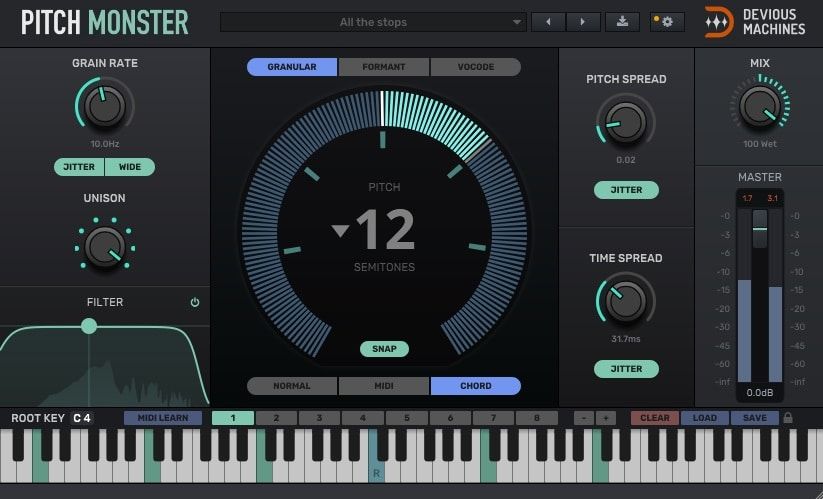
Create stacks of harmonies or pitch-shift beyond recognition with this versatile plugin.

Despite a simplistic interface, Pitch Monster lives up to its name with features beyond what you’d expect from similar plugins.

Furthermore, Pitch Monster often sounds better than other pitch-shifting plugins even when comparing the same functions thanks to its granular pitch-shifting engine.

Key Features:

Highly Capable
The plugin can change pitch up to six octaves from the original key. This flexibility makes Pitch Monster an unbeatable tool for sound designing. Similarly, it can create eight-voice harmony, with each voice capable of eight unison voices. That makes sixty-four voices in total.

Multi-Engine
The plugin features three pitch-shifting engines: Granular, Formant, and Vocode. The Granular Engine is suitable for any kind of audio, and you can even adjust the granule size. Conversely, the latter two engines are better suited for solo vocals. Formant changes the pitch of the vowel and the consonant separately, whereas Vocode flattens vibrato.
I suggest using the Forbmant mode for general voice editing and creating harmonies. It sounds the most natural for monophonic vocals. However, if you want to get creative and produce melodies for vocal chops, try the vocode mode.

Modes
Pitch Monster features three modes of performance: Normal, Midi, and Chord. The normal mode is merely a pitch shifter, whereas the Midi mode allows you to control the pitch using midi input with an optional glide feature. Similarly, Chord mode lets you play multiple notes simultaneously.
Furthermore, a Chord Memory feature lets you save up to eight chords. You can perform the chords using automation. This feature is excellent for creating artificial harmonies during a live performance.

Compatibility:

Devious Machines Pitch Monster is available for Windows 7 or higher 32-bit and 64-bit and macOS 10.9 to higher 64-bit only. It comes in VST 2/3, AU, and AAX formats.

Summary:

If you tend to need a pitch shifter often, you can’t go wrong with this plugin. It even handles vocal pitch correction to an extent via its Midi mode.

Furthermore, its harmony engine and chord memory features make the plugin unparalleled in that regard.

If you only ever need a simple pitch-shifting plugin, though, Pitch Monster may be overkill and overpriced. Otherwise, the plugin’s features are outstanding.

Related Reading:

The 7 Best Harmonizer Plugins (For Vocals, Sound Design & More)

4. Valhalla VintageVerb (Versatile Reverb)

More Info & Price (Trial Available)

VintageVerb is an algorithmic emulation reverb by Valhalla.

VintageVerb aims to bring to life the grit and dirt of vintage reverb hardware units from the 1970s and 1980s. The danger with emulation plugins is that they tend to sound fake or lifeless.

This is not the case here since Valhalla created a very versatile plugin that can be used in many different ways, with a sound that can be dark and mysterious or bright and overwhelming. 

Valhalla VintageVerb- Top 6 Reverb Plugins For Vocals (Next Level Reverbs) | integraudio.com

Key Features:

Modes
Valhalla VintageVerb is very versatile, mostly due to the different modes it carries. There are numerous modes with different characteristics that will make for subtle reverb sounds or exaggerated and chaotic ones. Some of the modes are concert hall, plate, room, chamber, random space, chaotic hall, chaotic neutral, sanctuary, chorus space, and many more. In addition, each mode has different decay length capabilities, different room size and shape, and overall completely different characters, which make VintageVerb a sound designer’s dream.

Color
The true brilliance of VintageVerb is inside the color menu. This is where the vintage emulation occurs since you can set the tone to the 1970s, 1980s, or now. The 1970s color has a lower resolution and a downsample character that helps capture the darker, filled with artifacts, the sound of that era. Similarly, the 1980s color has a noisy sonic profile but is significantly brighter and wider than the 1970s. Finally, if you choose the now color option, you’ll get a full stereo modern reverb with a clean sound and no artifacts. You can apply the color options to each of the different modes, which gives you unparalleled sonic flexibility.

Damping
In the damping section, you can sculpt the tone of the reverb. You get the high shelf and high-frequency controls which allow you to decrease the higher frequencies of the wet signal. You also get the bass frequency and bass multiplier knobs, which will help you set the decay time of your chosen low frequencies in relation to the main decay time. This means if you choose 2x on the bass multiplier, the decay on your low end will be double what the overall decay is. This is an interesting feature that can help you sculpt your bottom end with accuracy.

Shape and character
VintageVerb includes many more controls which you can use to fine-tune your reverb sound. The shape controls help you set the size of the reverb space and the attack of it. The diffusion menu with its late and early reflections controls will help you bring sounds in the front of the mix or push them back. Finally, with its rate and depth controls, the modulation menu lets you add subtle or extreme pitch effects on your wet signal to either humanize it with subtle modulation or completely alienate it with extreme pitch modulation. All these can do wonders when applied to a vocal. For example, if you increase the early reflections and decrease the late reflections, you’ll create a reverb that feels like it’s nearby. Add this to a plate model with some predelay, and you have an excellent all-purpose vocal reverb.

Utilities
There are high-cut and low-cut knobs for precise sculpting of your reverb signal. You also have access to a predelay knob which is crucial for vocal processing since it allows the singer to sing the words and then introduce the wet signal. Finally, a dry and wet knob is included for parallel processing, and a big decay knob sets the overall length of the reverb.

Compatibility:

VintageVerb is available on Windows 7 – 10 and macOS 10.9 – 10.15 in VST2.4, VST3, AU, and AAX formats.

Summary:

Valhalla VintageVerb is a proven classic choice for an all-purpose reverb. It can be tricky to balance since it tends to get bigger than life and overwhelming, but that can be a great fit for creating long textural vocal effects.

You can also use it as a subtle vocal reverb through the plate model or add some real depth and haunting feel to your vocals through the various other modes. Overall, VintageVerb is a very versatile plugin that can compliment any production style.

Related Reading:

Top 12 Reverb Plugins (And 5 Best FREE Plugins)

5. Neural DSP Parallax (Multiband Distortion For Bass Guitar)

More Info & Price (Trial Available)

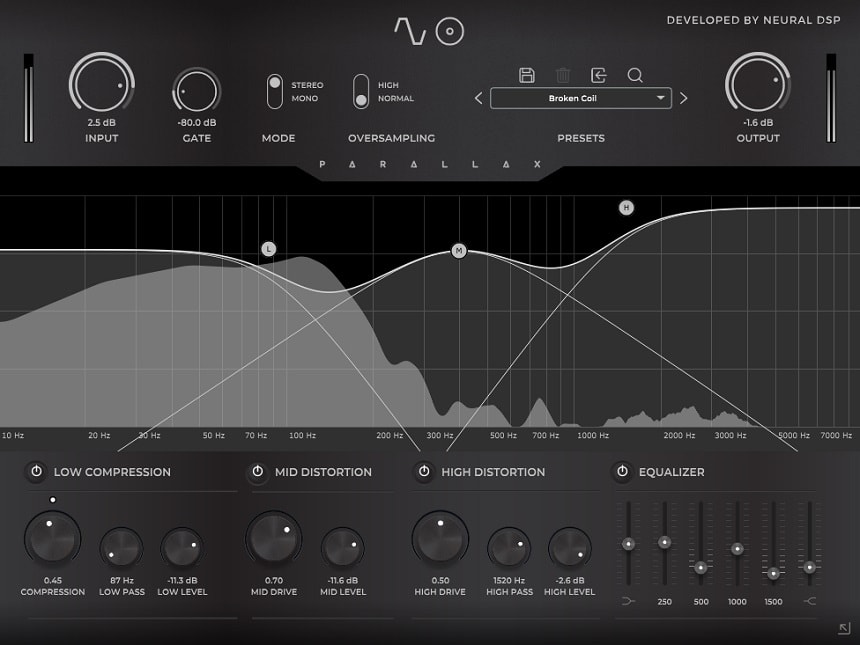
A great bonus on our list is the Parallax plugin from Neural DSP. This plugin will make your life easier and drop a mellow and punchy bass tone.

The Finnish company Neural DSP is one of the flagships in terms of amp sim software these days. They released many great guitar plugins collaborating with famous musicians and bands like Gojira, Adam Nolly Getgood, Tim Henson, Tosin Abasi, and others.

These guys have not ignored the bass players and created some fantastic pluginsDarkglass Ultra and Parallax. As for the last one, it is multiband bass distortion, which gives an outstanding sound quality. The point is that to get the best bass tone, and many engineers use parallel processing.

That is, they divide the bass line into several tracks and process them separately. Now you can do all this with only one plugin. It is important to note that this software is not a MIDI instrument but a processing one.

Neural DSP Parallax Multiband Distortion Review - Top 9 Bass Guitar Plugins (And 2 Best Freebies) | Integraudio.com

Key Features:

Distortion
You will be able to handle high and low-frequency distortion separately. Just use the Mid Drive, Mid Level, High Drive, High Pass, and High Level knobs. It uses tube modeling technology to give you a rich harmonic sound.

Low Compression
To build the foundation of your tone, you can separately influence the low frequencies. The Low Compression section is responsible for this. Here you will have three knobs for Compression, Low Pass and Low Level. Important to know that the Bus compressor algorithm is used here, providing you with quality signal processing.

EQ
With this tool, you can achieve an even greater sharpening of your tone. You will have a graphic equalizer with a range of 200 to 1.5 kilohertz. After processing the mid and high frequencies, bringing the overall tone in line with your desire is handy.

Cabsim
As with its other software, Neural DSP offers first-rate cab impulses. The Parallax plugin has a separate Cabsim section that will allow you to move two virtual mics around two speakers.

Presets
If you don’t want to deal with the settings, you will have the opportunity to play with ready-made presets. There are over a hundred of them. These are custom settings from musicians like Nolly Getgood, Kane Churko, Forrester Savell, Tom Doyle, etc.

Compatibility:

The plugin is available for Windows 7 or higher and macOS 10.14 or higher, both 64-bit only. It comes in VST/3, AU, AAX formats, and as a standalone host.

Summary:

Parallax Multiband Distortion is a premium plugin that will give you a great bass tone suitable for metal and other heavier genres. Its separate frequency processing provides a mix-ready sound as if a professional mixing engineer worked on it. You’ll also get to use the great cabinet impulses in this software.

6. PanMan (AutoPanning Tool)

More Info & Price (Trial Available)
Or Buy Here (Support Integraudio)
Auto-panning is finally made easy with this excellent software.

PanMan is an auto-panning software designed to combine classic sonorities into a new level, blending analog aspects and digital elements in a single housing.

Encompassing different elements from vintage hardware like PanScan, Cyclosonic FS-1, and Electrospace Spanner, this plugin houses the best characteristics of each unit to provide authentic and useful sounds in your mix.

PanMan - 12 Best SoundToys Plugins 2022 For Pro Sound | integraudio.com

PanMan - 12 Best SoundToys Plugins 2022 For Pro Sound | integraudio.com

Key Features:

Input and output controls
Both “Input” and “Output” knobs are meant to cut or boost the signal going into PanMan. You can easily set the controls to unity gain (when the same level coming from the input is going to output) by monitoring the LED-style indicators beneath the controls, with the single yellow color indicating that the signal is 6dB below clipping. Saturation is not always wanted, but this can be a great way to achieve it if needed.

Offset knob
This knob defines the base pan position, with zero degrees corresponding to the center (12 o’clock position). If you want to achieve hard left or hard right, simply set it to more or less 90 degrees, with the possibility to go up to 105 degrees – giving you the unprecedented feeling of audio coming from “beyond the speaker.”

Width
To set the appropriate width upon which the panning will react, there’s a dedicated knob. In more precise words, the “Width” control adjusts how the pan position can be modulated according to its position. The default value is 180 degrees, and the same limit regarding the “Offset” knob is also applied here (105 degrees on each side, totalizing 210 degrees). Speaking of which, these two controls are imperative to be explored to better set into your source material, and consistent experimentation is recommended.

Smoothing adjustment
The “Smoothing” knob configures how smoothly the pan position is set to transition from one point to another. The two extremes are “Hard” and “Soft,” with the former bringing abrupt jumps between the positions and the latter being more delicate and gradual. 

Modulation sources
The different modulation types included can be selected via a small white button in the center of PanMan’s design interface. Including sources are “LFO,” “Rhythm Step,” “Rhythm Shape,” “PingPong,” “Random,” and “Step.” To change any modulation source, click and hold on the push button below the current display type.

Compatibility:

This plugin is available for macOS 10.10 or higher (64-bit only) and Windows 7 or higher (64-bit only). It runs in standalone mode and VST2, AAX, and AU plugin formats.

Summary:

With the same elegant design as the other plugins in their catalog, Soundtoys has made auto-panning much easier and even funnier to mess with than usual. The controls offer varied and detailed configurations depending on what style of setting you’re tuned in, proving to be very versatile and responsive.

PanMan is the kind of plugin that deserves intrinsic exploration and experimentation to achieve better results over time, gradually adapting to whatever positioning needs your track requires.

7. Arturia DIMENSION-D (Chorus)

More Info & Price (Trial Available)
One of the most popular effects ever brought to you in one of its best renditions.

As always, Arturia is great when it comes to recreating an iconic sound. They do that with virtual instruments and effects likewise. This time, they decided to recreate Roland’s iconic Dimension C chorus effect.

This iconic effect was included in many of their equally iconic synthesizers and even got to be recreated in a BOSS pedal format. So now, you can have all nuances of this swirling effect inside your DAW.

Arturia Chorus DIMENSION-D - Top 20 Mixing Plugins For All Categories | integraudio.com

Key Features:

Dimension mode
One characteristic elements of this particular chorus was the few buttons in the main interface. Here, you have five – from zero to “4”chorus preset parameters. Each mode, except for zero, has a particular configuration and sound characteristic, and they all sound good nonetheless.

Oscillator shape
Similar to the Dimension’s parameters, you can switch between different oscillator shapes. There’s “Default,” “Sine,” “Ramp,” and two variations of waveforms. They all correspond to the modulation LFO options available, leading to interesting results that are not normally achieved with this kind of effect.

Dynamic color
This configuration changes the original behavior of the compressor and expander stages of the unit. There are four positions: “LF SAT 2,” “LF SAT 1,” “Default,” and “Smooth.” The first two have shorter time constants, bringing a slightly more saturated aspect to the final sound, whereas the latter two offer smoother and more traditional settings.

Width control
The sole “Width” knob below the “Output Level” meter controls the wideness of the stereo field in the effect. With the knob fully turned to the right, the processed signal stereo field is significantly wider than the original and will bring a mono-oriented sonority in the opposite direction.

Compatibility:

This plugin is available for macOS 10.13 or higher (64-bit only) and Windows 8.1 or higher (64-bit only). It runs in VST2, VST3, and AU plugin formats.

Summary:

Chorus is a very sought-after effect. Guitarists, bassists, keyboardists, and even vocalists can benefit from using it, rendering superb smoothness and delicacy to your sound. The DIMENSION-D chorus from Arturia is a nice recreation of a very specific chorus model, included in multiple synths and even made into a guitar pedal format.

There are a few extended configurations than the real unit, but they all sound marvelous and are highly responsive to your commands.

Related Reading:

Top 6 Chorus VST Plugins For Musicians (And 3 FREE Plugins)

8. Softube Tape (Tape Emulation)

More Info & Price (Trial Available)

Or Buy Here (Support Integraudio)

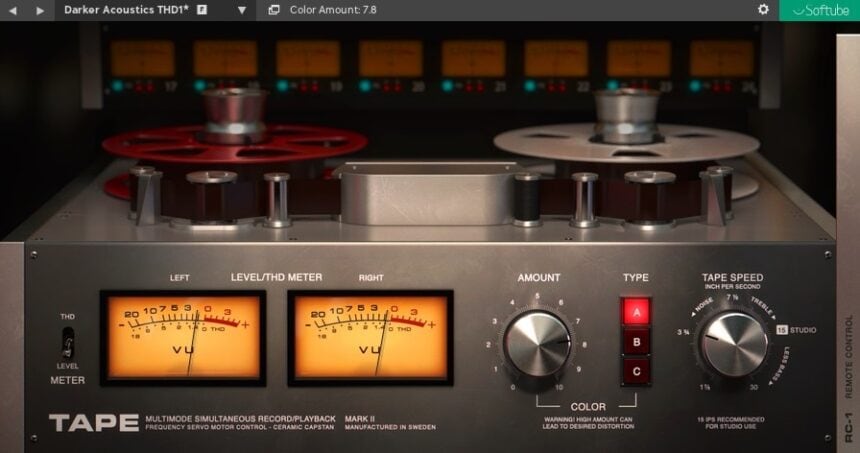
Tape by Softube brings you three different flavors in a simple and effective plugin to enhance your mixes.

Tape is an excellent option for people who don’t want to get too caught up in tweaking many controls to get what they want. It’ll take you right where you need it to be in just seconds.

With Tape, you can improve an entire mix with just a handful of controls. The UI explains itself, and as for the distribution of its different elements, everything feels accessible and relatively at hand.

Softube Tape - 20 Best Tape Emulation Plugins (Inspired By Real Hardware) For Mixing & Mastering | Integraudio.com

Key Features:

Super simple:
You can literally navigate through the entire plugin in 2 seconds. The graphic interface is optimized for efficiency and sounds good on its own. Great acquisition for beginners and pros, especially for fast results in fast-paced environments.

Not too much:
Even when taking the amount wheel to the maximum level, the plugin doesn’t break, but rather it adds some very musical distortion and subtleties that enhance your audio. You can quickly adjust some knobs and go back to crystal-clean analog sound even when the input is too hot and distorts aggressively.

Slide menu:
To the right, we can find more available controls to shape the tone of the distortion. The knobs and how they react are self-explaining, and they’ve included two buttons, “run” and “stop,” to produce a tape stop effect.

Different flavors:
You can choose between three very different and interesting models with unique characters and tones. Each one of these models is based on separate machines and components. Choose between a swiss reel-to-reel tape machine for a clean balance, a transformer-based machine for richer low-end harmonics, and a British tape machine for better mid-range definition.           

Compatibility:

Decapitator is available for Windows 7 or higher and macOS 10.10 or higherboth 64-bit only. It comes in VST 2/3AU, and AAX formats.

Summary:

Softube’s Tape plugin is undoubtedly one impressively user-friendly tape saturation plugin capable of producing remarkable tape effects to your signal. It’s not too aggressive as a saturator, but this plugin works better as a mix enhancer, which is likely what they’ve made it for in the first place.

It is comfortable to use, but frankly, it can be annoying not to have most controls in plain sight but kept in the displayable sleeve on the right. Nonetheless, this is an absolute killer plugin that can improve the sound of your mixes quite drastically, so make sure to try it out.

Related Readings:

Top 12 Softube Plugins For Music Production 

9. Arturia Dist COLDFIRE (Dual Distortion)

More Info & Price (Trial Available)

The Arturia Dist Coldfire is a revolutionary dual distortion plugin featuring a powerful modulation engine and a wide variety of distortion types that you can swap in and out.

There are two independent distortion engines in Dist Coldfire, and you can use them in whatever combination you like. A variety of pre-and post-distortion filters are available for each distortion type. Analog-modeled and purely digital distortion types are both available.

With assignable parameter modulation and dynamics processing, Dist Coldfire can dish out virtually any dirt you want.

Key Features:

Distortion Types
There are 150 factory settings to help you get started, some of which are meant to transform ordinary drum loops into snarling, ripping monsters. A total of eleven distinct kinds of distortion are available in the various distortion menus, with more options available in some categories.
For example, bit inverters and bit crushers are just two of the eleven primary flavors. Other examples include wave folders, wave shapers, rectifiers, tape and analog saturation, driven transformers, and so on. In addition, there is a delay section in the processing, with feedback, filtering, and tempo sync as options.

User Interface
The distortion engines sit opposite sides of the interface, while the master, band split, and dynamics controls sit in the middle. Tooltips explain what each control does and show the current setting. The input and output level controls can be linked to keeping the volume under control when cranking up the distortion.
You can independently adjust the overall output level and wet/dry ratio. A horizontal fader controls the volume of each distortion engine independently.

Modulators
The pre-and post-distortion filters, multiband/feedback, and extensive modulation section are all accessible via the advanced panel’s tabs, wherein you can choose LFO, Function, Follower, or Sequencer options. Because of its modulation capabilities, Coldfire is a potent tool for improvising with drum loops, and its modulators can be assigned to virtually any control in Dist Coldfire, including other modulators.
However, the sequencers and function generators can also transform rhythmic elements from sustained instrument parts. The output filters can be set to a high pass or low pass, while the pre-filters can be set to a bandpass, notch, or one of two combs.

Oversampling
Studio and Render oversampling modes are offered. The latter uses higher resolution but at the expense of increased CPU overhead. Whichever is selected, it will apply to both online and offline renderings despite the different titles.

Dynamics And Feedback
Arturia includes a dynamics and feedback component to round out the signal chain. Compressors, multiband compressors, and a limiter that can be placed before or after the distortion make up the dynamics section. Instruments that assist you in reining in and smoothing out your distorted audio.
Whether you find these instruments too simplistic or the entire dual distortion doesn’t have enough bang; feedback is always there to help. Dist Coldfire incorporates a feedback processor, which you may access through the panel’s advanced settings. It uses a filter to delay the feedback, and you can change the beat rate.

Compatibility:

The OS requirements for this plugin are Windows 7 or higher for PC and macOS 10.9 or higher for Mac. It comes in VST/RTAS/AU/AAX formats and supports 32 and 64 bit systems.

Summary:

Arturia’s Dist Coldfire is yet another innovative plugin that aims to expand traditional sound design. That goal was met, too. One of the best features they provide is a dual distortion plugin that sets them apart. From traditional saturations and distortions to techniques like wave folding/waveshaping and bit-flipping, you’ll find it all here.

10. Empirical Labs Mike-E Comp By Softube (Distressor/Analog Compressor, Saturator, Preamp)

More Info & Price (Trial Available)
Or Buy Here (Support Integraudio)
An all-in-one solution for the basic audio production needs.

Plugins that contain different effects and uses inside a single window are awesome and can be the perfect tool for most production styles. It’s nice to have all you’ll need in a single window, which can lead to significantly less CPU power consumption.

Empirical Labs Mike-E Comp was created in collaboration with Dave Derr to simulate the versatility behind the ELI distressor and provide meaningful colorations to your track.

Empirical Labs Mike-E Comp By Softube - Top 20 Mixing Plugins For All Categories | integraudio.com

Key Features:

Preamp
The “Preamp” section offers up to 18dB of gain boost, and it can be used to gain stage your track with the authentic character of a hardware unit. You can even disable the preamp distortion with the “Clean” option, while the “Bad!” indicator will force clipping whenever possible.

CompSat
One of the main sections of the plugin is called “CompSat,” and is arguably the heart of Mike-E. It works the same way as a distressor, but with additions like a longer attack time and additional emphasis circuit. Of course, the “Drive” knob will add any distortion values promptly, with the nearby LEDs indicating the amount of saturation added to your signal.

Emphasis
The “Emphasis” parameter is divided between three modes: “HF” emphasizes the high frequencies in the saturation circuit, “HF2” does the same but in the entire CompSat circuit, and LF enhances the lower frequencies in the compressor circuit. Switching between these profiles can make the plugin sound warmer and “creamier,” displaying a nice tape-like tone.

Extended features
As with other Softube plugins, Empirical Labs Mike-E Comp also offers extended features. These can bring nice parameters to complement the already included ones, expanding its functionality and making the overall response of this effect to be much more modern and precise, just like plugins are expected to.

Compatibility:

This plugin is available for macOS 10.13 to 12 (64-bit only) and Windows 10 or higher (64-bit only). It runs in VST, VST3, and AU plugin formats.

Summary:

Softube always brings exciting software that will certainly improve or add character to your tracks. And besides being a recreation of studio equipment, Empirical Labs Mike-E Comp is a nice plugin to have constantly around.

The saturation quality is superb, with subtle nuances that only the genuine or any tube unit could deliver. The different segments are interlinked and behave well if added jointly, making this a versatile and consistent audio-shaping tool.

11. Slate Digital MetaTune (AutoTune/Pitch Correction)

More Info & Price (Trial Available, Dongle Required)

Or Buy Here (Support Integraudio)

Meta-Tune is a simple auto-tuner and pitch correction plugin that is great for more ‘modern’ genres of music such as Electronic or Hip-Hop.

The easy-to-use interface gives you basic controls that have enormous impact and are bound to save you time in the mixdown. There certainly are more advanced and powerful plugins out there, but this one boasts simplicity with mixed results at a reasonable price.

Slate Digital MetaTune Review - Top 6 Auto-Tune & Pitch Correction Plugins | Integraudio.com

Key Features:

User-friendly Design and Interface
Meta Tune offers a highly user-friendly design paired with simple yet effective controls, allowing you to get editing in seconds. By adjusting the speed, sustain, and amount parameters, you can vary the result of your moves from a natural sound to a more robotic fx sound. Use the built-in keys and scales features to select your range quickly. You can also see where the vocals are hitting from the incoming signal of Heatmaps. Additionally, you can see where the outgoing signal is hitting, which means you can also see the level of pitch adjustment.

Negative Speed Processing
The negative speeds function refers to note detection and pitch correction timing. Essentially, it controls the speed at which tuning happens in the transitions between keys. Setting the ‘speed’ control beyond 0, you get into the negative speed region where Meta Tune’s unique algorithm kicks in. Designed to help the vocals pop against the rest of the instruments and note changes, it’s easy to use and can get you some fascinating results.

Groups Function
The ‘groups’ function is handy when working with a lot of vocal tracks in a mix. It allows you to link whichever other instances of Meta Tune you have in your session for multi-track editing. For example, you could connect your background vocals in a group and simultaneously make adjustments that affect the entire group. Grouping is a considerable time saver and a great perk that alleviates a ton of individual adjustments or copy-pasting automation.

Note Stabilizing
This feature has different settings to choose from, which will determine how much stabilization occurs. By employing this feature, you can eliminate the need to open up a graphic editor and manipulate problem areas by hand. By selecting Long, Mid, or Short, you can decide which instance sounds best for the type of music you’re editing. Long allows the singer’s natural vibrato to remain present, whereas the Mid and Short instances adjust faster and more in tune with the desired notes.

Compatibility:

This plugin is available for Windows 8 or higher and macOS 10.12 or higher. It comes in VST, VST3, AU, and AAX formats.

Important Note: Ilok USB dongle required.

Summary:

If vocals are your focus and simplicity is what you’re after, then Meta Tune is an excellent pick for you. Additionally, if you’re on a budget and can’t afford some of the high-end programs, it’s worth checking out.

Related Reading:

Top 7 Slate Digital Plugins For Mixing & Mastering

12. AudioThing Fog Convolver 2 (Convolution Reverb)

More Info & Price (Trial Available)
A genuinely stereo spatial tool that responds to every nuance dynamically.

Convolution reverbs are new and recent in the history of this effect. The nicest part about this type of effect is that impulse responses are used in the spatial context of your effect, which allows you to recreate  more accurately how a reverberation would occur in a given environment.

Key Features:

IR selection
The top left corner’s “IR 1” and “IR 2” buttons allow you to choose which impulse response is presently being changed, with the option of swiftly skipping any of the two. The little “Link” button (the small chain) connects the settings for both inputs, and the “Lock” button disables all parameters except the IR, which is loaded from a preset.

Graphic EQ
The inbuilt equalization may be turned on and off at any moment. There are five bands, and the ability to control each one with a mouse click while the mouse wheel adjusts the “Q” factor of that band. Each band may be reset to its default setting by double-clicking it.

Routing section
The little piece in the far right corner of the screen is in charge of determining the effect’s proper routing. You can select one of five routing modes: “Single,” “Serial,” “Parallel,” “Parallel Mix,” or “True Stereo.” You may also change the “Balance,” “Mix,” and “Output” settings for each IR.

General parameters
The nine general parameters are controlled by the grey knobs. “Pre Delay,” “Gain,” “Pitch,” “Start,” “End” (sets the start or end point for the IR), “Fade In,” “Fade Out,” “Curve,” “Balance,” “Mix,” and “Output” are among them.

Parameter lock
If you need to prevent some parameters from changing values, utilize the “Parameter Lock” option to make them unchangeable. If a parameter is locked, it will not be changed by any modifications, which may be specified for all parameters or just one.

Compatibility:

This plugin is available for macOS 10.9 to 12 (64-bit only) and Windows 7 or higher (64-bit only). It runs in VST2, VST3, AAX, CLAP, and AU plugin formats.

Summary:

The wonderful thing about current plugins is that they frequently surpass our expectations. Thinking of anything as a reverb with personalized impulse responses is quite the future, and it’s about time we started using some cutting-edge technologies in our job endeavors.

Fog Convolver 2 masterfully mixes contemporary IR modeling with classic controls and settings, providing an unmatched sound texture to whatever ambient you wish to create in your track..

Related Reading:

The 10 Best Convolution Reverb Plugins

13. Soundtoys Little Plate (Plate Reverb)

More Info & Price (Trial Available)

Buy Here (Support Integraudio)

Soundtoys is a beloved audio plugin company that delivers unique and instantly recognizable plugins. Little plate is a plate reverb that was inspired by five unique EMT 140 plate reverbs.

Soundtoys gathered inspiration from them and created Little Plate as an easy-to-use and instantly inspiring plate reverb catered to all music producers and engineers.

Soundtoys Little Plate - Top 6 Reverb Plugins For Vocals (Next Level Reverbs) | integraudio.com

Key Features:

Decay
As I already mentioned, Soundtoys was inspired by the iconic EMT 140. One area they decided to push to new boundaries is decay. The maximum decay found on the EMT 140 is five seconds, while on the Little Plate, you can push for 32 seconds or infinity. If you set the decay to infinity mode, the reverb tail never ends. This is very useful for those of us who are into sound design since you can create a long tail and resample it, process it in different ways, and resample it again to create haunting atmospheres and textures. As for classic vocal usage, I’d stick to the 1-2 second realm for dreamy vocals or the 0.5 seconds mode for classic subtle vocal plate reverb.

Mod and EQ
Mod is a switch inside Little Plate that introduces hints of modulation on the reverb tail. It can thicken up your reverb and add a dreamy and vibey quality to it that’s instantly associated with Soundtoys’ brand of sound. The EQ included is very simple and functions as a low cut. You can set it anywhere from 20Hz to 1kHz. It does a great job at cleaning up the low end or removing muddiness in the low-mid frequencies.

Simple to use
The best part about Little Plate is how simple it is to use and how inspiring it can be simultaneously. First, it comes with only four controls, and that’s all you need to create great-sounding reverb tones. Finally, the preset menu is filled with inspiring presets, just like any Soundtoys plugin. 

Compatibility:

Soundtoys Little Plate is available on Windows 7 or higher and macOS 1010 or higher in VST2, AAX, and AU formats.

Summary:

Little Plate is one of the easiest-to-use reverb plugins that don’t sacrifice creativity and sound quality for the sake of utility. The decay knob can inspire countless new sounds, and the infinity mode is great for creative effects, atmospheres, and sound design excellence.

14. Baby Audio Smooth Operator (Resonance Suppressor)

More Info & Price (Trial Available)

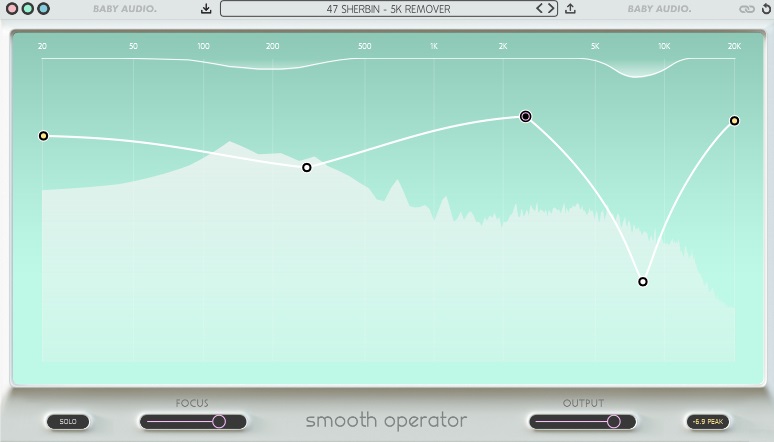
Baby Audio Smooth Operator is a smart sound balancer since it can reduce boom and harshness in mixes and instruments.

Initially, Smooth Operator by Baby Audio appears to be a competitor to dynamic resonance suppression plugins like Soothe by Oeksound. While dynamic resonance suppression is one of Smooth Operator’s capabilities, the application’s focus is not on improving audio quality but on sculpting sounds in novel ways.

Key Features:

Interface
Smooth Operator is a curved interface with extra options and buttons scattered around the edge, and it comes in three different color schemes. The key curve control is the threshold, which is adjusted by raising or lowering the Middle Node. Two more Outer Nodes on each side give you four to tweak the curve’s shape to perfection.
Also, you can adjust the threshold’s sensitivity to other frequencies by introducing offsets from the main threshold point.

Algorithm
Contrary to popular belief, Smooth Operator is not a multi-band compressor or a dynamic equalizer but rather an FFT-based algorithm that uses band-splitting to engage in a game of spectral whack-a-mole. The concentration slider regulates the degree to which each band’s reduction is decoupled from the others, with settings ranging from perfect harmony to a spiky, wavy look.
The ideal degree of smoothness is typically achieved in the middle, hence the name of this plugin. Though it may be tempting to pour Smooth Operator all over your mix or instrument, remember that just a touch of its sonic brush can improve things without sounding overcooked.

All-Around Smoothness
Smooth Operator is ideal before or after more conventional dynamics processing since it may easily increase perceived volume without approaching the peak level. You can shape low mids and cymbals concurrently on a drum mix or sibilance and mic proximity effects in a vocal; the cell technique provides a very flexible de-ess tool that can operate at numerous places across the spectrum. 

Focus Slider
At high Focus settings, any attenuation applied is centered on small resonant peaks; at low Focus values, the same peaks will induce broadband gain reduction. This is analogous to what the Sharpness slider accomplishes in Soothe. Five points on the EQ curve represent the remaining members of the control set.
The two white nodes behave like bands on a parametric EQ, with a frequency center, a gain or “offset” value, and a bandwidth that may be adjusted using the mouse scroll wheel. There is no wiggle room in the frequency range for the outer green bands; all you can do is offer an offset.

Compatibility:

The OS requirements for this plugin are Windows 7 or higher for PC and macOS 10.9 or higher for Mac. It comes in VST/RTAS/AU/AAX formats and supports 32 and 64 bit systems.

Summary:

Baby Audio has created a tool that has a profoundly subtle impact on a wide variety of production elements: Smooth Operator. This smoothness is not limited to the audio quality. Its straightforward but informative design encourages active listening over passive viewing and clicking. Furthermore, both your CPU and wallet will appreciate the low resource usage.

15. Eventide Rotary Mod (Rotary Effect)

More Info & Price (Trial Available)
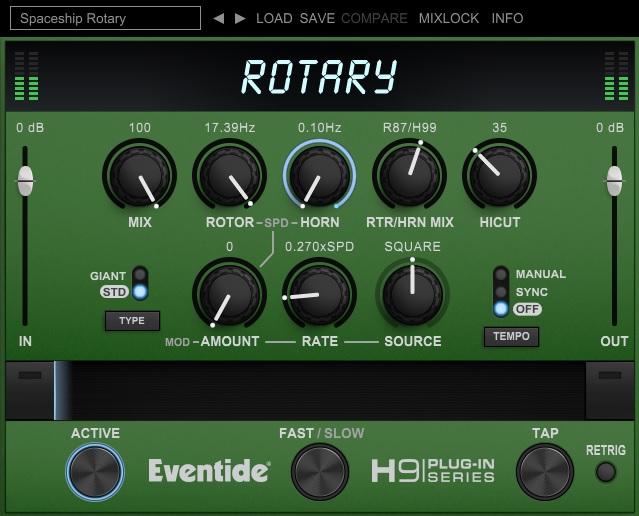
All you may ever want from a rotary effect is contained in this plugin.

Eventide is a very experienced company that has been developing excellent effects in hardware and software for a long time. Their famous racks, guitar pedals, and plugin effects are notorious for extreme quality in terms of sonority. This time, they showcase what they can do best with everything related to a rotary effect in Rotary Mod.

Top 9 Leslie & Rotary Speaker Plugins 2022 (+ 2 FREE Plugins) | integraudio.com

Key Features:

Independent speeds
The rotor’s and the horn’s speed can be adjusted separately via two dedicated knobs. This allows for a precise adjustment in your overall soundscape, further expanded by another individual volume control that can make each track stand out in the mix.

Frequency modulation
You can add frequency modulation to your speakers via a secondary LFO that includes a selectable modulation source, a custom rate control, and another responsible for the overall amount of the effect. 

Cabinet size
Rotary speakers come in different sizes and, as expected, may deliver different sounds because of that. In Rotary Mod, you can switch between “Standard” or “Giant” sizes via a small “Type” button on the left side of your user interface screen.

Tap tempo
Tap tempo is a nice element in effects like a rotary speaker. With the extended uses of DAWs, it’s an overlooked feature that may be crucial to your track. So, accordingly, Eventide included a tap tempo in Rotary Mod so all your swirling sounds can be synced properly with the BPM you’re working with.

Ribbon control
This control allows for seamless alterations in several knobs, somewhat emulating what the real equipment would provide to you. You can program the right and left ranges for these parameters, and the “Ribbon control” will allow you to morph between the settings. All you need to do is click anywhere on the “Ribbon” and move the electric arc back and forth.

Mix Lock
One additional feature that allows for a refined experience in Rotary Mod is the “Mix Lock” setting. This option ensures you can peak from the multiple presets in this plugin and keep the wet/dry mix constant simultaneously. This is perfect for actually hearing the difference between sounds and parameters.

Compatibility:

The plugin is available for macOS 10.9 or higher (64-bit only) and Windows 8 or higher (64-bit only). It comes in VST2, VST 3, AAX, and AU plugin formats. 

Summary:

Rotary Mod showcases what Eventide can do best with an effect that has been done masterfully. The effect is more than just a “Leslie effect,” as all the rotary elements you will need are contained in this plugin. More than that, the additional features, such as the frequency modulation included, make it more modern-sounding and useful to a wider range of styles. 

16. Crystallizer (Granular Effect)

More Info & Price (Trial Available)
Or Buy Here (Support Integraudio)
This highly creative effect is a combination of pitch shifter with reversed echo.

Another plugin inspired by the H3000 unit from Eventide, Crystallizer, is not so easy to be explained in a few words.

Although it’s branded as a “Granular Echo Synthesizer,” it’s capable of much more: you can pitch shift, add echo and shimmer in multiple ways, and bring awesome, reverse effects into this mix.

The result is a highly creative and forward-thinking effect that can expand your sonic choices significantly.

Crystallizer - 12 Best SoundToys Plugins 2022 For Pro Sound | integraudio.com

Crystallizer - 12 Best SoundToys Plugins 2022 For Pro Sound | integraudio.com

Key Features:

Pitch knob
The dedicated “Pitch” control adjusts the audio signal’s pitch in three octaves, either up or down. The values are listed as “cents,” and the maximum values are -3600/+3600. Setting this control at +100 cents, for instance, will result in a half-step change – in this case, upwards. 

Splice
This configuration determines the audio selection’s length captured and played back, with readings in milliseconds (from zero to 2050ms). A short value will result in minimal delay time, offering a subtle variation that lightly resembles a metallic sound, while higher values will make a selection of the input signal to be ‘grabbed’ and played back for the interval you have selected, like 300ms, for example. This creates small loops that can be set to be repeated according to your input time value.

Recycle
Located near the “Delay” control, the “Recycle” knob is a feedback control for the delay that ensures the output of the effect signal will be sent back to the input at varying values. Turning the knob up will generate repeating, rotating pitch effects, possibly even setting the spiral up or downwards. 

MIDI sync
Activating the “MIDI Sync” button locks Crystallizer to incoming MIDI information, making it possible to select specific note lengths and ensuring the effect stays in sync with the MIDI clock simultaneously. Although this can act similarly to an oscillator in a synth, this can be very helpful to keep this effect as responsive as possible and sound very organic to whatever MIDI controller you’re using.

Tweak mode
As with other Soundtoys plugins, there’s a dedicated “Tweak” page for Crystallizer. Here you can set offset values for pitch, splice, and delay controls, with a “Smoothing” knob that sets the crossfade between splices in the plugin’s delay. You also have high and low-cut knobs with an envelope control, making it possible to accurately set the dynamics in the effect.

Compatibility:

This plugin is available for macOS 10.10 or higher (64-bit only) and Windows 7 or higher (64-bit only). It runs in standalone mode and VST2, AAX, and AU plugin formats.

Summary:

Incredible sounds can come out of Crystallizer, and this doesn’t mean you have to be tweaking the values for hours to get a decent sound.

The easy-to-use interface welcomes anyone willing to experiment, but if you pay close attention to what each knob does, it will be much easier to configure every value.

This plugin can be a cool alternative for a more aggressive and customizable delay unit, with some interesting effects options that will provide new sonorities to your arsenal.

Related Reading:

Top 11 Granular Plugins For Future Sound Design

17. Waves Scheps 73 (Preamp & EQ)

More Info & Price (Trial Available)

Waves Audio worked with world-renowned mixing engineer Andrew Scheps to craft a 1073 plugin that perfectly matches the hardware.

Speaking of the 1073, Waves Audio’s Scheps73 is Waves Audio’s version of the British classic. It features interrelated bands that adhere to the 1073’s original specs and accurately emulate its behavior.

It also features a switchable low and mid-range, 18db/oct high-pass filter and includes the 1078’s 10Khz mid-range band. You can go from simply adding color to entirely defining your signal’s tone and shape in less than a minute.

Key Features:

Input/output link:
There’s a unique function to this plugin that uses inverse gain staging, which allows you to have realistic monitoring of the processing you’re adding. This monitoring helps you have the ability to determine how much overdrive you’re feeding into the signal and allows you to make better adjustments because your perception won’t be affected by the variation of gain.

Stereo mode:
The plugin operates on the stereo, dual, and m/s mode. On stereo mode, the left and right settings are linked, and every adjustment applies to both sides equally. If you work in dual mode, you can adjust each side independently, and if you change back to stereo, they’ll stay offset from each other so that any adjustment you make will remain the same. Finally, if you’re set to m/s mode, it adds a mid/side processor to the left EQ, so you’d control the middle with the left knob and the sides with the right.

Monitor section:
Allows you to monitor the left and right signal independently, mono, or stereo. This feature is helpful because it gives you different options to make better evaluations and adjustments when listening to the signal.

EQ section:
It has just about anything any EQ should have, but what’s particular about the EQ section is that in addition to the fixed frequencies that you get with the plugin, they’ve also included the 10Khz midrange band from the 1078, which separates it from the original piece. Each band has an in/out switch so that you can bypass them individually.

Compatibility:

Supports Windows 10 or higher, and macOS 10.14.6  or higher, runs on 64 bit only, and comes in VST2, VST3 AU, and AAX formats

Summary:

You can hear the openness and character of the neve. What makes this plugin unique is its control over the preamp and the ability to work with the tonal character. The modeling of the EQ is remarkably faithful to its analog counterpart. With all of the fantastic features added to it, it offers a broad palette of sound and character that separates this plugin from the rest.

Regardless, if you get this plugin, make sure to watch out for the output, since it can quickly go wild and be all over the place or hurt your ears if your monitor system is on a high level. The drive option sounds great, but it’s too much in terms of how much gain it adds and the significant amplitude difference.

Related Reading:

20 Best Waves Plugins For Mixing, Mastering & Producing

18. Devious Machines Infiltrator 2 (Multi Effect Tool)

More Info & Price (Trial Available)

The Infiltrator 2 is a monstrous multi-effect that can combine, sequence, and adjust a whopping ten separate effects. 

Devious Machines calls it a “turbocharged” update, and with 54 effects modules instead of the 28 in version 1, it’s evident the company has been hard at work. The layout is instantly recognizable, and existing customers can upgrade for no additional cost, which is a major plus.

You can utilize many copies of the same modules, and there are ten effect slots, user-editable multi-segment envelopes, and assignable macros, much like in the original Infiltrator. The amount of control you have in real-time truly sets it apart from other multi-effects. There are now two independent envelopes for each effect, each of which can be synced to a maximum of 128 bars in duration.

Key Features:

Presets
When it comes to presets, it’s common for effects plugins that pack a punch elsewhere to fall short. This could be because some people view the use of presets as lazy. But we consider it presets to be a crucial demonstration of a plugin’s capabilities. Infiltrators 750 presets already quite a lot, but v2 more than doubles that number.
It’s an insane amount, but at least they’re organized into categories and subcategories. To jumpstart your imagination, check out the Sound Design folder, where you’ll find patches like Faller Robo 4 Bar and Inertia. Presets like Bit Meddler, Future Announcement, and Slick Shifter are just a few examples of the incredible variety of sounds you can create with this plugin.

Distortion Module
A new “Degrade” setting has been added to the Distort module for all distortion fanatics. The degrading vibe of this loud and destructive processor becomes apparent at around 30%. Concerning reverb, everything has been rolled into a single module with three different settings (Reverb, LoFi, and the brand-new Void). An ‘infinite’-like effect is achieved at the highest settings, and the sound is textured overall.

Master Section
An improved Master section with drive and compression is included in Infiltrator 2, and the same type of compressor controlled by a single knob is now available as a standalone module. The Master tab has a bass bypass option (40Hz to 1kHz), effectively disables all processing for frequencies below the specified threshold.

Time Manipulation Modules
The modules that can alter past events are the most original additions. It’s great because of how simple it is to create tape slow-downs and reversals and how Stretch and Varispeed cover most speed ranges and spectrum. You now have many options for adjusting how your music is played back in time, with this new effect and others like the stuttering Looper.

Compatibility:

This plugin is available for macOS 10.10 or higher (64-bit only) and Windows 7 or higher (64-bit only). It comes in VST/RTAS/AU/AAX formats and supports 32 and 64 bit systems.

Summary:

Each effect in the plugin now has a second, assignable envelope that can modulate any of its parameters, greatly increasing its modulation capabilities. The additional Formant and Notch filter modes in the Dual filter are welcome additions. The improvement enhances the original in-depth and polishes it without changing its character. It’s not a cheap plugin, but it’s invaluable if you want a comprehensive set of creative tools.

19. UVI Shade (Creative/Comb Filter & Resonator)

More Info & Price (Trial Available)

From the makers of Falcon 2, one of the best sound designing instruments ever created, comes this versatile equalizer capable of comb filtering and so much more.

While we will be focusing on the comb filter side of this plugin, we must still mention its grandeur when it comes to EQing. Shade is a digital equalizer with unlimited bands, numerous kinds of filters, modulation, side-chain, etc. It also employs a spectrum analyzer on its background to provide visual feedback.

Shade generates the comb filtering effect using a predefined comb shape rather than feedback or feed-forward delay. It’s more accurate and offers you a lot more control than you’d normally receive. You can also utilize the comb shape to amplify the comb frequencies instead of the usual cancellation. Speaking of which, Shade also provides notch-shaped comb filters to make the effect even more apparent.

Other than comb filtering, the plugin features a phaser filter shape that has three preset dips/resonance in the frequencies. You can use the onboard modulators to animate the filters and create a flanger and chorus effect. We’ll get more into these in the next section.

UVI Shade - The 5 Best Comb Filter & Resonator Plugins | Integraudio.com

Key Features:

35 Filters
There are 35 filters divided into these categories: low-pass, high-pass, notch, band-pass, high shelf, low shelf, peak, phaser, comb, and special. While most of them are relatively ordinary, the last three are unique. For example, under the Special category, you’ll find tilt EQ and Xpander, of which the latter has 37 modes and three drive/saturation types.

Modulators
The plugin has a dedicated modulator section where you can add an unlimited number of modulators. The modulator types include an Envelope, Figure, Follower, LFO, Macro, MSEG, Random, Spread, and an XY pad. You can assign a modulator to a parameter by right-clicking the parameter and selecting the modulator from the list. As an example, you can use the Macro modulator to control several parameters at once.

Stereo Processing
Every band in this EQ offers several stereo modes: Stereo LR, Stereo MS, Left, Right, Mono/Mid, and Side. So, you could add filters only on the sides to create wide movements. Or, by filtering each side of the stereo channel independently, you could use the comb filter to generate pseudo-stereo effects in mono audio.

Effective
Shade is full of helpful features that make this EQ user-friendly and practical. For example, you can specify the slope value of the spectrum analyzer. And for most filters, the slope steepness can reach up to an astounding 2,000 dB/oct., which is a blessing for mastering uses.

Compatibility:

UVI Shade is available for Windows 8 or higher and macOS 10.9 or higher, both 64-bit only. It comes in VST 2/3, AU, and AAX formats.

Summary:

The plugin is a comprehensive digital equalizer on steroids capable of detailed editing, mastering, and sound designing. Having a dedicated modulator section makes intricate sound designing quick and easy. Furthermore, with modulators such as the Follower, you can create rhythmic sounds side-chained to kicks. Overall, the plugin is worth a try without a doubt.

Related Reading:

The 8 Best Filter Plugins For Precise Cuts & Boosts (+ 5 Free Filters)

20. Xfer LFO Tool (Versatile Sidechain Tool)

More Info & Price (Trial Available)

Xfer LFO Tool Review - 7 Best Sidechain Plugins | Integraudio.com

The Xfer LFO device is a comprehensive tool that gives you a vast selection of signal shaping options.

This plugin is very well suited to low-frequency instruments such as synth bass. The user interface is quite intricate and might be intimidating for those without basic knowledge of LFO’s function. 

Key Features:

Customizable LFO Editor
The LFO editor lets you draw in your volume automation onto an x-y grid mapping, which you then apply to your signal. The editor allows you to link their programmed automation to affect things like the volume level, stereo panning, or filter parameters.

Modulation Layering
The interface allows you to control up to 4 graphs at the same time. This is handy when your want to create different modulation patterns for the same signal. For example, you might want the volume to open up while the filter’s cutoff is being brought down. 

Smooth Setting
You can use the Smooth parameter to soften the punchiness of any peaks in the volume automation. Volume ducking can either be enhanced or dulled with this setting, giving you better control of signal dynamics while processing. 

MIDI-CC output routing
The LFO Tool comes with a midi out option. This feature converts any modulations that you have programmed and converts them into CC information. You can then route this information to an external digital or analog device like a synthesizer or sampler and affect its output accordingly. 

Compatibility:

This plugin is available in VST or AU formats for Windows7 and above users and Mac OS 10.12 or later.

Summary:

The Xfer LFO Tool is an incredibly diverse tool to have on hand when creating meticulous signal modulations. One of its significant advantages is the fact that its modulation controls reach further than just volume automation. You can also choose to have your modulations quantized to a grid, or you can manually set the rate. Over 100 LFO presets are available, giving you a dizzying amount of starting points to select from when shaping their sounds. The sidechaining presets allow you to create a volume ducking effect without routing anything in as an auxiliary signal. 

Best Free Effect Plugins For Pro Tools 2024

Integraudio & Sixth Sample Cramit (Multiband Dynamics)

More Info & Download

Cramit is CPU-friendly OTT compressor plugin featuring plenty of modern-day capabilities that works well for vocals.

In music, compression is used to minimize the dynamic range of signals that contain both loud and quiet portions so that they may be heard clearly. For example, consider the difference between a gentle whisper and the aggressive snap of a drum kit.

The mixing engineer must handle the dynamics for both of them to be heard on a recording. The quick beginning of sound when the stick touches the drum head is an obvious transition.

Key Features:

Carmit allows you to change this via the application interface and may be used as a pre or post-fader. You get two knobs to regulate the distortion and drive amount, which makes it extremely simple to apply the distortion effect, which simulates the saturation effects of analog equipment.

Moreover, the compressor’s reaction time may be adjusted using the Speed knob, and the gain can be adjusted using the Gain knob. You can also adjust the Depth of the compressor. Monitoring all of this is simple, thanks to the box on the right, which visibly displays any changes you make to the transient.

You can use Cramit on instruments like:

  • Bass: You can boost the dynamics and sound by utilizing some OTT.
  • Plucks: You could move your plucks forward in the mix, but be careful since compression might ruin lively dynamics.
  • Strings: Both the low and high analog strings are well matched with OTT.
  • Drums: Although it can thicken the drums, you must be careful not to apply too much compression because doing so might ruin the dynamics. The groove and feel of the drums are very crucial.
  • And so much more: This tool works great on virtually on any instrument or vocals when you need to add some life and energy to your mix. 

It can improve any sound you can think of. Just use three bands and several compression methods to play around with the samples above to see how you may start to enhance your sound.

Compatibility:

Cramit is available for Windows 10 or higher 32-bit and 64-bit and macOS 10 or higher 64-bit. It comes in VST 3 and AU formats.

Summary:

Cramit is a compressor that seamlessly integrates into the track as soon as you apply it, without overly complicating your workflow. It is definitely a plugin that appeals to all tastes.

Slate Digital Fresh Air (Vintage Exciter)

More Info & Download

Fresh Air from Slate Digital will help add clarity and brilliance to your vocals and mixes without harshness.

We often want to take the blanket away from our mixes, giving them more presence and spark. For many years this was possible thanks to exciters, special studio units that added content in the upper frequencies. The good news is that now you can achieve this for free.

Slate Digital’s Fresh Air plugin will help you do just that. It’s a dynamic processor that affects the mid and high frequencies, bringing them to life by adding air. The great thing about this software is that it’s as simple as possible since you’ll only have the two main knobs. So let’s take a closer look at it.

20 Best FREE Mixing VST Plugins For Musicians 2022 | integraudio.com

Key Features:

A Simple Operation
It won’t take long to learn this pluginthere are only two knobs with which the main control is performed. In particular, these are Mid Air and High Air. Adjust them and listen to how the clarity level changes. By the way, you can also link and control them simultaneously.

Trim Control
By processing the mid and high frequencies, your signal can get hotter. Therefore, you will need to balance it with the previous level. To do this, the plugin developers implemented a special Trim knob, essentially a regulator of the output signal.

Simple Metering
Despite its minimalistic design, the plugin has a modern-looking Meter at the top of the window. It will give you a clear view of what’s going on with your signal. Also, press the Power button to bypass the plugin and compare the level with the previous one.

Based On Vintage Exciter Technology
The developers of the Fresh Air plugin claim that it is based on Vintage Exciter Technology. It is what allows it to add brilliance and shimmer. Also, several parallel processes are implemented here, which should help bring clarity to the sound.

Compatibility:

Slate Digital Fresh Air is available for Windows 8 or higher and macOS 10.13 or higher, both 64-bit only. It comes in VST2/3, AU, and AAX formats.

Summary:

Fresh Air is a great plugin for adding presence to your sound. The best part is that you can use it on vocals and other instruments and mix buses. In addition, it’s unusually easy to use. The software especially comes in handy for pop vocals, but you can also use it for any other genre, including metal.

Related Reading:

Top 7 Slate Digital Plugins For Mixing & Mastering

Analog Obsession LOADES (De-Esser)

More Info & Download

Thanks to Analog Obsession’s LOADES plugin, you can easily get rid of annoying hisses and esses on vocals and cymbals.

We already mentioned the de-esser as part of the LOADED plugin from Analog Obsession above. But the cool thing is that you can also get this software separately. The developers have created a different version of the de-esser called LOADES, and we can say that the plugin is quite effective.

It also looks like the units of the 500 rack series, but there are only two sections. In the first one, you will have a full set of de-essing settings, and in the second one, you will find general parameters. Let’s take a look at what this plugin can do.

20 Best FREE Mixing VST Plugins For Musicians 2022 | integraudio.com

Key Features:

Set Up The Threshold
The Threshold knob will be the main one when working with this plugin. You will use it to select the amount of de-essing. You will notice quite drastic results after 12 decibels of reduction.

Use Shelf or Band
By default, the upper-frequency reduction here is in the form of a shelf. But you can switch this mode to the band and get a more narrow performance character. A separate Band knob helps with this.

Make It Softer
If you think the de-essing is too muffled, you can make it sound more expressive. For this purpose, the plugin’s creators have put the Soft function here. Click this button to see which option suits you best.

Release Control
Another very useful feature here is the Release knob. Its range is from 1 to 500 milliseconds. Thanks to this parameter, you can adjust how fast the plugin releases hissing and essing sounds. But, again, tweak this based on the material.

Mix, Input & Output
The plugin also has other vital controls to help you operate it better. In particular, this is the Mix knob for dry and wet balance. In addition, on the right side, you will see the Input and Output controls.

Compatibility:

Analog Obsession LOADES is available for Windows 7 or higher and macOS 10.9 or higher. It comes in VST/3 and AU formats.

Summary:

The LOADES plugin is a wonderful software that gets rid of annoying high frequencies naturally. There are enough controls to make it work the way you want it to. We don’t know exactly what frequency range this de-esser affects, but we have to admit that it works quite perfectly.

Valhalla Supermassive (Delay, Reverb)

More Info & Download 

Supermassive is a free reverb plugin by Valhalla. 

Valhalla is probably the king of reverb plugins, and Super Massive feels like a genuine gift of gratitude to their faithful users. As the name suggests, it specializes in long and massive reverb tones and features the familiar Valhalla interface. It’s not a subtle plugin, but it can add drama and depth to vocals of modern genres.

Valhalla Super Massive - Top 6 Reverb Plugins For Vocals (Next Level Reverbs) | integraudio.com

Key Features:

Modes
Super Massive has 12 different modes to choose from, including Gemini, Hydra, Centaurus, Andromeda, Lyra, Capricorn, and many more. They all have different core characteristics, like attack times, decay times, chorus, and density. They all are designed expertly and can serve different purposes. For example, Gemini is the subtlest and most conventional of all the modes. Therefore it’s great to use on vocals that need a more traditional mixing approach. However, you can still mangle it and create intricate reverbs by messing with the warp knob. In contrast, Large Magellanic Cloud is a wacky mode that serves super long reverbs with long initial delays, great for atmospheric sounds.

Feedback and density
As I mentioned earlier, the density is already modified internally and varies from mode to mode. However, you can still adjust the density knob to further emphasize a mode’s dense or loose reverb style. In addition, the feedback is an excellent knob to scale back on the long decay times or multiply them if you feel they’re not long enough.

Mod and EQ
The mod menu has two knobs, rate and depth. It helps you add character to your reverbs by modulating the pitch and creating thicker reverb sounds. The depth is the amount of the mod effect, and the rate controls the speed at which it takes place. Finally, an EQ with low cut and high cut knobs is included to roll off unwanted frequencies.

Guaranteed quality
When you work with a plugin from Valhalla, you know it’s going to be a wild ride and a memorable experience. Super Massive is no exception. The sound engines behind each mode are carefully constructed and can cover a wide range of sounds at the highest quality. My favorite part about Valhalla plugins, which are included in Super Massive, is the bottom bar explaining what each parameter does and how it affects the sound. It also provides useful information regarding the reverb mode you select and how to use it to the best of its abilities.

Compatibility:

Super Massive is available on Windows 7 – 10 and macOS 10.9 – 10.15 in VST2.4, VST3, AU, and AAX formats.

Summary:

Supermassive is a generous gift from Valhalla. The 12 reverb modes are carefully constructed and sound exceptional. The feedback and density knobs can help you craft unique spaces, while the mod and EQ parameters help you finalize the effect.

The only fallback of Super Massive is how massive it sounds, something that might be unsuitable for certain sounds or occasions. However, its sound quality and free nature make it an awesome reverb plugin.

TDR Nova (Dynamic EQ)

More Info & Download

Nova is a handy toolbox with everything you need for dynamic processing.

Nova is a powerful parallel dynamic equalizer that you can use for transparent frequency dynamic processing in mixing and mastering situations. This plugin offers you a wide range of possibilities in both cases. In addition, it allows you to be as drastic as you need while keeping transparency with the dry/wet mix knob without adding artifacts or distortion.

If you were looking for a free mastering solution or want to get started with dynamic EQs and didn’t know what to get, Nova by Tokyo Dawn Records is a great option. This plugin gives you precise control over your signal and brings the possibility of using it as a multi-band compressor or a wideband compressor.

Besides all its features, it has a smooth user interface, and it’s super helpful if you’re at a beginner’s level and aren’t familiar with this type of tool. It explains itself and has helpers that will guide you through the plugin so that you adapt quickly and achieve results.

TDR Nova Review - The 3 Best Free Dynamic EQ Plugins | Integraudio.com

Key Features:

Automatic gain compensation:
Nova has a button called EQ gain that automatically makes up for all gain additions and reductions you apply with the EQ to prevent you from confusing louder with better.

Band individuality:
Compress each band by group or individually with separate settings for each band. Determine which parts of the spectrum will be affected by the compression.

Wideband compression:
Nova comes with a wideband aside from the four EQ bands and the two filters that you can add to emphasize or reduce the overall EQ curve or add compression to the entire spectrum. Additionally, you can combine this band with the others to enhance an entire mix or for bus processing.

Control over your compression:
Not only do all individual bands have their compressor, but also you can control every aspect of the processing and even limit each band separately or exclude them from being compressed. You can adjust the ratio, threshold, attack, and release to the frequency cuts and the wideband.

Compatibility:

Supports Windows XP SP2 or higher, supports macOS 10.9 or higher, runs on 64 bit only, and comes in VSTAU, and AAX formats.

Summary:

Nova by TDR has many incredible features that differentiate it from most other plugins, and it’s free. There’s a paid version that includes a couple more EQ bands and slope options for the filters, along with a couple of improvements to the limitations in the free version. Still, this plugin sounds excellent, and it’s proven to be even more helpful than others to a certain extent.

Related Reading:

Top 12 Free EQ Plugins For Precise Mixing & Mastering

Integraudio & Sixth Sample Deelay (Delay, Reverb, Granular FX, Sound Design Tool)

More Info & Download

Deelay is a wonderful plugin from Integraudio and Sixth Sample that will surprise you with its many features.

There are stock delay plugins in almost every DAW. But sooner or later, the time may come when their functionality is not enough for you, especially if you want to look for a new sound or are engaged in sound design. In this case, the Deelay plugin will be especially useful. And the good news is that it’s completely free.

20 Best FREE Mixing VST Plugins For Musicians 2022 | integraudio.com

The number of different presets here is simply mind-boggling. All of them have a very different sounds. So you can glide through them until you find what you need.

20 Best FREE Mixing VST Plugins For Musicians 2022 | integraudio.com

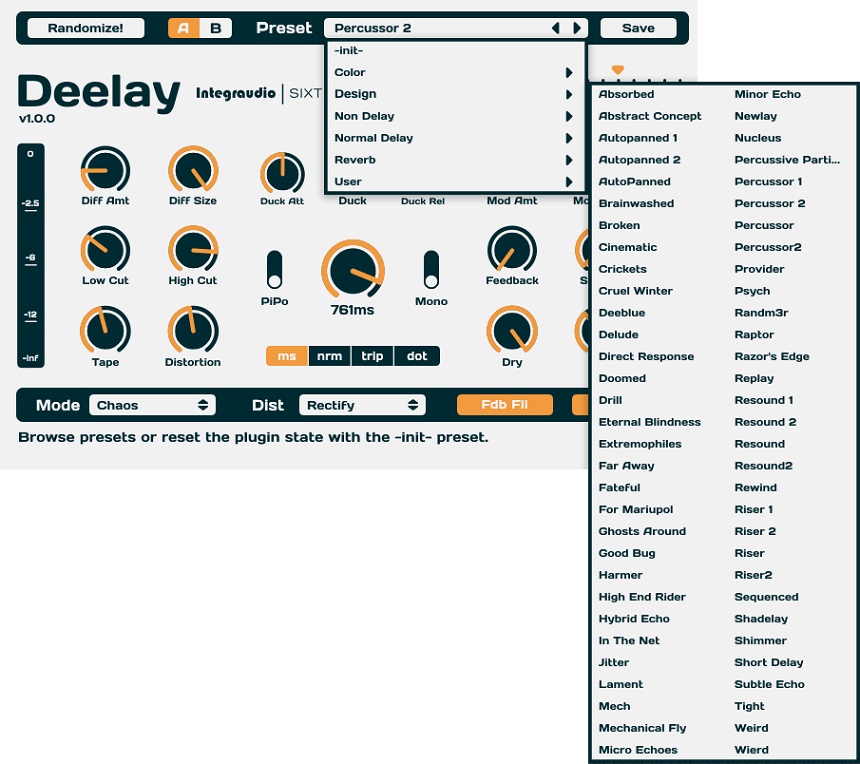
One of the main features of this software is the presence of different types of distortion. Such a variety will be difficult to find even in the well-known paid plugins.

20 Best FREE Mixing VST Plugins For Musicians 2022 | integraudio.com

And, of course, the different types of mods. The Deelay plugin has as many as 5 of them. That’s enough for you to get the sound you want. Let’s now look at the features in more detail.

20 Best FREE Mixing VST Plugins For Musicians 2022 | integraudio.com

Key Features:

Balanced Control Layout
When you first look at the settings of this plugin, they may seem a bit complicated to you. But in fact, everything is well-balanced here. For example, in the center, you’ll have the basic parameters that are responsible for the effect’s operation, like the Delay Time, Ping-Pong and Mono switches, and the Ducking settings. You’ll have Feedback, Spread, Lo, and Hi Cut Filters on the sides.

5 Different Modes of Operation
The mod choice will be fundamental to the operation of the delay. The plugin will give you options such as Normal, Reverse Forward, Pure Reversed, Chaos, and Reversed Chaos. For example, Reverse Forward can produce an inverted echo every second, and Pure Reversed every time. As for Chaos, it changes every echo’s pitch interval.

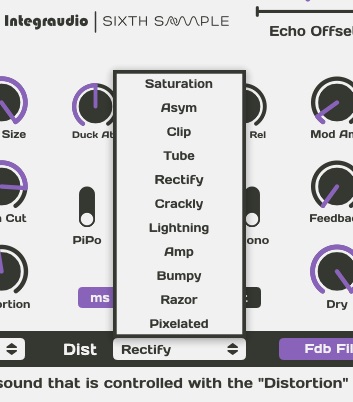
11 Shades of Distortion
The number of Distortion types here is also quite extensive. These include Saturation, Asymmetrical, Clip, Tube, Rectify, Crackly, Lightning, Amp, Bumpy, Razor, and Pixelated. Each one sounds appropriate to its name. So, for example, if we say Lightning, you get harshness and white noise. And Tube will give the effect of tube amplifiers.

Extensive Number of Presets
If you don’t want to bother with the settings, you can always choose from many presets. The plugin team created them. For example, they are divided here into subgroups Color, Design, Non Delay, Normal Delay, and Reverb. Of course, you will also have the opportunity to save your custom presets.

Additional Unique Features
The plugin also has many other unique features that make it very versatile. In particular, you can control Echo Offset and Deff Quality. In addition, you can apply a distortion before the output itself. And, of course, there is a separate Randomize button that gives you a random set of settings every time.

Compatibility:

Deelay is available for Windows 8.1 and higher (both 32 and 64-bit) and macOS 10.9 and higher (64-bit only). It comes in VST3 and AU formats.

Summary:

Deelay by Integraudio & Sixth Sample is one of those plugins that is hard to believe that they are free. You get a huge number of different features that help you achieve a unique sound of delay and reverb. And it’s all thanks to the advanced settings, different operation modes, and lots of types of distortion.

Analog Obsession FRANK 2 (Analog EQ)

More Info & Download

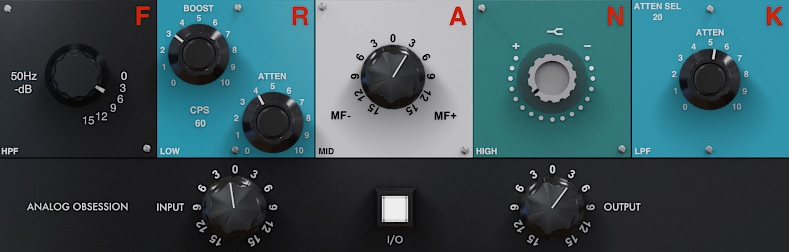
The FRANK 2 plugin from Analog Obsession is a tonal shaping EQ that is based on well-known studio hardware equalizers.

The tonal shaping equalizer would be a great tool to give some color and expressiveness to your instruments. It is exactly the plugin of the famous company Analog Obsession, which creates its software based on analog gear. All products are free, but you can support the developer on Patreon.

Overall, there are three bands of EQ, Low and High Pass filters. So by the plugin’s name, you can understand that it is a kind of Frankenstein. And it is not strange because each parameter is taken from a separate studio equalizer, whether API, Neve, or Pultec. So let’s take a closer look at the plugin.

20 Best FREE Mixing VST Plugins For Musicians 2022 | integraudio.com

Key Features:

High and Low Pass Filters
The two Low and High Pass filter knobs are located on both sides of the window. The first is based on the Helios and allows you to cut from 0 to 15 dB at 50 hertz. The second one is a Pultec-style high-frequency attenuator, allowing you to go from zero to 10 decibels.

Adjust The Lows
As for the low frequencies, you will have two whole knobs at your fingertips. The first is a boost, and the second is an attenuator. Their frequency of action is 60 hertz. In general, they are based on Pultec units.

Mid Control
The black knob on the gray background will be responsible for the mid frequencies. You will be able to cut and boost up to 15 decibels. Most likely, this setting is based on API hardware.

Add Some Highs
And, of course, the knob on the green background will help you remove or add high frequencies. It’s a shelf. At least you can tell that from the little icon above the knob. Here the creators took the Neve units as the basis.

Input and Output Knobs
Notably, the plugin allows you to drive more signal into it thanks to the Input control. So you can add more harmonics to it. There is also an Output knob, which helps balance the signal’s outcome.

Compatibility:

Analog Obsession FRANK 2 is available for Windows 7 or higher and macOS 10.9 or higher. It comes in VST/3 and AU formats.

Summary:

The FRANK 2 plugin can be your to-go equalizer for working with any instrument. It can be vocals, guitars, bass, and drums. Yes, the plugin is a kind of Frankenstein, but that’s how it’s designed to give you a unique sound. So experiment with it to see for yourself.

Analog Obsession Room041 (Reverb)

More Info & Download

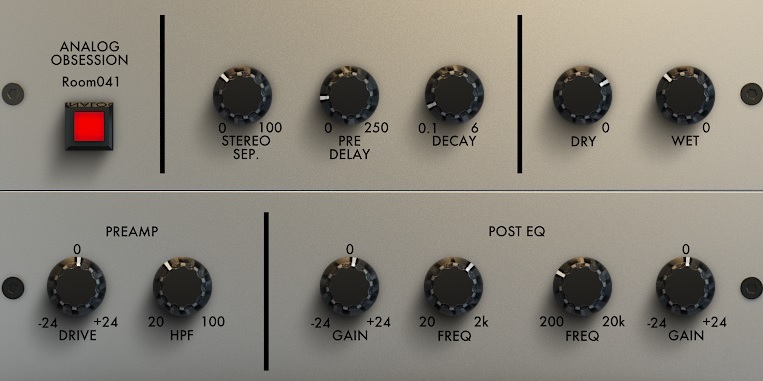
The Room041 plugin by Analog Obsession gives you room reverb and plenty of tonal shaping options.

If you need to add spatiality to your tracks, namely room, the next item on our list might do the trick. It is Room041, the first reverb plugin created by Analog Obsession. It is not modeled from any unit, but you will find here settings of one of the famous plate reverbs.

Overall, you get enough settings for the reverb effect itself, but a few extra features are packed here. For example, you’ll be able to add saturation as well as tonal shaping thanks to the Post EQ section. And now about all of it in more detail.

20 Best FREE Mixing VST Plugins For Musicians 2022 | integraudio.com

Key Features:

Sharpen Your Reverb
There are three knobs for setting the reverb itself. In particular, these are Pre Delay and Decay. Thanks to them, you can adjust the tail and the character. There is also a Stereo Separation control, which is responsible for the transition from mono to stereo.

Preamp Section
It’s something you don’t always see in reverb plugins. Room041 has a separate preamp section. Here you will have the Drive control, which will help you to add saturation. You also get a High Pass Filter range of 20 to 100Hz.

Add Some EQ
It is also noteworthy that this plugin has a Post EQ section. So you will be able to influence the frequency spectrum of your effect. In general, there is a Low knob ranging from 20 Hz to 2k Hz and a High from 200 Hz to 20k Hz. Both parameters you can cut or boost by 24 dB.

Be Dry or Wet
And, of course, you will have a separate section to adjust the ratio of the dry and wet signals. These are the two Dry and Wet knobs, which are located in the upper right corner of the plugin window. So, for example, if Wet is turned to full and Dry to a minimum, you will get the maximum affected signal.

Compatibility:

Analog Obsession Room041 is available for Windows 7 or higher and macOS 10.9 or higher. It comes in VST/3 and AU formats.

Summary:

Analog Obsession Room041 is an excellent plugin that will give you a quality sounding room reverb. It has everything you need to get the effect you want and also sharpen its tonal features. You can use this software on any instrument, but it will sound the coolest on drums, guitar, and vocals.

Related:

12 Best Reverb Plugins For Music Production 2024

iZotope Vocal Doubler (Vocal Enhancer)

More Info & Download

If you need an easy-to-use solution to enhance vocals, iZotope’s Vocal Doubler plugin may be a good option.

Recording vocal doubles is standard practice in music production. It helps enhance the vocals and gives them more width. But what if you don’t have these tracks pre-recorded? In that case, software like doubler can easily achieve this effect.

Such is the Vocal Doubler plugin from the company iZotope. And the good news is that you can get it completely free. Its main advantage is that it is as easy to use as possible because you will only have a few controls. So let’s take a look at what’s here.

20 Best FREE Mixing VST Plugins For Musicians 2022 | integraudio.com

Key Features:

Add Some Separation
Separation control will determine the variation between the original and processed signals. At the same time, it will add more width to the stereo picture. In addition, you can control this parameter thanks to the main center slider.

Choose The Variation
In turn, the Variation control, which is second, will do pitch variation. Use both of these parameters to delay the doubled vocals from the original, as well as to choose the desired pitch.

Effect Only Button
If you want to hear only the doubler effect, you can click Effect Only. It will exclude the sound of the original vocal, and you will only hear the doubled one. Use this if your plugin is on a separate send.

Doubling Amount
And, of course, the Amount knob will help you determine the relationship between the dry and wet signals. So, for example, you can use it if you don’t want too obvious dubbing effect, but just a bit to get the desired atmosphere.

Compatibility:

iZotope Vocal Doubler is available for Windows 7 or higher and macOS 10.8.5 or higher, both 64-bit only. It comes in VST2/3, AAX and AU formats.

Summary:

iZotope’s Vocal Doubler is an extremely easy-to-use software that quickly provides width to your vocal tracks. You can use it to add dimension to choruses or to highlight individual phrases on verses. It’s perfect for voice, but that doesn’t mean you can’t try it on other instruments.

Analog Obsession Distox (Multi-Mode Distortion)

More Info & Download

Analog Obsession’s Distox plugin will help you add grit to guitars, drums, and other instruments.

A slight addition of saturation or distortion is a major technique to make tracks a little more expressive and audible in the mix. On the other hand, smashing instruments with the distortion can also be a good creative idea. It is exactly what is possible thanks to the next item on our list.

It is Distox by Analog Obsession, which is a multi-mode distortion plugin. You get as many as seven distortion mods here and all the settings you need to bring this into the mix at its best. Also deserving of special praise is the plugin’s rack-unit design. Let’s break it down in more detail.

20 Best FREE Mixing VST Plugins For Musicians 2022 | integraudio.com

Key Features:

7 Distortion Types
In the plugin’s center, you will switch between seven types of distortion. They are all based on tubes and an op-amp circuit. In total, there are three op-amps and four tubes.

Adjustable In and Out
You will also be able to drive more signal into the plugin thanks to the In knob and thus get more saturation and distortion. On the other hand, you will be able to balance the output signal with the Out knob.

Mix The Right Amount
Of course, in this kind of plugin, you can’t do without a separate Mix control. It allows you to adjust the ratio between distorted and clean signals. It will be useful if you do not want all 100% of the effect.

High & Low Pass Filters
Also, the developers have put Low and High Pass Filters here. The first goes from 20 kHz to 10 kHz and the second from 20 Hz to 2 kHz. So, for example, you can use this to make distortion apply only to a specific frequency range.

Compatibility:

Analog Obsession Distox is available for Windows 7 or higher and macOS 10.9 or higher. It comes in VST/3 and AU formats.

Summary:

Analog Obsession’s Distox is a great emulation of the distortion that op-amps and tubes provide. For example, you can use this for a guitar to add some crunch. On the other hand, it might be a good idea to crush drum room tracks with this software. It can be used however you want if you need to get grit in your sound.

Related:

Top 11 Distortion Plugins 2022 (And 4 Top Free Plugins)

UJAM Finisher Micro (Multi Effect)

More Info & Download

UJAM’s Finisher Micro helps you quickly apply the effect and get a little extra inspiration.

Imagine a situation where you feel that a certain instrument needs to add an effect, but you don’t know which one. It can happen especially with beginners. However, UJAM has created a free plugin to help you quickly and easily solve this problem.

This software is called Finisher Micro and is essentially a multi-effect plugin. You get 25 different effect chain Modes and the Amount knob, thanks to which you can determine exactly how much effect you need. The plugin is very simple and interesting. Let’s talk about it more substantially.

20 Best FREE Mixing VST Plugins For Musicians 2022 | integraudio.com

Key Features:

Select The Desired Effect
At the bottom of the window, you will see the Mode knob, which allows you to choose the desired effect. In general, there are 25 of them, and their names are self-explanatory. For example, there is Infinity, SpaceGrinder, Old Radio, Rotor Cab, Flanger, Vibrato, Chorus, and many others.

Choose The Proper Amount
When you select the desired effect, you can use the Amount knob to adjust its value. By the way, it will also affect the way the effects work. For example, they will be faster or simply more expressive.

Input And Output Adjustment
The last controls in the set are the In and Out sliders. With the last one, you can balance how much signal comes out of the plugin. And the first one allows you to send a larger amount to the plugin.

Compatibility:

UJAM Finisher Micro is available for Windows 8 or higher and macOS 10.12 or higher, both 64-bit only. It comes in VST, AAX and AU 2 formats.

Summary:

Thanks to UJAM’s Finisher Micro plugin, you can quickly find the effect you want. There are many of them here, and they all sound pretty good. This software will be a great solution to provide your mixes with ear candy. In addition, it’s extremely easy to use.

Analog Obsession BUSTERse (SSL Compressor)

More Info & Download

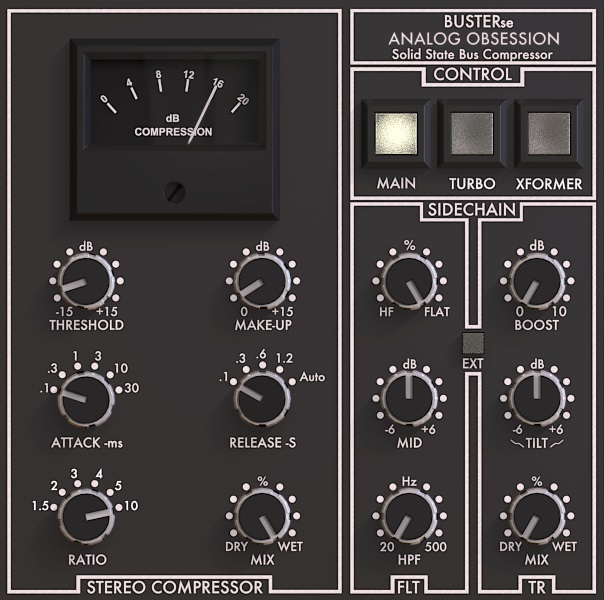
Analog Obsession’s BUSTERse plugin can be your main tool for “gluing” mixes.

Now, what do you use the bus compressor for anyway? First, it allows you to shape transients, and second, to get the effect of “gluing” the mix as a whole. The SSL Bus Compressor is a very popular equipment for this, which was part of the console. But now, there are enough plugins that emulate its operation.

Such is the free software BUSTERse from Analog Obsession. Its main feature is that, in addition to the compressor settings, it has many additional features that will help you affect the character and dynamics even more. Let’s now try to take them all apart.

20 Best FREE Mixing VST Plugins For Musicians 2022 | integraudio.com

Key Features:

Familiar Compressor Settings
If you already have experience with SSL-style compressors, then the set of basic settings will not discourage you. In particular, there is the usual Auto Release, Ratio from 1.5 to 10, Attack from 0.1 to 30 milliseconds, Make-Up Gain, and Threshold control.

Dry/Wet Control
Unlike many paid plugins, the developers have also implemented the Mix knob, which implies selecting the ratio of Dry and Wet signals. This parameter can be very helpful if, for example, you want to do a parallel compression for drums.

Additional Mods
At the top right of the plugin window, you will get three buttons that are responsible for mods. In particular, the first Main will work like the usual bypass. Also, here is the Turbo, which will bring the plugin to work more similarly to the original unit. And in addition, there is an Xformer mode to get more saturation.

Sidechain Filter
The Sidechain section makes your work with the plugin most exciting. You can use it to influence how the compressor perceives frequencies. For example, there is a High Pass Filter here and two Mid and HF knobs.

Transients Shaping
On top of that, the Sidechain section has another set of TR controls to help you influence the transients a bit more. For example, you will find a Tilt control that will boost the high frequencies and cut the lows, or vice versa. In addition, there are also separate Mix and Boost knobs.

Compatibility:

Analog Obsession BUSTERse is available for Windows 7 or higher and macOS 10.9 or higher. It comes in VST/3 and AU formats.

Summary:

Analog Obsession’s BUSTERse plugin may seem a bit complicated at first. But if you learn how to use it, it can become a powerful tool for bus compression. This software will allow you to “glue” the mix and influence the transients in the best way. And the fact that it’s free is wonderful.

Related:

Top 14 Plugins by SSL 2023 (Best Effects By Solid State Logic)

Imaginando DLYM (Chorus/Flanger/Delay Modulator)

More Info & Download

Imaginando’s DLYM plugin can be your main tool for getting light and extreme sounding effects.

DLYM from the Portuguese company Imaginando is quite powerful free software. You can get extra width by applying it to all kinds of instruments. In general, there are chorus, flanger, and delay effects.

As for the settings, they are quite straightforward. You’ll have the basic effect controls, a choice between two modes of operation, and a few more features. So let’s try to analyze what’s hidden here.

20 Best FREE Mixing VST Plugins For Musicians 2022 | integraudio.com

Key Features:

Choose Your Waveform
DLYM provides a choice of waveforms. To be more specific, its waveform is used in modulation. In particular, there are Triangle, Sawtooth, Square, Sine, Sample & Hold, and Filtered Sample & Hold options.

Usual Effect Settings
There is also a set of standard settings, without which it is difficult to imagine any effect plugin. For example, this is Time to control the length of the delay. In addition, you will find Feedback, Rate, and Depth controls.

Spread It Across The Picture
The developers also put a separate Spread knob here. It is designed to help you get a wider stereo picture of the effect. So you get mono on the left and full stereo on the right.

Crossover Function
In addition to this, the plugin also has a Crossover function. It is a High-Pass Filter that helps you remove certain frequencies from the effect. Thus, in the left position, it will be flat. Turn it clockwise to remove low frequencies and beyond.

A Lot Of Presets
And, of course, the plugin has enough ready-made presets. There are subtle effects and quite destructive ones. Overall, there are more than twenty of them. So you can find options like 8-bit Flicker, Alien Invasion, Changing Flange, Faster Phaser, and many others.

Compatibility:

Imaginando DLYM is available for Windows 10 or higher and macOS 10.13 or higher, both 64-bit only. It comes in VST, AU, AUv3, and AAX formats.

Summary:

It is an easy yet powerful plugin that gives you great-sounding delay, chorus, and flanger effects. That’s how we can characterize Imaginando’s DLYM in a few words. There are enough settings to get the sound you want and a number of ready-made presets. This plugin can also run on devices like iPhones or iPad, as it supports the AUv3 format.

Related:

Top 6 Chorus VST Plugins 2024 For Musicians (And 3 FREE Plugins)

Analog Obsession VariMoon (VariMu Compressor)

More Info & Download

Analog Obsession’s VariMoon plugin will give you the character of the famous tube compressor.

The tube or variable mu compressors are some of the most expensive audio equipment. They provide smooth compression and enough harmonic distortion. In general, they are most often used as tools for mastering or drum buses. And now, we will look at one of the emulations of this hardware.

The VariMoon plugin is based on the famous Vari-Mu compressor and limiter. But in addition, the creators have laid here a few more features. For example, you can change the release, ratio, dry and wet balance, and apply a sidechain. Now about all of this in more detail.

20 Best FREE Mixing VST Plugins For Musicians 2022 | integraudio.com

Key Features:

6 Release Positions
The attack of this compressor is fixed at 10 ms. But as for the release, you will be able to change it thanks to a separate switch. There are four fixed positions, 0.3, 0.8, 2.0, and 5.0, and two automatic 2/10 and 0.3/10/25.

DC Threshold
In addition, you will also have a Ratio selection switch. It is called DC Threshold. Here you can apply very little compression and limiting or quite extreme. The range is from 2:1 to 10:1.

AC Threshold
As for the AC Threshold knob, this will be your usual threshold control. Use it to determine when the compression needs to kick in. In general, the range here is 50 decibels.

In, Out, and Mix
Small metal knobs help you balance the signal. For example, with the In knob, you can send more signal to the plugin and get more harmonics. And, of course, balance with Out. In addition, there is a Mix knob, which will be useful for parallel compression.

Sidechain Section
The Sidechain section is located under the VU Meter. In particular, there is a button for the external sidechain and High Pass Filter. The latter works in the range of 20 to 500 hertz. Thus, you can remove low information from the compression.

Compatibility:

Analog Obsession VariMoon is available for Windows 7 or higher and macOS 10.9 or higher. It comes in VST/3 and AU formats.

Summary:

Analog Obsession VariMoon is a great plugin best suited for material with slow transients. For example, you can use it for vocals, bass guitar, drums, or mix bus. The sound can become a little fatter and more expressive thanks to this software. At least you’ll have a full arsenal of options to provide that.

Related:

The 7 Best Vari-Mu Compressor Plugins 2023 (And 2 Best FREE Tools)

Caelum Audio Tape Cassette 2 (Saturation/Tape Emulation)

More Info & Download

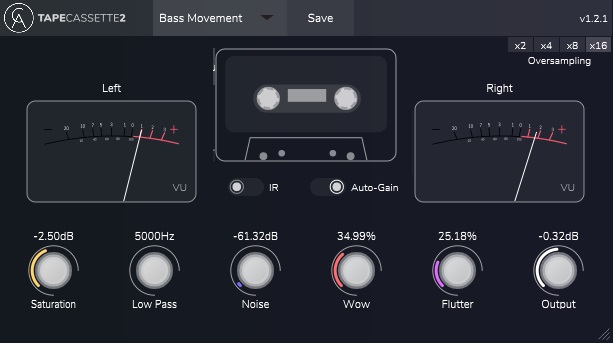
Caelum Audio’s Tape Cassette 2 might be handy for producers who make lo-fi music.

We all remember that warm cassette sound from our childhood. But, remarkably, now we can achieve it directly in our DAW to create lo-fi music. Caelum Audio’s Tape Cassette 2 plugin will help you do just that.

Tape Cassette 2 is a fairly simple plugin with some great features. Thus, you will have full control over creating your custom tape sound because you can adjust almost all of its components, right down to the noise. So let’s see what the creators have hidden under the hood.

20 Best FREE Mixing VST Plugins For Musicians 2022 | integraudio.com

Key Features:

Add Some Saturation
In this plugin, you can adjust the saturation level yourself. A separate knob on the left side of the window is responsible for this. By adding harmonics, you get a crisper and more expressive sound.

Adjustable Low-Pass Filter
You will also be able to apply a Low-Pass Filter – there is a separate control for this. Its operating range is from 5 to 22 kHz. Use this to filter out unwanted frequencies.

Give It Some Noise
Another great feature here is the ability to add noise. By the way, it’s the sampled noise from the Type 1 tape. Again, use the special knob to adjust its level. It should provide the proper atmosphere.

Wow & Flutter Controls
The two Wow and Flutter knobs also help give your sound the right cassette effect. The first is a wobbler, and the second gives a distortion effect. It would be ideal for lo-fi.

IR and Auto-Gain
On top of all this, you will also be able to apply an IR of the Type 1 Cassette. This switch is located at the top. In addition, there is also an Auto-Gain mode, so you don’t have to balance the output yourself.

Compatibility:

Caelum Audio Tape Cassette 2 is available for Windows 7 or higher and macOS 10.11 or higher, both 64-bit only. It comes in VST3, AU, AUv3, and AAX formats.

Summary:

Caelum Audio’s Tape Cassette 2 plugin will give you plenty of options to give your sound an authentic cassette atmosphere. It has all the required features, including noise, saturation, and special effects. The plugin is easy to use and especially suitable for producers making lo-fi music.

Related Reading:

Top 12 Saturation Plugins In 2022 (Best Mixing & Mastering Tools)

Analog Obsession LOADED (Channel Strip)

More Info & Download

Analog Obsession’s LOADED plugin gives you everything you need to mix almost any instrument, especially vocals.

Using a channel strip plugin is always great because you have all the main tools for mixing a particular instrument at your fingertips. Think of it as a console that allows you to process an individual track from start to finish. That’s exactly what the plugin called LOADED will give you.

It emulates five studio units of the 500 format and one general. Here you get Preamp, De-Esser, Gate, Compressor, and EQ. The last one in the chain will be a module where you can control the input and output signals. Let’s break it all down in more detail.

20 Best FREE Mixing VST Plugins For Musicians 2022 | integraudio.com

Key Features:

Preamplifier Section
The Preamp section will be the first in your chain. Here you will be able to add Gain and, therefore, more harmonics. In addition, here you will find the High-Pass Filter and the Treble and Bass Boost. In addition, you get the XFMR button, which emulates the operation of transformers.

Add Some De-Essing
When you compress vocals, you get a more expressive hissing sound, which can cut the ear. De-Esser is precisely designed to soften them. As for the plugin, you’ll have a Threshold, Release, and Mix knob. In addition, there are two modes, Band and Soft.

Gate Unwanted Sounds
A cool bonus here is the presence of the Gate. Thanks to it, you can mute the sound up to a certain threshold. It can be useful for vocals, guitar, and drums. This section also includes Threshold, Release, and Mix controls.

EQ Section
As for the equalizer, it is similar to other channel strips. In particular, you can boost and cut by 15 dB the high frequencies at 10 kHz. The same goes for the lows; here, it’s at 100 hertz. In addition, you will have two bands for High Mids and Low Mids.

Add Compression
And, of course, you will have a separate compressor. Here you get a Ratio range of 1.5 to 20 and a Threshold down to -60 decibels. There are also Auto-Release and Quick Attack buttons and Sidechain functions. In addition, the compressor has a Mix knob.

Compatibility:

Analog Obsession VariMoon is available for Windows 7 or higher and macOS 10.9 or higher. It comes in VST/3 and AU formats.

Summary:

Analog Obsession LOADED is a great choice to get the channel strip plugin flavor of the hardware. You can use this software to mix each of your tracks since everything you need will be at your fingertips. Especially this software is good for those who work on live recordings.

Related Reading:

7 Best Channel Strip Plugins 2024 (Waves, UAD, Brainworx)

TriTik Crush (Bitcrusher)

More Info & Download

TriTik’s Krush plugin is a great audio destructive tool to help make your beats more expressive and aggressive.

Bitcrusher is a popular sound effect that involves applying a distortion by lowering the resolution of the audio signal. It allows you to achieve a somewhat warm sound. On the other hand, it can become somewhat harsh. However, providing an aggressive sound is common, especially for beats or other percussive elements.

The free Krush plugin from TriTik is just the thing to help you achieve this effect. Despite the usual bitcrusher settings, you will also get many additional ones, including modulation and filter parameters. Let’s analyze them one by one.

20 Best FREE Mixing VST Plugins For Musicians 2022 | integraudio.com

Key Features:

Add Some Drive
The Drive control will be the first in your set of settings. It provides transformer-based distortion and saturation. At least it sounds like the effect of analog hardware. Add this to make the signal more expressive.

Crush & DWSP
You also get the two more standard bitcrusher parameters here: Crush and DWSP. The first will reduce your bitrate, and the second will reduce the sample rate. So that gives you a traditional bitcrush sound.

Filter Section
The Filter Section is easy enough to use since nothing is extraordinary here. You will get Low and High Pass Filters with two knobs responsible for adjustable frequency and resonance.

Apply Some Modulations
Notably, the Krush plugin also gives you the ability to modulate distortion. In particular, you can adjust the LFO rate time or synchronize it with the project. In addition, there are four different shapes of modulation and settings: Drive, Crush, DWSP, Freq, and Res.

Dry/Wet Control
And, of course, the developers of the plugin have not left you without the settings of the ratio of Dry and Wet signals. You will see them in the right part of the window. Thus, you can get a completely affected signal or hide it under the original one.

Compatibility:

TriTik Krush is available for Windows 7 or higher and macOS 10.6 or higher, both 64-bit only. It comes in VST/3, AU, and AAX formats.

Summary:

The TriTik Krush plugin can give you a nostalgic bitcrusher effect and take it beyond the usual sound. Here you can get both quite minor effects and pretty bizarre creative solutions. Krush is suitable for beats, but you can also use it for any other instrument that needs distortion.

Related Reading:

7 Best Bitcrusher Plugins To Crush Your Sound 2023

Analog Obsession LALA (Inspired By Teletronix LA2A)

More Info & Download

The LALA plugin from Analog Obsession gives you smooth compression that’s great for vocals and bass guitar.

The LA2A-type compressors are among the most popular studio units. They provide smooth compression with a slow attack, which is ideal for processing vocals and bass guitars. Through years of digital music production, dozens of plugins have been created that emulate their operation. And now we’re going to talk about a free one.

It is another Analog Obsession product called LALA. You will immediately see by its design that it is a reference to the original LA2A compressor by Teletronix. You will have the same main Gain and Peak Reduction knobs and additional features. We’ll talk about them below.

20 Best FREE Mixing VST Plugins For Musicians 2022 | integraudio.com

Key Features:

Extremely Simple Operation
As with other similar plugins, you get an extremely simple operation. It comes down to only two knobs, Peak Reduction and Gain. With the first, you can select the amount of compression, and the second helps you balance the output signal.

Sidechain Section
On the left side of the plugin, you will see some additional features. For example, there is a High Pass Filter from 20 to 500 hertz. You can also adjust the compressor’s sensitivity to medium and high frequencies, thanks to the corresponding knobs. And, of course, there is an External Sidechain button.

Adjust The Balance
If you want to use this plugin for parallel vocal compression, you will have the option to do so. That’s because the developers have implemented here the Mix function, which is not present even in some similar paid plugins. So use it to find a proper balance.

Three Nice-Looking Skins
Another cool thing about this plugin is that it has three skins. Specifically, these are White, Vintage, and Modern. It’s not a big deal, but it’s nice. Choose the one that pleases your eye the most.

Compatibility:

Analog Obsession LALA is available for Windows 7 or higher and macOS 10.9 or higher. It comes in VST/3 and AU formats.

Summary:

Analog Obsession’s LALA is an unusually straightforward plugin that helps you get smooth and musical compression. However, the settings on the left side of the window may be a bit confusing if you are a beginner. You can even leave them untouched, using only the two main knobs. But, overall, the plugin can easily compete with paid products regarding sound quality.

Related Reading:

Top 6 Analog Hardware Limiters 2022

Surreal Machines Crack (Transient Shaper/Clipper/Maximizer)

More Info & Download (Bottom of the page)

The Crack plugin from Surreal Machines might be a great option if you need a simple transient shaper.

If you are faced with a situation where your drums lack punch and definition, the transient shaper plugin may be the solution. Thanks to this software, you can personally control the attack and sustain and make the material fit your creative situation as much as possible.

The free Crack plugin from Surreal Machines can help you with this perfectly. It is very easy to use and has only four knobs. Also, you will be able to change the nature of the dynamics, which is also awesome as on freeware.

20 Best FREE Mixing VST Plugins For Musicians 2022 | integraudio.com

Key Features:

Add or Reduce Attack
With the Attack control, you can make the transients more expressive and thus get punchiness. And vice versa – if you need to soften them, turn the knob back. It works well on percussive material.

Sustain Control
As for the Sustain regulator, it’s pretty self-explanatory. Use it to extend the sound of this or that instrument. It also works great on drums, but on other instruments, too.

Change The Dynamics
The Dynamics section is the most interesting part of this plugin. That’s because the developers have put several options here that you can apply to your material and thereby change the dynamics. In particular, these options are Thru, Clip, Limiter, and Maximizer. You’ll also have an Amount knob here.

Dry/Wet Regulator
Last in the Crack plugin’s settings chain is the Dry/Wet control. If you don’t want 100 percent of the plugin’s effect, you can always let this go in parallel and make it less noticeable.

Compatibility:

Surreal Machines Crack is available for Windows and macOS. It comes in VST and AU formats.

Summary:

Crack is a great free plugin from Surreal Machines to help make your beat or live drums better. You will have control over attack, sustain, and dynamics and the ability to adjust the balance between dry and wet signals. By the way, this company also has a paid version called Impact, with many different settings.

Related:

10 Best Transient Shaper Plugins For Various Purposes 2024

Analog Obsession BLENDEQ (Dual-Circuit EQ)

More Info & Download

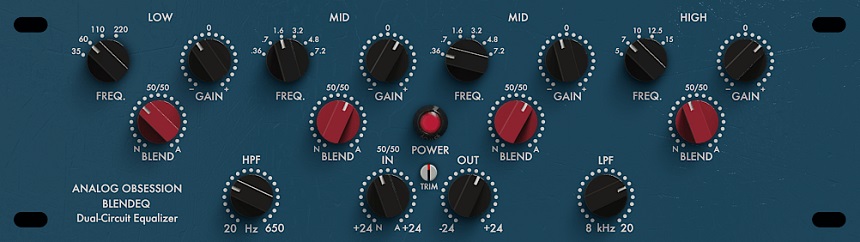
BLENDEQ by Analog Obsession is a plugin in which you get a combination of two legendary hardware equalizers.

It’s no secret that different hardware studio units have different sounds. It is what makes them unique and appropriate for a particular situation. And this applies not only to preamps and compressors but also to equalizers. Fortunately, Analog Obsession has created a plugin in which you can blend two flavors of gear.

The main thing about this plugin is that in addition to the usual EQ bands, you will also have blendable knobs. So you can either go for a specific one or get them 50/50. The same goes for the Input signal. So let’s talk about that in more detail.

20 Best FREE Mixing VST Plugins For Musicians 2022 | integraudio.com

Key Features:

4-Band EQ
In total, you get four EQ bands. Specifically, there are Low from 35 to 220 Hz, two Mid controls from 0.36 to 7.2 kHz, and High from 5 to 15 kHz. You can boost or cut each of them with separate knobs.

Blendable Knobs
You will have a separate red Blend knob for each of the bands. So you can get the Neve sound on the left and the API sound on the right. Or leave them in the 50/50 position to get a unique sound.

Drive Your Input
As for the Input knob, there is also a mixing option. So, if you twist it to the left, you’ll get harmonics characteristic of Neve hardware. And vice versa, you will get an API flavor to the right. There is also a separate Output control.

Use The Filters
In addition to all of this, you will also have High and Low Pass Filters. These controls are located on both sides at the bottom of the plugin window. HPF goes from 20 to 650 hertz, and LPF from 8 to 20 kilohertz.

Compatibility:

Analog Obsession BLENDEQ is available for Windows 7 or higher and macOS 10.9 or higher. It comes in VST/3 and AU formats.

Summary:

Analog Obsession BLENDEQ is a great plugin for getting the best out of two analog equalizer emulations. The N option will give you a smoother sound, and the A option will give you punchy transients. At first, the large number of knobs might confuse you, but once you figure out how to use them, everything becomes easy and simple. The plugin is suitable for both individual instruments and program material.

Chow Tape Model (Tape Emulation)

More Info & Download

The Chow Tape Model plugin from Chowdhury DSP will give you the warmth of tape and the ability to achieve a crazy sound.

We all know that tape saturation is an important part of music production, especially if you want to get some warmth and breathe life into your tracks. And all this will be quite possible, thanks to the free plugin Chow Tape Model.

In general, you will have full control over many parameters of the virtual tape machine. Thus, the plugin allows you to recreate your unique version and get the sound just the way you want. All in all, you can either get very subtle effects or achieve unconventional, creative solutions.

20 Best FREE Mixing VST Plugins For Musicians 2022 | integraudio.com

Key Features:

Gain And Filters
The first section of this plugin’s settings is pretty straightforward. Here you get the Gain section with Input, Dry/Wet, and Output settings. Then, if you click on the Filters tab, you will see two Low and High Cut knobs.

Adjust The Tone
As for the second section, things get more interesting. For example, in the Tape tab, you will have a Bias control to affect the quality of the tape. There are also Saturation and Drive knobs. In turn, in the Tone tab, you will find the Bass and Treble settings.

Loss, Degrade & CHEW Section
The Loss, Degrade and CHEW Section will be responsible for the behavior of the tape player. In particular, you will have control over parameters such as Gap, Thickness, and Speed. In addition, you will be able to provide the sound of old tape that degrades and gets chewed up.

Mess Up Your Sound
At the end of the settings chain, you will see two boxes Flutter and Wow. Thanks to them, you can get weird effects, most suitable for lo-fi music. Each tab will have Rate, Depth, and other settings.

Oversampling And Hysteresis Mode
On top of that, you will be able to change the oversampling, which will affect the quality of the signal. But be careful because this can affect the CPU load. Apart from that, you will also have several Hysteresis mods, which will also provide different sound quality of the virtual tape.

Compatibility:

Chow Tape Model is available for Windows, macOS, and Linux. It comes in VST/3, AU, AUv3, CLAP, LV2, AAX formats, and as a standalone host.

Summary:

Chow Tape Model is a powerful film emulation plugin, and it’s pretty hard to believe we can get it for free. It has incredible settings and will help you sharpen the sound of your virtual tape machine in the best way possible. In addition, there’s a Tip Jar button in the right corner where you can thank the developer.

Related:

20 Best Tape Emulation Plugins 2024 (Real Hardware Emulations)

Chow Phaser (Phaser)

More Info & Download

The Chow Phaser plugin will help bring more excitement and movement to your tracks.

Phaser is one of the quite long-standing and popular audio effects. It involves creating a copy of an audio signal somewhat out of phase. Their amplitudes interact with each other to create a motion effect. It is what makes it possible to get a more exciting sound.

Now we look at another free plugin from Chowdhury DSP called Chow Phaser. It has sufficient settings and can work in mono and stereo. In the latter case, you will be able to set different parameters for both channels and thus get more depth and width.

20 Best FREE Mixing VST Plugins For Musicians 2022 | integraudio.com

Key Features:

Full Control Over The Effect
You will have ample opportunity to sharpen the sound of the phaser to suit this or that creative situation. For example, there are Depth, Feedback, Modulation, and Skew controls. With these parameters, you can choose exactly how you want your phasing to go.

Add Some Dirt
Also, the developer did not leave us without the ability to influence the character and color of the effect itself. In this case, you can use the knobs on the plugin window’s right side. For example, you can add saturation with the Drive control and make it dirtier with Dirt and Thrash.

Use Mono or Stereo
Another notable feature of this software is that you can use it in Mono and Stereo modes. In the second case, you will have a mirror set of settings for both channels. Adjust them differently to get as much width in the stereo picture as possible.

It’s Resizable
A nice bonus is that the plugin window is resizable. So you can resize it to make it more convenient for your eyes. By the way, depending on this, the size of the knobs will also change.

Compatibility:

Chow Phaser is available for Windows, macOS, and Linux. It comes in VST/3, AU, CLAP, LV2, and AAX formats.

Summary:

Chow Phaser might be a great option if you want a free phaser plugin. It has everything you need to set up your sound quickly and get the desired results. You will be able to apply this to both mono and stereo material. Plus, the plugin is resizable.

Voxengo SPAN (Frequency/Spectrum Analyzer)

More Info & Download

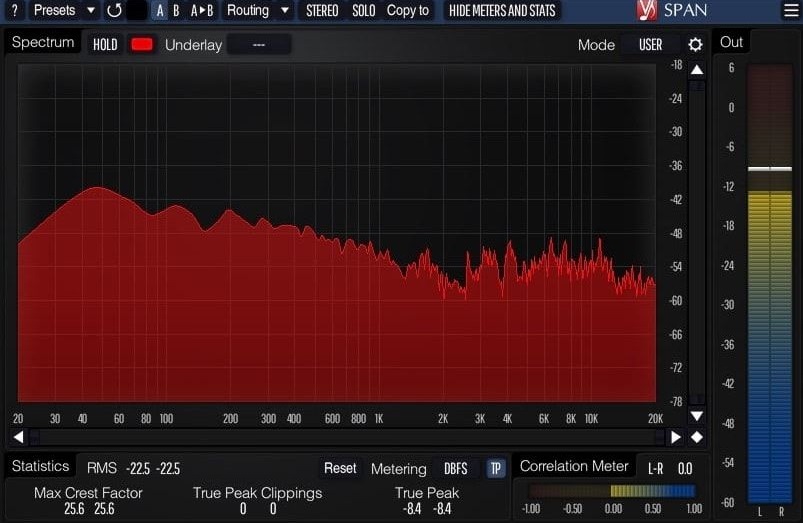
Voxengo’s SPAN plugin can serve as a wonderful frequency spectrum analyzer.

We all know how important it is to mix with our ears, not our eyes. But still, in some scenarios, visual analyzers can help you. For example, to see what’s happening with frequencies you can’t hear. It’s also useful for comparing your material with a reference.

Such a plugin is exactly the SPAN from Voxengo. And it is the kind of plugin that is hard to believe is free. You will have a visual interpretation of the frequency spectrum and all the necessary settings to display it as conveniently as possible. So let’s talk about that in more detail.

20 Best FREE Mixing VST Plugins For Musicians 2022 | integraudio.com

Key Features:

Detailed Metering
At the bottom of the window of this plugin, you will get the most detailed metering of your audio. In particular, it will display the RMS, Max Crest Factor, True Pick, and Correlation Meter here. You can remove this information if it bothers you with the Hide Meters And Stats button.

Solo The Necessary Frequencies
If you press Control or Command on your Mac and then click and drag, you will enter Solo mode. That way, you can glide through the frequency spectrum and listen to bands of frequencies individually. By the way, you can make the band narrower or wider if you use scrolling.

Mid-Side Spectrum Analyzer
It is noteworthy that you can analyze the overall stereo picture and switch to Mid-Side mode. You will find this feature in the presets. Thus, the plugin will display the information in the middle in one color and on the sides in another color.

Change Block Size
If your spectrum looks like many spikes, you can make it smoother. Go to the settings and find the Block Size section. You can change the resolution so that you only see the overall trend, not the peaks and harmonics.

Change The Display Range
Another useful feature is that you can change the Display Range. You will also find this option as separate controls in the settings. Thus, you can expand the spectrum and see information in your mix, for example, below 20 hertz.

Compatibility:

Voxengo SPAN is available for Windows XP or higher (both 32 and 64-bit) and macOS 10.11 or higher. It comes in VST, AU, and AAX formats.

Summary:

Voxengo’s SPAN plugin will help you explore the frequency spectrum of individual instruments or a mix in detail. It has all the necessary meters and presets that help you look at the picture from different perspectives. It’s quite light on the CPU and will be a great addition to any DAW.

Alex Hilton A1StereoControl (Stereo Imager/Widening)

More Info & Download

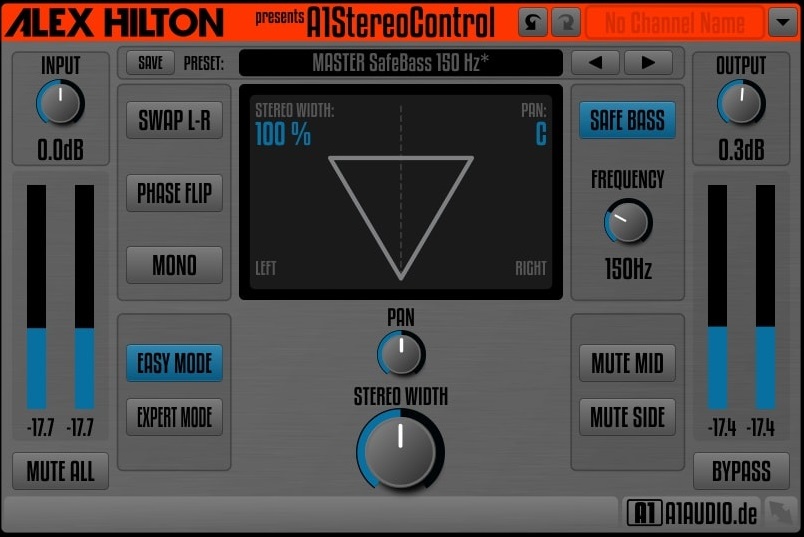
A1StereoControl plugin will help you provide a wider stereo picture during mixing or mastering.

Stereo widening plugins are quite popular in music production. Some professionals advise not using them, relying only on panning instruments. But others like to use such software to get a slightly wider stereo picture. Now we will talk about one such plugin, which is free.

It is A1StereoControl by Alex Hilton, which you can download from the website of the same name. It has simple and expert controls and many other interesting features that will provide you with better monitoring. Let’s break it all down.

20 Best FREE Mixing VST Plugins For Musicians 2022 | integraudio.com

Key Features:

Keep It Simple
You can control the width of the stereo picture without complicating your life. Thanks to only two knobs in the center Pan and Stereo Width, it will be possible. Use the first to direct the signal to the left or right channel and the second to make it wider.

Expert Mode
If you want full control over widening parameters, you can enter Expert Mode. Use the special button on the left side of the window to do this. Here you will have additional options to influence Pan Law, select Balance or Dual Pan, as well as Linear, Logarithmic, or Sin/Cos modes.

Safe Bass Function
During stereo widening, this effect mustn’t affect the low frequencies, which remain in mono. The good news is that you will have a Safe Bass knob to ensure this. Here you can select the crossover frequency up to which plugin will not apply the widening.

Monitoring Features
You will also have several chips at your disposal that will provide detailed monitoring of the stereo picture. For example, you can mute mids or sides. In addition, you can swap left and right channels, invert the phase, or listen to everything in mono.

Compatibility:

Alex Hilton A1StereoControl is available for Windows and macOS, both 64-bit only. It comes in VST2, AU, and AAX formats.

Summary:

If you have never tried the stereo widening technique, you can safely try it with the A1StereoControl plugin. At least you don’t need to invest any money. It has all the necessary settings, both simple and expert level. In addition, you get several monitoring features. By the way, you can donate some tips to the creator of this software on his site.

Acon Digital Multiply

More Info & Download

Acon Digital Multiply Review - The Best Free Chorus Plugins | Integraudio.com

Acon Digital’s Multiply is a six-voice free chorus plugin with an anti-comb filter technology.

The plugin delivers everything you expect from a chorus effect and a little more. You can simulate up to six identical voices to thicken up your sound. Additionally, you can use the Pre-delay knob to create diffuse and modulated echoes.

Key Features:

Frequency Modulation
You can set up the Voice Count to your liking and tweak these two knobs to find the best sounding Chorus effect. Depending on the source material, too much Depth can generate thick sounds or wobbly results. Therefore, use it carefully.

Amplitude Modulation
The Tremolo effect produced in this section helps widen the sound, especially when you set the Pre-Delay at a high value. It would help if it had a sync mode, but it makes the effect sound more analog.

Equalizer
The prominent EQ has simple-to-use four-band controls. You can create low- and high- cuts to focus the processing within a limited frequency range. Use the other two controls to manipulate the curve within the selected region. You can create shelves, slopes, and bells that let you shape the sound to your liking.

Character & Sound:

You can use this plugin to create thick, rich chorus textures. The sound is lush and natural, and you can even generate reverb effects with it. There are eighteen built-in presets that show you the plugin’s robes and give you a direction in which to go on. The automatic comb-filtering avoider comes in handy to make each chorus voice sound clean and full, and the EQ gives the user extended versatility.

Compatibility:

Multiply is available for Windows 7 and up and macOS 10.8 and higher as a VST, AAX, and AU plugin.

Summary: 

Incredibly, a free tool can do so much and sound so exquisitely. Multiply is a must-have in your collection. You can make the effect as subtle or apparent as you wish, but it will sound breathtaking anyway.

Related Reading:

30 Best Free Plugins For DnB, EDM, EBM, IDM & Experimental Music

Baby Audio Baby Comeback (Delay)

More Info & Download

Made as an alternative to Comeback Kid, the Baby Comeback is a great accessible delay plugin.

Although it has the same style as its paid counterpart, the Baby Comeback offers fewer controls for you to tweak. This lack of options shouldn’t be a problem, as the plugin gives you excellent sounding delays with its few presets available.

The main feature that stands out is the Ducking element which we will explain more in the section below.

Baby Audio Baby Comeback - 10 Best FREE Plugins For EDM | Integraudio.com

Key Features:

Ducker
The Baby Comeback offers a great feature called Duck control that allows you to reduce the effect volume when the input signal is present. This feature gives you more clarity and works exceptionally well with vocals and drum loops.

Flavors
The Baby Comeback has 4 different presets that give you unique delay effects. The effects offer a different flavor, with Wide offering a delay that bounces at the ends of your stereo field, Analog giving you a retro hardware delay sound, Saucey is a hidden gem, and we will let you find out its characteristics. Cheap is, well, for a cheap-sounding effect that You can use in some break sections.

Compatibility:

Baby Comeback is available for Windows 7 or higher 32-bit and 64-bit and macOS 10.7 or higher 32-bit and 64-bit. It comes in VST/3, AU, and AAX formats.

Summary:

The plugin also features a ping-pong switch, which bounces the delay signal through your speakers to fill some space. Additionally, you can use the classic Time and feedback knobs to tweak when the delay triggers and how strong it will be.

Kilohearts Essentials Bundle

More Info & Download

KiloHearts Essentials is a free collection of thirty useful and expansive plugins.

The collection includes EQ plugins, dynamic processors, harmonic processors, time-based effects, and many more effects and plugins of great utility and can also be loaded as Snapins in the Snapin by KiloHeartz. The company also offers perpetual free updates once you download the free license of the plugin and shows intentions of updating the collection from time to time.

Key Features:

Versatile set of tools
No matter what kind of effect you want for your sound design or production, be it an equalizer for sonic shaping, a compressor for squaring your dynamics, a chorus for enhancing the stereo image, or a delay for adding a space or ambiance to your sounds, the Essential collection has you covered.

Hands-on control
For each effect plugin, you have good control over the sound. For example, with its compressor, you can set the threshold, ratio, attack time, release time, make-up gain, and sidechain another signal in the plugin. Similarly, if we talk about the delay plugin, you can adjust the feedback, enable ping-pong, adjust duck, pan, and mix, and set the delay time in milliseconds or sync it to the tempo.

Innovative plugins
Some plugins in the collection are cool, unique, and great for creative sound design. For example, the Ensemble plugin lets you create harmonies on a single voice with up to twelve voices in unison. Similarly, there are plugins for interesting effects like the Haas effect, Ladder filter, non-linear filter, reverse effect, and more.

Compatibility:

The plugin is available as VST 2, VST 3, AU, and AAX plugin formats in 64-bit only and requires at least 2 GHz of CPU and 1 GB of memory. It works with Mac and Windows.

Summary:

KiloHearts has provided plugins for tape machine effects, formant filters, and transient shapers for free in the collection. The Essential collection will expand your toolkit and add new instruments to your arsenal if you’re a music producer or sound designer who uses only stock plugins due to budget constraints.

Scroll to Top