Today we’ll talk about what a Comb Filter is and what it sounds like. Additionally, we’ll explore what a Resonator does in music and take a look at the best comb filter and resonator plugins for 2025!
What Is Comb Filtering?
Comb filtering is when two identical sound waves are slightly delayed due to sound reflections, multiple microphones, speaker positioning, or manually during post-production. This results in some of the wave’s frequencies adding together and some canceling out, resulting in a comb-shaped wave.
Depending on the frequency and rate of delay, sound can completely cancel itself or enhance the comb filter effect. If the delay is longer than 25ms, the effect gets significantly reduced, resulting in echo. As it’s impracticable to record a single frequency in the real world, sound recordings usually carry thousands of frequencies.
Therefore, if two or more microphones capture the same sound source, chances are some frequencies will suffer from comb-filtering.
But first, a little background information so everyone’s in phase… I mean, on the same page. Take a look!
6 Best Comb Filter & Resonator Plugins
1. Polyverse Supermodal
Polyverse Supermodal is a sound design tool that blends traditional filtering with physical modeling and advanced modulation.
I really appreciate how Supermodal pushes creative boundaries without becoming overly complicated. It’s rare to find a filter that feels this fresh and still stays usable in everyday projects.
The interface is clean and responsive, with animated controls that make modulation visually intuitive.
The layout splits 2 main filter types side-by-side: a classic state-variable filter and a modal filter based on resonant models. There’s also a built-in modulation section that adds a lot of movement and depth without making the workflow feel heavy.
- Dual Filter Design
On the left side, there’s a state-variable filter that transitions smoothly between low-pass, band-pass, and high-pass modes.
It can self-oscillate when pushed and includes a Drive control that adds warmth or grit. I often use it for shaping synth leads and tightening up bass lines, nothing surprising here, but it sounds clean and polished.
- Modal Filter Engine
The real innovation happens on the right side, where the modal filter lives. This section includes 27 models made up of 200+ resonant bands, designed to mimic materials like metal, wood, or even abstract waveforms.
Each model can morph between three variations using the Xform control, and the results range from subtle formant shifts to full-blown resonator effects.
- Decay, Damping & Partials
You get a lot of control over the modal behavior. Decay sets how long the resonance rings, Damping reduces high-frequency content, and the Partials controls let you isolate lower or higher frequency components.
It’s a flexible system that makes it easy to fine-tune tonal color.
- Dry/Wet Mix & Blend Control
There’s a Dry/Wet knob for overall balance and a Blend control to mix between the classic and modal filters.
I tend to keep the blend somewhere in the middle for subtle movement, but you can also go fully modal if you’re after a more experimental sound.
- Flexible Modulation System
The plugin includes four modulation slots, with sources like LFO/Sequencer, Random Generator, Envelope Follower, and a Meta Knob.
Each modulation source can be applied to any parameter with simple visual routing. The sequencer is especially useful cause it’s tempo-synced and supports a range of shapes and patterns, making it easy to build rhythmic effects.
- Morphing Between Filter Variations
Using modulation or automation, you can morph between filter models in real time. This creates evolving textures that feel organic and dynamic. It’s particularly effective on pads, drones, and percussive loops when you want to add tonal movement.
There are a couple of small limitations. Currently, all modulation shares the same glide time, and switching filter models while adjusting parameters can introduce a bit of delay unless you reduce it manually.
Still, these are minor workflow considerations and don’t detract from the plugin’s overall creativity.
Supermodal stands out because it combines sound design flexibility with a clean user experience.
Polyverse Supermodal comes in VST2, VST3, AU, and AAX formats for macOS and Windows users.
2. Xynth Audio Rezonator
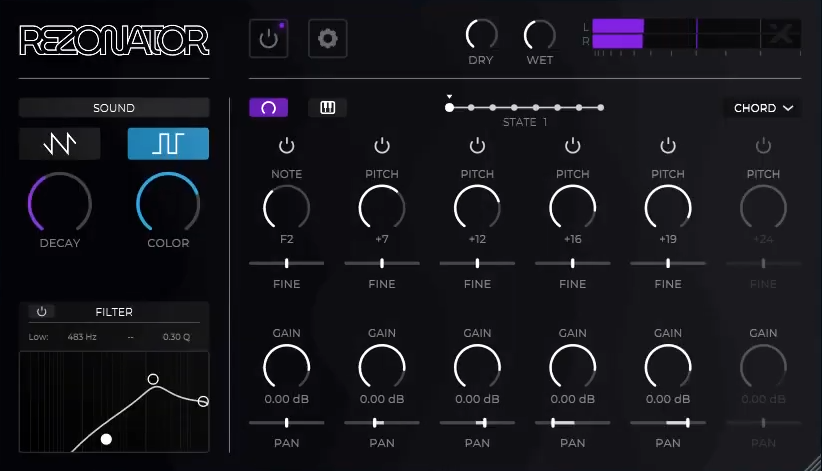
Rezonator is designed to infuse your sounds with rich harmonic resonance and is perfect for transforming any audio into lush, vibrant chords.
Key Features:
- Global Control Features
The plugin includes the Sound Type selector parameter that changes the comb filtering characteristics, offering Saw-mode for positive resonance across all harmonics and Square-mode for selectively resonating odd harmonics. You can also adjust the Decay to regulate feedback levels, while Color controls high-frequency attenuation for a softer overall sound.
- Harmonic Tuning Capabilities
Rezonator lets you tune any of the 6 built-in resonators, allowing for the creation of harmonious layers. You can adjust Note and Pitch knobs in semitones and fine-tune with sliders in cents for precise control.
- State Management
With 8 programmable states, Rezonator lets you store multiple chords and harmonies for quick access. You can easily switch between these states using a single slider, streamlining the process of creating dynamic arrangements.
- MIDI Integration
The MIDI input functionality allows you to route MIDI directly into the plugin, generating intricate melodies and harmonies. It provides a MIDI Input toggle, ensuring seamless routing within your DAW. You can opt for Normal or Round-Robin modes to manage note playback, with settings to adjust release time and the maximum number of simultaneous notes, enabling expressive playing styles.
- Flexible Effects Processing
Rezonator includes a selection of effects such as filters, reverb, and stereo-width adjustments that can be applied exclusively to the wet signal. You also get settings such as dry/wet mix, reverb length, and frequency controls for lows and highs, allowing for finely tuned reverb applications.
Added features like portamento for smooth tuning transitions and stereo width enhance immersive quality, creating rich audio environments.
- Intuitive Filtering Options
The plugin enables filtering specifically for the wet signal, allowing for precise adjustments before using it. The filter section includes high-pass, bell/peak, and low-pass options and allows you to edit parameters by dragging or double-clicking to set values. Bypass functionality is also included.
Compatibility:
Xynth Audio Rezonator is available in VST, VST3, and AU plugin formats for Mac OSX 10.11 or later and Windows 11, 10, 8, and 7 ( 64-bit) operating systems.
3. UVI Shade
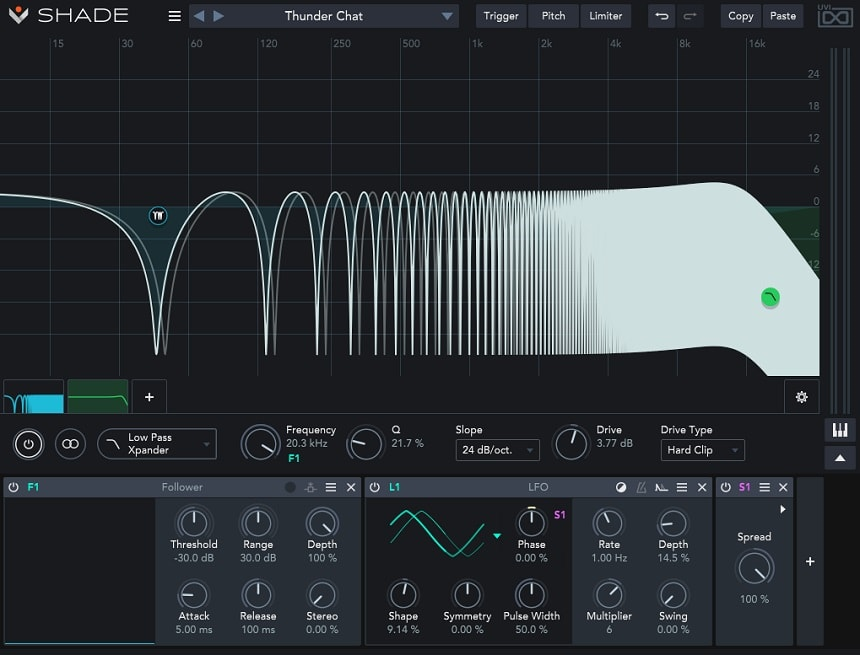
From the makers of Falcon 2, one of the best sound designing instruments ever created, comes this versatile equalizer capable of comb filtering and so much more.
While we will be focusing on the comb filter side of this plugin, we must still mention its grandeur when it comes to EQing. Shade is a digital equalizer with unlimited bands, numerous kinds of filters, modulation, side-chain, etc. It also employs a spectrum analyzer on its background to provide visual feedback.
Shade generates the comb filtering effect using a predefined comb shape rather than feedback or feed-forward delay. It’s more accurate and offers you a lot more control than you’d normally receive.
You can also utilize the comb shape to amplify the comb frequencies instead of the usual cancellation. Speaking of which, Shade also provides notch-shaped comb filters to make the effect even more apparent.
Other than comb filtering, the plugin features a phaser filter shape that has three preset dips/resonance in the frequencies. You can use the onboard modulators to animate the filters and create a flanger and chorus effect. We’ll get more into these in the next section.
Key Features:
- 35 Filters
There are 35 filters divided into these categories: low-pass, high-pass, notch, band-pass, high shelf, low shelf, peak, phaser, comb, and special. While most of them are relatively ordinary, the last three are unique.
For example, under the Special category, you’ll find tilt EQ and Xpander, of which the latter has 37 modes and three drive/saturation types.
- Modulators
The plugin has a dedicated modulator section where you can add an unlimited number of modulators. The modulator types include an Envelope, Figure, Follower, LFO, Macro, MSEG, Random, Spread, and an XY pad.
You can assign a modulator to a parameter by right-clicking the parameter and selecting the modulator from the list. As an example, you can use the Macro modulator to control several parameters at once.
- Stereo Processing
Every band in this EQ offers several stereo modes: Stereo LR, Stereo MS, Left, Right, Mono/Mid, and Side. So, you could add filters only on the sides to create wide movements.
Or, by filtering each side of the stereo channel independently, you could use the comb filter to generate pseudo-stereo effects in mono audio.
- Effective
Shade is full of helpful features that make this EQ user-friendly and practical. For example, you can specify the slope value of the spectrum analyzer. And for most filters, the slope steepness can reach up to an astounding 2,000 dB/oct., which is a blessing for mastering uses.
Compatibility:
UVI Shade is available for Windows 8 or higher and macOS 10.9 or higher, both 64-bit only. It comes in VST 2/3, AU, and AAX formats.
4. Tritik Moodal
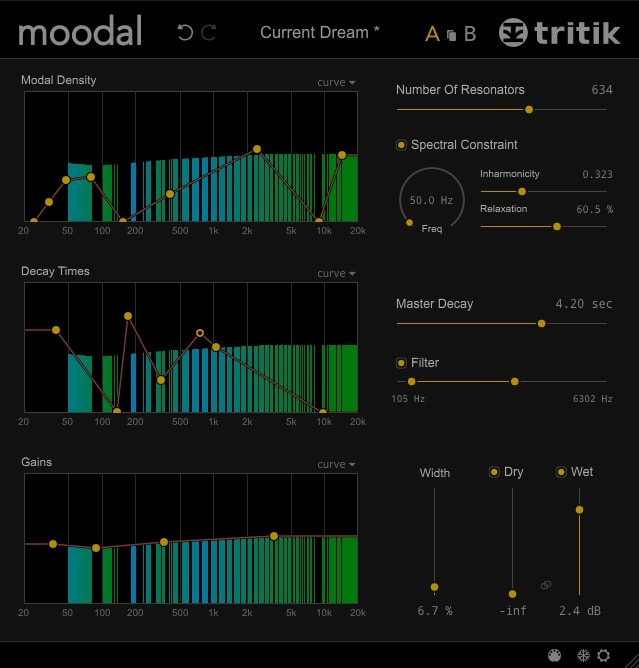
With a highly complex resonance engine, Moodal can make any signal tremendously wide or extremely narrow. It offers expanded freedom for any sound sculpting while still valuing realism.
Moodal can do exciting modeling to spaces and objects by providing artifacts to affect the sounds in a mix. You can make a drum sample appear unworldly huge, or incredibly small with its many modern filters simulating reverberant spaces.
Its straightforward interface is excellent for easy and quick implementation; you can set up properties in the whole frequency range by using the practical and interactive three editable curves in the main panel.
Key Features:
- Three Frequency Curves
The frequency curves displayed on the main panel of Moodal are extremely handy. Each has parameters to set Modal Density, Decay Time, and Gain of the resonant frequency in the signal.
In all of them, the graphic organizes itself so that the vertical axis will determine the resonator quantity, decay time, and output. At the same time, the horizontal axis represents the frequency.
- Spectral Constraint
A handy feature is the Spectral Constraint. Its a parameter, that when active, will ascertain the fundamental frequency by constraining the probability function with the frequency knob.
You can then set values for Inharmonicity, which creates a dissonant tonality when boosted, spreading the harmonics widely. You can also adjust values for Relaxation if the user wants a “cross-fade” between the harmonics imposed by the frequency ascertainment and the harmonics that weren’t.
- Mastering
The plugin offers a giant sonic presence with its Master Decay feature, which the user can set for up to ten seconds. You can also define an ideal distribution range of Resonators in the Width control. The Dry and Wet segments work intuitively. Tritik’s Moodal is extremely easy to use and can quickly improve any mix.
Compatibility:
This plugin is available for Windows 7 or higher 32-bit and 64-bit and macOS 10.7 or higher 64-bit only. It comes in VST 2/3, AU, and AAX formats.
5. Softube Spectral Multiband Resonator – 4MS

Softube added another popular module to its Modular platform. 4MS licensed and endorsed the virtual SMR, and it emulates the original’s hardware and firmware.
The 4ms Spectral Multiband Resonator is an advanced multiband resonant filter that can do a wide variety of things to audio, including vocoding, remixing songs, harmonizing, outputting spectral data, quantizing music to scales, and ringing like a marimba when plucked or tapped.
Key Features:
- Scale
The SMR has a central LED ring with a 23-note scale and six resonant bandpass filters surround it. Manually or with a continuous variable, you can quickly sweep all filters throughout their existing note scale.
The note scales range from the more common Western and alternate tunings to the more exotic Gamelan and microtonal scales. In addition, the volume of each filter’s output can be adjusted independently using CV.
- Controls
The filters feature a variety of “tunings,” or configurations, that range from a dozen to twenty different tonalities. There are both microtonal and equal-tempered versions of these. The Bank control on the right of the screen is used to make that choice.
However, the Rotate knob in the middle, the Scale knob to the higher right, the Morph knob to the lower right, and the Spread knob to the right govern how the individual pitches are distributed over the various filters.
- Filters
A wide range of “pitch-colored” filterings and ringings can be created by interacting with these settings. Each filter also features an envelope follower that you may use to modulate the sound by adjusting the envelope of a single channel, either continuously or according to a predetermined scale.
- Additive Synthesis
SMR can function as an oscillator bank in an additive synthesis setup. You can put it to work as a vocoder, phaser, quantizer, stereo widener, CV source, arpeggiator, or sequencer.
In the context of remixing, SMR can be used to isolate and isolate triggers from audio recordings. It has the potential to function as a drum synthesizer, with the ability to trigger offbeat and even beats with a pulse. For further craziness, you can use it as a foundation for multiband compressor patches.
Compatibility:
This plugin is available for macOS 10.10 or higher (64-bit only) and Windows 7 or higher (64-bit only). It comes in VST/RTAS/AU/AAX formats and supports 32 and 64 bit systems.
6. lmdsp Superchord
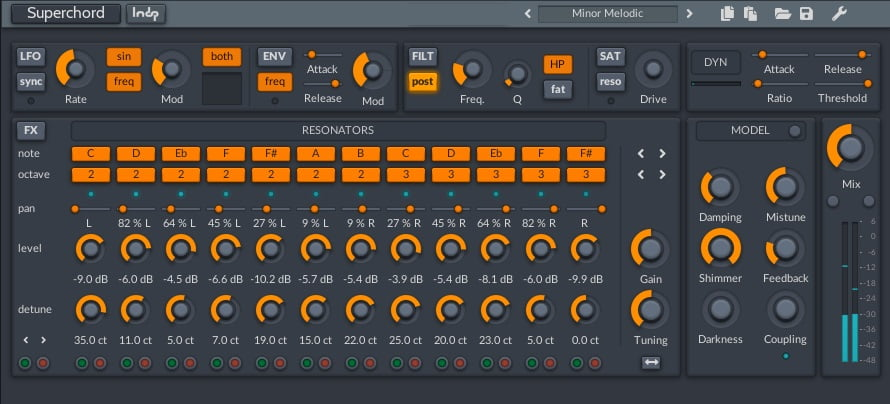
Superchord is an excitingly new plugin by lmdsp that emulates virtual strings’ resonation.
It can texturize your sound and create entirely new soundscapes. Superchord is made of 12 string resonators that can be pitched to any key or create any chord. You can create interesting effects by setting two resonators to the same note and slightly detuning them. Moreover, you can pan each resonator individually across the stereo field for great depth and fatness results. The plugin also lets you play the effect as a MIDI instrument.
Key Features:
- LFO
Optionally, you can engage the low-frequency oscillator. This function can be synced and modulated to taste. It also has three Target modes, which modulate different controls: Frequency, Pitch, and Gain. This last one is being applied to the main output for tremolo effects. You can also change the shape of the LFO.
The plugin offers classic waveforms, such as sine, triangular, saw, and square, as well as unexpected patterns. Some of these are Sample and Hold (s|h), which jumps to a random value on every cycle, and Shot emits spikes at random intervals.
- Model Panel
Located at the right of the resonators, these are the plugin base controls. Damping controls how much resonation occurs. Shimmer opens up the upper harmonics. Darkness is a low-pass filter that muffles the sound.
Mistune controls the string’s relative tuning, helping emulate real-life strings. Feedback makes notes ring for a longer time, also increasing their fullness. Lastly, Coupling simulates how nearby strings would resonate sympathetically with each other.
- Advanced Controls
By clicking the button beside the Model name bar, you’ll access the advanced controls. These settings generate more subtle results on the sound and can create interesting special effects.
Tracking controls how the resonators react to lower frequencies from the input signal. Pluck Position changes the sound according to the area of the string that’s being plucked. The three H.V. sliders adjust the horizontal to vertical polarization, with Damp H.V. creating a more complex decay envelope.
Buzz simulates the humming sound generated by instruments with non-rigid string attachments.
Compatibility:
This plugin is available as a VST2, VST3, AU, and AAX for 64-bit Windows 7 and up and macOS 10.11 and higher.
Best Free Comb Filter Plugins
1. Kilohearts Resonator
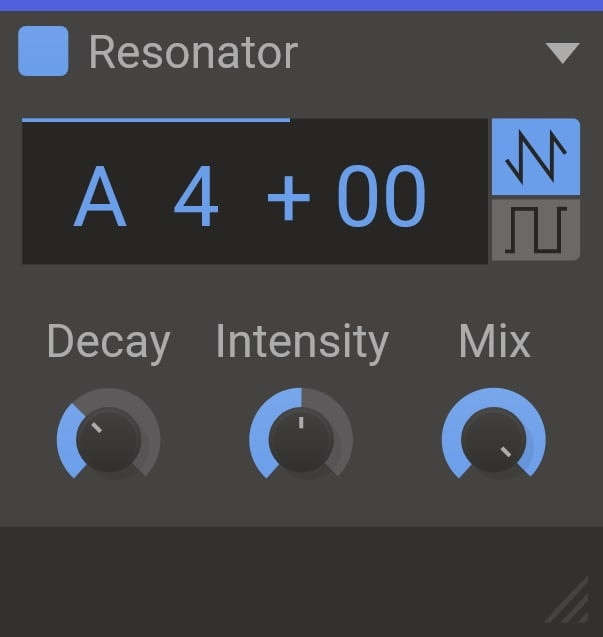
The Kilohearts Resonator adds harmonic resonance to any sound you want.
Define the pitch you want to resonate, set the decay and intensity and change the timbre with the wave selector. This is how simple it is to turn any sound into a harmonic frenzy. If you want to back down the effect, you can rely on the mix knob.
Key Features:
- Wave Shapes
The plugin offers you two timbres represented by two different waveforms. The one at the top is the saw-tooth wave, which will resonate with all sound harmonics. The option below is the square wave, which will resonate only with the odd harmonics.
- Decay
This controls how long the resonance lasts after the input signal stops. Unfortunately, you don’t get a sync mode, so if you want to make it breathe with the beat, you’ll have to set it by ear. Also, you can mix low pitches with the Decay knob to create interesting delays.
Compatibility:
The Resonator is available as an independent VST, AU, and AAX plugin for Windows 7 or newer and macOS 10.7 or newer, and as a snapin for all Kilohearts’ hosts.
2. Kilohearts Comb Filter

The Kilohearts Comb Filter is a simple-to-use plugin that works independently or as part of the Kilohearts Snapin hosts.
Like all other Kilohearts Snapins, this plugin is very minimalist-looking, offering only the basic functions expected from a comb filter. You set the cutoff frequency, and the plugin will carve all multiples of the base frequency, creating repeated troughs and peaks across the spectrum.
Key Features:
- Polarity & Stereo Controls
The Polarity button lets you choose between positive or negative polarity, changing the processed signal’s phase. The Stereo control flips the right channel phase, enabling the plugin to be used for mono compatibility.
Compatibility:
The Comb Filter is available as a snapin for all Kilohearts’ hosts, as well as an independent VST, AU, and AAX plugin for Windows 7 or newer and macOS 10.7 or newer.
3. FKFX Influx
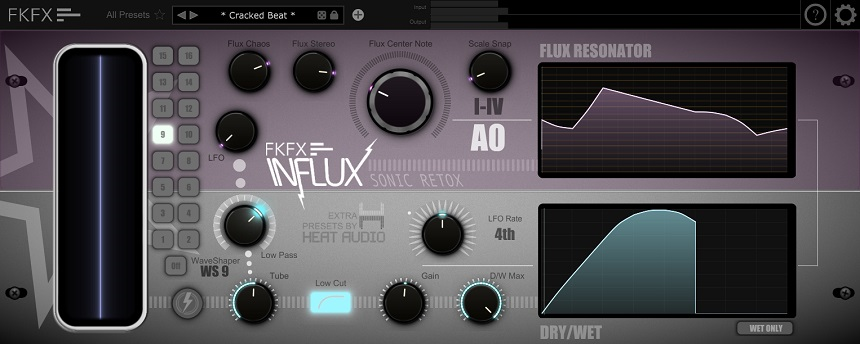
FKFX Influx has a modern resonator module that combines itself with a Low pass and Tube distortion. The plugin also offers a vast array of presets, and it’s entirely free.
The plugin by FKFX is excitingly budget-friendly. It also has a solid interface featuring diverse controls while still being practical. You will be able to set many Flux parameters and monitor the effects through two graphic monitors.
The highly handy presets are easy to work with. With many factory-presets on Influx, you can set precisely what best presets fit in the mix while using an intuitive preset manager and a Preset Locking option.
Key Features:
- Presets
FKFX Influx has a massive amount of inspiring presets that the user can customize freely. Apart from the eighty-two factory-built presets, youcan also obtain more presets on the FKFX Facebook page, which will add up to 210 presets.
A Preset Locking option is advantageous since it allows you to keep specific parameters and change remaining settings when loading different presets.
- Flux
The plugin offers some exciting controls to change the Flux feature. The flux resonator will display an LFO editor, and Flux Chaos will add fiery energy to the resonating audio input. You can choose the flux resonator’s root note on the Flux Center Note.
The scale snap has up to 38 automatic scale modes. Flux stereo works intuitively, and Flux LFO will regulate the Low-pass filter.
- Editing
You will have access to many editing tools within the plugin. With the many featured tools, you can define sonic textures by smoothing, normalizing, flipping, chopping, rolling, using Pencils, and snap modes. In addition to that, a “Wet Only” segment will provide only the wet signal when active.
Compatibility:
This plugin is available for Windows 10 or higher and macOS 10.0 or higher, both 64-bit only. It comes in VST 2/3, and AU formats.
Bonus:
MeldaProduction MCombMB
More Info & Price (Trial Available)

The MCombMB by Melda Productions is a multi-band comb filter with extensive sound-shaping controls.
The plugin splits the audio into up to six frequency bands, each with four filters. You can easily adjust the frequency, gain, and panorama of each filter in the main view. If all this control is too much, you can choose to randomize your filtering.
This option is available inside each filter or globally for complete randomization. As with most Melda plugins, you can access a settings menu for each section of the plugin that gives you more controls and possibilities.
Key Features:
- Band Editor
On the outside, the band editor might seem like a simple frequency analyzer. However, it hides several essential features. As mentioned, you can add up to six bands in the MCombMB. These bands are divided in the band editor by a long vertical line.
You can reposition each band by dragging its central dot or adjust its gain by dragging the horizontal line. At the bottom, the short vertical line allows you to change the band’s panorama when in stereo mode or its depth when in mid-side mode.
In the band menu, you can thoroughly adjust each band’s crossover, redefine the bands you’re working with, create new bands, and include different types of analyzers on top of the frequency spectrum. All this helps you not only focus on where and how you want the plugin to act but also how much information you want from it.
- Band & Filter Panels
Below the Band Editor, you’ll find the band-selection area and the main comb-filtering controls. Use the arrows at the upper-right corner of this section to select the additional bands. For each band, you get four different filters. You can use all four or bypass a few.
Alternatively, you can bypass an entire band to check how it sounds. You get a Dry/Wet knob that lets you blend the unprocessed signal back with the modulation. The Gain, Frequency, and Panorama knobs work individually with each filter, letting you shape the sound as you want.
The Feedback knob controls the amount of processed signal that returns to the input, and it has a limiter of its own to avoid the typical feedback squeal. Attack and Release knobs are used to shape the feedback limiter. Finally, you also get high-pass and low-pass filters for the entire band, named Min and Max.
This large set of controls lets you filter your sound in virtually any possible way.
- Presets & Randomization
The MCombMB comes with several factory-made presets, all with creative and intriguing names and functions. You can select a preset or Ctrl-click the preset grid to load a random preset.
Alternatively, you can use the intelligent randomization features of the plugin to come up with unexpected results. You can apply the Random function by clicking on the dice icon, choosing to randomize the entire plugin’s settings or focus on bands and filters.
You can also Ctrl-click the dice icon to restrain the engine so it only slightly randomizes the chosen parameters or Alt-click it, which will result in extreme randomization.
Compatibility:
This plugin is available for 32- and 64-bit PCs running Windows Vista or newer and 64-bit-only Macs running macOS 10.9 or higher. It is available in VST, VST3, AU, and AAX formats.
What Does Comb Filtering Sound Like?
Comb-filtering sounds very similar to a flanger effect, in which you hear frequencies sweeping through the source sound. Depending on the frequencies being affected, it sounds different. Usually, you can expect a hollowed, robotic sound due to the cancelation of some frequencies.
What Does A Resonator Do In Music?
Resonators pick one or multiple frequencies and vibrate in accordance with their amplitude, generating sound. Depending on the input signal’s intensity, resonators also change the frequency overtones’ strength, modulating its tonality. They’re used as effects in music post-production.
Conclusion
Comb filters and Resonators generate different effects, but you can combine them for extra texturization, as we’ve seen on this list. Some plugins offer more possibilities than others, but we tried to cover the very basic to the mind-blowing ones. Unleash your creativity and take your sounds to uncharted territory with any of the plugins from this list.

The Integraudio Editorial Team consists of experienced music producers, audio engineers, and plugin enthusiasts dedicated to providing in-depth reviews and guides for music production software.