
FabFilter plugins are one of the most precise plugins when it comes to mixing and mastering. If you need transparent compression, precise EQing, modern saturation, we got you covered! Also, we included their minimal, yet powerful synth as well.
Let’s dive into our list now, we hope you will find this list helpful! Enjoy.
1. FabfFilter Twin 3 (Synth)
More Info & Price (Trial Available)
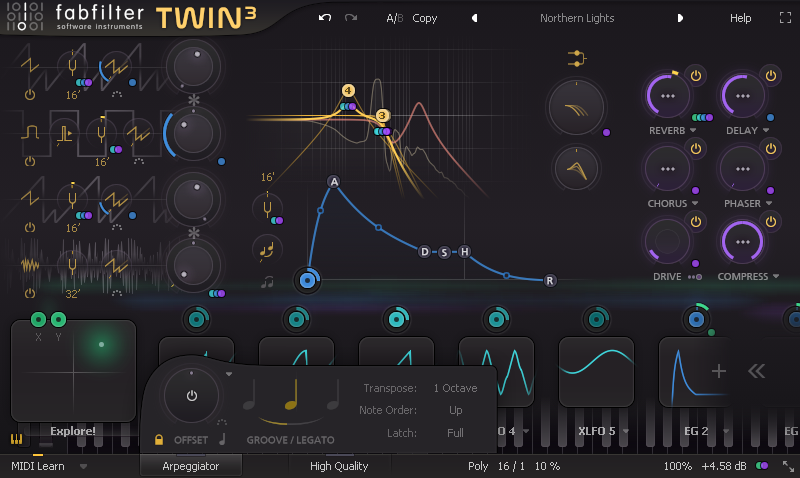
Twin 3 is the third iteration of the Twin series and is designed to be a versatile and powerful virtual synthesizer for music production and sound design.
It offers a wide range of sound generation capabilities, including subtractive synthesis, frequency modulation (FM), and even wavetable synthesis. That allows you to create diverse sounds, from classic analog-style tones to modern and experimental textures. It features an intuitive graphical interface that makes sound design and tweaking parameters straightforward.
Key Features:
- Modulation and Effects
The plugin includes a variety of modulation sources and effects to shape and manipulate sounds. You can modulate parameters using envelopes, LFOs (Low-Frequency Oscillators), and more. Additionally, there are high-quality built-in effects like reverb, delay, and distortion.
Modulation options are endless, with various sources like XLFOs, XY controllers, and envelope generators. It also includes ring modulation and scalable interfaces. The high-quality option enhances audio quality, while the Source Level control scales output for sources.
- Polyphonic and Monophonic Modes
With the plugin, you get both polyphonic and monophonic modes, allowing you to create chords and complex harmonies or focus on single-note leads and basslines.
- Presets and resizeable GUI
The plugin has a collection of presets and sound banks to help you get started quickly and explore different sonic possibilities. You can also resize its graphical user interface (GUI) to fit your workflow and screen size preferences.
- Modular-Style Workflow
FabFilter Twin 3 offers a modular-style workflow, allowing you to patch and route modules and modulation sources to create intricate soundscapes. It features a drag-and-drop modulation matrix that simplifies complex routing.
- High-Quality Effects
Twin 3 boasts a suite of high-quality effects that enhance sound design possibilities. It includes professional-grade effects such as reverb, delay, chorus, and distortion, which can be applied directly within the plugin.
These effects are not mere add-ons but are seamlessly integrated into the synthesis process, allowing you to sculpt and shape your sounds with precision, adding depth, texture, and character to your creations.
- Easy programming
This synth offers straightforward programming thanks to its four vintage-style oscillators, flexible filters, and integrated top-tier effects. Crafting distinctive sounds is a breeze. The redesigned preset browser allows you to search by typing, tag your favorites, and efficiently locate the perfect sound for your needs.
Compatibility:
The plugin is available in VST, VST 3, AU, and AAX formats (32- and 64-bits) and is compatible with Windows and Mac.
Summary:
FabFilter Twin 3, as compared to its previous versions, boasts an entirely revamped and user-friendly interface, simplifying workflow. Sound quality is enhanced with analog-modeled drift for oscillators and improved filters. The addition of a fourth oscillator further expands sonic possibilities.
With features like polyphonic portamento, live modulation visualization, and extensive help resources, Twin 3 is a versatile synth available in various formats.
2. Timeless 3 (Delay)
More Info & Price (Trial Available)


With plenty of new features and an overhauled GUI, Timeless 3 continues on the legacy of the previous version as one of the most flexible delay plugins available today.
It’s a challenge to try and compile everything this plugin can do in a short piece. The concept is that you can create a traditional delay effect using feedback or a multi-tap delay effect, both with an extensive level of modulation on just about any parameter available.
The resizable user interface of this plugin is incredible — it even shows visual feedback of your delay effect on the left half of the upper section. The rest of the section shows a frequency spectrum and an EQ to filter the wet signal.
Another parameter called Diffusion can create lush reverb-like effects easily. Furthermore, it includes various analog-sounding effects like saturation, lo-fi effect, dynamics, and tape-style pitch modulation.
Similarly, you could modulate the multi-tap delay features in a very short length of time to create custom time-based effects like chorus, flanger, and ensemble. Or you could create the reverb shimmer effect by using the pitch-shifting feature along with Diffuse.
Key Features:
- 6 Filters
There are six filters available in total, and each can be a high-pass, low-pass, band-pass, notch, peaking, and shelf filter in any combination. The first three are designed to emulate analog filters with a smooth sound and internal saturation. In addition, you can change the filter routing to parallel, serial, or per-channel mode.
- Multi-taps
Timeless 3 excels as a standard delay plugin, but it shines just as well in the multi-tap delay mode, which you can access by clicking on the Tap Editor at the top left of the interface. With this editor, you can create your delay pattern by intuitively dragging the delay taps on the screen with your mouse. Furthermore, you can save a custom pattern as a preset.
- Stereo Control
You can control the delay feedback, cross-feedback, and mix level of each stereo channel independently. Not only that, you can adjust the stereo width and the panning in each filter as well. Combine that with modulation, and the sonic possibilities become endless.
- Virtually Limitless Modulation
There are fifty slots available for modulation, and you can modulate almost any parameter by drag and drop. There are five kinds of modulators available:
XLFO
It can generate almost any waveform, including custom ones, and can be synchronized to the host tempo. You can create new waveforms by using the node-based curve editor.
Envelope Generator
It is a regular ADSR envelope, which is triggered by either an audio threshold or midi input. Make sure you turn on the midi input for Timeless 3 for the latter.
Envelope Follower
It generates modulation based on the signal level of either the audio you are processing or external side-chain input. The former is useful when you want the delay only when the vocalist sings louder, for example.
MIDI Source
It transforms any incoming MIDI data, including CC data, into a modulation signal. It becomes insanely powerful when coupled with other modulating effect plugins.
XY Controller/Slider
Control two parameters at once with the XY controller or multiple parameters using a single slider. This one is less a modulator and more a convenient tool for creating macros.
Compatibility:
Timeless 3 is available for Windows Vista or higher 32-bit or 64-bit and macOS 10.10 64-bit. It comes in VST 2/3, AU, AAX, and RTAS formats.
Summary:
Almost every effect plugin developed by FabFilter is faultless, and this one is no different. The only issue it might have is the amount of flexibility it offers making it more sound design delay than a regular delay. However, the new GUI has made Timeless 3 user-friendly and straightforward. So, if you were daunted by the sea of possibilities before, now is the time to reconsider.
3. Volcano 3 (Creative Filter)
More Info & Price (Trial Available)

Volcano 3 sports a complete overhaul over its previous iteration of this creative filter plugin with a fiery user interface, better filters, and even more flexibility.
First released back in 2005, this 2021 version of the Volcano filter plugin is filled to the brim with features. Despite its incredibly futuristic and digital user interface, the filter plugin boasts a vintage-style gritty and creamy sound.
And if I’ve learned anything from reviewing FabFilter plugins, things are bound to get quite complicated as we dive in.
Let’s talk about the user interface. Volcano 3 features three main sections from top to bottom on its UI: the filter display, the controls, and the modulation section. The filter display resembles a parametric EQ and shows each filter you’ve added.
Similarly, the filter controls let you change the settings for the selected filter. And lastly, the modulation section shows all the modulation sources that can generate highly creative results.
Key Features:
- Multiple Filters
The filter display section is an interactive display that lets you add up to four analog-modeled, self-oscillating filters. You can effortlessly create a new filter by double-clicking on the frequency spectrum.
Likewise, you can change the frequency and resonance of each filter using your mouse. And a small pop-up lets you change the filter shape and pan of each filter.
Furthermore, you can add a low-cut or a high-cut filter by double-clicking on the left or right edge of the frequency spectrum. Changing the slope of the filters is as easy as scrolling your mouse wheel over the filter nodes. Similarly, other commands and shortcuts make working with Volcano 3 rapid and intuitive.
- Routing
The middle section of this plugin holds the filter controls. And you’ll find the Routing controls on the left part of this section. Here, you can change how the filters are connected and the plugin’s channel mode. First, you can make any two filters connected in parallel or serial mode.
And the routing mode button changes whether the filters are in stereo, dual-mono, or mid/side mode. In a mastering session, the mid/side mode is handy as a stereo imager.
- Grit and Style
Each filter offers a drive knob that controls the input drive of the filter. You can increase it to make the filter grittier and saturated. Similarly, the Style button reveals a menu of eleven types of filters, each with a distinct flavor:
Classic
The Classic style is the filter design from the FabFilter One synthesizer. It sounds smooth and responds rapidly to modulations.
Smooth
As the name suggests, this style prioritizes smoothness. So, it’s ideal for creating filter sweeps that sound close to hardware sounds.
Raw
This style generates a lot of overdriven sound and flavor. FabFilter recommends it to distort guitar sounds. And I recommend it to add some bite to a bass guitar.
Hard
This style is slightly less distorted than the previous one. Still, it is rather feisty.
Hollow
The Hollow style offers a moderate amount of distortion with a lot of low-end self-oscillation. Self-oscillation essentially means the filter generates a waveform similar to a sinewave when you increase the resonance high enough. It’s a trait found in analog filters, which was once undesirable but is now used creatively.
Extreme
It adds the most amount of distortion. And it’s very unpredictable.
Gentle
This style is the most common style of filters you’ll find. It’s ideal for general use cases.
Tube
The name itself suggests a warmer, shaped sound. And I find it excellent on electric keyboard sounds like the Mark II, although FabFilter also recommends it for synths.
Metal
The Metal style provides a rough, sharp sound. And it creates a type of ringing distortion.
Easy Going
The Easy-Going style is the softer version of the Tube style.
Clean
This one doesn’t add any saturation or clipping at all. So, it turns the filter into a digital design.
- Modulation
First, you can add a delay of up to 50ms on each filter. This feature allows you to combine the sound with other filters parallelly and create the Haas, chorus, and flanging effects. However, you’ll need to modulate the filters to get creative and moving results.
Volcano 3 offers five types of modulation sources, which can modulate just about any parameter on the interface. These sources include XLFO, envelope generator, envelope follower, MIDI, and XY controller. Let’s check out each in more detail:
XLFO
The XLFO can generate custom waveforms that sync with your DAW’s BPM to create rhythmic or smooth movements. You can also use it as a traditional LFO. However, the fun starts when you turn it into a 16-step sequencer with a glide setting per step.
Envelope Generator
This source generates a standard ADSR envelope. You can trigger this generator with a MIDI input or an audio signal. Furthermore, this audio signal can be an external side-chain input.
Envelope Follower
The Envelope Follower source follows the audio signal’s loudness, whether it’s internal or external side-chain audio. You can customize the attack and release times of the modulator to change how fast it responds. And you can switch to a transient mode to make it react to fast transients like drum hits.
MIDI & XY Controller
The MIDI modulation source lets you use any MIDI data like CC data as a modulation signal. It’s excellent for controlling the parameters using your MIDI keyboard or sequencing plugin. Similarly, the XY controller lets you control two parameters simultaneously using a virtual XY-pad. You can also use a virtual slider to control only one parameter.
Compatibility:
Volcano 3 is available for Windows Vista or higher 32-bit and 64-bit and macOS 10.12 or higher 64-bit only. It comes in VST 2/3, AU, AAX, and RTAS formats.
Summary:
If flexibility, modulation, and fast workflow are essential to your music production, Volcano 3 isn’t a plugin you want to miss out on. This awesome filter plugin provides just about every feature you could imagine on a filter plugin.
Furthermore, it sounds super smooth and can emulate analog-style grit or modern transparency as you want. Its modulation features allow this filter to turn a boring saw pad into an exciting rhythm with a complex chorus effect single-handedly. And while the fairly steep price may make it seem pricey, the sheer power of this plugin makes it feel like a steal.
4. Pro-Q 3 (High-End EQ)
More Info & Price (Trial Available)


The third and latest version of this powerful EQ now includes dynamic control.
Fab Filter’s Pro Q series has been almost a must-have for engineers at all levels for years. These EQs are perfectly transparent, easy to use, and have different display modes for the spectrogram (pre/post-processing).
Still, most importantly, they are the most versatile EQs out there in the market because of their infinite frequency bands, zero latency mode, linear phase processing, fully adjustable parameters, etc.
Now you can control dynamics to specific frequencies, whether you’re boosting and want to control the signal or dipping a particular frequency that’s disturbing you. These fab filter EQs are almost a worldwide standard, mainly because their RTA is very graphic, which is very helpful for those who are just getting started.
This new version of Fab Filter’s Pro Q has a couple of additions that we will talk about, so stay tuned.
Key Features:
- New EQ filters:
Unlike the past versions, Fab Filter Pro Q 3 brings new filters on our equalizers, such as a tilted shelf and a flat tilt. In addition, you can apply and change these filters directly from the box outside of the frequency band, which is a great plus to the previous versions.
- Optimized UI:
The new Fab Filter lets you choose whether you want to use the EQ for stereo, mid/sides, and left/right processing on the go. Create a new band and select whichever processing mode you’re interested in using, differently from the older versions, where this option was almost hidden.
Additionally, they’ve added a brick wall slope that’s surprisingly transparent and very useful for mixing situations.
- Dynamic EQ:
They’ve added a new way of processing that’s entirely new to this plugin: the dynamics control on the EQ. This new feature is perfect in several contexts for mixing and mastering, and it’s perfectly there sitting around the gain knob.
- Collisional frequency marks:
Fab Filter includes a visualization of possible areas where frequencies are potentially high. This is used to ease up finding the troubling areas of the spectrum to fix them. Keep in mind that this is not an intelligent feature, so I wouldn’t recommend you to run and try to fix something whenever you see the mark, but to use it as a reference to spot possible issues that you’re looking to address.
- Sidechain and EQ match:
Fab Filter added a new way to use the sidechain capabilities of this eq. Typically, you’d use this feature to match a reference track’s tone and spectrum balance, contrasting both tracks’ spectrum and manually matching them. Still, now, Pro Q 3 takes you there automatically with AI assistance.
Compatibility:
Supports Windows 10, supports macOS 10.10 or higher, runs on 64 bit and 32 bit systems, and comes in VST, VST3, AU, and AAX formats.
Summary:
Fab Filter Pro Q 3 is an improvement of both of its predecessors. This EQ has been very well known for its transparency and versatility, and it keeps getting better with each release.
This latest plugin version came out in 2018 and is still one of the best equalizers to use regularly.
One thing that you can appreciate from Fab Filter is that they continuously improve their plugins to optimize your performance and, obviously, your workflow. Use Pro Q3 if you want transparency and accuracy, as this is probably the best tool to use when you need precision.
5. Pro-C 2 (All-Round Compressor)
More Info & Price (Trial Available)


If you’re looking for a versatile compressor suitable for mastering and beyond, you should check out the Pro-C 2 from FabFilter.
The Pro-C 2 plugin from FabFilter has long been popular among music production professionals. First of all, it is versatile because of the different compression styles. Of course, there are a few among them that are suitable for mastering. Second, it has a great design.
As for settings, you get all the compression controls you need, including Knee, Lookahead, Range, and Hold. In addition, there is a Sidechain function and the ability to monitor the gain reduction signal.
Key Features:
- 8 Gain Reduction Styles
You can use this plugin for almost anything – it has as many as eight compression styles. Specifically, Clean, Classic, Opto, Vocal, Mastering, Bus, Punch, and Pumping. As for Mastering, it’s clean with low amounts of harmonics.
- Extended Compressor Settings
The versatility of this software adds an extended number of settings. For example, you get Threshold, Ratio, Attack, Release, and Gain. In addition, there are also Knee, Range, Lookahead, Hold, and dry/wet ratio controls.
- Auto-Release & Auto-Gain
Notably, you will be able to put Release in Auto mode. To do this, use the small button under the knob. This option is often used in mastering or bus processing, as the compressor automatically decides when to release the signal. In addition, there is also Auto-Gain, which will automatically balance the output signal.
- Side-Chain Function
Of course, this plugin would not be complete without the Side-Chain feature. You can set it up by clicking on the same name button at the bottom. A display with a frequency spectrum will appear in front of you, where you can specify which area the compressor should ignore.
- 2x And 4x Oversampling
If you use this compressor heavily, you may get a certain amount of distortion. Use the Oversampling function with 2x and 4x parameters to mitigate it. You will also be able to turn off this parameter altogether.
Compatibility:
FabFilter Pro-MB is available for Windows Vista or higher (both 32 and 64-bit) and macOS 10.12 or higher (64-bit only). It comes in VST2/3, AU, and AAX formats.
Summary:
Pro-C 2 is a wonderful plugin from FabFilter, which has long won the hearts of many music professionals. It gives you eight styles of compression. So you can use this software not only for mastering but also for mixing. Also, it has advanced settings and quite a beautiful design.
6. Saturn 2 (Saturator)
More Info & Price (Trial Available)
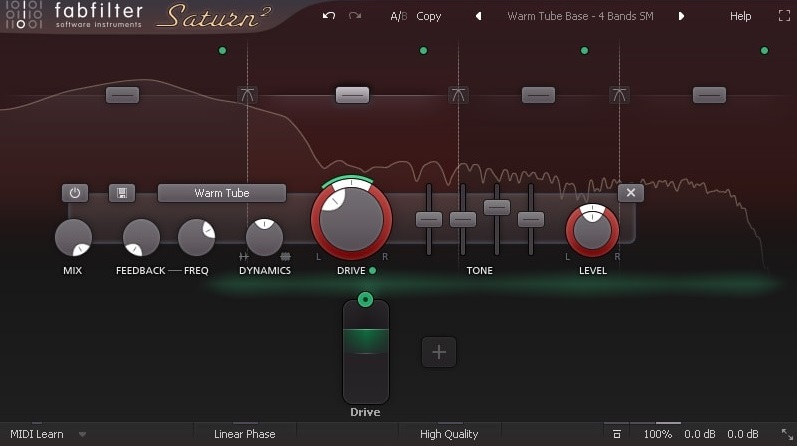

You can get it all from relatively slight saturation to hard distortion with the Saturn 2 plugin from FabFilter.
Saturation is a crucial part of vocal processing. The fact is that the main disadvantage and, at the same time, the advantage of digital processing is that we get a very clean signal. Therefore, we need to add some distortion to warm up the transients, as if engineers did it with analog gear. In this case, the vocals will sound more expressive and exciting.
Saturn 2 is a universal software from the famous FabFilter company. Here you will find a lot of different saturation flavors for almost all occasions. You will be able to control your vocals’ coloration, harmonics, and warmth. Also, a remarkable fact is that you can use this plugin for both individual tracks and mastering as a whole.
Key Features:
- Select Your Bands
An essential part of Saturn 2 is selecting different bands and processing them separately. To do this, click on the desired region of the frequency spectrum, and the plugin will create a separate section.
By the way, on the bottom panel of the settings, you will see such options as small tonal shaping EQ, Drive, Dynamics, Feedback Mix, and others. You can process each of these sections by switching from one to another.
- Left/Right or Mid/Side
Another cool feature of the plugin is applying processing separately to both the left and right channels. You will see the desired control in the center. You will also be able to switch it to Mid/Side mode. It will be beneficial for mastering.
- Different Saturation Flavors
The choice of different types of saturation in this plugin is awe-inspiring. For example, you will have Tube, Tape, Transformer, and Saturation options. Each of them has different stages, from very slight to more pronounced.
In addition, you will have the ability to apply individual saturation effects, including Smudge, Breakdown, Foldback, Rectify and Destroy.
- Amp Saturation
Despite all the different saturation types, you will also be able to use some amp emulations. Among these options are American Plexi, British Rock Amp, Smooth Amp, Crunchy Amp, Lead Amp, Screaming Amp, and Power Amp. It allows you to process guitar DI tracks or apply them to vocals, creating a unique sound.
- Saturation Modeling
You will also have plenty of options for modeling your saturation with the Add Source option at the bottom of the plugin window. Click it and select the desired option. For example, here you have the Envelope Follower, with which you can achieve different exciting effects.
Compatibility:
The plugin is available for Windows Vista or higher (both 32 or 64-bit) and macOS 10.10 or higher (64-bit only). It comes in VST/3, AU, AAX, and AudioSuite formats.
Summary:
With the Saturn 2 plugin from FabFilter, you get an all-in-one tool for working with saturation. You will be able to apply the most diverse flavors to different frequency regions, both for individual tracks and for the mix as a whole.
This software is perfect for you if you want to have everything at once.
Related Reading:
Top 12 Saturation Plugins (Best Mixing & Mastering Tools)
7. Pro-L 2 (Limiter)
More Info & Price (Trial Available)
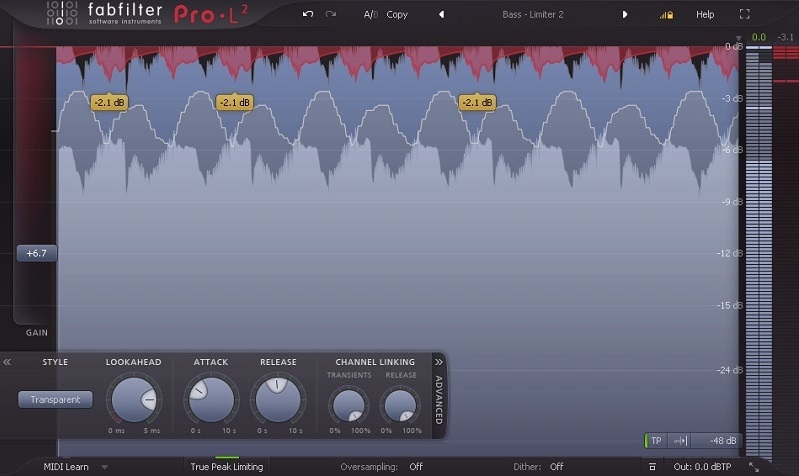

FabFilter’s Pro-L 2 is a versatile tool suited for all music genres for either mixing or mastering.
Each of the plugin’s styles offers different transparency and punch levels. You can go from clear-sounding to extreme pump just by changing the algorithm. Additionally, the advanced controls allow the necessary fine-tuning to avoid any artifacts.
Key Features:
- Real-Time Level Display
Here, you can visualize how your audio’s being processed. It’s great to help you decide which attack and release values to use.
- Limiting Styles
The eight algorithms available make limiting highly straightforward. They are program-dependent, which means they’ll adapt to the input signal while still preserving their character.
- Lookahead
This knob will help shape the limiter’s attack. Lower values can cause a clipping effect, while higher values will generate superb gain reduction.
- Channel Linking
If you want to process each track independently in a stereo file, you can do so by unlinking the channels. This will make the limiter work as two separate units instead of being a single limiter for both channels.
- Unity Gain Output
By clicking the “1:1” button at the output menu in the lower bar, you’ll activate the Unity Gain function. This will lower the output volume by the same amount that you raise the input gain, keeping the resulting sound always at the same level. It’s great to help you hear and fine-tune the limiting without the extra volume.
- Surround Mode
You can go up to 7.1.2 Dolby Atmos, and the interface will automatically adapt to the extra channels.
- Presets
The Pro-L2’s selection of built-in presets offers limiting options for most musical genres in comprehensible categories.
Character & Sound:
FabFilter’s Pro-L2 can add some character to your sound, especially in the Punchy and Aggressive algorithms. Otherwise, the plugin sounds clear and artifact-free.
Moreover, the up to 32x oversampling eliminates distortion and aliasing, while the True Peak technology avoids digital clipping. When it comes to professional transparency, this is one of the more advanced plugins in the market.
Compatibility:
This plugin is available for Windows XP and higher and macOS 10.8 or newer in VST, AU, and AAX formats.
Summary:
The Pro-L2 is a professional-grade limiting solution for every mixing and mastering engineer. The extensive metering section lets you hear and tailor your sound to your needs. The different display modes are a bit distracting, but nothing that you can’t turn off. Overall this is a go-to limiter for every occasion.
8. Pro-R (Reverb)
More Info & Price (Trial Available)
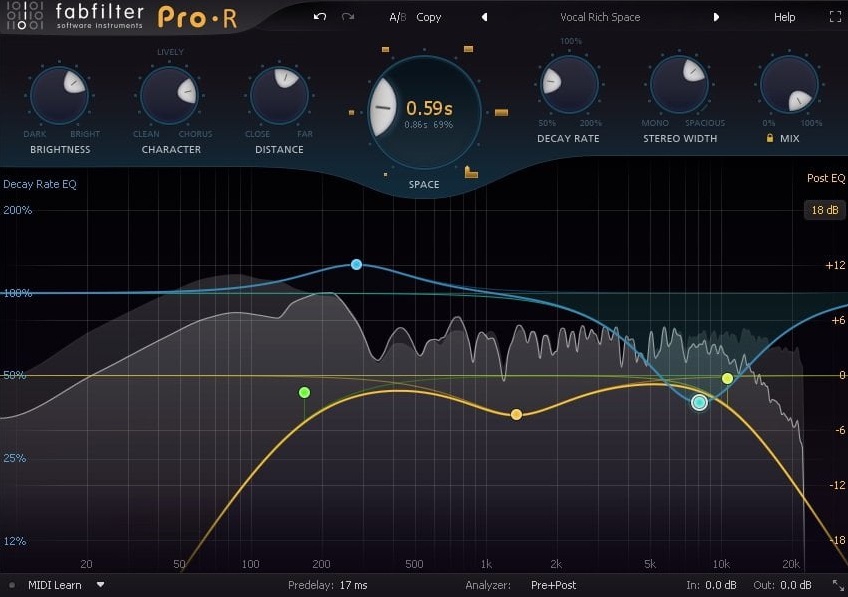

Pro-R is a musical reverb plugin designed by FabFilter.
FabFilter removed all technical terms and controls you’d usually find on high-end reverbs and added a simplified set of parameters to create a “musical” reverb that’s still catered to the professional producer.
This is achieved by combining multiple functions in a single knob and from the FabFilter – trademark EQ graph, which provides constant feedback on your frequency/musical note relationship.
Key Features:
- Space knob
The space knob is at the center of this plugin and controls the room model of the reverb. Instead of just controlling the decay of the reverb, it switches between various reverb models as you increase its value.
It’s hard to know exactly how many models are featured since they are unnamed, but the classics such as cathedral and room are definitely featured. The best part about this is the lack of clickiness or clanky sounds while switching from one model to another.
The switch is seamless, which is why this plugin is insanely powerful and creative since you can automate the space knob and move between different styles of reverb without drawing too much attention to the switch.
- Decay rate and predelay
The decay rate is an interesting feature of Pro-R. As you set the space knob, you get a decay value corresponding to the reverb model set. If you wish to increase or decrease this decay value, you can through the decay rate knob. It will multiply or divide the set decay as you get to scale it with values from 50% to 200%.
The predelay feature is the most straightforward and closest to how you usually see it on other plugins, written in ms. The best part about the predelay is that you can sync it to your host BPM.
It feels natural and provides the opportunity to create rhythmic reverbs that work closely with the rest of the instruments in your track; another reason why Pro-R is musical.
- Decay Rate EQ
Inside Pro-R, you’ll find a version of FabFilter’s signature equalizer. The blue bands are included in the Decay Rate EQ, an EQ that controls the decay rate in relation to the frequency of the signal. This means you can increase the reverb decay of a certain frequency by simply boosting it through the EQ.
You get six bands with high shelf, low shelf, notch, and parametric band options. This is another tool that helps you fine-tune your reverb sound and make it sound exactly as you want it to. The orange EQ bands are a post-reverb EQ that helps you process the finalized signal for some additional sculpting.
- Shape the sound
Inside Pro-R, you’ll find more knobs that help you shape your reverb even more. The brightness and character knobs help you shape its tone. If you turn the brightness knob all the way to the left, you get a darker and warmer tone, while if you turn it to the right, the reverb is much brighter and crispier.
The character knob affects the reverb’s tail by modulating the reverb’s late and early reflections. I suggest you play with this to figure out your preferred setting since it can add depth to your reverb and chorus-like characteristics.
Finally, the distance knob helps you push sounds to the back of the mix or bring them closer to the listener by modulating the early reflections and diffusion of the reverb.
Compatibility:
FabFilter Pro-R is available on Windows XP-10 and macOS 10.10 or higher, 64-bit only, in VST2, VST3, and AU formats.
Summary:
FabFilter delivers a clever and modern plugin that approaches reverb in a new way. The effect is very musical since the user can modify the reverb’s decay based on a note through its frequency, set the predelay in note values, and create complex spaces by modulating the space knob.
The EQ graph is powerful and inspiring but also quite advanced, which is why I’d recommend Pro-R to advanced and experienced producers.
9. Pro-MB (Multiband Compressor)
More Info & Price (Trial Available)

FabFilter remains a leader in software plugin innovation and development with this ultra-flexible multiband compressor.
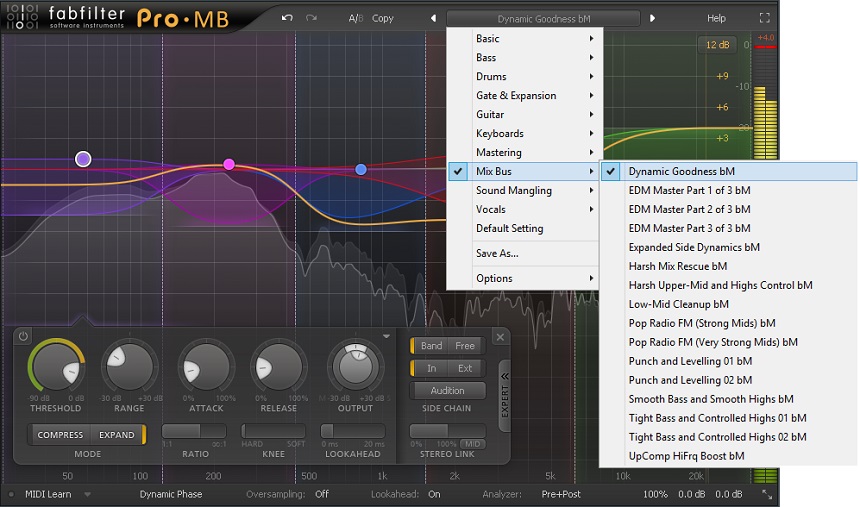
The most significant feature that sets this multiband compressor apart from the rest is its ability to create a free band anywhere you like. That means, if you want a band from mid to high-frequencies, there is no need to create three bands to set the middle one where you need. Instead, you just create one band exactly where you want, and the rest of the frequency spectrum remains untouched.
Key Features:
- Six Bands
The FabFilter Pro-MB has a maximum of six bands. Each band could be created and moved freely, so there is no crossover between bands. Of course, if you prefer the traditional crossover system, the Pro-MB easily lets you snap the bands together as well. This innovative method of band manipulation does help save a lot of time.
- Multiple Processing Modes
This plugin has both compression and expansion modes. And FabFilter offers mid/side modes, stereo control per band, and gating to top it off.
- Global Mix
The Pro-MB has a global dry and wet knob that could be useful for NY/parallel compression. Your DAW can automate the knob as well. Automation of the mix knob is instrumental if you have to engage the multiband compressor in the middle of a song without the effect sounding obvious.
- Linear Phase mode
Speaking of using the compressor in the middle of a song, the Linear Phase mode offered by this plugin is remarkably smooth. With up to four times Linear Phase oversampling, moving the band around in the middle of playing audio will create no audible artifacts at all. This feature is also great for using the multiband in a mastering chain.
- Crossover Slope
As with most multiband compressors, the Pro-MB also offers multiple options for the crossover slope steepness. The steepness ranges from 6 dB per octave to 48 dB per octave. It is great to see a relatively large range for the steepness. It makes the plugin suitable for both subtle mastering uses to surgical sound sculpting.
- Great GUI
One of the best things about this plugin is that the graphical user interface is freely resizeable. And not only that, but the UI is also very intuitive to use. Almost every change you make in the parameters gets reflected in the beautiful, large graphical view.
This includes various processing modes, gain reduction, etc. In the background of this view, you also get a customizable frequency spectrum. Overall, the aesthetics give this plugin a very modern and meticulous feel deserving high praise.
Compatibility:
The FabFilter Pro-MB is compatible with Windows (32-bit and 64-bit) and macOS 10.10 or higher (only 64-bit). The plugin comes in VST 2/ 3, AU, AAX Native, and RTAS for Pro Tools.
Summary:
This plugin’s intuitive and innovative nature makes it a highly commendable candidate for any kind of multiband compression needs. Even if you are just starting, the plugin makes sense as soon as you get the hang of the interface.
Along with that, the filters are exact and smooth.
The only issue you could have with this plugin is the price. However, if you have a regular need for a multiband compressor, we think it’s well worth the investment.
10. Pro-DS (De-Esser)
More Info & Price (Trial Available)
Almost every FabFilter product excels at what they do, and this one is no different.
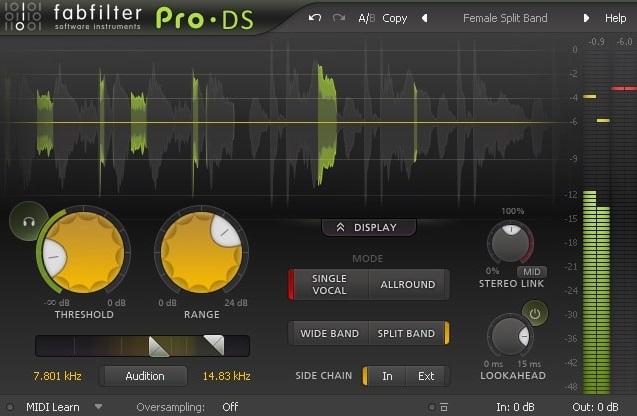
Pro-DS provides extensive controls and a convenient layout in its fully scalable user interface. It has two modes for its detection: Single Vocal and Allround. As the name suggests, the first is better suited for single vocals, whereas the second can be used on drums, woodwinds, and other instruments to reduce harsh high-frequencies.
Similarly, it also offers Wide Band and Split Band processing. When sibilance is detected using one of the detection algorithms we mentioned above, Pro-DS acts on your audio. And so, Wide Band processing mode affects the entire spectrum, whereas Split Band only processes the frequencies higher than your selection.
Overall, it offers plenty of customization and incredible sound, not to mention its great visual feedback of your input and processing. In addition, if you want more accuracy, you can also add up to 15ms of Lookahead.
Key Features:
- Intelligent Detector
The plugin’s Single Vocal detection mode uses an intelligent detection algorithm that filters out only the sibilance from the rest of your audio. This feature results in an artifact-free transparent de-essing in almost every use case.
- Custom Filters
You can set the detection frequency range in Allround mode using the sliders below the large Threshold and the Range knobs. The first slider, a high-pass filter, also doubles as the selected frequency for the Split Band processing mode described in the previous section.
The frequency range has a minimum of 2 kHz, with the maximum being 20 kHz.
- Adjustable Stereo Processing
The Stereo Link knob controls whether the two channels of your stereo sound should operate independently or be linked together. In addition, there’s a drop-down menu to select either Mid or Side mode.
- 4x Linear Phase
Pro-DS offers 2x and 4x oversampling to reduce any aliasing. It’s useful when you are using higher Range settings or processing a busy mix. However, note that this feature uses more CPU power and may also introduce latency, along with the ones caused by split-band and lookahead features.
Compatibility:
This plugin is available for Windows Vista or higher 32-bit or 64-bit and macOS 10.10 or higher 64-bit only. It comes in VST 2/3, AU, AAX, and RTAS formats.
Summary:
As with any FabFilter products, the quality and features Pro DS provides are astounding and highly commendable. Its intelligent sibilance detection makes the de-essing process effortless and swift. However, it’s worth mentioning that its price may be beyond the budget for many, especially since we are talking about de-essers.
Bonuses:
Pro Bundle (Mixing & Mastering Bundle)
More Info & Price (Trial Available)

FabFilter and its high-quality plugins need no introduction for most conventional music producers.
FabFilter has been producing professional effect plugins and instruments for nearly twenty years. And the Pro Bundle features their mixing and mastering line of plugins. It comes with seven effect plugins: Pro-Q 3 EQ, Pro-R reverb, Pro-L 2 limiter, Pro-C 2 compressor, Pro-MB multi-band compressor, Pro-DS de-esser, and Pro-G gate/expander.
You probably noticed that pretty much every plugin by FabFilter has found a spot on our best-plugins lists, and that is no coincidence! For example, Pro-Q 3 is pretty much the industry standard for EQs, and Pro-R sounds incredibly smooth and realistic despite being a digital reverb that barely uses any CPU.
Similarly, Pro-L 2 is one of my favorite limiter plugins that provides multiple algorithms to enhance the punch, retain transparency, maintain dynamism, etc.
Key Features:
- Sleek Interface
You’ve got to hand it to FabFilter when it comes to designing user interfaces. Every plugin in the bundle looks elegant and feels fluid and modern. They all feature a customizable frequency spectrum that helps you understand what’s happening. Furthermore, it can display helpful tooltips that get you started without having to refer to a manual.
- Mastering Quality
Every plugin dealing with frequencies (Pro-Q, Pro-MB) feature a high-quality linear phase mode. Similarly, all plugins provide up to 4x (Pro-L has 32x) oversampling. They ensure alias-free and phase-shift-free performance, fit for mastering your tracks. Although, I recommend keeping oversampling off while you are mixing and only using it to render your project to avoid CPU overload.
- Side-Chain
Every dynamic plugin in the bundle (including the Pro-Q 3 as it has dynamic EQ features) features an internal and external side-chain. You can use external side-chaining to link the dynamics of one track to the level of another (for example, bass to kick). It helps you achieve clean mixes quicker.
- Efficient
The FabFilter Pro bundle plugins are efficient in audio performance and CPU performance. You can load many instances of the plugins in a project with barely any noticeable CPU usage or latency. Of course, it all changes when you enable linear phase mode and oversampling. Still, the plugins sound clean and transparent, even without enabling oversampling.
Compatibility:
The FabFilter Pro bundle is available for Windows Vista or higher 32-bit and 64-bit and macOS 10.10 or higher 64-bit only. It comes in VST 2/3, AU, AAX, and RTAS formats.
Summary:
If you are looking for a complete mixing and mastering bundle, I recommend keeping this one high on your list. Nowadays, almost every studio relies on FabFilter products for many of their tasks because of their quality and reliability.
However, the biggest issue with their plugins is the steep price. Often, music producers don’t truly exploit all the features you can find in FabFilter products making the considerable investment hardly worth it. Still, I recommend demoing the plugins and seeing if you need what they have to offer.
2. Pro-G (Gate)
More Info & Price (Trial Available)


FabFilter’s Pro-G plugin helps you quickly eliminate background noise on vocal tracks.
Gating is another technique that will make your life much easier. The point is that when you compress vocals, the noise threshold goes up, too. It is incredibly annoying if the vocals were first recorded with a somewhat low gain. Of course, you can manually cut out the noise parts between phrases. But on the other hand, you can also mute them thanks to the noise gate.
The Pro-G plugin is excellent software from the famous company FabFilter. It has a whole bunch of settings, which makes it pretty versatile. In addition to the usual Threshold, Attack, and Release knobs, you also get a side chain function and many other exciting features. It’s also quite lovely in appearance.
Key Features:
- Set Your Threshold
The Threshold slider will be the biggest and most important in using the plugin. Thanks to it, you will configure what part of the signal you need to block. There is also a pretty handy indicator, which will clearly show what areas are muted in black.
- Ratio Control
Also, the developers have included Ratio control, which is quite rare in other similar software. With it, you can slightly open up the muted signal so you can hear what’s going on between the notes. In the case of vocals, maybe it will let out some breaths.
- Lookahead Feature
Lookahead is a helpful feature that helps the gate trigger even faster than the minimum attack. The point is that it will pay attention to transients before they happen. Be careful, though, as it may cause a slight latency.
- Make It Listen
Another cool thing about this plugin is that it knows how to listen. You’ll find this Audition feature in Expert Mode. Thanks to the two filters, you will let the gate know which frequency region to pay attention to and which ones to mute.
- Variety of Modes
This plugin can be versatile also because of the modes of operation. They will indicate the operating algorithm that will be most suitable for certain tracks. For example, there are Classic, Clean, Vocal, Guitar, Upward, and Ducking options.
Compatibility:
The plugin is available for Windows Vista or higher (both 32 or 64-bit) and macOS 10.12 or higher (64-bit only). It comes in VST2/3, AU, AAX, and AudioSuite formats.
Summary:
The Pro-G is a pretty good gate with advanced settings that can help you out when you need to get rid of unwanted noise. It has all the options you need to make it go fast or vice versa. It also has a cool Listening feature that helps the plugin pay attention to the desired frequency range.

The Integraudio Editorial Team consists of experienced music producers, audio engineers, and plugin enthusiasts dedicated to providing in-depth reviews and guides for music production software.