You’ve probably seen the term Comb Filtering in synths and filter plugins and perhaps even in recording guides. But what is comb filtering, and what causes it, exactly? Let’s find out.
Comb filtering is something that recordists have had to deal with ever since we grew past monophonic recordings. It causes a strange flanging effect that is just plain unnatural. However, even though the comb filtering effect is something we attempt to avoid most of the time, modern music producers have developed creative ways to incorporate it into their mixes.
What Is The Comb Filtering Effect?
Comb filtering is the effect that occurs when you have an identical, delayed copy of an audio signal playing together with the original copy. Those frequencies in the audio with identical phases get mixed together, whereas those with opposing phases get canceled out.
It could happen either in recording or during playback due to speaker arrangements. The latter is especially obtrusive as it can cause you to misjudge mixing decisions. However, it’s pretty straightforward to solve if you follow the tips described in this article about the best near-field studio monitors.
How Does Comb Filtering Work?
In the real world, comb filtering happens when two or more microphones with different wire lengths or uncalibrated preamps pick up the same signal. Similarly, it can also occur due to room reflections. Generally, a time difference between 1ms to 25ms between the two recorded signals will cause the effect.
In a home studio, the most common cause for comb filtering is in guitar recording. If you have two mics, each for an end of the guitar, you might end up with a stereo recording that doesn’t sync well. The result is comb filtered audio.
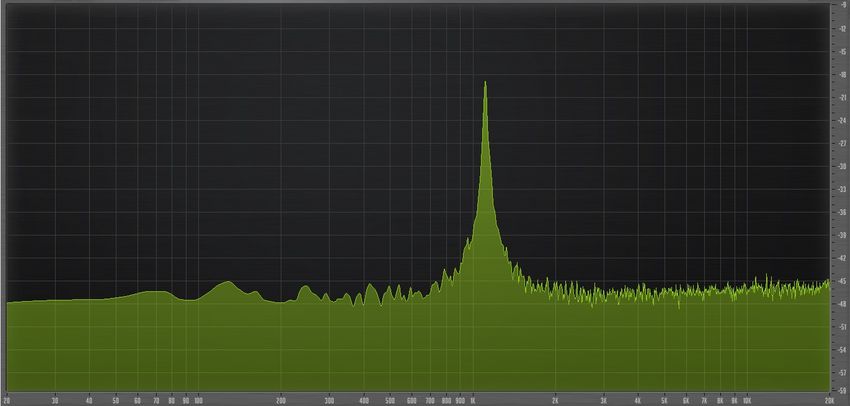
The following graph shows the phenomenon in a frequency spectrum (Photo is showing filter section in “UVI SHader” plugin)

Since the graph on a frequency spectrum looks like spaced notches resembling a hair comb, this effect became known as the Comb Filtering Effect. The peaks on the graph are in phase, whereas the troughs or valleys are of opposing phases.
Every sound is made of thousands of frequencies, so it is nearly impossible to record audio without dealing with comb filtering of some kind. You can recognize comb filtering by the peculiar frequency sweeping it causes that almost sounds robotic.
How Do I Avoid Comb Filtering While Recording?
If reflections, whether from walls, ceilings, or equipment, mainly cause the comb filtering effect, room acoustic treatment helps minimize it. Similarly, use a similar cable length when you are recording with multiple mics. Furthermore, avoid using multiple mixers/interfaces if it isn’t essential.
You might also find comb filtering occurring due to electronics. In this case, check your outboard plugins’ latency, especially if you have some setup in parallel. Also, if you are recording two mics, record each mic in a separate track instead of a single stereo track; doing so gives you the option to time-align the recording while editing.
What Is A Comb Filter Effect Plugin?
A comb filter effect plugin simulates real-life comb filtering. It creates delayed copies of your sound and lets you use the effect creatively. You can adjust the factors involved in the comb filter effect to fine-tune the sound to your liking. Synth sounds benefit the most from comb filtering.
In a way, it is a stationary flanger. If you didn’t know, the flanger effect is also created by playing back delayed copies of a sound, but the delay is modulated. So, using a comb filter, you can create a flanger-like effect but with much more control, thanks to automation.
Here’s a short video demonstrating the comb filter effect:
What is Resonance?
An audible peak in the frequency spectrum is a resonance. In recordings, you might find a single resonant peak or multiple caused by the size and shape of the room and instrument (snare, guitar, violin body). Controlled resonance is used in audio production to emphasize a frequency, often complementing filters.
What Is A Resonator Effect Plugin?
In music production, a resonator is an effect plugin that emphasizes a set of frequencies to produce musical sound. Such groups of frequencies may imitate chords, harmonies, or something that you choose as a part of sound design. These plugins can switch the sets of frequencies rhythmically for performance.
Why should I Use These Effects?
While we want to avoid comb filtering and resonance in actual recordings, comb filter and resonator plugins are helpful for sound design. For example, comb filters can turn a simple saw wave into something much more complex, and resonators can make even drum beats sound harmonized.
How To Use A Comb Filter In A Mix?
While there are various uses for a comb filter, the most common use is with synthesizers. You can use it to create string-like pluck sounds, bass stabs, and even pads. Expect to hear what you might describe as “glassy” or “metallic” texture. Hence, comb filters are often favored for electronic music.
How to Use A Resonator In A Mix?
Resonators often allow you to incorporate chords or harmonies into atonal audio, such as drums, percussions, or white noise. Similarly, you could also use it to generate formant effects (vowels a-e-i-o-u) in tonal sounds. Likewise, using it on the reverb can simulate various odd spaces (like bathroom or pipe).
Resonator & Comb Filter VST Plugin Examples
Now that we know what resonators and comb filters are, we can look into various software plugins providing these effects. Melda, Tritik, and Imdsp have plugins that allow you to split your audio into parts and add different filters to it:
1. MeldaProduction MCombMB Comb Filter
The MCombMB filter is one of my favorite comb filters for its unique filters and options. You could use it over a synth sound or even a live recording to make it sound different. And it can also help you make your recordings clearer by targeting and eliminating unwanted frequencies.

Key Features:
- Multi-Band
The band editor allows you to split the audio into several bands and then reposition them whichever way you want. You can split it into up to 6 different parts and add additional filters and presets to it without a problem. - Presets
The plugin also allows you to create your own presets and plug them in wherever you want in one of the bands. Furthermore, besides the featured factory presets, you can also use the built-in “intelligent” randomizer feature to generate unexpected sounds. - Modulators
MCombMB also features modulators including an LFO, audio level followers, envelope generators, randomizer, and pitch detectors. You can modulate just about every parameter in the plugin to create motion in your sound. It is super handy for synth sounds when you want evolving pads, for instance.
Compatibility:
The plugin is available for Windows 7 or higher 32-bit and 64-bit and macOS 10.9 or higher 64-bit only. It comes in VST 2/3, AU, and AAX formats.
Summary:
As with most Melda plugins, MCombMB is highly comprehensive. It will provide you with all the tools and settings that will give you the most out of comb filters, and I recommend exploring all of the menus they have because you can find valuable resources.
2. Tritik Moodal Resonator
Moodal is a viral audio plugin that allows you to manipulate every part of your sound and even wholly transform a recording of your musical instrument. I often use it to simulate spaces and materials such as strings or plates. It sounds precise and fitting for professionals.

Key Features:
- Accurate Engine
The plugin has a unique resonance engine that can replicate the real-life sounds of a restaurant, school, or shopping mall. This program lets you sculpt the sound the way you want it to be, and it will also allow you to generate a completely new frequency that will fit perfectly into an existing sound. - Numerous Filters
With more than 1000 resonant filters, you will be able to create any type of noise or environment you want. Carefully sculpt a distinct character in your synth or design a monster’s voice for your film; you will be able to find the sounds you would never think you could record. - Presets
Not only can it help you create your original preset, but it also provides you with a unique preset browser that allows you to search for those used by other users online. You could even create presets and distribute them to others on the platform.
Compatibility:
The plugin is available for Windows 7 or higher 32-bit and 64-bit and macOS 10.7 or higher 64-bit only. It comes in VST 2, AU, and AAX formats.
Summary:
If you are not someone who tends to experiment with sounds and recordings, then this probably isn’t the right platform for you. I believe this is the best option for people who love experimenting and creating unique and creative sounds.
3. lmdsp Superchord Resonator
The Superchord program emulates virtual strings and allows you to control resonance. It has 12 resonators that you can pitch to any key and create any type of chord. While the sound you will get with this resonator is usually straightforward and natural, some of its effects can also create otherworldly sounds.

Key Features:
- 12 Resonators
This plugin is one of the rare resonators that offer 12 options for audio manipulation. You can completely manipulate the sound throughout its settings, make two resonators produce the same tone, or pan each of them separately across your stereo field. - Low-frequency oscillator
It also allows you to engage in a low-frequency oscillator with three target modes – Frequency, Pitch, Gain. Each of them will help you gain complete control over the sound to generate vibrato or tremolo. - Model panel
The plugin has a model panel that contains global controls and gives you feedback about activated filters and actions you have taken. The advanced controls will allow you to add even more special effects to your recording. - Dozens Of Special Effects
There are, for example, the Pluck position option and H.V. sliders that will allow you to adjust the polarization. You will also be able to separate the audio into different bands and move them around however you want.
Compatibility:
The plugin is available for Windows 7 or higher 32-bit and 64-bit and macOS 10.9 or higher 64-bit only. It comes in VST 2/3, AU, and AAX formats.
Summary:
Hundreds of filters and different settings give you the space for creativity and audio manipulation, so this is one of the best resonators you can come across. However, it can be a steep learning curve, especially if you are a beginner in this field.
4. UVI Shade
Shade by UVI is a versatile equalizer that features comb filtering.
Using neither feedback nor feed-forward delay to generate the comb filtering effect, Shade uses a preset comb shape. It makes it more precise and gives a lot more control than you’d get generally. Furthermore, you can use the comb shape to either cut the frequencies or boost them, which gives a different effect.
Other than the comb effect, it offers standard hi-pass, low-pass, notch, band-pass, and shelf filters. And it also features a “phaser” filter shape, which, unlike comb/flanger shape, has only three dips in the frequencies. So, the effect is much more subtle and can be more musical in extreme amounts.

Key Features:
- Q-Width
Shade lets you control the Q-width or Q factor of the comb filter, so you can adjust how prominent or narrow each tooth of the comb is. Furthermore, you will also find notching, tilting, and band-passing comb filters under the Comb section. Each provides a different style of sound, especially when automated. - Stereo Controls
In this EQ, every band, including comb-shaped ones, supports multiple stereo modes: Stereo LR, Stereo MS, Left, Right, Mono/Mid, and Side. So, for example, you could use the comb filter to create Haas effects in mono audio by filtering each side of the stereo channel separately. - Modulation
Clicking on the downward-pointing arrow at the bottom right of the interface opens a modulation section, where you will find 9 kinds of modulators. They include an Envelope, Figure, Follower, LFO, Macro, MSEG, Random, Spread, and an XY pad. Each of them can create stunning movements in your sound. I especially recommend the Figure modulator, which uses geometric shapes to create modulation. Assigning a modulator to a parameter is as easy as right-clicking the parameter.
Compatibility:
UVI Shade is available for Windows 8 or higher and macOS 10.9 or higher, both 64-bit only. It comes in VST 2/3, AU, and AAX formats.
Summary:
Our description is merely a taste of what Shade can do. It’s a full-fledged equalizer with modulators capable of surgical editing, broad assessment, and animated sound designing. The modulators also support side-chained triggering, so you have even more possibilities for creativity. I highly recommend giving it a try.
Conclusion
When two identical audio signals play out of sync with each other, it causes the comb-filtering effect. The reason behind the comb-shaped alteration of the audio is because of how frequencies work. You’re probably aware that higher frequencies are sound waves moving faster, whereas low frequencies are slow. So, depending on how out of sync the two audio signals are, the comb filtering starts from a different position on the frequency spectrum, but the shape follows a similar character.
Comb filters and resonators often go hand-in-hand because many plugin manufacturers include both in a plugin. However, as our list of example plugins above prove, they can be found separately as well.
We hope this short guide helped you understand more about comb filters and how you could use them to create unique sounds in your projects.

The Integraudio Editorial Team consists of experienced music producers, audio engineers, and plugin enthusiasts dedicated to providing in-depth reviews and guides for music production software.