10 Best Clipper Plugins For Better Mixes
If you want to achieve competitive commercial loudness without destroying your transient punch, switching to the best clipper plugins is the single most effective move you can make.
Push a heavy brickwall limiter too hard, and a mix instantly loses punch. In my own mixing workflow, over-limiting always resulted in lifeless, squashed transients. That is why clipper plugins have become an indispensable tool for clean, transparent peak management.
Unlike traditional compression, a dedicated audio clipping software shaves off short peaks instantly at the sample level to reclaim valuable headroom. This precise approach allows for maximizing loudness without generating the pumping artifacts or muddy low-end common with standard dynamics processors.
I have stress-tested dozens of options to narrow down the top 10 best clipper plugins for mixing and mastering. This list covers pristine, clinical mastering clippers, character-rich saturation tools, and the ultimate free clipper plugin to tightly control your digital audio transients. Let’s dive in!
Kazrog KClip 3
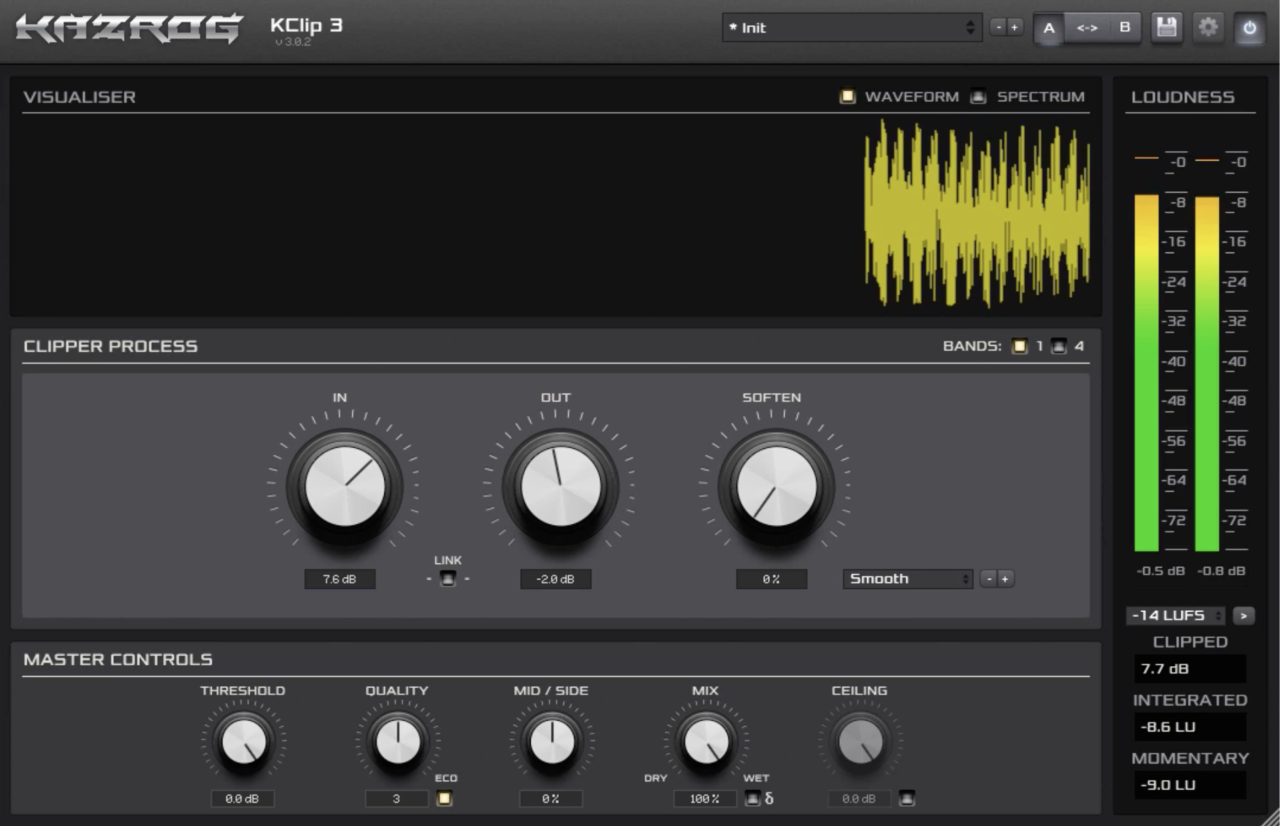
I’ll start with Kazrog KClip 3, which is a powerhouse mastering clipper that excels across individual tracks, buses, or full master chains. What sets it apart is its ability to offer deep, high-level control without making the workflow feel slow or over-complicated.
The plugin features eight distinct clipping modes: Smooth, Crisp, Tube, Tape, Germanium, Silicon, Broken Speaker, and Guitar Amp. This range allows you to jump effortlessly from clean, clinical peak shaving to grit-filled, harmonic saturation, depending on what your track needs.
- Multiband & Mid-Side Processing
You can split your audio into up to four bands to clip frequencies independently, or use the Mid-Side mode to precisely balance the stereo image.
- Up to 32x Oversampling
It offers independent controls for real-time mixing and offline bounce oversampling, allowing you to eliminate aliasing artifacts during final export.
- Integrated LUFS Metering
The built-in loudness target meter displays real-time levels directly inside the interface, keeping you from needing a secondary metering plugin.
- Real-Time Waveform Visualizer
The resizable interface displays exactly where and how much your transients are being shaved, giving you immediate visual feedback to make precise adjustments.
With its highly flexible threshold control, KClip 3 operates beautifully as a single-plugin solution. Whether you need gentle micro-transient control on a drum bus or heavy loudness maximization on a final master, it handles the physics of digital audio gracefully.
KClip 3 comes in VST, VST3, AU, and AAX formats for macOS and Windows users.
Venn Audio V-Clip 2
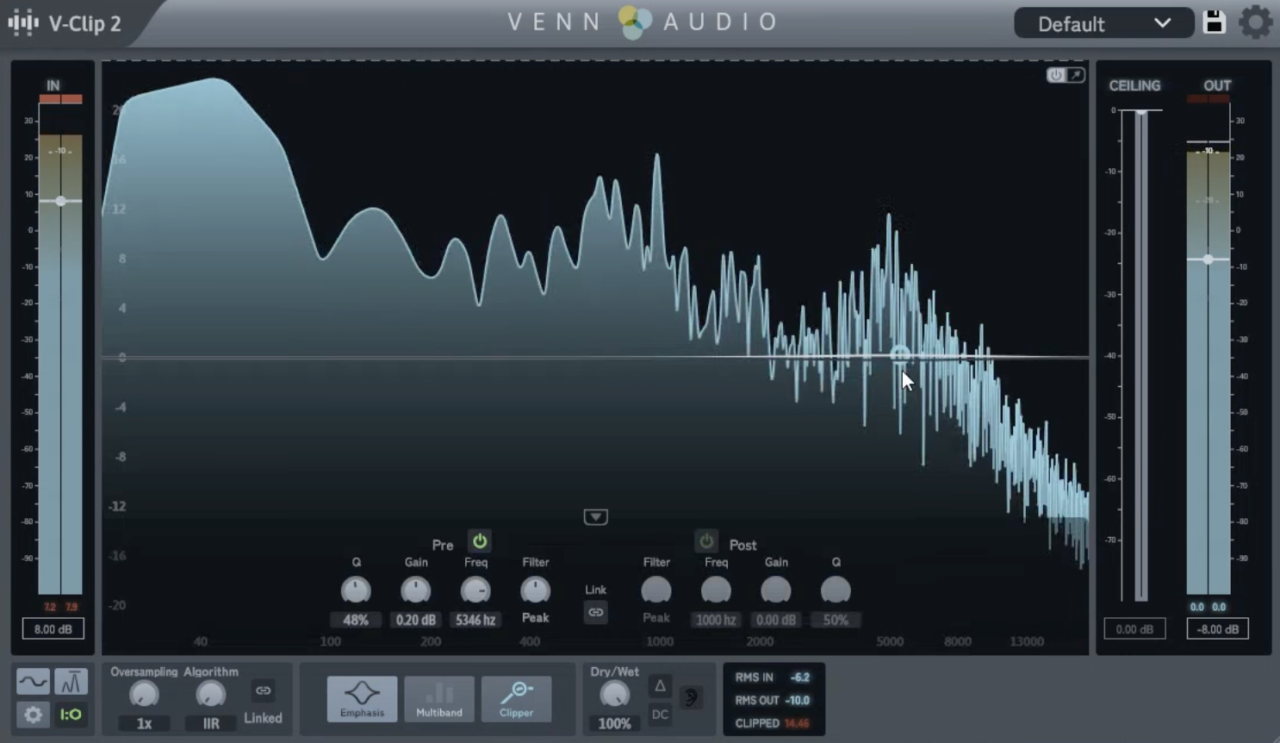
What I enjoy most about Venn Audio V-Clip 2 is how it brings high-end, dual-axis visual precision without forcing you into an overcomplicated setup. I’ve used plenty of clippers that leave you guessing, but this tool stands out by giving you absolute certainty over exactly how you reshape your transients.
The interface is beautifully streamlined, fully resizable, and scales smoothly to any screen setup. Navigating the controls feels lightning-fast and immediate, letting you dive right into your tracking or mixing workflow without any performance lag.
- Multiple Clipping Algorithms
I like the diverse waveshaping options here because they let you escape rigid, one-dimensional clipping. I typically use the harder settings to instantly snap loud drum peaks for extra headroom, while shifting to the softer, more saturated shapes to add smooth analog warmth to synths and vocal buses.
- Resizable Waveform Display
This zoomable visualizer is the feature I lean on most when fine-tuning a dense mix. Zooming horizontally to check transient timing and vertically to see exactly where the signal clips lets me dial in heavy bass tracks with total confidence instead of relying entirely on my ears.
- Lightweight and Zero-Fuss Performance
What seals the deal for me is how incredibly light this utility is on system resources, meaning you can load it across dozens of tracks with barely any CPU drain. While there are no real downsides to speak of, its minimalist, limit-free footprint keeps your high-track-count sessions running flawlessly.
It’s my go-to tool for managing transients on punchy modern electronic tracks and heavy acoustic drum groups.
V-Clip 2 comes in VST3, AU, and AAX formats for macOS and Windows users.
SIR StandardCLIP

SIR Audio Tools StandardCLIP has effortlessly maintained its status as an industry workhorse for nearly a decade. While flashy new tools drop constantly, I keep coming back to this plugin because its flexible engine easily shifts from brutal, transparent peak truncation to a smoother, warmer saturation vibe.
The layout gives you absolute, surgical authority over how your audio wave hits the ceiling without overcomplicating your tracking workflow. Adjusting parameters feels incredibly direct and clinical, letting you make instant adjustments while analyzing how your signal reacts on the fly.
- Up to 256x Oversampling
I am enthusiastic about the pristine upsampling engine because scaling up to 256x completely eradicates digital aliasing artifacts. Whenever I am pushing a loud, aggressive master to commercial levels, this extreme oversampling keeps the top-end flawlessly smooth and musical compared to other clippers.
- Waveform and RMS Metering
The real-time waveform display paired with high-precision input and output RMS meters completely eliminates blind guesswork from your gain staging. I rely on this visual data constantly during fast-paced mixing sessions to guarantee I am leaving the perfect amount of headroom on my master bus.
- Odd Harmonic Coloration
What makes this utility truly special is its ability to double as a creative saturator by adding rich odd harmonics to your signal. I love using this mode to inject instant mid-range bite and presence into thin acoustic snares or lifeless synth loops without loading an extra distortion module.
The user interface looks a bit dated compared to modern design standards, but the pristine sound quality completely balances it out. It is my definitive go-to choice for tracking buses and final mastering projects that demand competitive loudness without sacrificing transient punch.
StandardCLIP comes in VST3, AU, and AAX formats for macOS and Windows users.
Yum Audio Crispy Clip
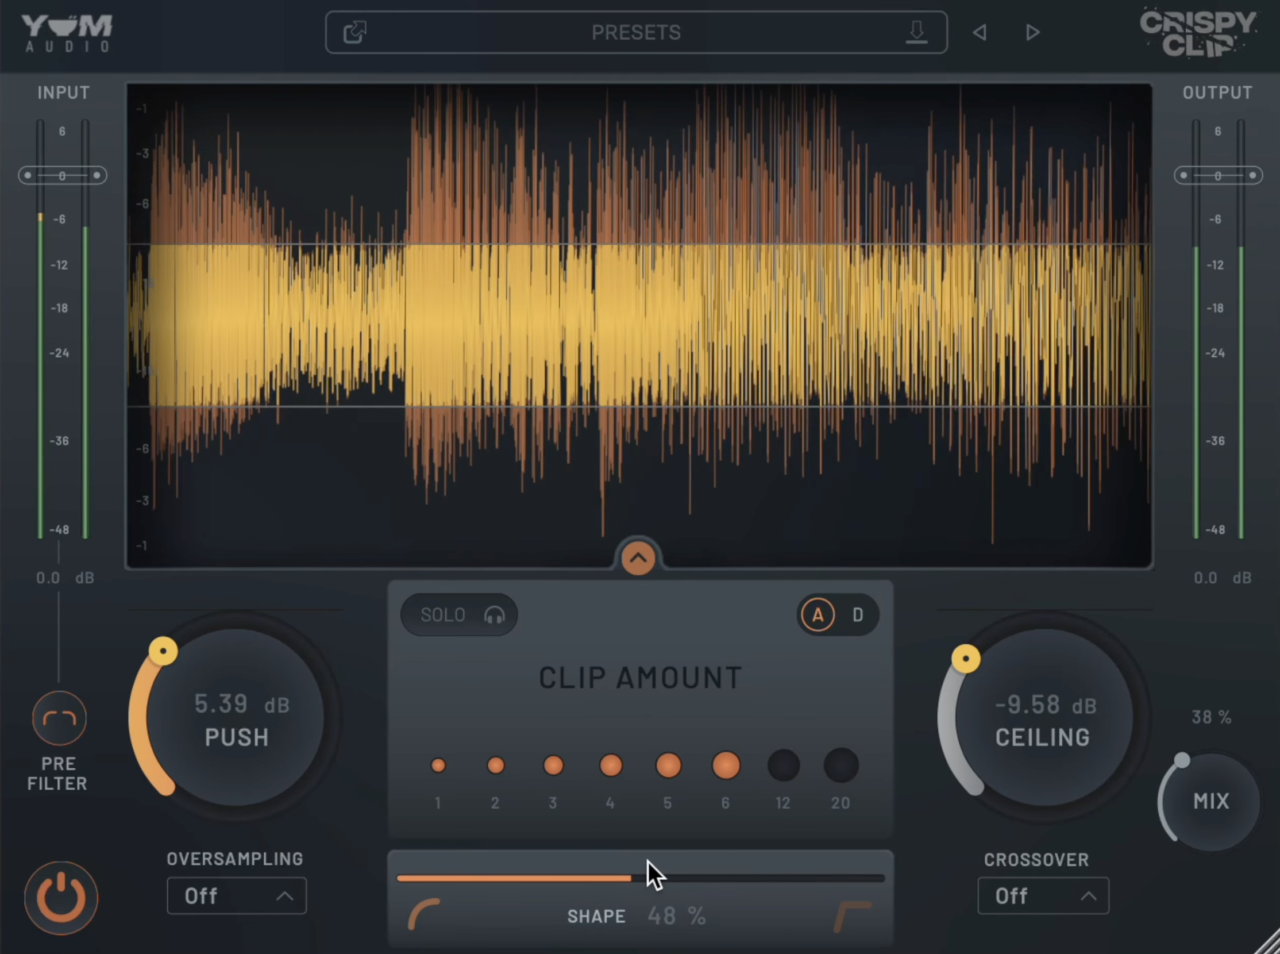
A lot of clippers force you to pick a hard side between clinical peak-chopping and soft saturation, but Yum Audio Crispy Clip caught my attention by letting me escape that choice entirely.
I have spent a lot of time blending both styles seamlessly on full mix buses using the central shape slider. Finding that exact sweet spot where a master gains perceived loudness without losing its transient punch is why this tool found a permanent place in my workflow.
The user interface trades complex menus for a clean, colorful layout that centers completely on real-time visual feedback. Dialing in your input drive feels highly intuitive, and you never have to squint at microscopic numbers to see how much signal is hitting the threshold.
- Continuous Shape Parameter
Instead of forcing you to click through static modes, moving this slider lets me morph smoothly from rounded, analog-style warmth to blunt digital truncation.
On acoustic vocals, I love keeping it closer to the softer side to add a subtle harmonic edge that helps them sit perfectly in the center. When a drum group feels buried under heavy guitars, leaning the shape control toward the hard end brings back that essential front-end snap.
- Frequency Zoning Crossover
This feature handles a major headache by splitting your audio so you can target specific frequency bands while leaving the rest of the signal completely untouched.
I routinely clip just the high frequencies of sharp percussion loops to tame harshness without altering the natural dynamics of the low-mid body. Having this kind of selective control makes it much more versatile than traditional, full-range clippers.
- Input Pre-Filter Control
Filtering the signal right before it hits the clipper stage keeps the processing algorithm from over-reacting to problematic low-end energy.
If you ignore this stage, sub-bass rumble can occasionally smear the clipping behavior on tracks with heavy sub content. I find it highly useful for cleaning up low-end mud on instrument groups so the clipper can focus purely on transient control.
It is my favorite tool to reach for when shaping dense synth stacks and bass-heavy electronic tracks that need extra presence.
Crispy Clip comes in VST3, AU, and AAX formats for macOS and Windows users.
Slate Digital Bus Clipper

What I love about Slate Digital Bus Clipper is how it tackles the loudness war by splitting the work into two independent steps instead of relying on a single, overworked ceiling.
I’ve used plenty of limiters that start breathing heavily when you push for commercial levels, but this tool manages to pull off incredible structural density without making the mix feel squashed or small.
The layout is refreshingly practical, putting precise gain reduction readouts and visual mapping right in front of you. Navigating the settings is remarkably streamlined, completely removing the typical second-guessing that happens when you’re trying to maximize your headroom on a tight timeline.
- Two-Stage Clipper and Booster Architecture
Running a sample-by-sample clipper straight into a waveshaping booster is where the real magic happens.
The first stage ruthlessly chops off instantaneous peaks with zero lookahead or delay, freeing up headroom so the second stage can smoothly lift the quieter details. It’s a killer combination that gives my mixes that sought-after modern presence without the typical intermodulation artifacts of time-based processors.
- 3 Unique Processing Modes
You aren’t locked into a one-size-fits-all curve because the plugin provides three distinct characters for both stages, ranging from Mellow to Aggressive.
I rely heavily on the real-time transfer function display to visually map out how the curve shapes the audio, letting me dial in soft harmonic saturation on vocals or hard brickwall clipping on acoustic drums.
- Delta Listen and Constant Gain Monitoring
Level matching can completely trick your brain into thinking louder is better, which is why I constantly toggle the Constant Gain Monitoring (CGM) switch to strip away volume bias during critical A/B testing.
Paired with Delta Listen, which solos exactly what is being truncated, you can audit your tracks to ensure you aren’t accidentally stripping away punchy low-end details you wanted to keep.
- Mastering-Grade Metering
Hitting streaming targets is effortless thanks to the deeply detailed, integrated, and short-term LUFS meters built straight into the system.
Because there are no attack or release controls to smooth things over, it functions as a completely static processor that demands careful attention to avoid over-clipping your source material.
Bus Clipper comes in VST, VST3, AU, and AAX formats for macOS and Windows users.
Softube Clipper
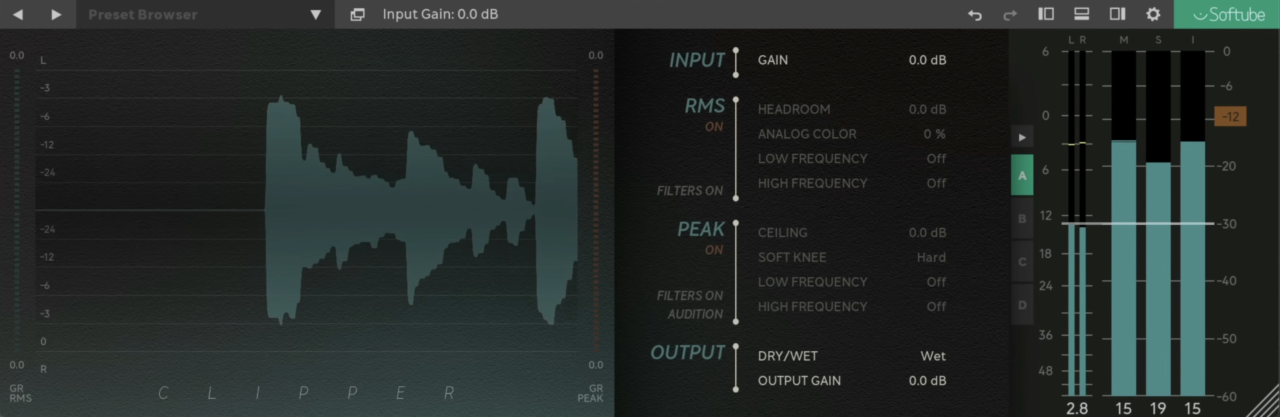
I completely underestimated how much I would end up leaning on the Softube Clipper when I first added it to my toolbox. Instead of hitting a harsh, digital wall when pushing your tracks, this utility has a great knack for managing rogue peaks while keeping the core signal beautifully polished.
This clipper VST introduces extra volume and presence so cleanly that it instantly sets itself apart from standard mathematical clippers.
The entire user workflow centers around an elegant layout that strips away all unnecessary technical distractions. Rather than getting bogged down in endless configuration sub-menus, dropping it onto a channel strip lets you immediately execute fast mixing decisions.
- Peak Management Without Harshness
Taming sharp transients often introduces an unpleasant, fractured texture to a mix, but I love how transparently this processing architecture shaves down peaks.
When handling volatile acoustic instruments or driving sensitive vocal buses, it lets you tighten up the overall dynamics and secure extra headroom without inducing any obvious digital distortion.
- Blend Control for Natural Results
The integration of a dedicated parallel knob is easily the specific control that keeps my tracks from sounding completely flat and over-processed. By mixing the clipped signal back with your original audio, you can comfortably dial in a heavy layer of harmonic warmth and grit while retaining the natural, dynamic breathing room of the performance.
- Simple Menu-Free Interface
What keeps me moving during high-pressure mixing sessions is the straightforward dashboard that focuses entirely on tactile, immediate adjustments. You can tweak a few critical parameters on the fly and immediately move forward with your arrangement instead of losing your creative momentum inside deep menu systems.
While your operating system needs to be completely up to date to avoid potential compatibility issues, the zero-fuss design makes it incredibly dependable.
Softube Clipper comes in AU, VST, VST3, and AAX formats for macOS and Windows users.
PluginBoutique Dual Clip
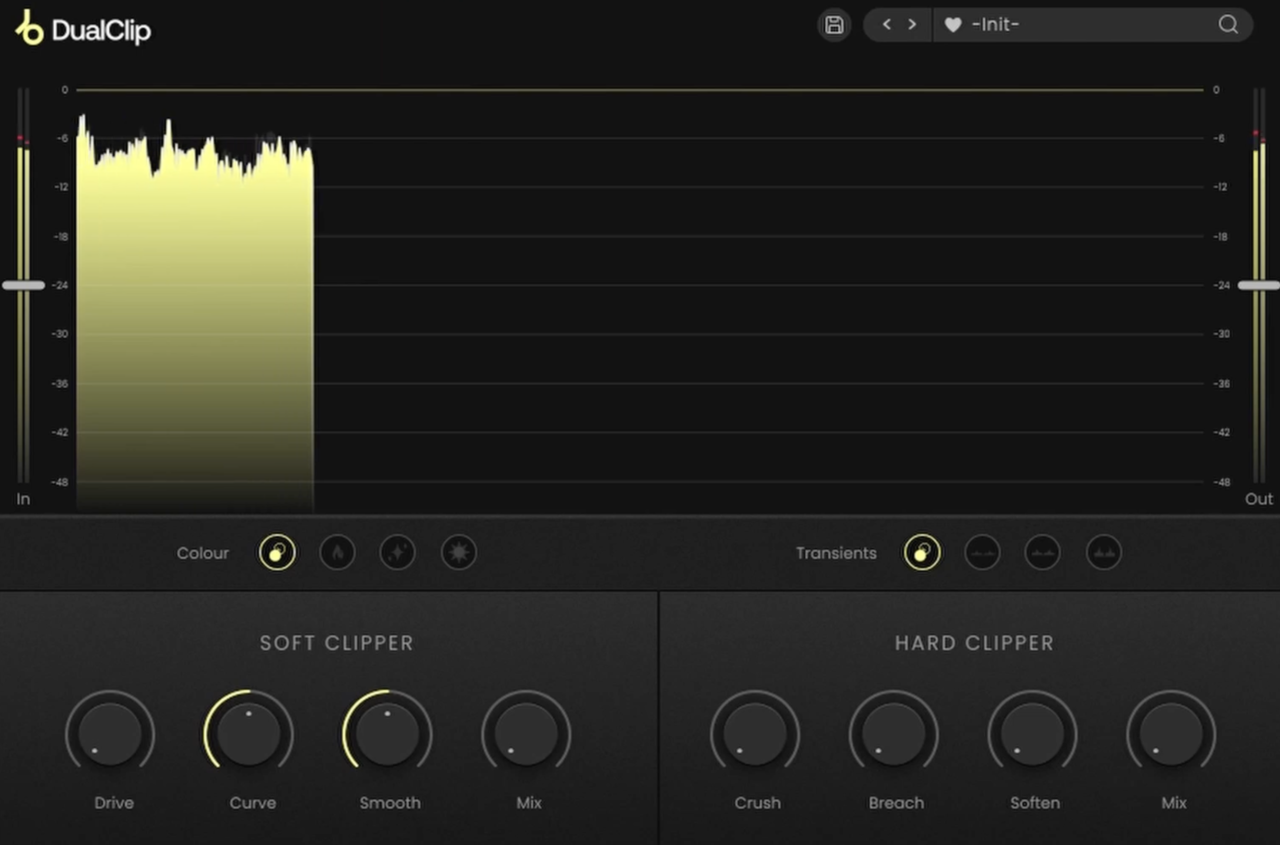
PluginBoutique Dual Clip is one of those clipper plugins that connect the gap between clean transient containment and vintage-style grit.
I think the star here is the layout that lets you seamlessly tap into both sonic signatures, a clinical digital chop and a heavy analog smear, within a single lane.
The dashboard is also nice as it is completely stripped of technical clutter, so that you can dial in precise changes entirely on the fly without breaking your creative momentum.
- Dual Clipping Modes
Having access to both hard and soft clipping engines under one hood makes analyzing different dynamic approaches an absolute breeze.
I routinely toggle the ultra-fast hard mode to instantly shave down peaky acoustic snare transients, while switching over to the soft algorithm to wrap a bassline in a warm, hardware-style harmonic fullness.
- Frequency-Focused Curve Control
This specific knob is an asset because it allows you to tilt the clipping behavior toward targeted frequency zones.
When I want to inject bright presence into a vocal track without turning the low-mids muddy, or if I need to thick up a kick drum without introducing brittle top-end crunch, this selective filtering keeps the tone beautifully balanced.
- Smooth Control for Clean Release
Adjusting the clipper’s response envelope via the Smooth dial provides an excellent fallback when a straight brickwall truncation sounds a bit too jarring.
Raising this parameter gracefully rounds off the signal’s release edge, allowing me to transparently push for extra commercial headroom on delicate instrument buses without generating obvious distortion artifacts.
While the ultra-minimalist interface means you miss out on advanced multiband splitting or extensive target LUFS metering setups, the simplified control set keeps your processing incredibly focused.
Dual Clip comes in VST, VST3, AU, AAX, and Standalone formats for macOS and Windows users.
Canvas Audio Cactus Clipper
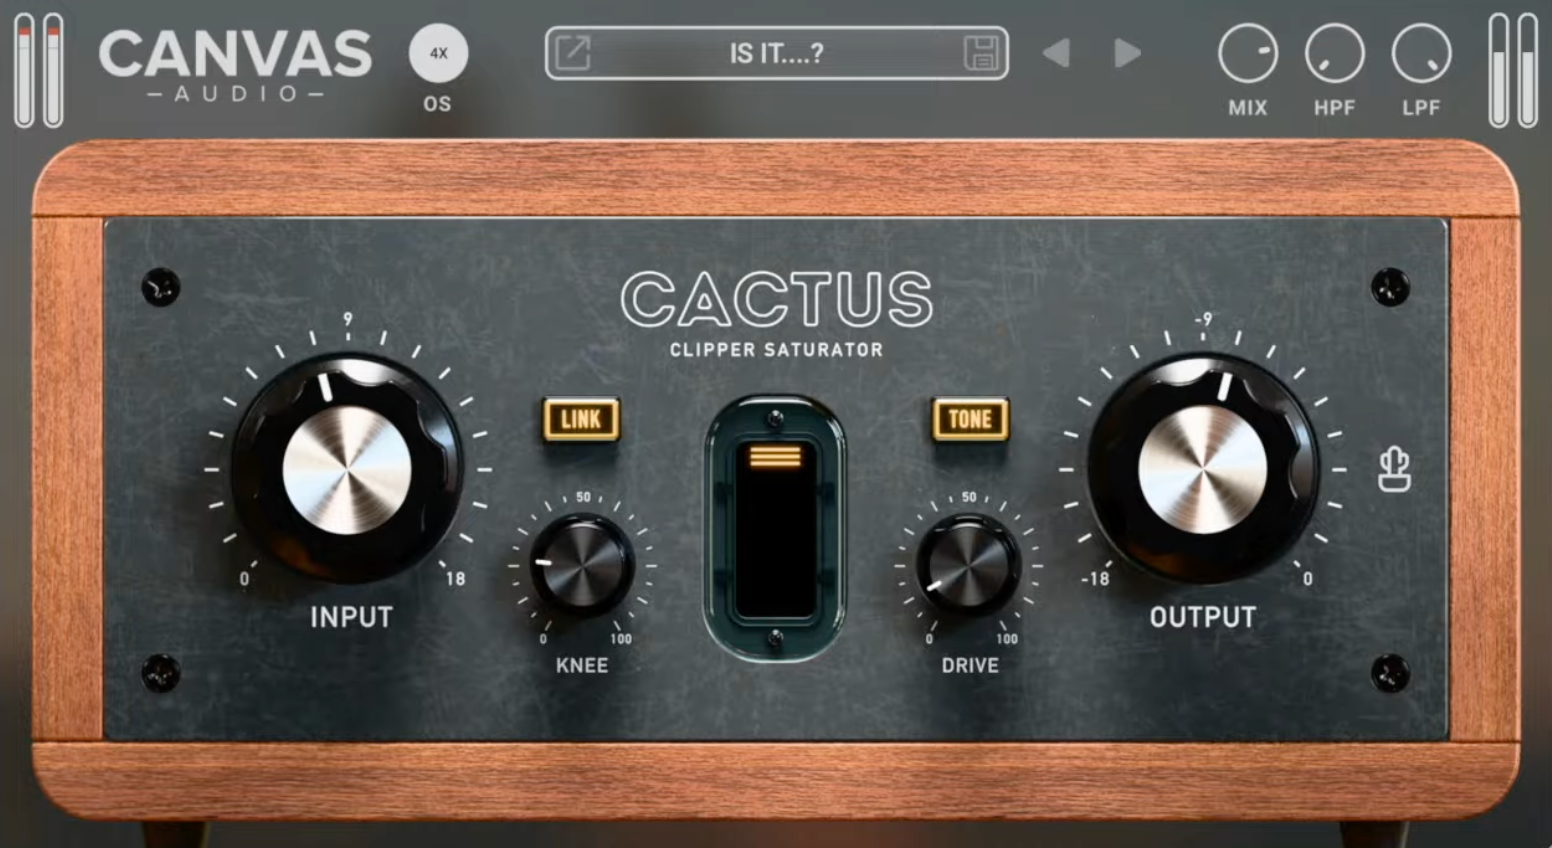
Canvas Audio Cactus Clipper completely deserved a place on the list by by introducing a character-rich, analog attitude to transient control.
I’ve thrown this tool onto countless sub-busses when standard clippers felt a bit too sterile or lifeless. What I love about it is how beautifully it blends the aggressive punch of a hardware peak-shaver with the organic warmth of a dedicated saturation circuit.
The user interface keeps things remarkably immediate, favoring an intuitive, single-page layout that focuses entirely on real-time acoustic adjustments. It drops straight into your session with an ultra-light CPU footprint, letting you shape tracks without worrying about system lag.
- Variable Knee and Saturation Drive
By adjusting the integrated variable knee, you can completely dictate whether your transients melt softly into saturation or hit a sharp, tape-like brick wall.
I find this dual-layered architecture incredibly satisfying for 808s and basslines because driving the circuit creates thick, musical harmonics that help the low-end cut through small phone speakers.
- Linkable Input and Output Gain
Volume bias can easily trick your ears during a mix session, which is why having a fully linkable input/output gain tracking system is such a massive asset.
Cranking the input to find the perfect clipping sweet spot automatically scales back the output ceiling in real-time. This provides an honest, level-matched comparison so you can judge the processing based on tone rather than pure loudness.
- Pre-Clipping Filtering and Bonus Utility
Filtering out problematic frequencies before they hit the clipping stage is simple using the built-in HPF and LPF controls. I rely on this feature to clean up low-end sub-rumble, ensuring the clipper responds purely to the crisp front-end snap of a snare rather than getting confused by low frequencies.
As a massive added bonus, it comes bundled with Prickly Clip, a simplified one-knob tool that I use when I just want to slam transients instantly without any fuss.
If you happen to require forensic, hyper-precise mastering oversampling beyond its standard 4x cap, you might find its technical limitations a bit restrictive. Even with that constraint, it remains a great option for sculpting grit into digital synth leads and adding serious muscle to modern hip-hop drums.
Cactus Clipper comes in VST3, AU, and AAX formats for macOS and Windows users.
MMS NovaClip
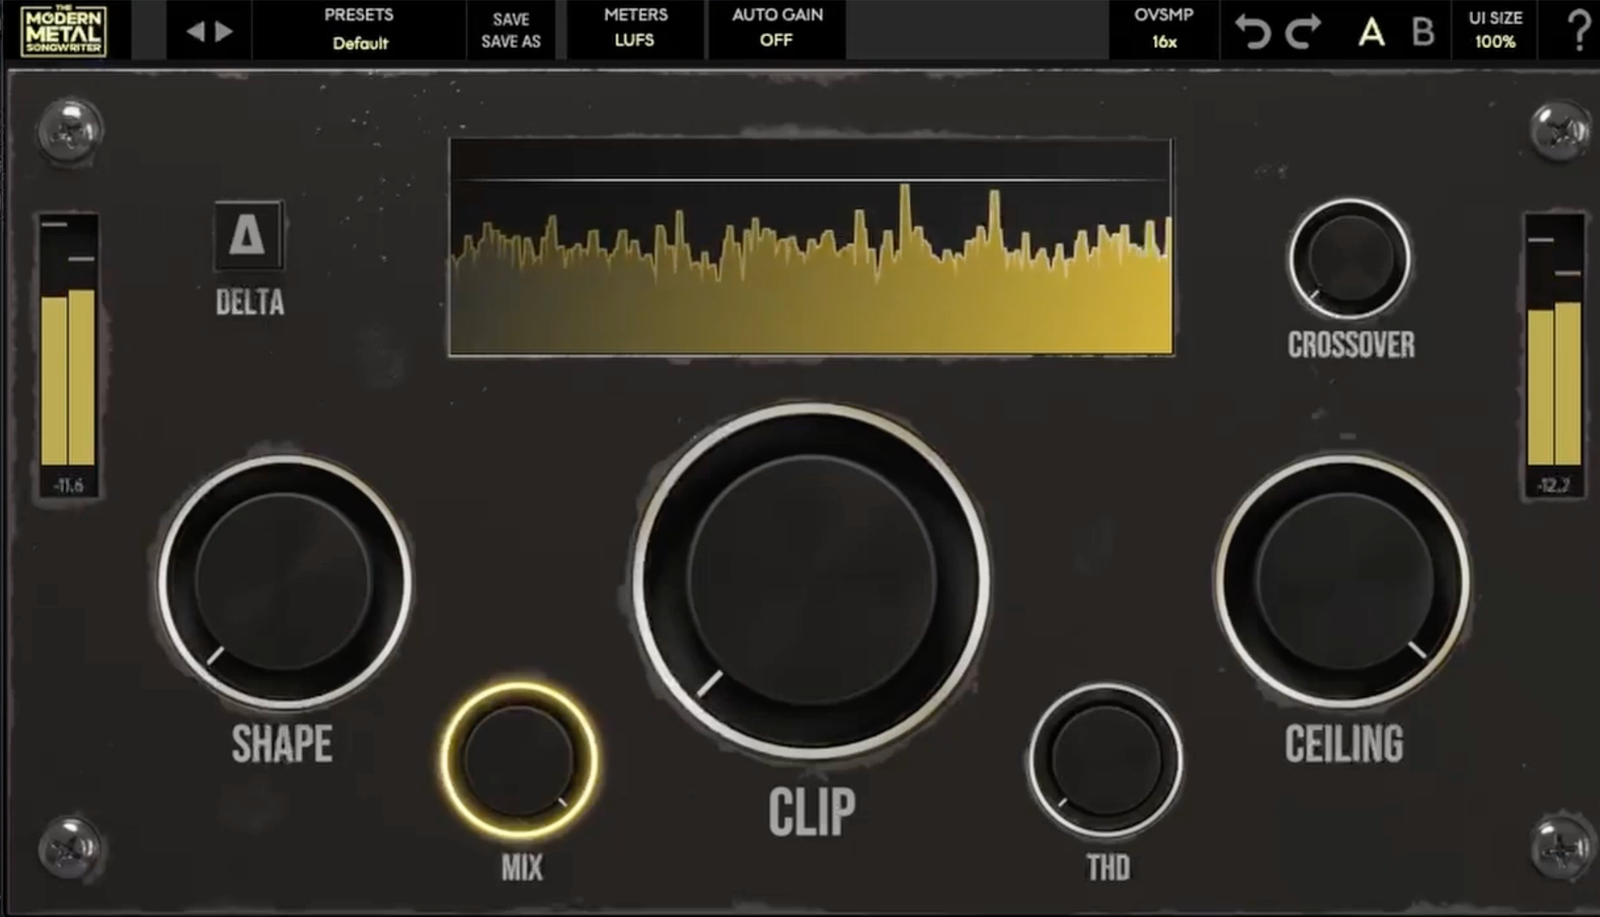
Heavy rock and metal mixes require an almost impossible balance of extreme loudness and hyper-snappy transient definition. I’ve used standard clippers that turn distorted rhythm guitars into a fizzy, broken mess, but MMS NovaClip stands out because it was built specifically to absorb that exact kind of sonic punishment.
This VST beautifully locks down dense, aggressive arrangements without letting the low-end fall apart or sounding choked when pushed for competitive streaming volumes.
The user experience is refreshingly utilitarian, throwing out complex menu hierarchies to keep you moving quickly during an intense tracking or mixing session.
- Aggressive Clipping Algorithm
Running dense drum groups or heavy guitar chains through this engine adds an immediate layer of perceived thickness without accumulating low-mid mud.
Even when I push the input drive past what would normally be safe boundaries, the truncation remains incredibly musical and tight. It provides that consistent, locked-in front-end slap that modern heavy genres absolutely demand.
- Streamlined Control Environment
The interface feels intentionally designed for fast mixing decisions, keeping the essential dials front and center. I love being able to grab the clipping amount, pull back the final output, and jump right back into the track without any secondary guessing.
This straightforward layout makes it exceptionally easy to use, even if you aren’t an absolute mastering specialist.
Because it is a highly focused tool designed to excel at raw aggression, it won’t be the best fit if you are looking for a highly versatile, multi-band mastering powerhouse.
It has become my immediate choice for finishing metal and hardcore projects where in-your-face transient energy is non-negotiable.
NovaClip comes in VST3, AU, and AAX formats for macOS and Windows users.
Outobugi Clamp (FREE)
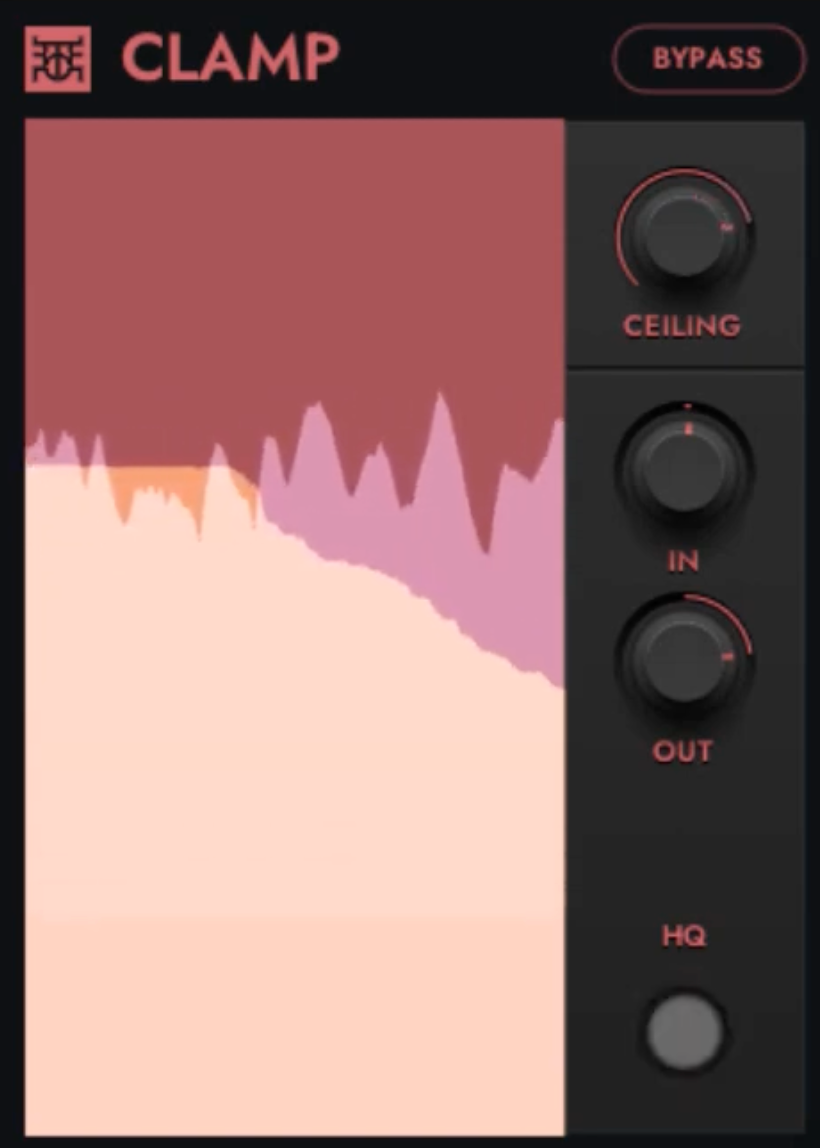
Finding a free utility that handles brutal peak shaving without eating up system power can be tough, but Outobugi Clamp won me over by skipping visual bloat to deliver pure transient control.
I enjoyed tossing it onto crowded channel strips when massive mastering clippers feel like absolute overkill. It quickly proves you don’t need a high-end price tag to pin down a wild snare transient.
The dashboard is completely bare-bones, meaning you can dial in massive changes within seconds. Getting a track to behave requires virtually zero setup time, which keeps my engineering workflow fluid and focused when I’m in the zone.
- Dual Clipping Modes
Flipping between two distinct sonic behaviors is effortless here. When dealing with hyper-aggressive drum hits, I load up hard clipping mode to cleanly chop off peaks for instant headroom, while shifting to soft clipping wraps tracks in a warm, tape-like fullness.
- Internal 4x Oversampling
To keep nasty, thin digital harshness from ruining a loud export, this engine is a massive asset. Engaging the 4x upsampling systematically filters out high-frequency aliasing artifacts, ensuring the top-end stays completely musical even when pushing a bright overhead track to its limits.
- Lightweight, Minimalist Footprint
What seals the deal for me is how ridiculously gentle this processor is on CPU resources, allowing me to stack it across dozens of individual tracks. While the total lack of visual waveform scopes or advanced metering might feel a bit too bare for some, the zero-fuss design means you just set your threshold and keep moving.
It is my favorite choice for quickly taming erratic drum tracks and individual percussion stems on the fly.
Clamp comes in VST3 format for Windows users.
Last Words
Learning to lean on clippers completely changed how I manage mix dynamics. Instead of slamming a single limiter at the end, using clippers helps you hit competitive loudness without destroying your transient life. If you want to get the most out of them, a few fast habits will make all the difference.
I always distribute the workload early by dropping lightweight clippers across individual tracks and instrument groups. Shaving just 1 to 2 dB of rogue peaks from your snares and vocal chains prevents your final master bus from choking. This incremental approach leaves your mix sounding much cleaner and more cohesive.
On the master bus, I love pairing a transparent clipper directly before a true-peak limiter. The clipper handles the instantaneous, lightning-fast spikes so the limiter can smoothly lift the overall track without pumping. Just be careful with heavy sub-bass, as low frequencies distort quickly and usually need gentler settings or a high-pass filter.
Finally, always use level-matching during A/B testing to keep your ears from being fooled by pure volume. Back off the output trim to match the bypassed level so you can judge the processing honestly. If the track still sounds punchier and more focused at the exact same volume, you have nailed the settings.

Berk is a multi-instrumentalist musician from Istanbul, Turkey. He has been playing guitar, handpan, and percussion for over ten years, developing a sound that blends melodic sensitivity with rhythmic depth.
He began his musical journey as a teenager, learning guitar and performing in several bands. In 2016, he discovered the handpan, an instrument that immediately resonated with him on a deeper level and gradually became central to his artistic identity.
Since then, he has performed in streets, festivals, bars, and concert venues across different countries, connecting with diverse audiences through both intimate and large-scale performances.
Alongside his live work, Berk is deeply involved in studio production. He works from his home studio, where he composes, records, and produces his own music. His studio serves as a creative space for layering handpan, guitar, and percussion with modern production techniques, allowing him to shape fully realized, atmospheric compositions from start to finish.
His music explores a wide range of genres and textures, combining organic acoustic instruments with detailed studio production to create immersive and expressive soundscapes.