
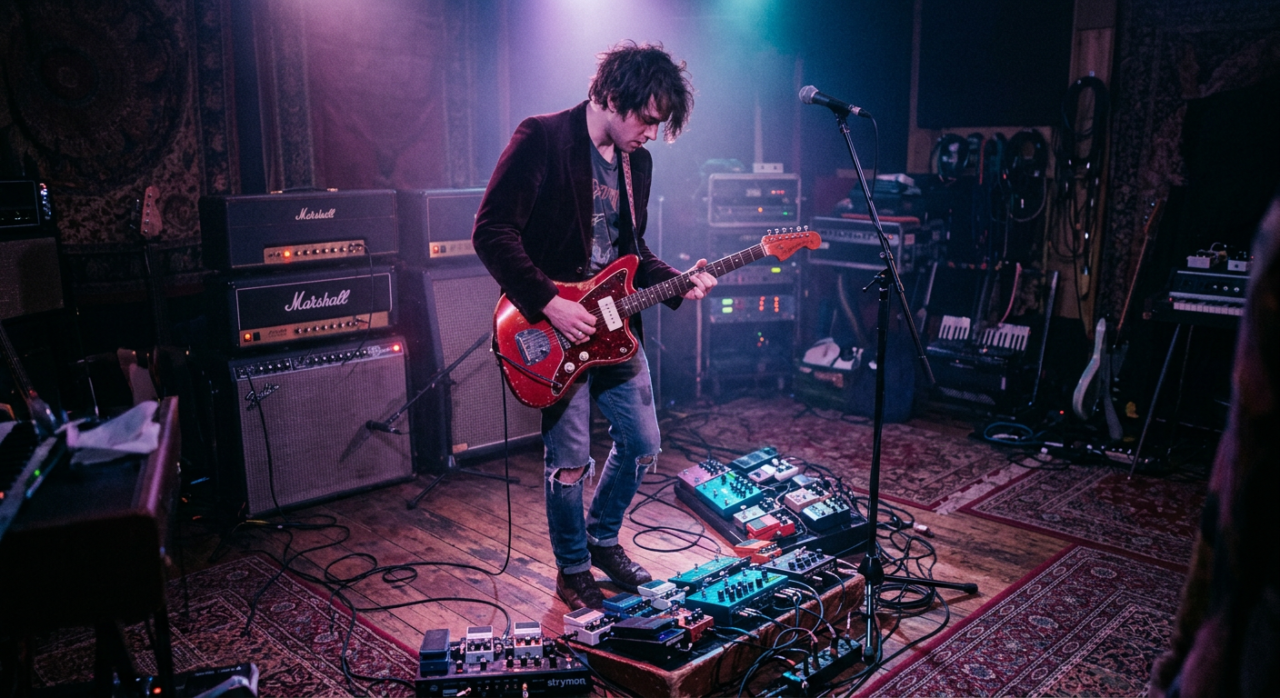
In this guide, I’ll show you exactly how to produce shoegaze music from scratch. Whether you’re new to the genre or looking to refine your sound, learning how to produce shoegaze opens up a world of layered guitars, atmospheric textures, and dreamy sonic landscapes — all covered here with audio examples and plugin recommendations.
What Is Shoegaze Music?
Shoegaze, to me, is essentially a very layered and spacial style of Alternative Rock. Think a dreamy version of Nirvana. Rather than the typical in-your-face riffs that Alternative Rock is known for, the guitars are more used as a texture, with lots of layers and effects.
Before we dive into the technical side of how to produce shoegaze, let’s look at the key characteristics that define the genre.
A very common effect chain in Shoegaze is having a reverb pedal at the start of the chain, going into a distortion or fuzz. This really creates a wash of sound that creates the atmosphere of the genre.
Bands that pioneered the genre include:
The sub-genre really started in the late 80s in the UK with these bands. The typical characteristics of Shoegaze are layered guitars, atmospheric soundscapes, dreamy vocals, lots of modulation and spacial effects, and lots of dynamic textures.
In modern times, Shoegaze has really branched off into many different styles. Let’s quickly look at the most popular styles and the bands pushing them forward right now.
Modern Shoegaze:
Heavy Shoegaze:
Dream Pop:
In this article, I’ll be going through producing a typical Shoegaze song, that way at the end you will know the standards of the sub-genre and will be able to push it out into the different branches easily if that’s what you want to pursue.
I’ll be using Ableton Live 12, but you can use any digital audio workstation that you prefer.
Producing A Shoegaze Song
Let’s break this down into the different elements of the song. I’ll start with guitars as they are typically the most dense part of this style of track. Before diving in, I’ll just mention that the BPM is 160 and I am going for a half-time feel.
Also, you’ll notice a bunch of reverb and delay send tracks at the bottom of some of the screen shots. I typically have sends set up with three different reverbs (plate, room, and hall) and three different delays (slap, wide, ambient). This gives me the freedom to really create the space I want in any mix, which is extremely useful in this sub-genre as space plays such a huge role.
The important thing to remember with this style, and to be cautious of, is completely drowning out the sound. Yes, you want a wash of ambient sound, but it can’t get to the point where nothing is distinguishable.
How To Produce Shoegaze: The Key Elements
Guitars
For the guitars, we will have a lot of layers, so I am breaking it down into four sections.
Main Riff
The very first thing that I wrote for this was the main guitar riff. It’s pretty simple and each time round is a slight variation, except for phrases 1 and 3 which are the same. I recorded it on guitar, but I wrote out the MIDI below just for demonstration purposes.
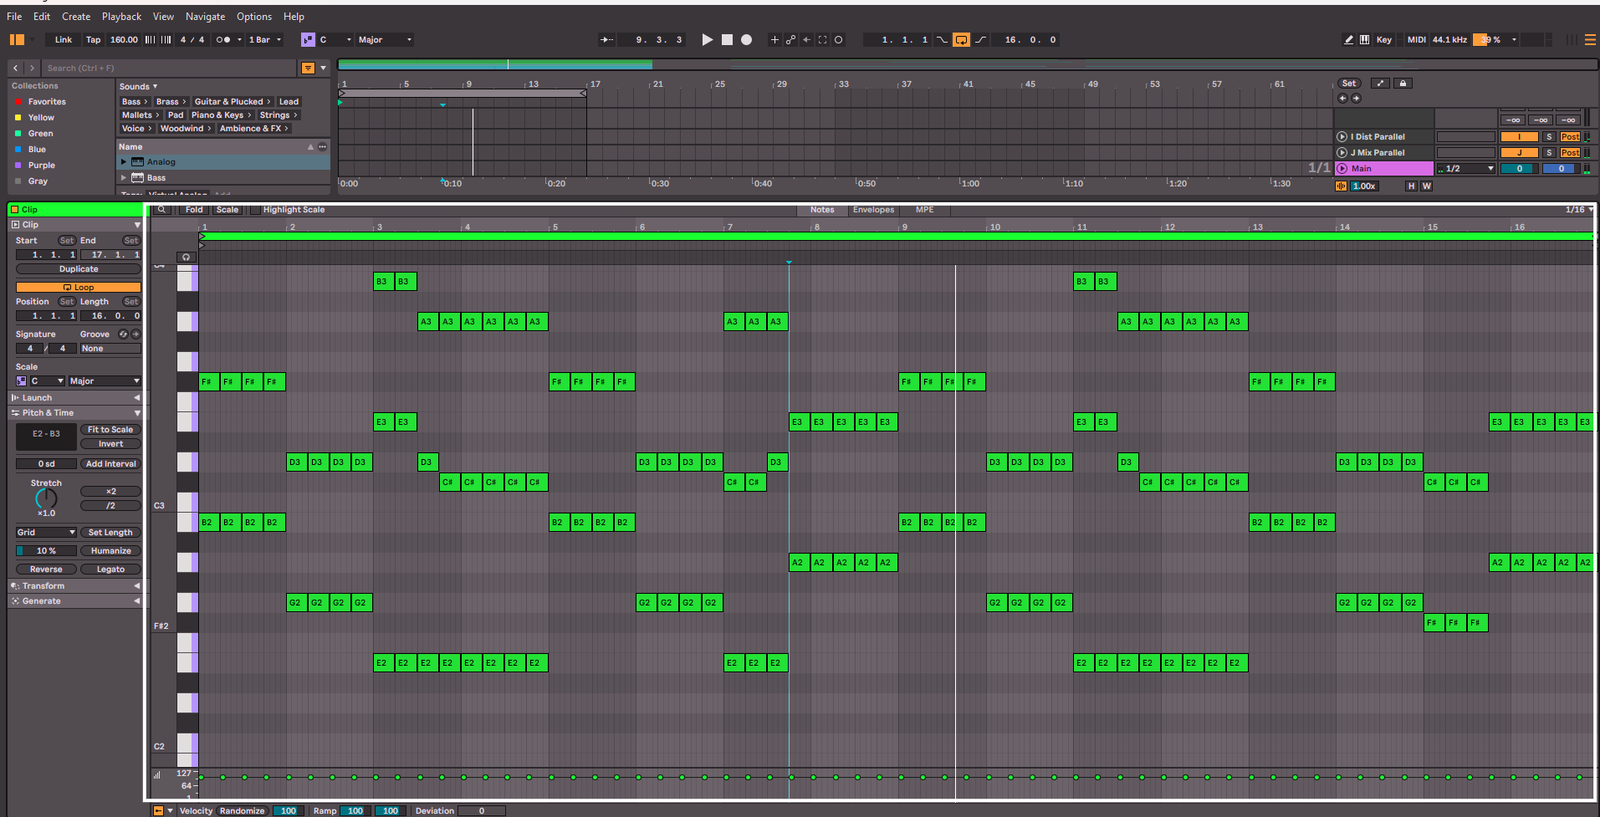
I recorded the part twice, and then panned the tracks hard left and right. This helps to really give a wide sound. Let’s have a listen to what we have so far:
Now let’s talk about the guitar tone and effects, as they are super important in this genre. I am using BIAS FX 2 by Positive Grid, however they have discontinued this product. Fortunately they released BIAS X as a replacement, so you can follow along with this using that, or any amplification and effects plugins you have.
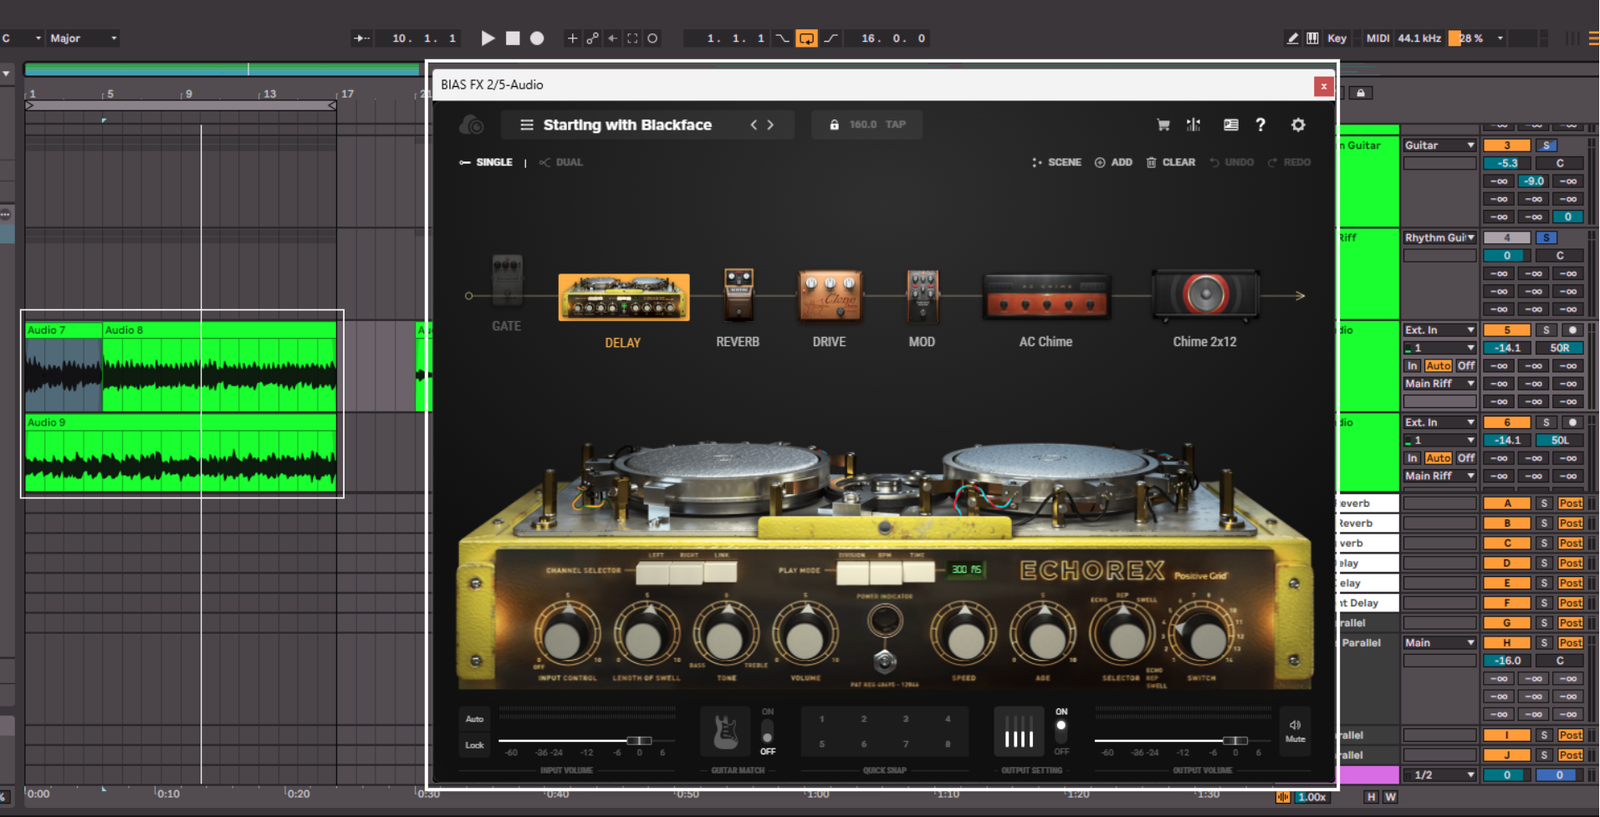
A very common effects chain for guitars in Shoegaze is to have spacial effects (such as delay and reverb) going into distortion or fuzz. On top of that, modulation effects are always adding textures to guitar sounds. Specifically for this part, I am starting the effects chain with a tape delay going into a reverb pedal. This is the spacial texture that starts off the tone. Then we have a drive pedal, which is adding distortion to the signal, and is also distorting all the delay repeats and reverb. Finally we have a phaser to add some movement to the tone, creating an even more washed out sound. The amp I chose is a Vox AC30, just as it has a great bright clean tone to add effects on top of.
Main Lead
After writing the main riff, I wrote a lead guitar line to add some melody into this song. Once again, this is just simple, and catchy, but really elevates the song to the next level. Below is the MIDI for the lead melody.
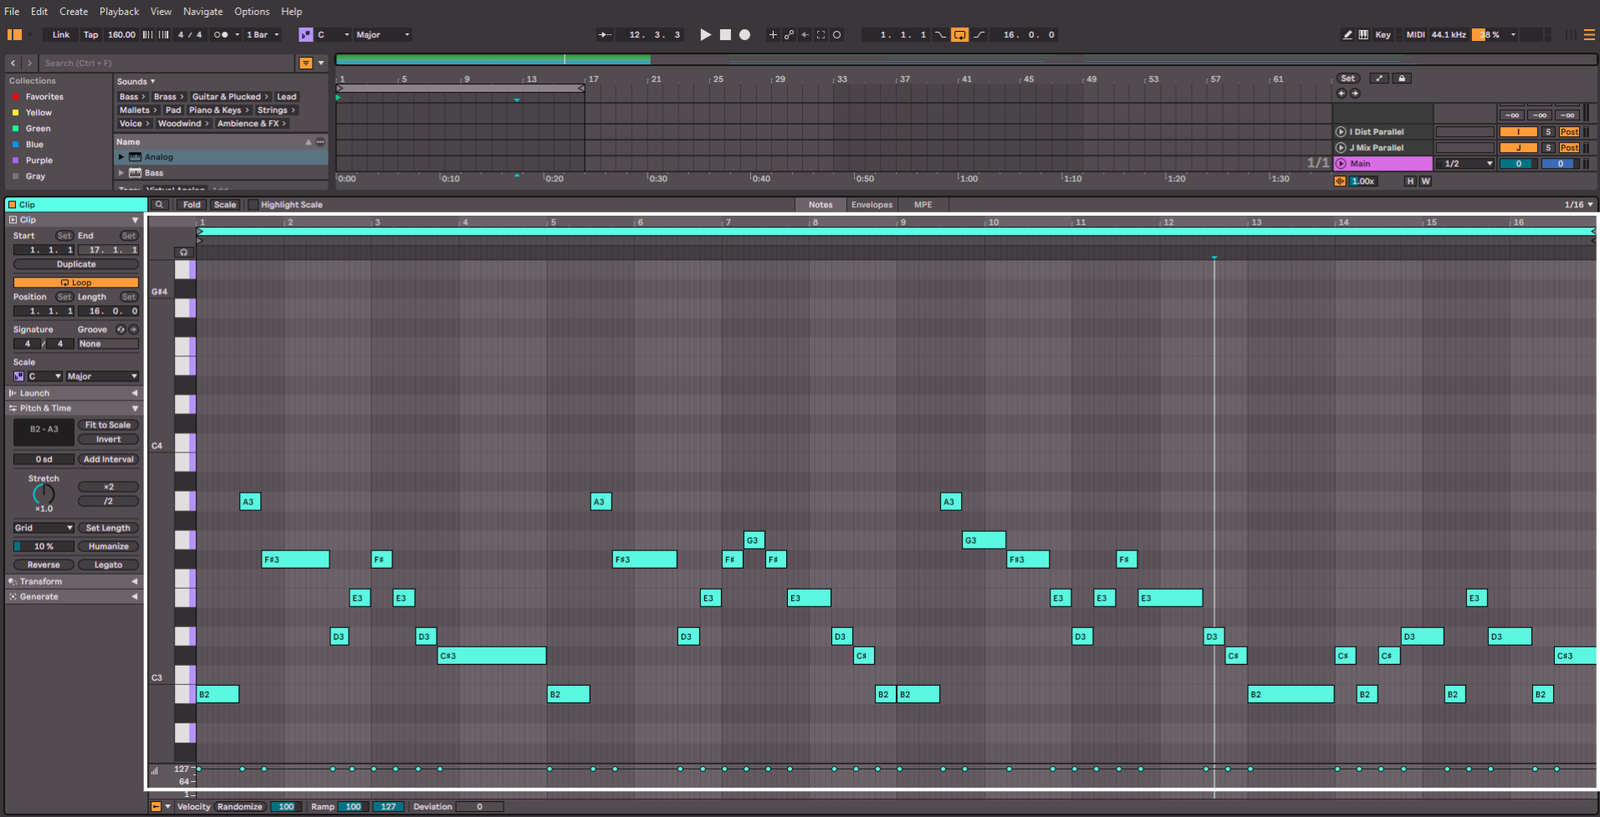
I recorded this part twice to get a thicker and layered sound, then I duplicated each one. One of the duplicates was then pitched an octave up and the other an octave down. This creates a really huge sound for the main melody and helps it to stand out, but not be overwhelming.
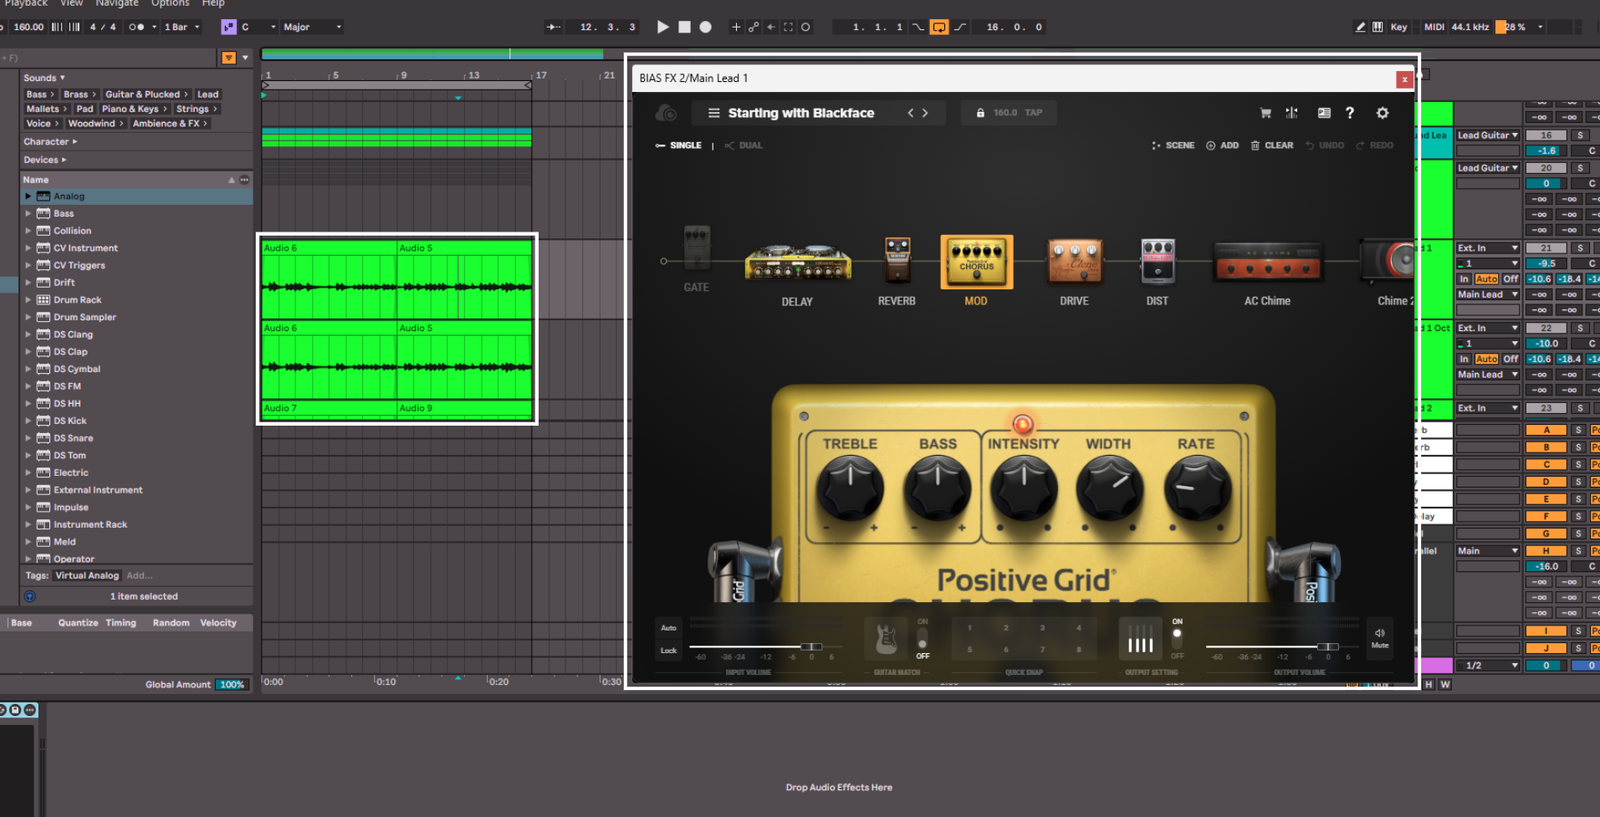
For the processing, it’s very similar to the main rhythm guitar tone with some slight differences. I added in a Big Muff style fuzz to make it even more saturated and blown out. I also changed the phaser to a chorus for a different flavour of modulation. Remember, I am building a huge layered and spacious guitar tone, so these variations really help to blend all of them together. The extra saturation on the main lead is to just push it to the front of the mix a little bit so you can latch on to the melody. Once again, using BIAS FX 2.
Rhythm Textures
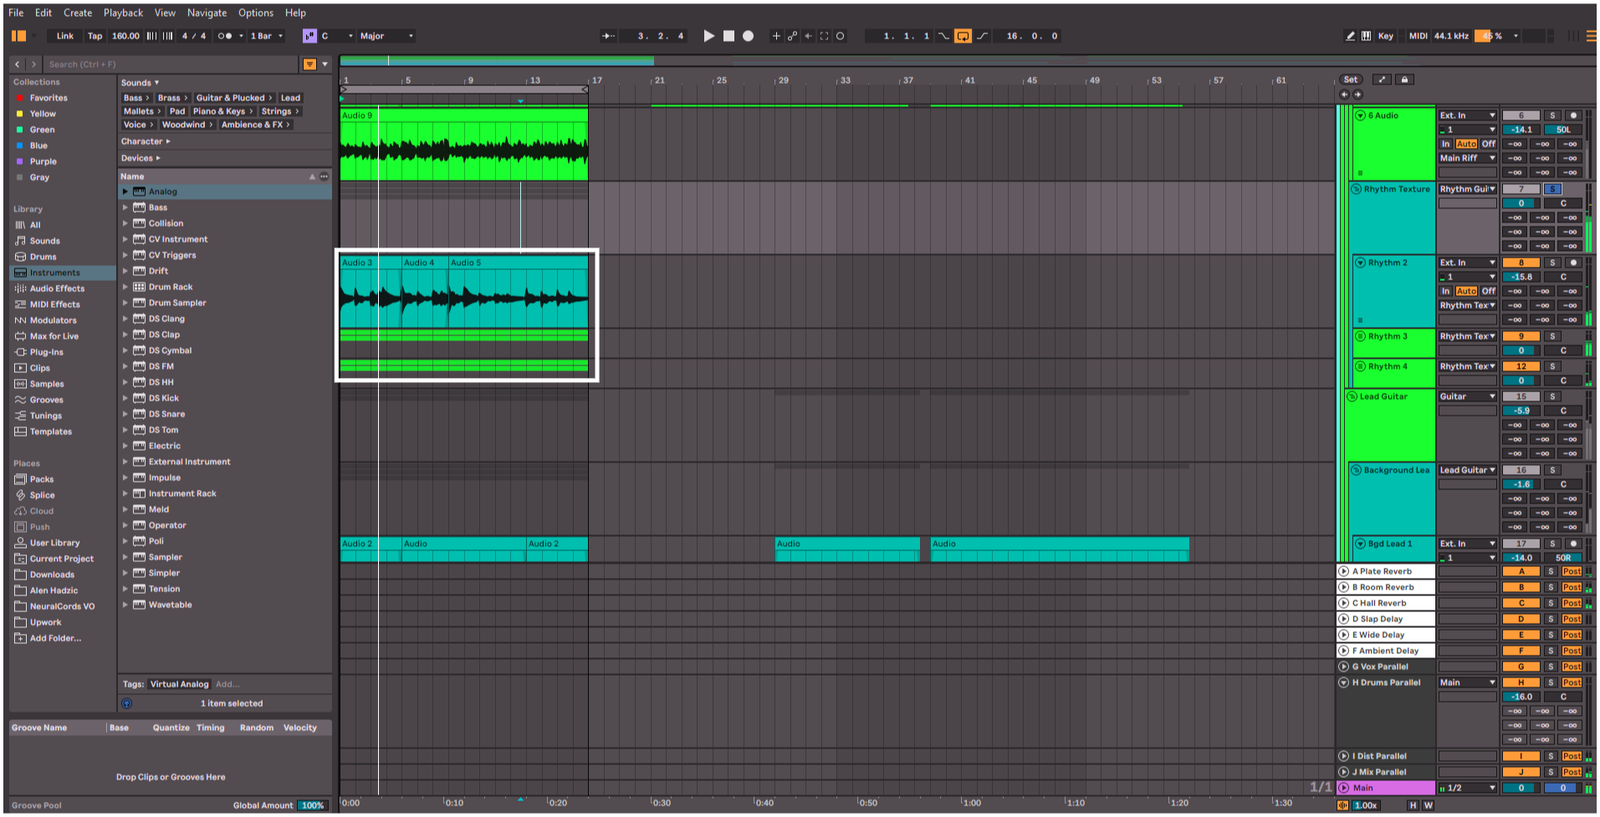
For the extra layers supporting the main riff, I played 3 different variations of the riff with 3 different tone variations. The tone changes are just changing what kind of modulation is being used, what reverb is being used, and the distortion type. This all is adding another texture layer to the whole part. For two of the variations, I double tracked them and panned them hard left and right. For one of them, it’s just going straight up the center.
Lead Textures
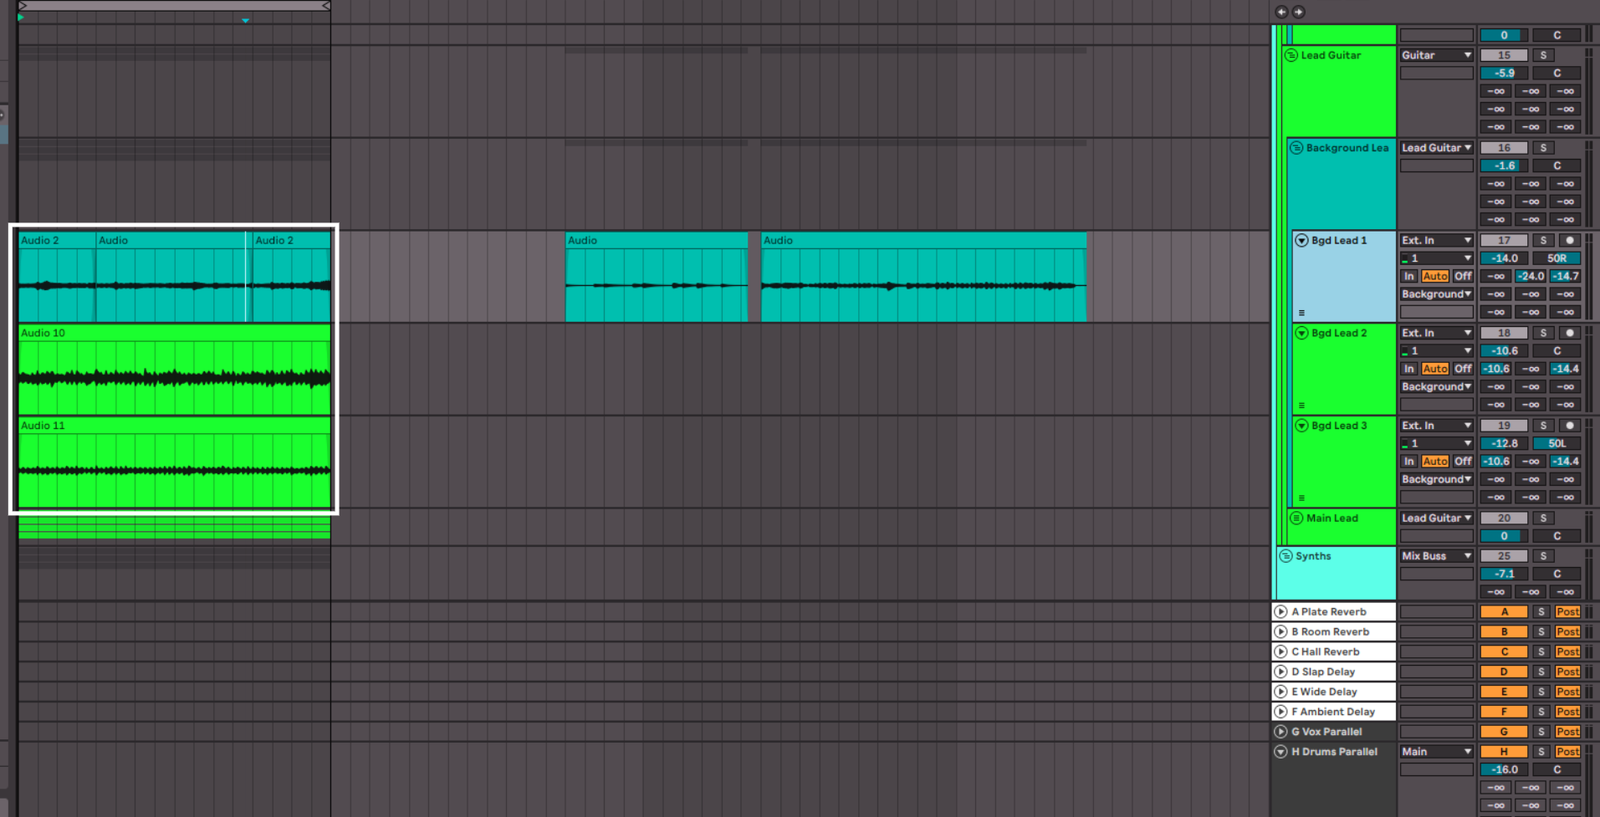
For the background lead parts, I recorded 3 different parts and panned them right, left, and center. These are super washed out with reverb as they are just there to add another layer to the guitar section. It’s not important to pick out each part. It’s all blending together to create a wall of sound.
So that’s all of the guitar parts, finally. I did say that it was the most dense section. Let’s hear them all together.
Drums
Now it’s time to add some rhythm to this track. The drums are going to be in a half time feel, meaning that even though the BPM is 160, the feel of the drums is more like 80 BPM. This effect is mainly achieved through how often the main snare is hitting, which here is on the 3rd beat of each bar. As you can see below in the drum MIDI there are extra snares, but these are softer hits to just add to the groove, not the main anchor points of the beat.
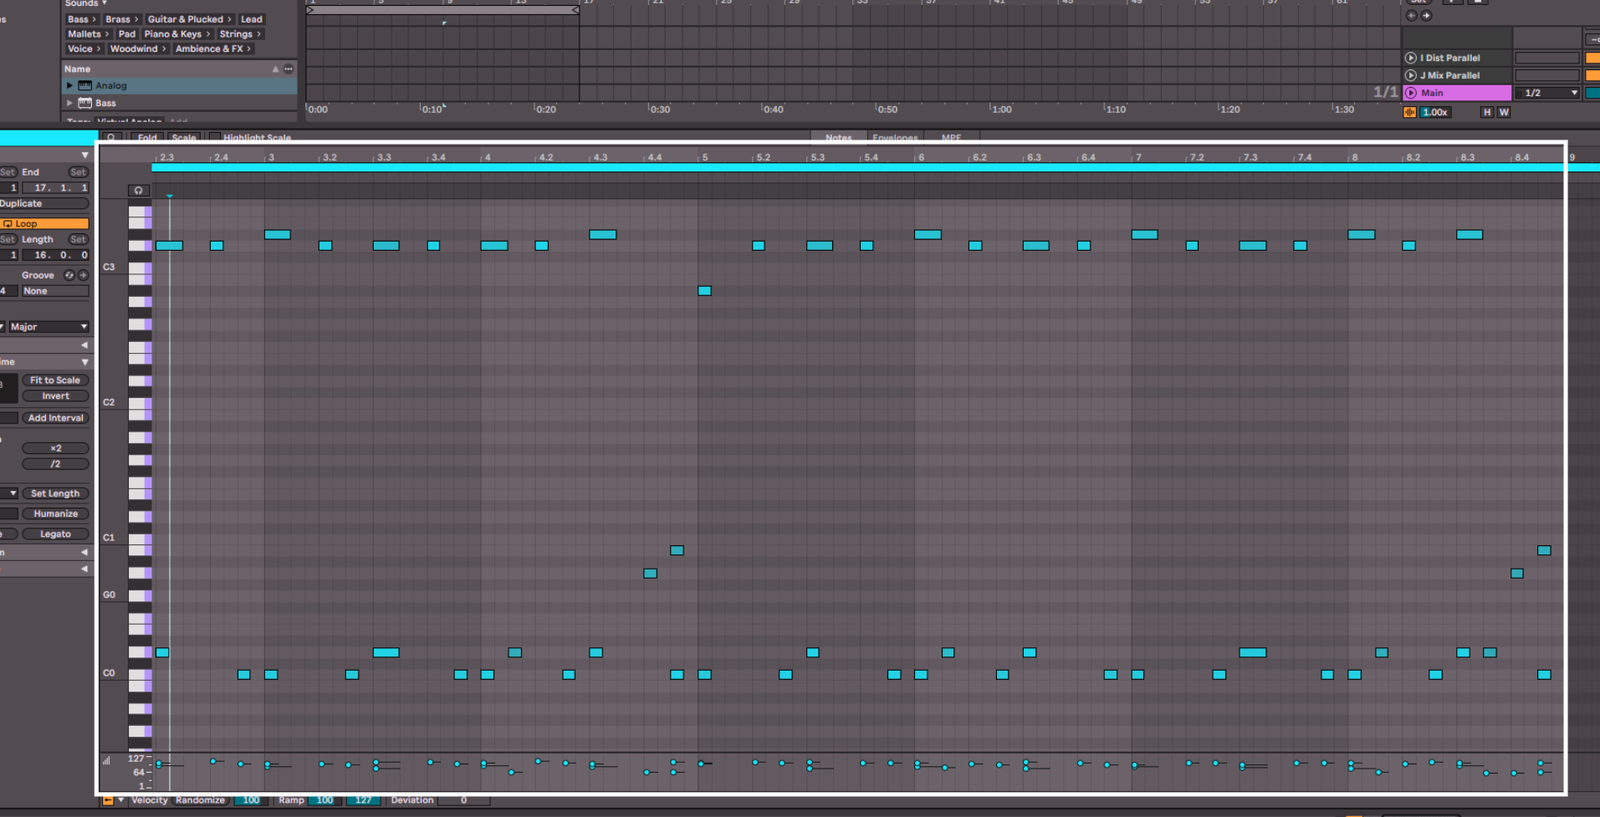
When using drum libraries, it’s so important to focus on the velocities of each note. This dictates how hard each hit is. Adding variation to this makes it feel more human, and being intentional with which hits need more power behind them helps to create more of a groove. For example, look at the cymbals, every off beat hit is slightly less in velocity, which is actually how a proper drummer would play them. Getting to know the drum library you’re working with also helps a lot, because each one behaves slightly differently.
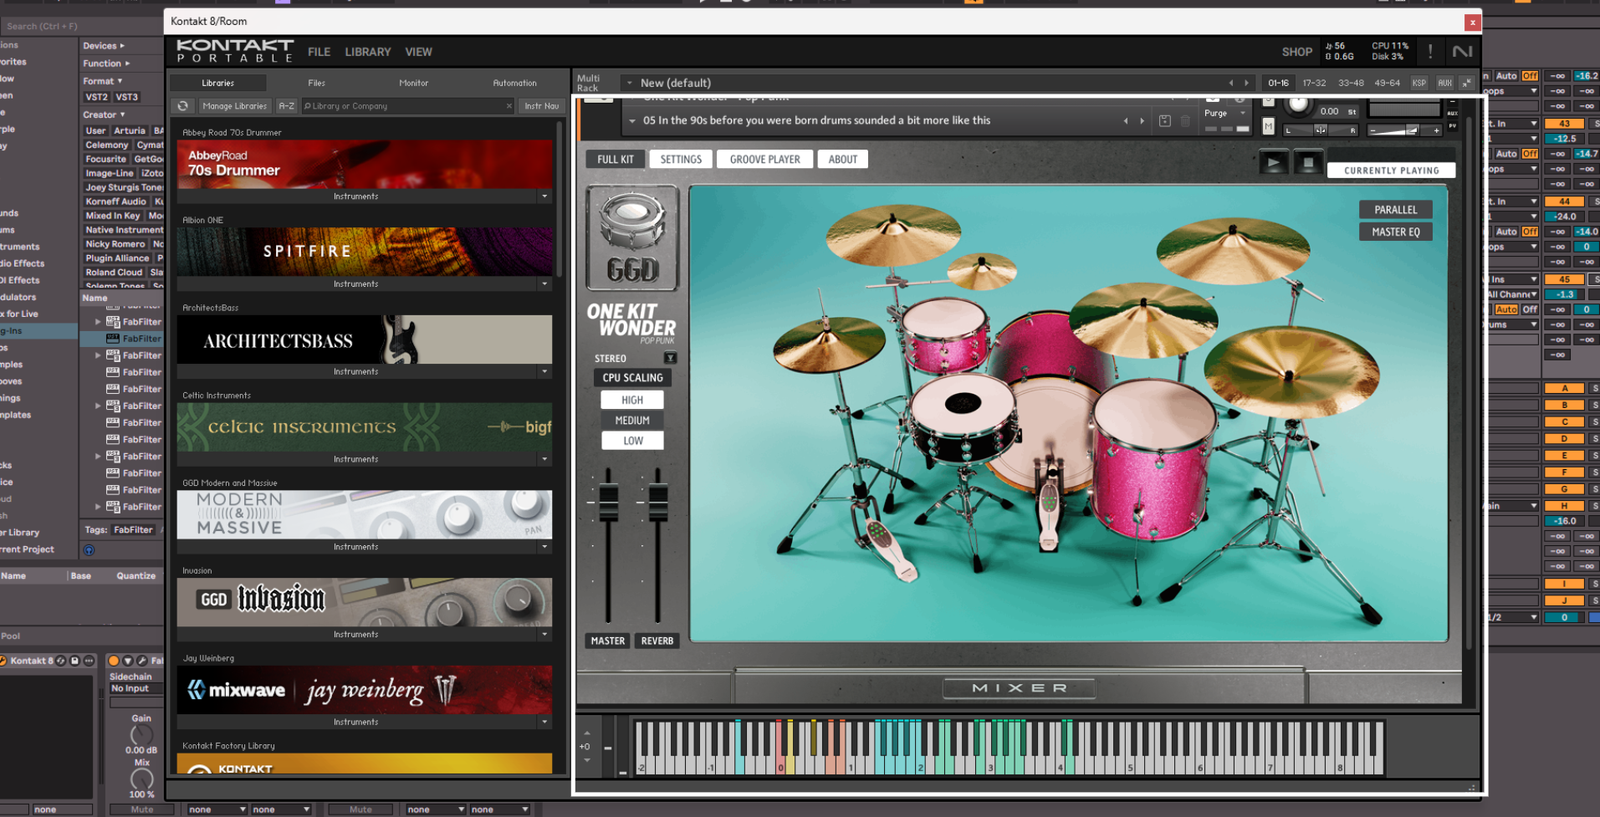
The drum library I am personally using here is the One Kit Wonder Pop Punk by GGD. However, you can use any kit you prefer, it’s more about getting the feel and space right than the source kit, within reason. Of course, a bad drum library will sound bad. But there’s so many options that are great out there.
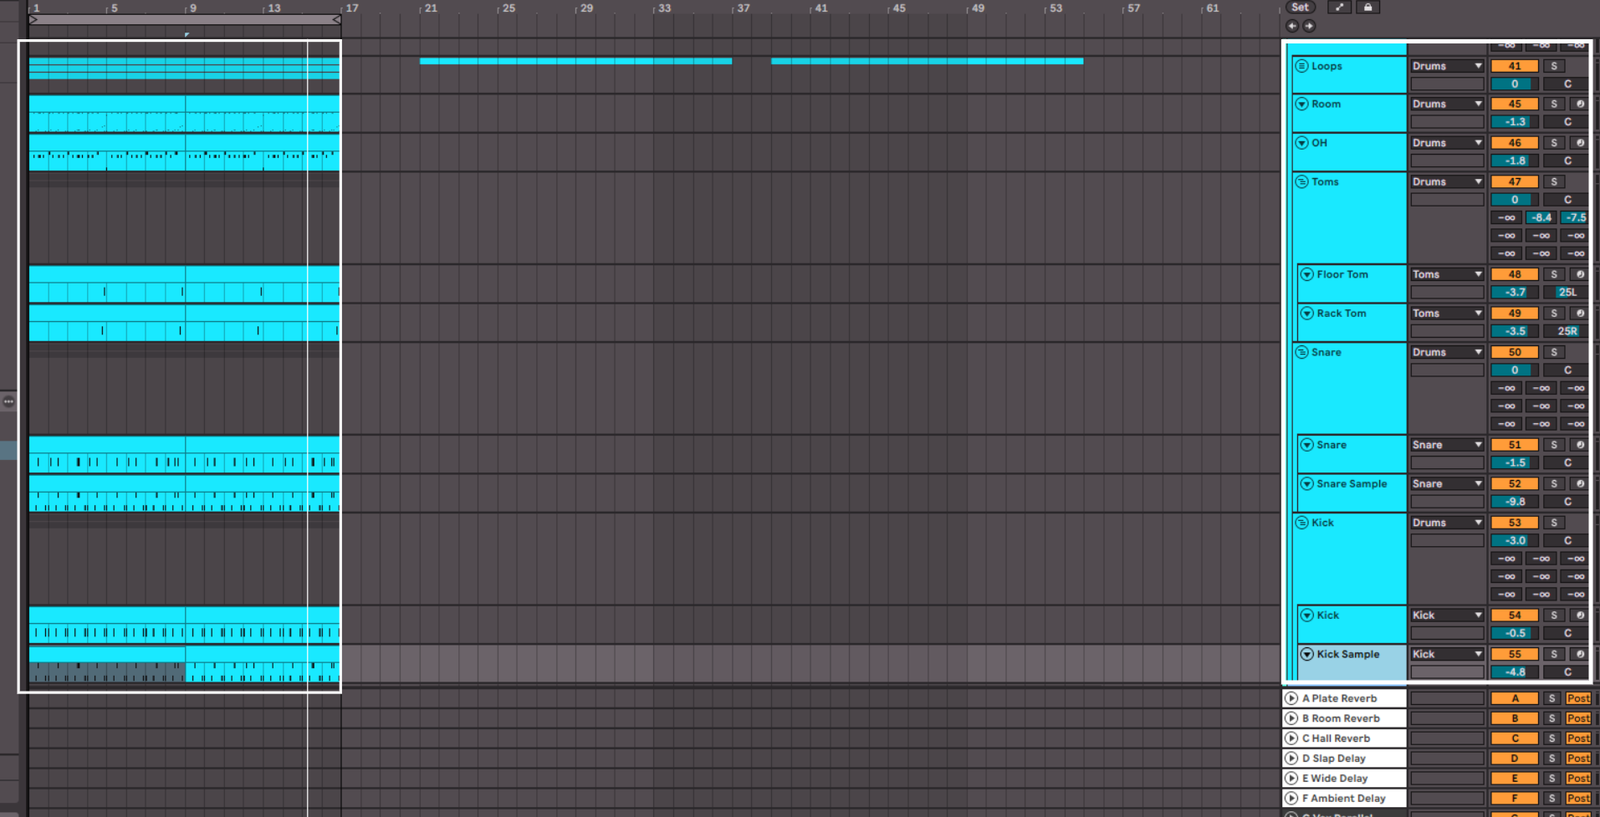
As you can see above, I’ve separated out all of the drums into their own tracks. Namely, I’ve separated the close mics for the kick, snare, and toms, plus the overheads, and then the room mics. This means I can send different parts of the drums to the reverbs, that I have setup on the sends, with specific amounts for that section. For example, I have a lot of room reverb and some hall reverb on the snare, but none on the kick. I also have really washed out the room mic by sending the highest amount to these reverb sends. This means that the reverb sends have all the different tracks in this song to varying degrees, and gives me total control over how spacious I want this production to be.
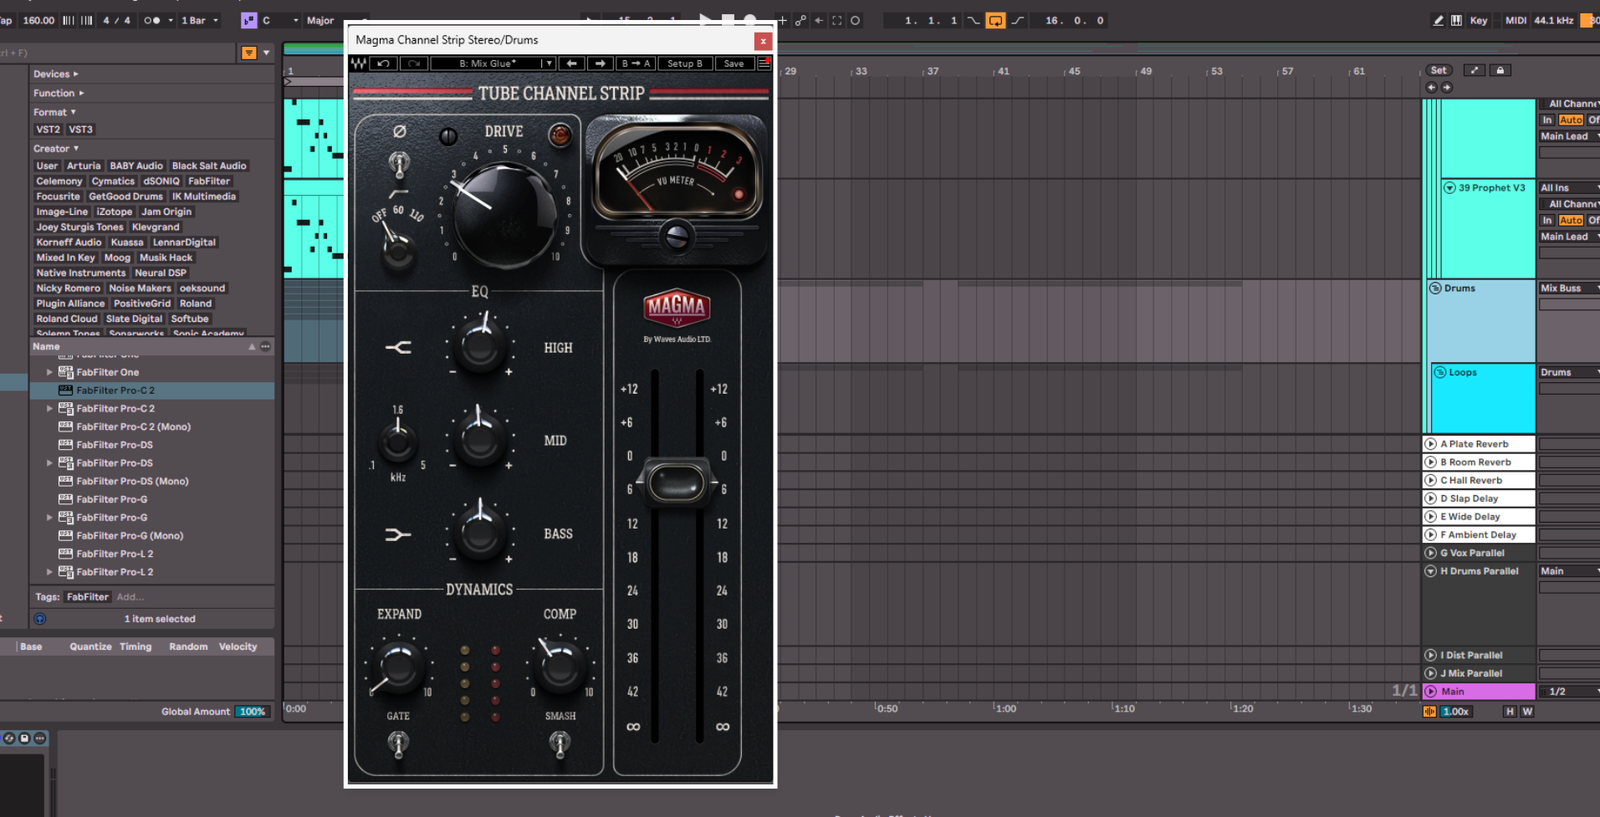
The main processing I am doing on the drums is on the entire drum bus. I have a Magma Tube Channel Strip by Waves on there doing a few things. Firstly, it’s adding some saturation to the drums. Not a crazy amount, but something to just warm it up a bit and slightly (and I mean slightly) dampen the hard transients. Then I am doing some subtle EQ moves, mainly boosting some highs and cutting a very small amount of 1.5kHz, just to brighten it up and remove some ‘honk’. Then I am compressing the drums to get just a couple dB of gain reduction. I am not slamming the drums with compression, just slightly taming it and gluing it all together. Let’s have a listen:
To add in some more life to the drums, I have also subtly added some percussion loops to the track. These are just live recordings of different percussion, bringing some human feel to the rhythm.
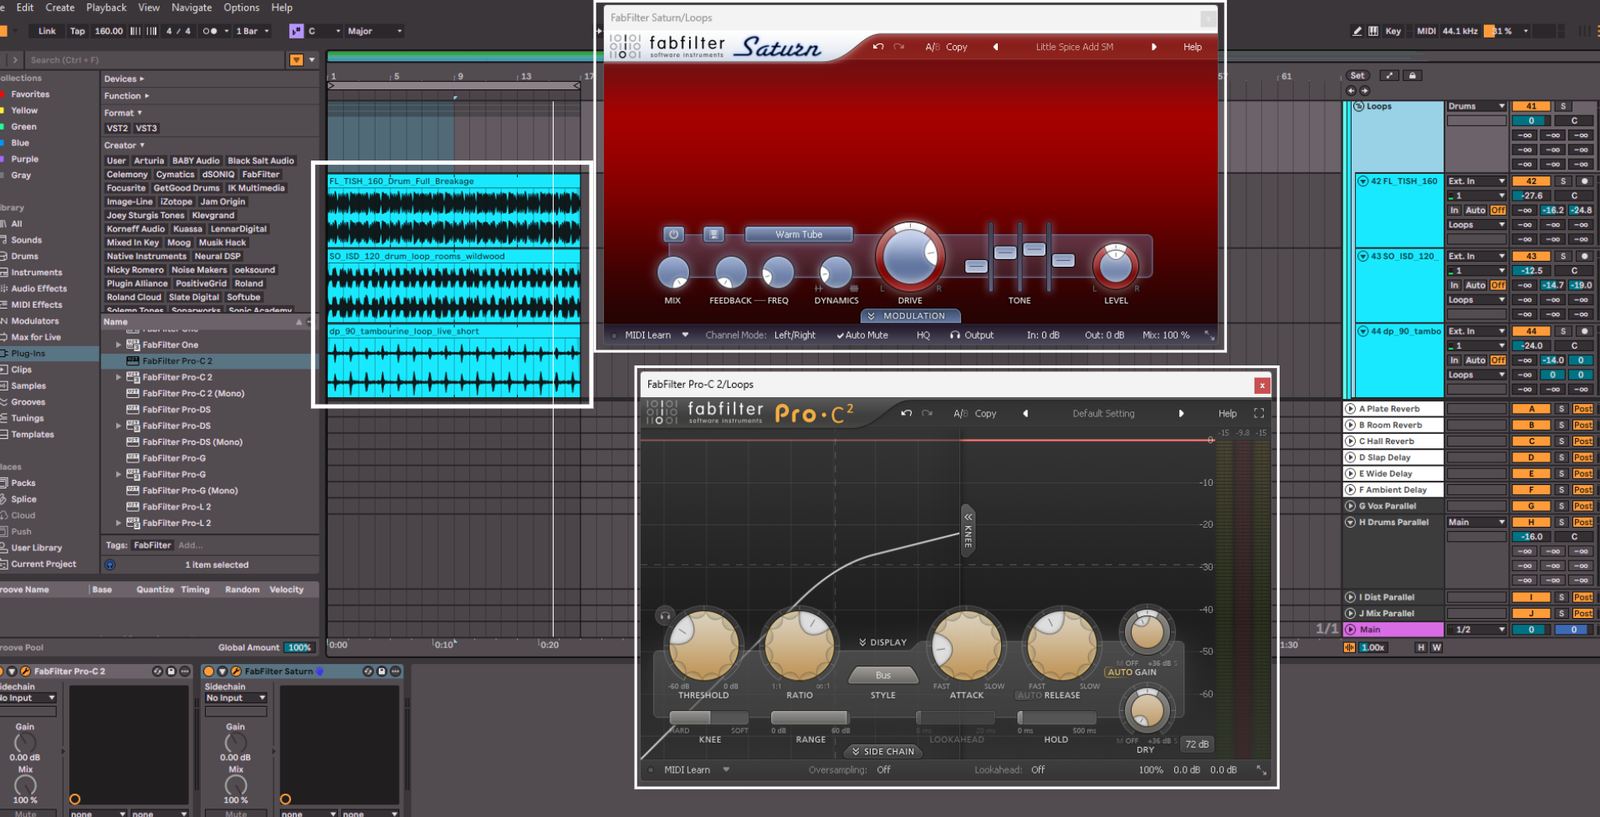
I’ve processed these by adding some compression in the form of Fabfilter Pro C2 to tame the dynamics of the percussion, so that nothing sticks out too much. I then followed this up with Fabfilter Saturn 2, which is an amazing distortion plugin. Honestly, one of my favourites. The main thing I am using this for is to shape the tone of the percussion, add a healthy amount of tube saturation, and to bring the dynamics knob down which is tightening up the percussion.
Together with the drums we have this:
Bass
For the bass part I am simply playing the main riff and octave lower. It’s filling out the low end of the track. Where it gets more interesting is the processing. I recorded the part once, but duplicated it twice. Let’s go through each one.
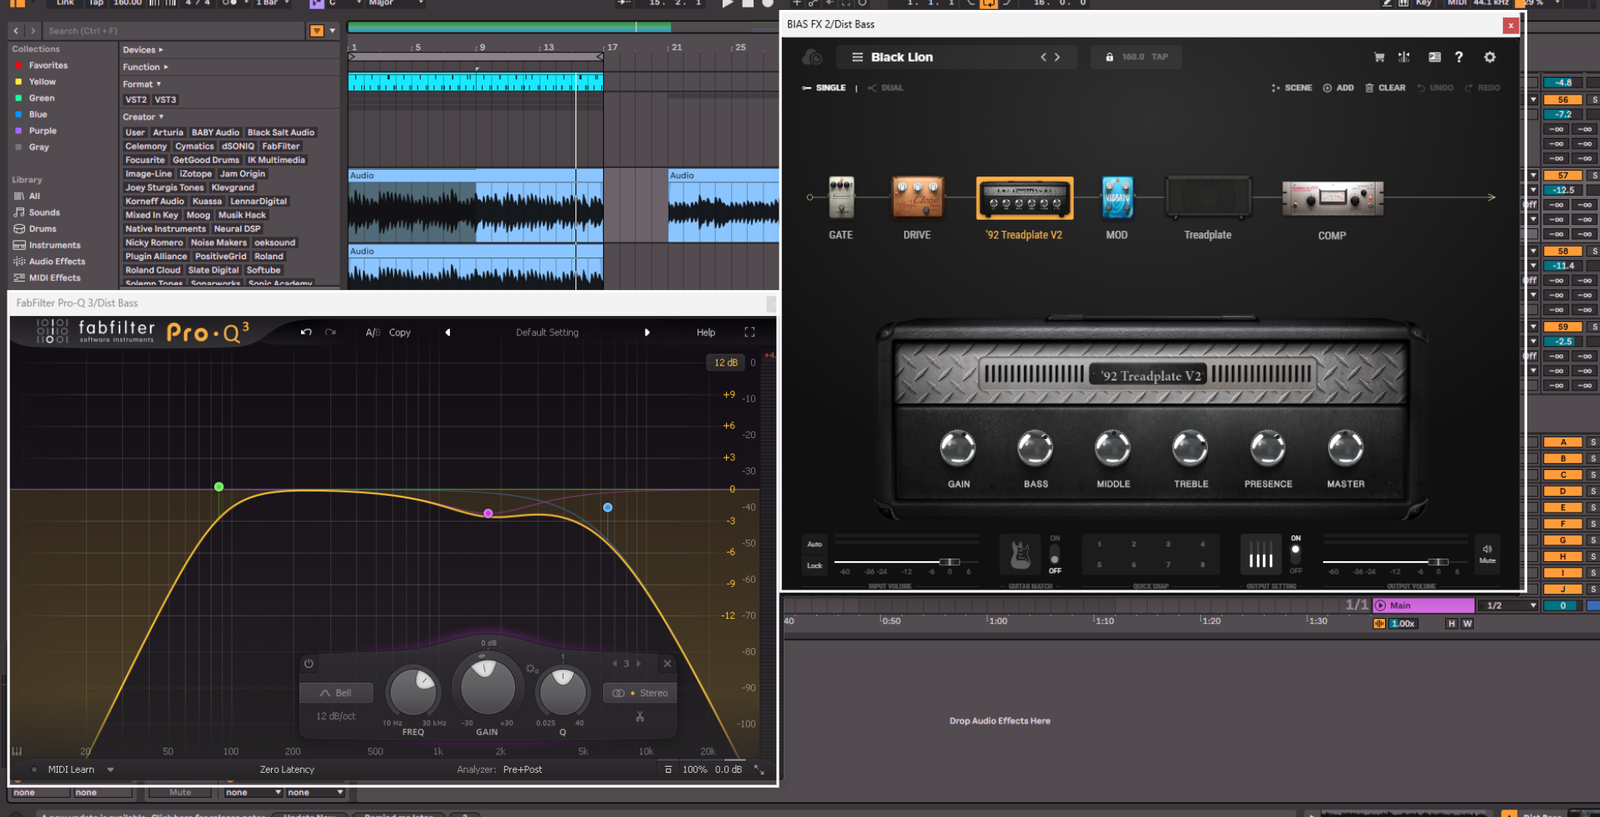
Above is the processing for the distorted bass. I’ve added some modulation too, and cut out a fair amount of low and high end. This is a texture, not the main body of the bass, so it’s blended in.
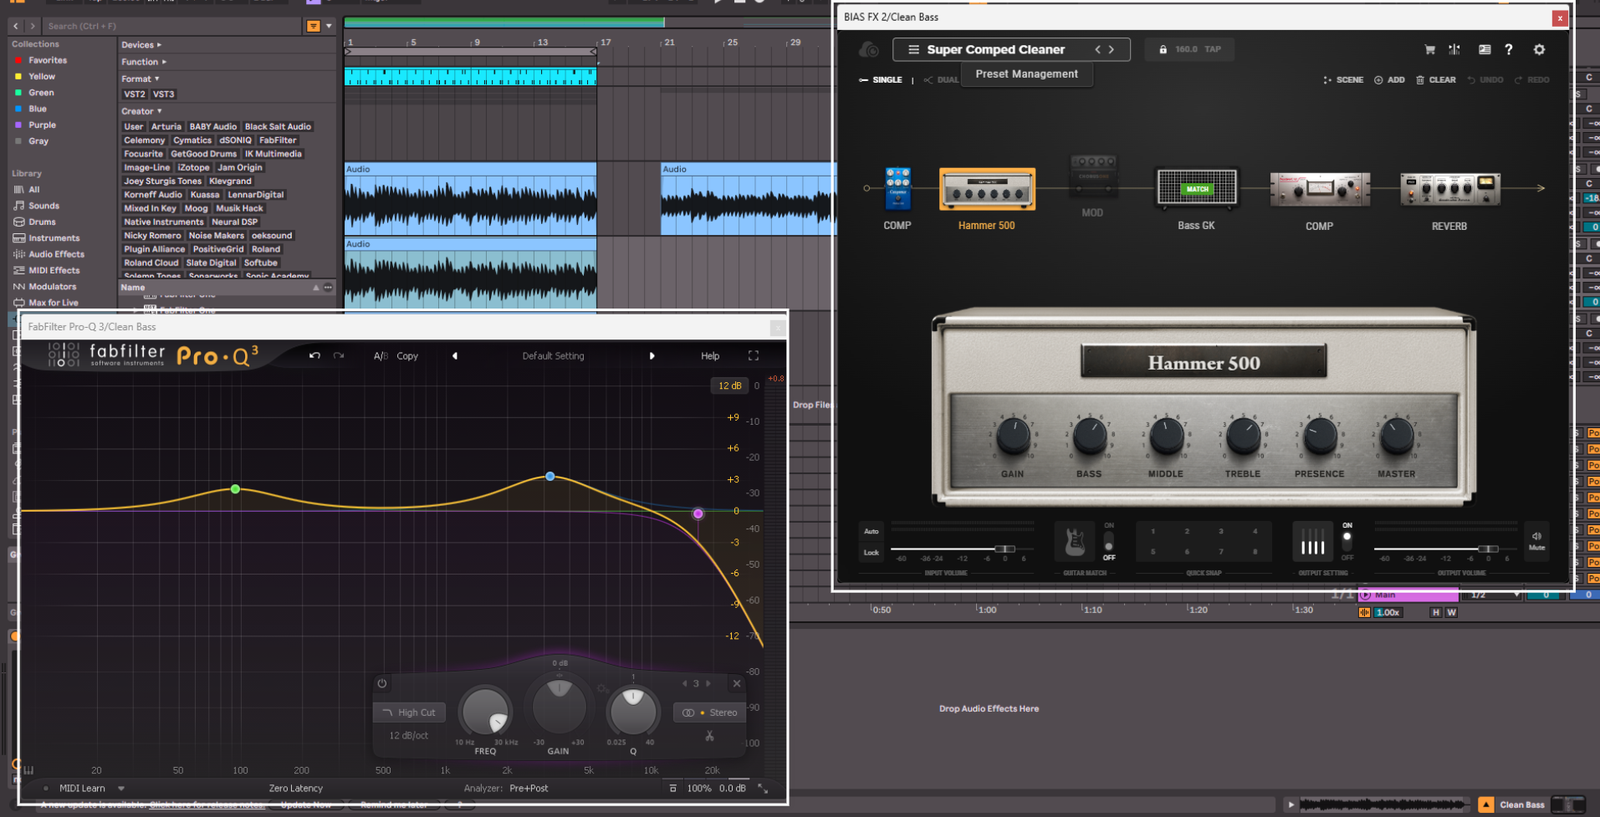
Next is the clean bass amp. This is giving us the full range of the low end of the bass, plus some attack is being brought out with the EQ move above at around 5k.
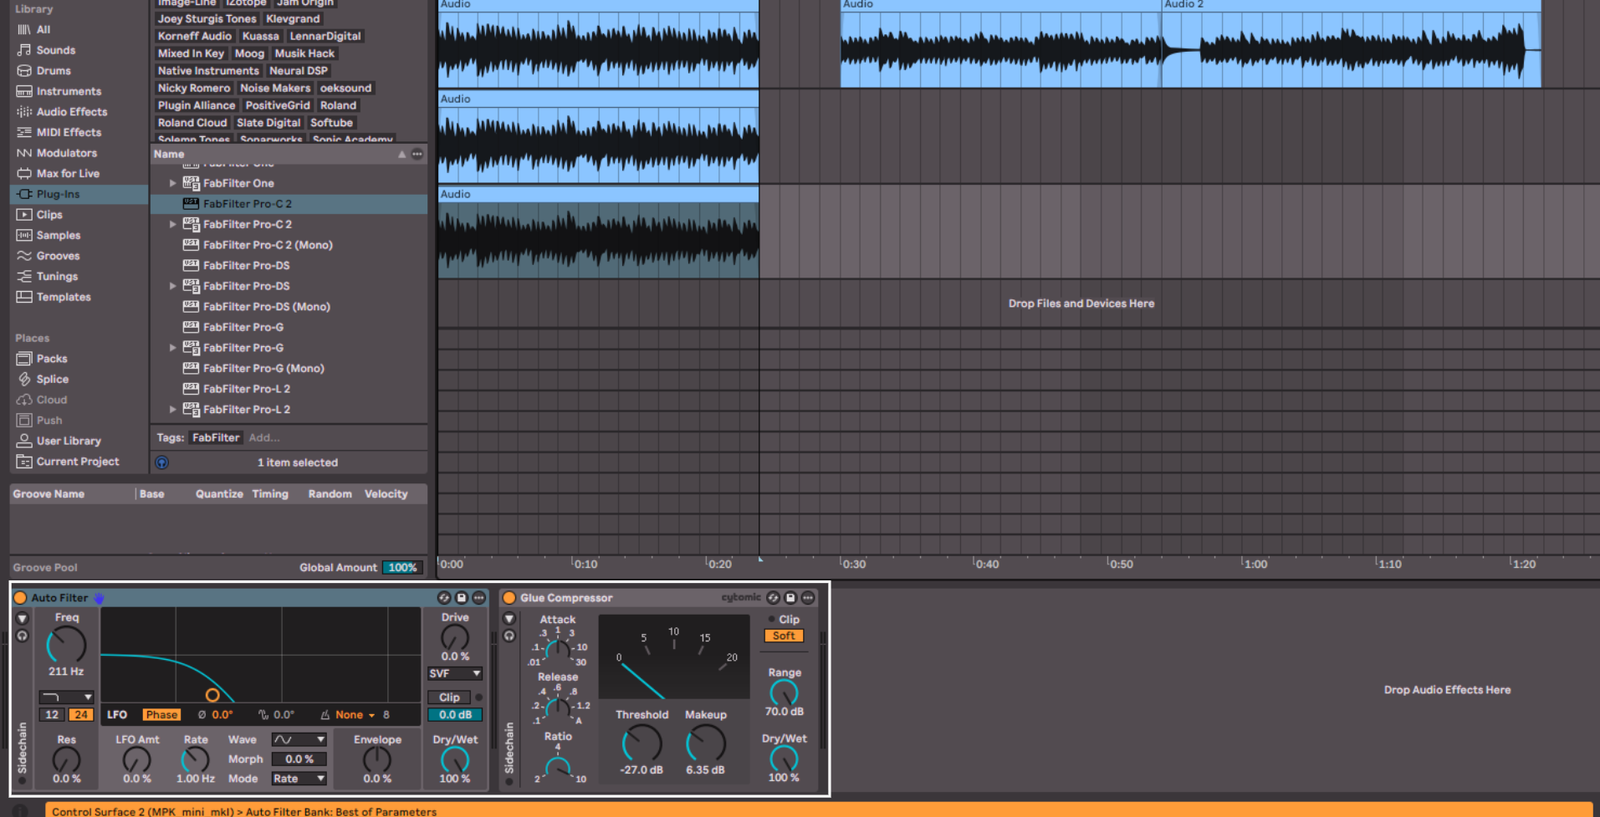
For the last bass duplicate, I pitched the whole part down an octave to get some sub-bass frequencies in the track, which helps to thicken it up. This is the filtered so only 200Hz and below can be heard, then massively compressed to keep it consistent in terms of volume. You probably won’t be able to hear this without headphones.
All together, the bass sounds like this:
Synth
The last aspect of this track is the synth, and like the guitars I have broken the synth into different sections as there is a fair bit going on. All of the synth parts are being quite generously sent to the reverb sends.
Synth Lead
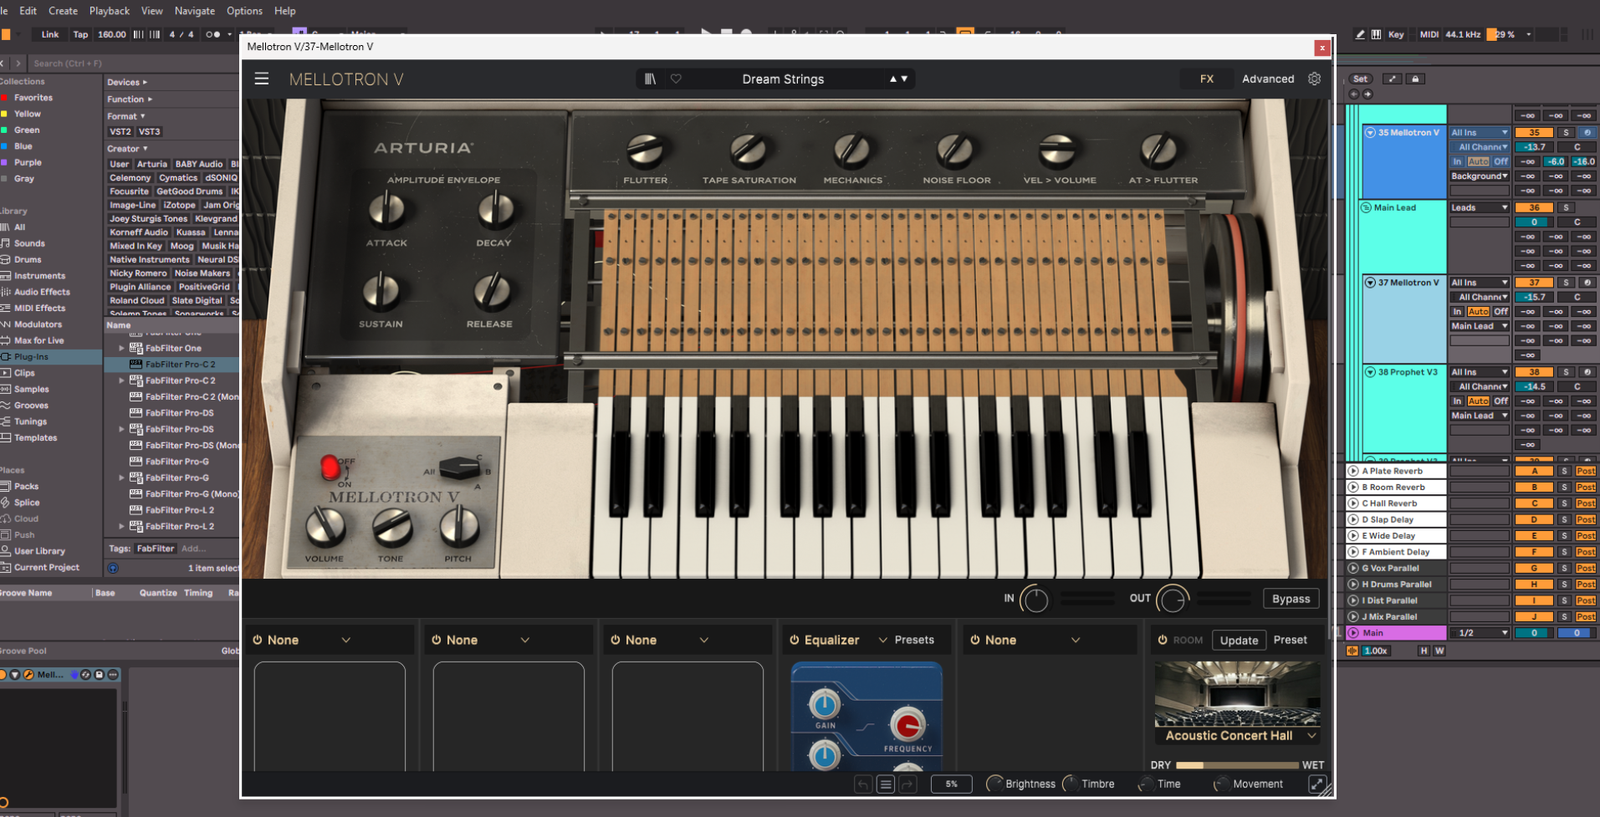
First is the synth lead, which is literally playing the same melody as the guitar. I’ve got a few layers of synths playing this provided by the Mellotron by Arturia and the Prophet 5 by Arturia.
Synth Drones
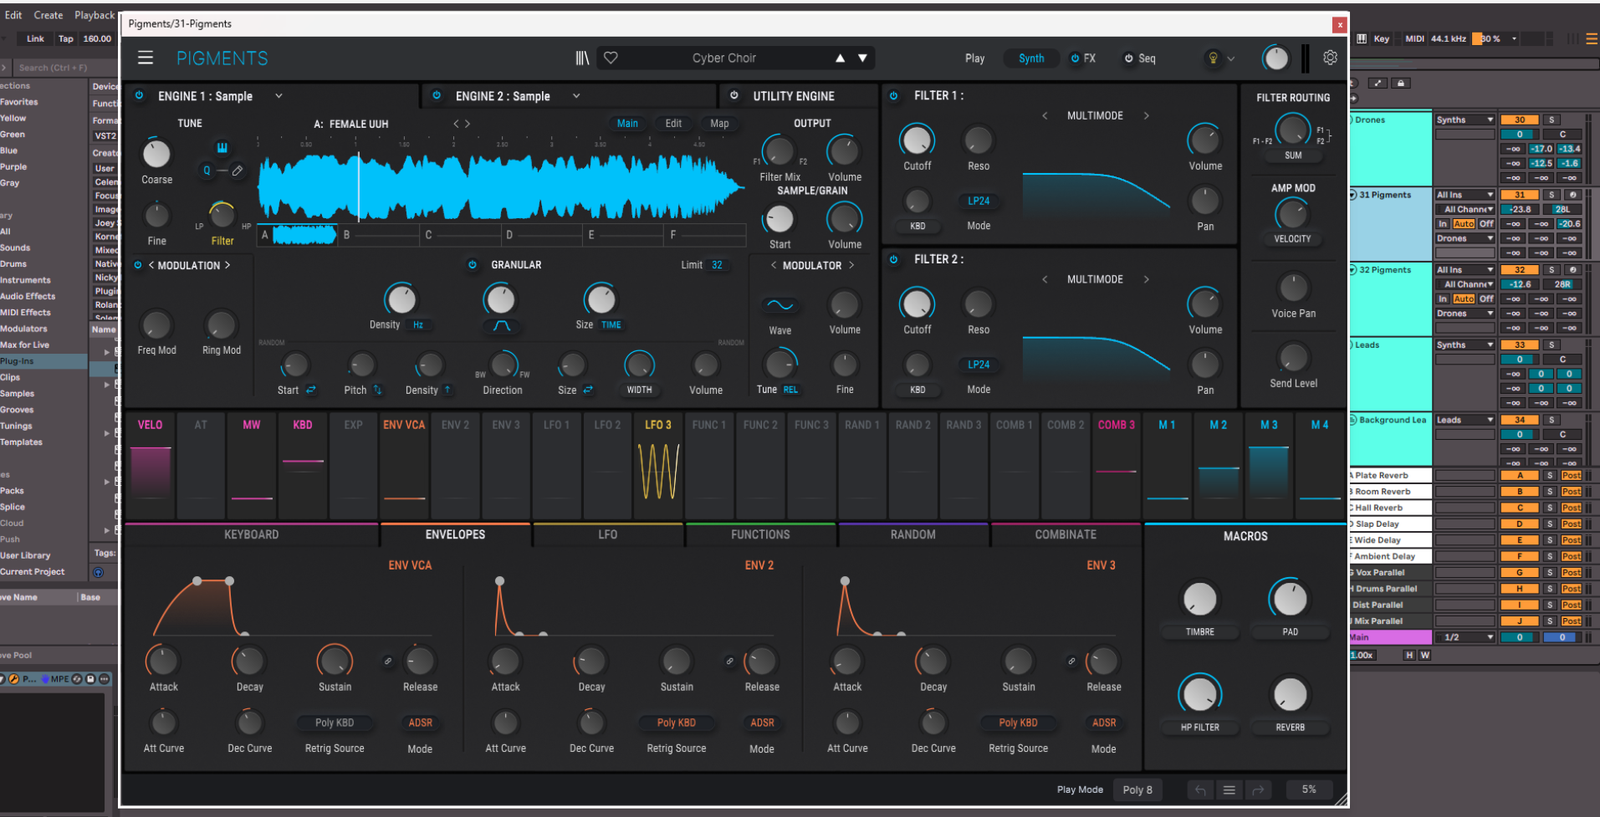
Next we have a layer of drones, which are coming from a couple of patches from Pigments by Arturia. These are just the key note (B) being played over the whole section. The patches are granular so they have a lot of movement to them.
Synth Pads
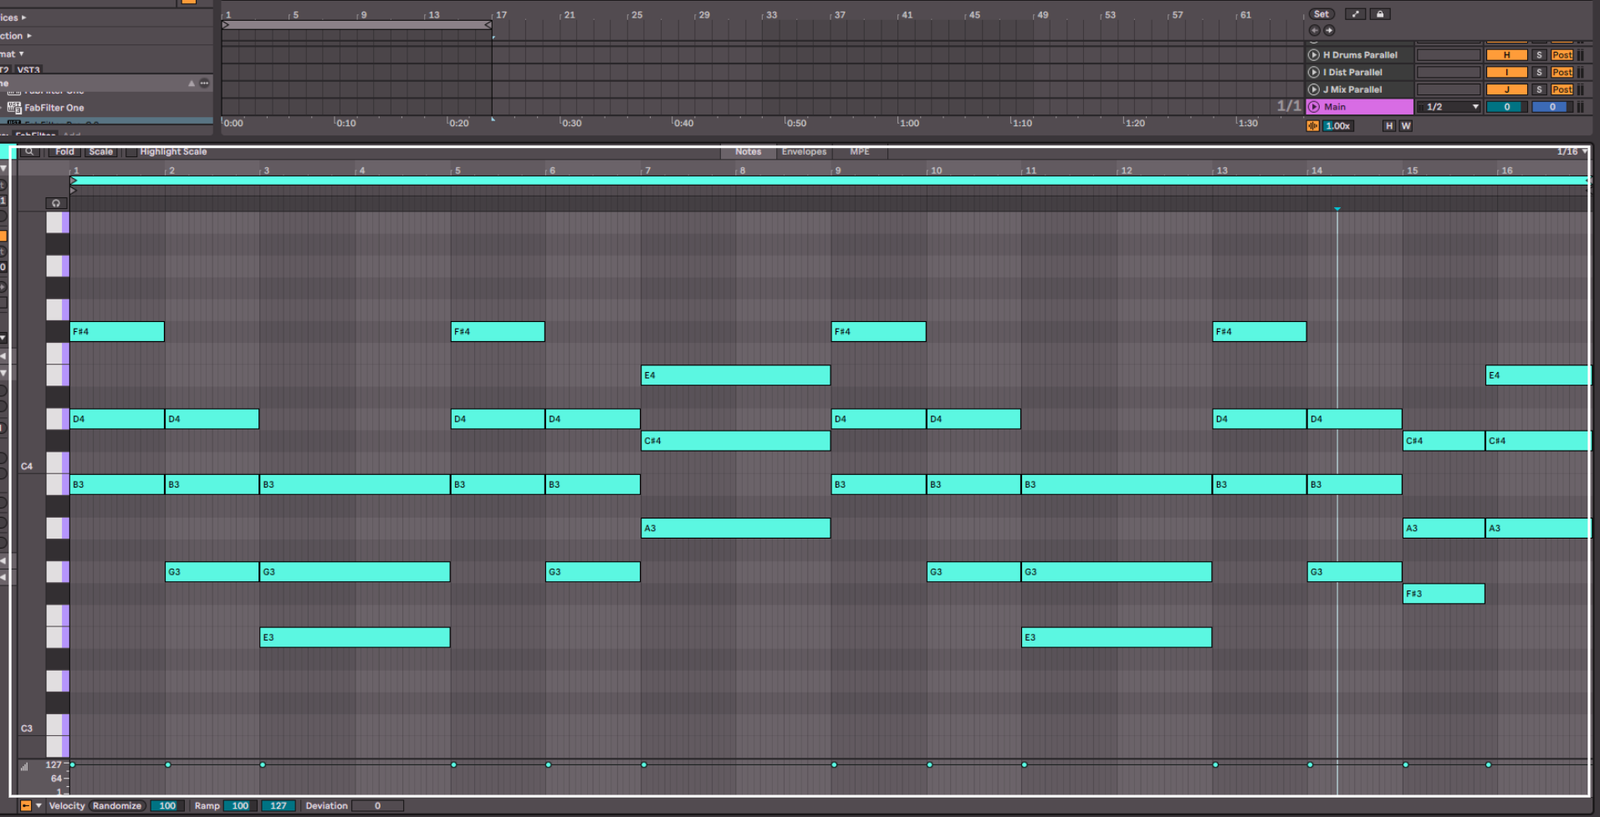
The last synth layer is the pads. These are just playing the chords that the riff is playing, but simplified. Below is the MIDI for them.
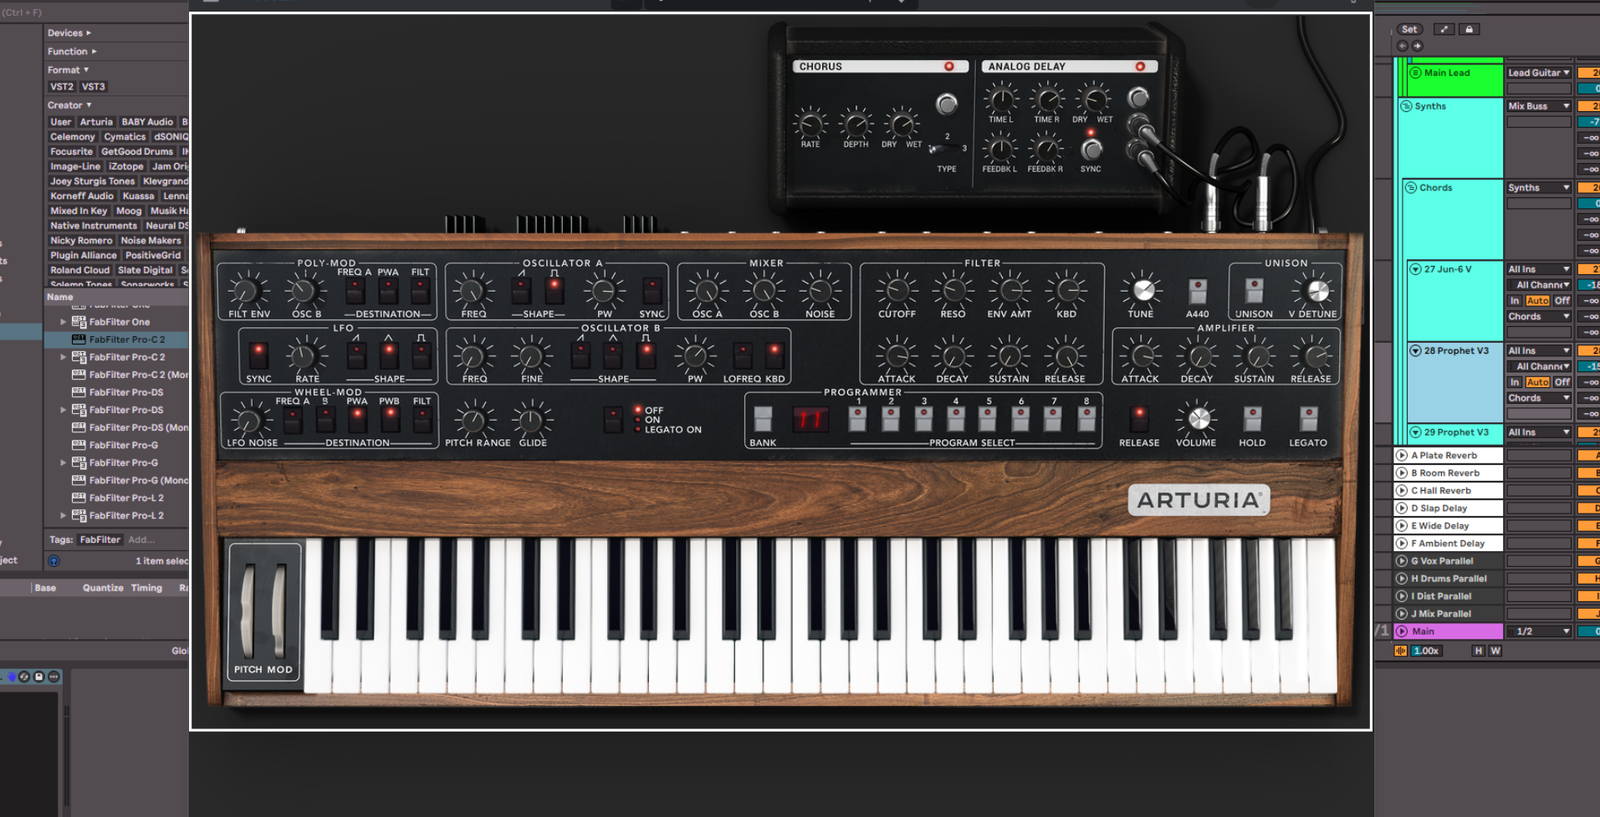
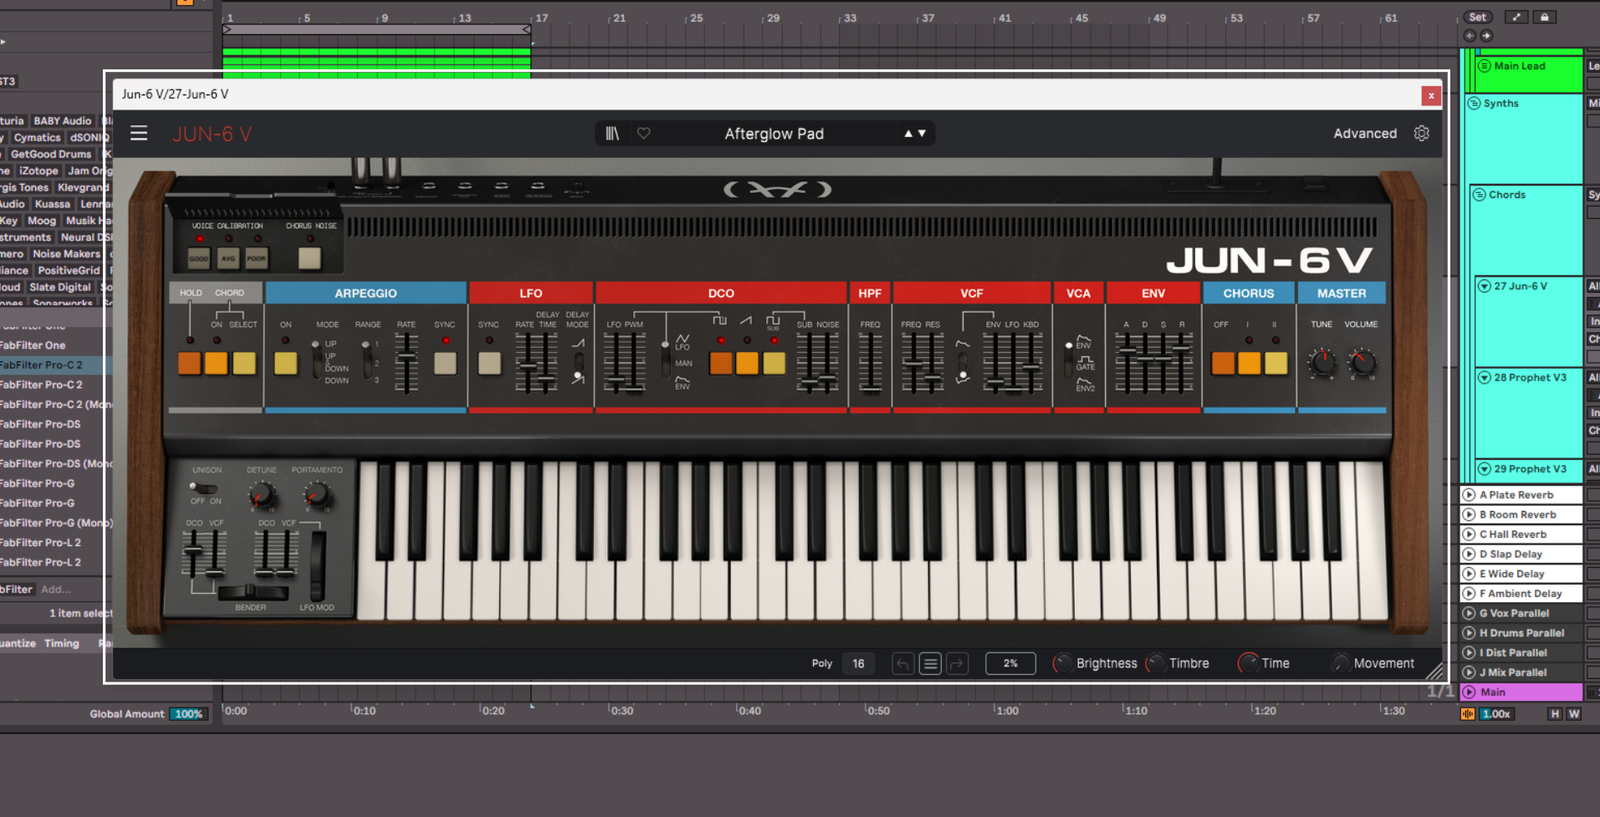
The pad sounds are coming from the Prophet 5 by Arturia and the Jun-6 by Arturia. They are just some nice washy textures to float around the track. They are very subtle in the mix, but take them out and you notice that a lot of movement and texture has gone.
Conclusion
Putting all of these together, we have this:
So now you have the fundamental knowledge of how Shoegaze is made. You can take this further by creating a whole song out of this, or you can branch out into the different styles of Shoegaze. If you want to write more of a Dream Pop song, then you can clean up the guitars. If you want to write some heavy Shoegaze, you can lessen the spaciousness of the guitars and make them more saturated.
Knowing how to produce shoegaze is just the beginning — the real magic comes from experimenting with layers, effects, and textures until you find your own version of the sound. Experiment and enjoy.

I am a music producer, songwriter, mixing and mastering engineer, sound designer, composer, multi-instrumentalist, vocalist, and musical artist. Yeah, I know, it’s a mouthful. Basically, if it involves music, I am super into it. I recently became a full-time freelancer in the music space, having dabbled in it for around 10 years. I started playing guitar at 7 years old, and I am now almost 30 (almost!). Music has been a main part of my life since I formed memories. I literally cannot remember a time before music. I adore every aspect of creating and working on music, from starting a song to mastering and polishing the final piece. It’s all incredible.
I’ve worked on many projects over the years, including my own. I release pop/indie music where I do everything, from writing to recording to mixing to mastering, and I even create all the content around it. I do this under the name Mauve Shores. A big passion of mine is metal/alternative music, so I release music with my band Midnight Paradise. The band is literally me and my best mates, so it’s super fun. I do everything except for play drums and bass in that. The final project I release under is called Heavy Blink, and I put out LoFi Beats. I’ve even had tracks reach over 250k streams on Spotify.
Outside of my own projects, I have worked in a variety of genres. I’ve written, produced, mixed, and mastered pop songs for the artist No False Feelin’, one of which got in the UK Top 40 Spotify playlist and has almost 1 million streams. I currently create drum and bass remixes for a client, some of which have over 2 million streams. I’ve done mixes for events such as a dance recital and a business event. I’ve also done some audio cleanup and sound design for a live voice over group that do their anime in person. Right now I am working on a mixture of my own stuff, and with clients. For example, I am beginning to produce, mix, and master a death metal album, and also at the same time a teen pop style song. I love the variety that comes with this line of work.
I am also super nerdy about the gear and technology revolving around music. I could talk for days about my favorite plugins for specific things. Don’t even get me started on EQs. I began as just a guitar player, so my gear obsession has definitely been more towards pedals, but the more I got into production, the more this expanded to everything.
Outside of music, I am into a lot of different things. I love to connect with nature, whether this is through hikes or even making terrariums. I really enjoy skateboarding, playing rugby, and running. I’m also into creating things in general, I always have some DIY projects going, whether that is woodwork, or electronics. Before going full-time as a freelancer, I was a software developer for 6 years, so programming is something I still enjoy and do in my free time. Of course, we can’t forget about how much I enjoy spending time with my wife and my friends.