
This article will teach you how to reduce/fix latency in REAPER, making the DAW ready for live recordings or performances. We use latency to describe how long your DAW takes to play back your input, whether MIDI or audio. Regardless of your noticing, it exists in every setup, but it mainly becomes problematic when the delay affects your performance. Hence, it’s important to lower it as much as possible by optimizing our hardware and drivers.
You can use a proper audio driver for your audio interface and decrease the buffer size to reduce latency in REAPER. An optimal sample rate like 44.1 kHz or 48 kHz can also be helpful. Similarly, avoid plugins that need latency, like limiters that “look” at the audio before it plays, during live performances.
If you are going to take something away from this article, those three tips are the most important. However, I find it crucial to understand such topics in more detail. A better understanding helps us figure out ways to optimize REAPER, particular hardware, and workflow, achieving the best performance out of our workstations.
So, let’s get into the basics first:
What Causes Latency In Computers?
Your computer constantly processes thousands or millions of calculations to generate the sounds you hear. It’s no surprise that it requires some time to do so. So, we refer to this time as latency, and the processing is the primary reason. However, there is more to it than that.
A crucial term we use in DAWs or computers, in general, is “block” or “buffer.” It is a temporary place in your RAM to hold data while it’s being moved between your computer’s processor and audio interface. So, having a smaller block size means your computer moves only a little data at a time.
Remember that “a little data” means a short time in audio. If you’re only going to move audio data constituting a tiny length of time, the computer will have to repeat the task many thousands of times to generate a second of audio. Conversely, if you were to move more data at a time, i.e., have a bigger block size, it would constitute a longer length of time. And the computer will have to repeat the task fewer times per second than before. Hence, this process is much easier on the CPU.
You’ll notice that I’m talking about the length of time in each case I’ve presented above. When you have a smaller block size, the computer transfers smaller/shorter data, requiring faster and more calculations. Hence, you’ll get less latency in your performance, albeit using more CPU resources as the computer needs to process faster. Contrariwise, using a bigger block size makes it easier for the CPU because it can wait longer between calculations, increasing latency. So, part of using a DAW is figuring out the most sensible block size according to your current task and project.
Reduce Latency
In this section, I’ll get into the detailed steps to minimize latency in your REAPER setup. There are different sets of measures depending on whether or not you have an audio interface, whether your recording latency is being compensated correctly, and if you have software performance latency. Furthermore, we’ll discuss sample rates and oversampling.
Reducing Latency (With Audio Interface)
If you own an audio interface, make sure you have it connected to your computer with the provided cable. It’s important to install the manufacturer’s drivers from their website. Furthermore, if you’re on a Windows PC, ensure you have installed the hardware drivers and other provided tools alongside an audio system called ASIO (Audio Stream Input/Output). Often, they’re installed together by the same installer.
The ASIO audio system facilitates a direct connection between REAPER and your audio interface. By default, Windows places the DirectSound system between the two to provide you with more features, often undesirable for professional use. Further, DirectSound results in more latency due to the added unnecessary features, whereas ASIO gives the lowest possible.
Mac computers do not require ASIO drivers as they use the Core Audio API, which functions similarly to ASIO.
Once you’ve installed the audio interface and drivers, follow these steps:
- You’ll find the current audio device information at the top right of REAPER. Click on the text to open the audio device preferences. Alternatively, you can open Preferences (Control + P or Command + ,) and find Devices under the Audio subheading.
- macOS Only
Set the “Audio Device” to your audio interface. - Windows Only
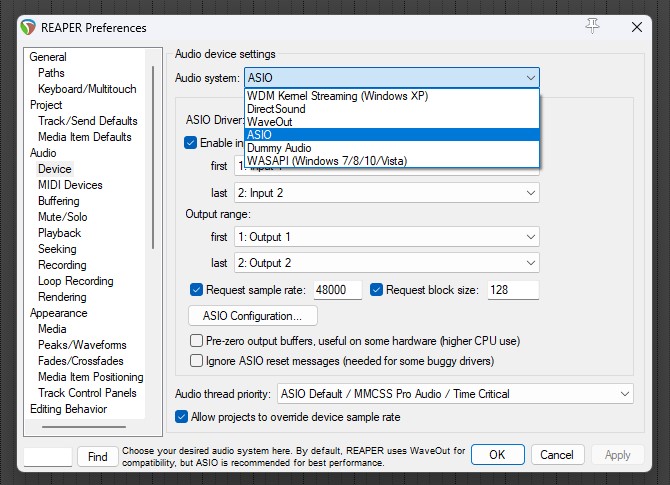
Change the “Audio system” to ASIO by selecting it from the drop-down menu.
- Change the “ASIO driver” to whatever proprietary ASIO driver you’ve installed. If there are multiple options, make sure you select the right one. For example, I use a Focusrite Scarlet audio interface, which is a USB device, not a Thunderbolt device:

- Windows & macOS
- Enable “Request block size” to allow REAPER to change the buffer size of your audio system.
- Change the block size (buffer size) to a smaller value to reduce latency. However, remember it will consume more resources and require a fast CPU. Use multiples of 2 for the block size – I recommend using 64 as the lowest.
If your computer glitches and stutters when using a low block size in a project with many plugins, I recommend switching to a larger size, like 512, while mixing or editing. Neither of these tasks requires low latency. Similarly, you can disable unnecessary plugins while recording to use a small block size without glitches.
Reduce Latency (Without Audio Interface)
Windows Only
Previously, I talked briefly about DirectSound, how it’s undesirable for professional use, and how the ASIO system is a better alternative. However, you only need the ASIO system if you have an audio interface. The WASAPI audio system is better for PCs without an audio interface.
Microsoft introduced WASAPI as an alternative to DirectSound in Windows Vista. It offers comparable latency performance to an ASIO driver, even outperforming it in some cases! Furthermore, some people might know about wrappers like ASIO4All or Generic Low Latency Driver, which are essentially WASAPI drivers disguised as ASIO. So, avoid them if you can use WASAPI directly, as with REAPER.
- Open audio device preferences by clicking on the audio device information at the top right of REAPER. Alternatively, open Preferences (Control + P or Command + ,) and find Devices under Audio.
- Change the “Audio system” to WASAPI on Windows PC. Change the “Audio Device” to your computer’s built-in device on Mac.
- Windows Only
You’ll find four options in the Mode drop-down menu: Shared, exclusive, exclusive (polled), and shared loopback. The shared mode allows other applications to use the audio device of your PC while REAPER is playing audio. So, you can’t change the sample rate, and the Windows volume control will affect the DAW. Conversely, the exclusive modes take over the audio device as ASIO drivers do. The shared loopback mode allows you to record the output of your PC as an input in a track.

- I recommend using the exclusive mode as it lets REAPER control the audio device completely. However, if it doesn’t play, try the exclusive (polled) mode.
- Windows & macOS
Adjust the block size as needed after selecting the correct input and output devices. Please refer to the previous section for more on the block size.
Sample Rate
The sample rate is the number of times a sound is sampled per second when converted from analog to digital. The higher the sample rate, the more accurate the representation of the original sound. So, if you recorded at a 44.1 kHz sample rate, it would mean that the sound is sampled 44,100 times per second. Other common sample rates are 48 kHz, 96 kHz, and 192 kHz.
In previous sections, I talked about the block size, which is a space where audio data is stored while moving it. I also mentioned that the block size essentially constitutes a length of audio. However, we must also consider how the sample rate affects the block size. An example will help:
Suppose I have two robots, A and B, and I’ve told them to move some water from one place to another in 1 second. Both robots have empty 1-liter jars to move the water with, but I’ve given Robot ‘B’ 2 liters of water to move instead of 1. So, Robot ‘B’ will have to repeat the task twice to move 2 liters in 1 second.

Think of these robots as your CPU with the water as the sample rate, the 1-liter jar as the block size you’ve set, and the number of times the robots work as the latency. Hence, if you increase the sample rate (water) while keeping the same block size (jar capacity), your CPU will have to work more times per second. Put simply, a higher sample rate results in lower latency, but it consumes more resources as the CPU is working faster.
Raising the sample rate is the same as lowering your block size. However, some audio interfaces’ ASIO systems limit the lowest block value. In such cases, increasing the sample rate can be a simple workaround to lower the latency if your computer can handle it:
- Open the audio device preferences page by clicking on the audio device information at the top right corner of REAPER.
- Check “Request sample rate.”
- Change the sample rate to what you want. I recommend using 44100 Hz if you only produce music and 48000 Hz if you work on films, games, and TV or intend to release music on streaming/video platforms. However, if the block size doesn’t go down far enough to avoid latency, use a higher sample rate like 88200, 96000, 176400, 192000, etc.
Plugin Samples
The block size we’ve discussed so far relates to the DAW’s buffer. However, each plugin you add to your project might have a different block size, especially if they use oversampling. Oversampling means processing audio at a higher sample rate to improve quality and accuracy.
Changing the block size or adding latency for features like lookahead in compressors will affect the latency performance of REAPER. You can see how many samples the plugin requires per block in the FX chain – anything above your chosen block size in the audio device preferences will add more latency. Furthermore, you’ll also find the samples required per track, summing the samples consumed by each plugin, in the chain.

If a plugin you’re using adds too much latency, try swapping it for a lighter plugin. Generally, the stock REAPER plugins add little to no latency. So, they make great temporary substitutes if you don’t want to replace your preferred plugins. Similarly, some third-party plugins offer latency-free real-time operation while performing the final render with oversampling and other features. You can typically find this option in the plugin’s settings.
Recording/Playback Latency Compensation
A rare problem you might face is your recording not being where you played it. So, you’d have to manually move the recorded items to place them at the intended time. This problem occurs when your audio interface doesn’t report the correct latency value to REAPER.
When you’re recording or playing, there will always be some latency between a DAW and the audio interface because of hardware limitations. Simply put, the audio interface “hears” your input audio before REAPER does and also before it plays the output from REAPER. So, REAPER has to adjust the input audio or MIDI according to the audio interface’s reported latency. The reported latency might be inaccurate if your interface’s drivers aren’t up to date or compatible with your OS.
Hence, your first step to correcting this issue is updating Windows and drivers. If you use macOS, I recommend looking up if your interface is compatible with your current or future OS version before updating. If updating doesn’t help, here’s what you can do:
- Open Preferences by pressing Control + P or Command + , (comma).
- Find Audio on the left pane and click the Recording subheading.
- If it isn’t already checked, turn on “Use audio driver reported latency.” Try recording and see if the issue is solved.

- If your issue wasn’t solved, use the “input manual offset” values on the right to correct it. Using positive numbers moves your future recordings backward (toward the left on the arrangement page).
A neat trick to test the latency compensation is playing the metronome on your monitor speakers and recording it with your mic. The recording should be perfectly on time. Be sure to turn off monitor input on the track to avoid feedback noise.
Software Operation Latency
REAPER offers several options that change the buffer of your project’s media items and the latency you experience when operating the DAW. Note that these features do not affect your MIDI or audio input. Instead, they affect how quickly REAPER responds to commands like pressing the spacebar to start playback.
Since some of these options affect the efficiency of your CPU and RAM, you can expect some performance boosts by optimizing them. Better CPU efficiency means you can use a smaller audio device block size, thereby reducing your recording latency. Follow these steps to adjust the buffering options:
- Open Preferences by pressing Control + P or Command + , (comma).
- Find Audio on the left pane and open the Buffering subheading.

- The “Media buffer size” value changes the audio length to preload on your RAM. If your hard disk is slow, you can increase this value. However, the default 1200ms is fine for most cases.
- Ensure “Disable media buffer for tracks with open MIDI editors” is checked. It reduces latency while working on the piano roll, although at the cost of some CPU.
- You can uncheck “Disable media buffering for tracks that are selected” in most cases. However, if you often work with audio and are experiencing software latency while editing, enable this option.
- Enable “Anticipative FX processing.” Set “Render-ahead” to 200ms.
- Enable “Allow on tracks without FX” to avoid crackles and glitches when setting a low audio device block size.
- Disable “Allow on tracks with open MIDI editors” to avoid software latency.
- Enable “Allow live FX multiprocessing” and leave the CPU count at default. If unsure, open the Task Manager or Activity Monitor to find how many logical processors (threads) your CPU has. Alternatively, search the thread count for the model of your CPU on the internet.
Conclusion
Much of the recording latency comes from the audio device’s block size. So, using proper audio systems like ASIO or WASAPI and lowering the block size helps you get the best performance out of your audio interface and computer. Issues like plugin samples, latency compensation, and software latency are often the culprits when changing the block size doesn’t help.
SWS Extension has an action to bypass all effect plugins on a track with a press of a shortcut, allowing you to record without latency. I have one on a toolbar for easy access. Furthermore, you might also try increasing the block size while mixing and lowering it while recording for optimal performance.
If nothing helps, you can also consider upgrading your CPU. Remember that your audio interface’s model has little to do with the latency; any modern interface works perfectly well. Instead, it’s your CPU’s clock speed that matters. A faster CPU allows a smaller block size, resulting in lower latency. I recommend looking for a CPU with at least 4 cores (8 threads) and a 3 GHz boosted clock speed.
And with that, we’ve reached the end of this article. I hope you’ve found it helpful to learn how to reduce all kinds of latency in REAPER. Happy music-making!

The Integraudio Editorial Team consists of experienced music producers, audio engineers, and plugin enthusiasts dedicated to providing in-depth reviews and guides for music production software.