
Let’s explore the various features necessary for electronic music production and find out if REAPER has what it takes to be good for electronic music.
The popularity of DAWs like FL Studio and Ableton Live among professional electronic music producers has made them and similar DAWs the default choices for many producers. Similarly, abundant learning material is available online for such DAWs, making them a sensible choice among beginners. However, you might sometimes feel like moving away from mainstream choices, often leading to better creativity and perhaps even workflow improvement!
While I have used DAWs like FL Studio, Ableton Live, Bitwig Studio, etc., I currently use REAPER exclusively. Although, I don’t make electronic music alone, which makes my choice somewhat biased. However, I will attempt to enlist all the pros and cons of REAPER and other DAWs to help you make an informed decision.
Is REAPER Good For Electronic Music?
Yes, REAPER is good for electronic music as it’s a highly customizable DAW, allowing nearly any type of workflow. However, it lacks built-in instruments and has a learning curve. While REAPER can do almost anything, many of its features come from extensions and scripts, which may be complicated for beginners.
Still, many producers use REAPER as their DAW of choice because of its customizability, low price, and third-party plugin compatibility. The customizability includes UI themes, keyboard shortcuts, user-programmed scripts (thousands available online), plugins programmed inside REAPER, toolbars, touch-screen shortcuts, etc.
REAPER has maintained a low price due to Cockos’ business model and the lack of built-in instruments. Consequently, the latter reason adds further customizability. Unlike in most other DAWs, you can pick whichever instruments and plugins you want to include without spending twice.
DAW Types
Two main types of DAW software are available today: linear and non-linear. A linear DAW has an arrangement page or playlist where you see all the recordings and tracks you’ve created. Furthermore, the tracks (MIDI or audio) are listed vertically, whereas the time is recorded horizontally.
A non-linear DAW does not follow this tradition. Instead, it lets you create sequences or clips, each of which is almost like an arrangement by itself. You place these multi-track clips or sequences on the actual arrangement page to form a song.
If you’ve ever used a tape recorder, you’ll find a linear DAW much more straightforward. On the other hand, many people love how a non-linear DAW allows you to create loop-able, bite-sized sequences of music that you can fit together with other ideas to end up with a complete song. REAPER, Cubase, Cakewalk, etc., are perfect examples of a linear DAW, whereas FL Studio is the only major DAW strictly following the non-linear workflow. Ableton Live and Bitwig Studio incorporate some non-linear features to form a hybrid workflow.
Neither workflow is better for all use cases, making the comparison highly subjective. Nowadays, most DAWs quickly innovate and add features you find in another DAW. So, you can do everything you’d need to produce music in any DAW except for highly specific tasks. For example, Nuendo allows integration with video game middleware, while REAPER and Digital Performer let you work on films with subprojects.
Hence, instead of trying to prove that REAPER is better for electronic music, I’ll cover how you could accomplish the same tricks and workflows a typical music producer might be used to in a different DAW like FL Studio and Ableton Live. After that, I will enlist some other features in REAPER that you might find interesting for electronic music production.
Essential Features
Arrangement Page/Playlist Features
One of the major distinctions between traditional and modern producers is how they utilize drums and percussion samples. While it’s common for most traditional musicians to keep samples in samplers and program them by playing or sequencing, electronic producers prefer to add them directly onto the arrangement page.
Consequently, the latter get to manipulate the samples, even chopping them up for creative rolls and glitches.
REAPER allows you to add samples directly onto the arrangement page as well. Anything you add on the arrangement page (MIDI, audio, video, SMPTE, or empty) is an item. Then, you can manipulate each item any way you want.
You can enable ‘loop’ in each item, allowing you to drag the ends of the item and create an endless loop. Similarly, razor editing lets you select groups of time and items to copy or move them:

Furthermore, REAPER allows you to add automation envelopes directly to the item. The default envelopes include volume, pan, mute, and pitch.
Alongside various tools like playback rate, formant-preserving pitch adjustment, reverse, channel selection, etc., in the media item properties, these envelopes offer deep manipulation of your samples. And that’s without even another one of my favorite features:
Takes & Take FX
When you record live, you might have to record multiple times to capture the perfect performance. Each recording is called a take, and REAPER lets you store multiple takes within one item. Then, when editing, you can select the best take per item or even a good portion of a take by chopping the item into multiple pieces. You might know of a similar feature called comping from Ableton Live or Studio One.
The item envelopes I was talking about in the previous section are actually take envelopes. So, you could add the envelopes to an item and each take! Similarly, REAPER allows you to add plugins like VST reverbs, EQ, compressors, etc., to each take, and you can add take envelopes for the automatable parameters of the plugins.

Furthermore, REAPER can use both effect and instrument plugins as Take FX. Hence, from adding corrective EQs and pitch correction to audio recordings and VST instruments to individual MIDI items, Take FX with envelopes opens a new world of audio manipulation and creativity for electronic music production.
Media Explorer
The media explorer lets you explore and import files from your storage drive to your REAPER project. You can import audio, video, MIDI, and project files. Furthermore, you can create databases of files from multiple directories to collect them all in one place. A good use of this feature is to create a database of snare samples from multiple folders.

The simplest way to import an audio file is by dragging and dropping it into the arrangement page. However, if you right-click an audio file, you will find options to import it into REAPER’s proprietary sampler Reasamplomatic5000 (RS5K). While it isn’t the most powerful sampler, importing drum samples and triggering them with MIDI notes is handy.

Likewise, Media Explorer lets you change the sample file from all selected items. Suppose you have added kick samples directly onto the arrangement page. If you dislike the kick sound, you must replace all the kick items in your project. Doing so manually would undeniably be tedious. Hence, this feature is crucial to keep in mind. Here’s a gif showing you how to do it:

Other features of Media Explorer include pitch detection, changing the preview and import rate, cropping audio before importing, metadata editing, etc.
Routing & Sidechaining
Routing involves sending the audio output of one track into another. Typically, you use this feature to create a bus or effect send, a single track with an effect like reverb. Sending multiple tracks into this effect bus saves CPU resources since you only use one plugin instead of one on each track.
Another common use of routing is creating sidechains, which is when you send the output of ‘Track A’ into a plugin on ‘Track B.’ Then, the plugin will analyze ‘Track A’ and process the audio in ‘Track B.’ Typically, we use this feature to ensure two instruments with similar frequency content, like bass and kick, do not clash.
For instance, you could send the output of a kick track into the compressor of a bass track so that the bass volume is lowered every time the kick sounds. You could do the same for the synth, creating the familiar ducking sound in EDM.
In this case, the compressor compresses the synth while analyzing the kick. Similarly, sidechaining a dynamic EQ is an excellent way to create spectral room in your mix.
Most tracks we use for music production are stereo (with channels 1 and 2 designated for the left and right speaker). However, REAPER allows you to have multiple channels per track. For example, the sidechain signal I mentioned previously is sent in channels 3 and 4.
Surround sound and Ambisonics mixes in films and games utilize more channels like 6, 8, 12, or even higher. You could use these extra channels (up to 64) to add creative mid/side or frequency-based effects without routing to multiple stereo tracks.
Piano Roll
The piano roll is a MIDI editor page where you can write notes manually with a mouse or edit existing notes you’ve recorded. It displays chromatic pitch vertically, with a virtual keyboard helping you keep track and the timeline horizontally.
However, since the piano roll is a vital component of electronic music production and each DAW does it differently, one of the producers’ biggest concerns is its ease of use. Some DAWs have tedious piano roll editors.
Fortunately, REAPER isn’t one of such DAWs, and its customizability ensures ease and comfort even to those coming from another DAW. Users of FL Studio will be happy to know that REAPER allows you to modify the mouse functions to add and delete notes with your left and right mouse clicks.
Similarly, holding and dragging can be set to marque selection, although I prefer the default right-click and drag myself.
I recommend first trying out its default drag-to-write and double-click-to-delete setup and then changing the mouse modifiers if needed.

REAPER allows you to open multiple piano roll editors per project, one for each track or even a MIDI item! You can have multiple editors open if your screen is large enough. Alternatively, you can view and edit multiple tracks in a single piano roll. It’s like “ghost notes” in FL Studio but with editing functionality and no pattern limitations.
Other crucial features in REAPER’s piano roll include custom scales, humanizing, quantizing (with strength and groove), naming notes (for key switches), moving the mouse wheel to change velocity, velocity ramping, etc.
You’ll also find a node-based MIDI CC editor, which lets you create smooth curves for modulation, pitch, expression, etc., with merely a few clicks. Furthermore, scripts can add chord writer, strummer, CC transformation features, CC LFO generator, and more.
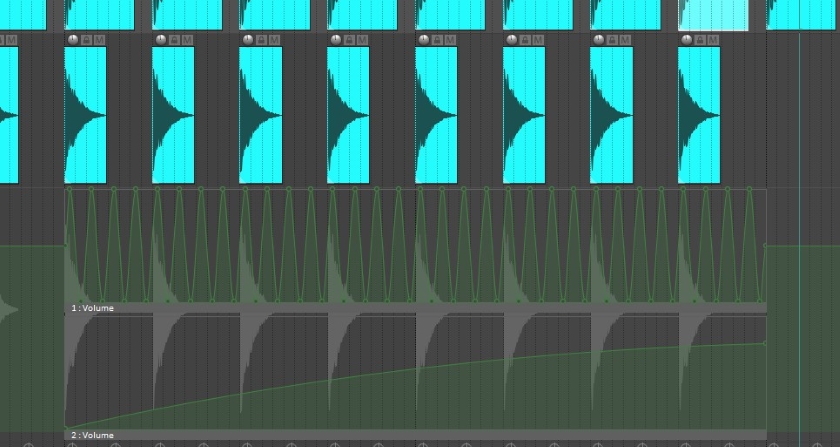
Automation Items
The easiest way to add automation in REAPER is by setting up a keyboard shortcut to show the track envelope for the “last touched parameter.” Then, you can click on a parameter, press the shortcut, and the envelope will appear for the track.
You can create the envelope curves as you want in linear, square, slow start/end, fast start, fast end, and Bezier shapes. However, electronic music production often requires you to copy a section of envelopes to another part of your track, modify, or loop it. That’s where automation items come in.
An automation item is a section of envelopes grouped and turned into an item or clip. FL Studio users will be familiar with the concept – the automation clip in FL Studio is essentially the equivalent of REAPER’s automation item. Furthermore, automation items allow you to generate LFOs to modulate the parameter.
You can even have multiple automation items for a single parameter playing simultaneously to try out creative effects effortlessly. For example, if I had one automation item for an LFO and one for a volume ramp, I’d easily create a volume ramp LFO by placing them together. Here’s how it would look:
You can also create pooled duplicates, which means any changes you apply to one item will be applied to the duplicates.
Conversely, unpooled duplicates create new copies with no link to the original – it’s basically “make original” in FL Studio or “real copy” in Cubase. When you’re done working with automation items, REAPER allows you to change the items back into regular envelope nodes. You can add further changes to the envelopes after that.

Stretch Markers
Stretch markers allow you to correct the timing of an audio recording by stretching various sections of the audio item. If you’ve used Ableton Live or Cubase, you know this feature as warp markers or audio warping. However, REAPER uses different algorithms like zplane’s Elastique (Pro, Efficient, and Soloist) 2 and 3, Rubber Band, the creative Rrreeeaaa, etc., than the DAWs mentioned above.

Besides selecting the stretch algorithm, REAPER allows you to change a few more audio stretch settings for each media item. Two of the most important options are fade size and optimization modes. Generally, I leave the mode option at its default, although it can be helpful for certain vocal content. Likewise, increasing the fade size can greatly improve the stretch quality, especially of vocals.

Parameter Modulation
Parameter modulation uses modulators like LFO shapes to automate a plugin’s parameter. Most electronic music producers are familiar with it and use it as an integral part of their workflow. Hence, REAPER offers an LFO and envelope follower for modulating any automatable parameter in a plugin:
- LFO
The LFO modulator automates the assigned parameter in one of these six shapes: sine, square, saw (left), saw (right), triangle, and random. You can set the LFO to run freely or sync to your project’s tempo. Similarly, you can assign the baseline, speed, strength, phase, direction, and phase reset modes of the LFO. You can’t automate any of the parameters in this LFO. - Audio Control Signal
The envelope follower or ‘audio control signal’ modulator uses the input audio to alter the selected parameter. Essentially, it turns a knob left or right in your plugin based on the loudness of your input audio. So, if you applied this modulator on a volume knob and set it up to reduce the volume whenever the audio gets louder, you essentially get a compressor! Ergo, the modulator has a similar UI to a graphical compressor.
The two modulators I’ve talked about come in the box with REAPER. However, as with anything in REAPER, you can easily find more MIDI modulators in the form of JS plugins (plugins written in REAPER found in the official forum/stash). These include envelopes with MIDI input, more advanced LFOs, sequencers, arpeggiators, key followers, etc. The coolest thing about using these modulators over the default ones is that they’re automatable. So, I use them whenever I want to design complicated sounds.
Assigning a JS modulator is the same process as the default modulators: click on a parameter, open the “Param” menu, and find “Parameter modulation/MIDI link.” Then, you can either select one of the default modulators or “Link from MIDI or FX parameter.” The latter allows you to use a JS modulator, but make sure you place the modulator above the plugin you’re looking to modulate in the FX chain. Here’s an example with the JS modulator ReaRack2’s LFO:

Note that JS modulators aren’t the only modulators you can use in REAPER. Many VST modulators to generate CC data are available for free or purchase. For example, GSDSP’s Magic MIDI Modulation is an excellent modulator with an LFO, custom LFO, amp follower, pitch follower, spectral followers, etc.
Resource Optimization
REAPER is well known for its efficient use of computer resources thanks to its excellent coding and resource-friendly UI design. Beyond that, it also provides various features and options that can help you optimize the DAW for your workflow and computer.
For example, it lets you select what kind of multi-core CPU processing you want, whether to bypass unused plugins automatically, media buffering for hard disk/SSD, anticipative FX processing, etc.
REAPER offers one of, if not the most, rock-solid performances with effect and instrument plugins. It can load 32-bit and 64-bit plugins and keep buggy plugins in a separate process to prevent crashing your project session if the plugin crashes. However, you have to identify a plugin as buggy for REAPER to run the plugin in a separate or dedicated process.
By default, REAPER keeps all of the plugins in its own process. Here’s how separate or dedicated process works:
A separate process means all the instances of the selected plugin (like Serum or Kontakt) will now run in a new process, separate from REAPER. Suppose you had five instances of Kontakt in a project, and one crashed. Then, all five Kontakt instances will stop working, although your project will be safe.
A dedicated process loads each instance of a plugin in a new process. So, if you had three Serum instances in a project, you’ll find three processes in the Task Manager or Activity Monitor other than REAPER itself. Should one of the instances crash, the remaining two will keep running. While this method may sound better, each instance will show a “bridged” window and consume more resources, which may be annoying. Hence, I recommend it only for known buggy plugins.
Considering these features and the lightweight DAW, it’s no surprise that many people without powerful computers prefer using REAPER. Users of FL Studio, another lightweight DAW, should find similar or better performance from REAPER. However, if your REAPER isn’t performing well, I have written another article about optimizing the DAW.
Curated Features
Project Bay
Project Bay is like Media Explorer but is for your project’s media files and user-created libraries. It gives you an overview of the audio items, MIDI items, FX, item groups, comps/takes, and automation items you have in your project. However, while they’re useful, my most-used tab is the first one, called source media.
The source media tab shows you all the media files (usually audio) referenced in your project. If you add a sample, it is added to this page, and if you enable “retain” for that file, the file stays on the source media tab even if you delete it from your arrangement page. Furthermore, you can create additional bays or libraries that you can bring up in any REAPER project.
For example, you could keep your ethnic percussion samples in one bay and vocal samples in another as a library to load into any project. Moreover, Project Bay allows you to create folders to organize your files. You can drag and drop the files from your bay to your arrangement page to import them into your project.

Next is the media items tab, which shows any media item (audio, MIDI, and video) in your project. Like the source media tab, you can use the “retain” option to keep the items available even after deleting them from your arrangement. Another wonderful use is to drag and drop previously used samples, MIDI items, etc., in your project.
It makes the items act like clips in Ableton Live or patterns in FL Studio, except every copy is an original pattern (unpooled) and merely grouped together. Moreover, you could even select multiple media items, right-click one, and select “import into project” to import them together into their respective tracks like a “scene” in Ableton Live. Speaking of the session view, here’s something you might be interested in:
Playtime
Playtime is a paid extension for REAPER (currently €20) that adds a window like Ableton Live’s session view. You can add MIDI items and audio samples (via RS5K sampler) as clips and record complete arrangements into the main arrangement page by playing the clips in whatever order you want. Furthermore, you can use this tool directly with a touch screen or hardware for live performances.
Monitor FX
Monitor FX are effect plugins that you apply after the master bus. They are handy for modifying the sound on your monitor speakers or headphones without altering the mix or master. Furthermore, the monitor FX chain is neither stored in a specific project nor rendered when exporting. So, if you add speaker correction software like IK Multimedia ARC 3, REAPER will retain the plugin in every project.
Folder Tracks
Any track in REAPER can become a folder track, and you can have a folder within a folder with yet another folder, and so on. All the tracks within a folder send their audio to the parent folder. So, you could use folder tracks merely to organize your project or as buses for mixing.

Similarly, I like to use folder tracks for multi-timbral instruments like Falcon or Kontakt. Let’s say I wanted to add two Kontakt instruments, and neither needed particularly heavy processing.
In that case, I could have two tracks to write the MIDI notes in, put them both in a folder track with Kontakt and then assign the two instruments a MIDI channel each.
You could set the MIDI channels of the two tracks either in the piano roll per note or by adding a JS MIDI Tool to force a certain channel regardless of your individual note’s channel. I prefer to do the latter as it’s a set-and-forget way:

Free Item Positioning
REAPER allows you to place multiple items simultaneously without overlapping each other. Combined with Take FX and envelopes, this feature becomes extremely powerful for sound design. For example, you could layer multiple samples, add effects to each, and group them to make them behave like a single item. Here’s a gif showing you how audio items behave in the Free Item Positioning mode:

Free Item Positioning has to be enabled on each track you want – right-click a track and click “Free Item Positioning.” As shown in the gif above, you can place samples without overlapping or overlapping with a crossfade. Furthermore, you can disable Free Item Positioning when you’re done editing, but editing the items in the normal mode will cause everything to overlap again. Hence, I would only disable Free Item Positioning for aesthetic reasons.
Project Tabs
REAPER can open multiple projects simultaneously, allowing you to work on multiple files and even play two projects together as long as both have the sampler rate. Each project is loaded in a project tab similar to the tabs you see in internet browsers. Furthermore, you can synchronize the background project tabs with the active tab’s playing position while playing all of them simultaneously. Note that REAPER syncs the project tabs using real-time, not musical time/beats.

One of the coolest uses of this feature is when I’m making tutorial videos. I can record my voice in one tab while working on a project in another tab. This feature is superb if you’re interested in making videos for social media or YouTube. Likewise, I’ve used it to record an entire live show while playing the backing tracks on another tab. And with the ability to send audio from one tab to another using ReaStream, surely there are quite a few more uses!
Subprojects
A subproject is a project file that has been added to another project as an audio file. Instead of using a simple WAV format file, REAPER uses a proprietary format, which updates or renders automatically as you work further in the subproject. Hence, it’s convenient for sound designing and mastering.
Sound designing often involves multiple synths, samples, effects, complicated routings, etc. To clean up a project, you can select the tracks involved in the sound design, right-click one of them, and click “Move tracks to new subproject.” Then, REAPER creates a subproject in your project’s media folder, replaces your MIDI files with an audio render, and opens the subproject in a different project tab. Later, when you open the project, you can access the subproject’s tab by double-clicking the audio item. If you make edits in the subproject, the audio item in your project updates automatically.
You can also drag and drop a project from the Media Explorer into your arrangement page. REAPER will open the project file, render the audio, and add it to your project as a subproject. However, the rendered audio file will stay in the original project’s directory.
I like using this feature for creating an album master. Instead of manually rendering songs in an album, create a master project containing the entire album, with each song as a subproject. Then, if you notice a mixing error while mastering, double-click the audio, let the subproject’s tab load, fix the issue, and hit save to render the new update. It’s that simple!
Conclusion
Nowadays, only a few tasks truly limit you to a specific DAW. Music production is possible on any DAW, although you will need experience and practice to find an effective workflow. However, despite REAPER’s linear workflow bias, it’s the one DAW that truly lets you create your perfect DAW. It lets you collect virtually every feature you want, from UI themes and chained actions triggered by a keyboard shortcut to entirely new features from user-programmed scripts. It’s no wonder that people call REAPER the Linux of DAWs!
Having said that, is REAPER good for electronic music production? Clearly, that’s a question best asked to the individual producer. REAPER is perfectly capable as it is. However, a few features will be missing from the basic REAPER installation, mostly those you’re used to from another DAW. You can add many of those missing features, discover new ones, and add similar features to those you see in other DAWs, granted you’re prepared to give REAPER some time.
In my case, I was previously using Cakewalk, although I’d used Nuendo, FL Studio, and Studio One too. I left REAPER alone for months because I was overwhelmed. However, I decided to sit down and finally look into this DAW one day. Soon, I discovered many scripts that added features I knew from FL Studio, Ableton Live, Pro Tools, Studio One, Cubase, etc.
I realized there is no need to trade one feature for another by switching DAWs in REAPER. That rabbit hole ate up about a month of my time! However, I was left with a DAW I understood and felt comfortable with by the end. It was by no means the last day of customization, though. I still tweak something or add another shortcut almost every week. I find it worth the time for the workflow improvements I get, shortening the time it takes to complete mundane tasks like adding a high-pass filter or cleaning up my project folder.
I suggest learning the basic REAPER installation from online tutorials if you’ve never touched another DAW. However, if you’ve used another DAW extensively, customization is the key to making REAPER feel like home. In return, you get to improve the workflow to your liking, work with virtually any kind of media, and be assured of computer resource optimization. And, of course, the support of a passionate community.
So, what do you think? Is REAPER good for electronic music production?
Happy music-making!

The Integraudio Editorial Team consists of experienced music producers, audio engineers, and plugin enthusiasts dedicated to providing in-depth reviews and guides for music production software.