Whether you’re recording Hip-Hop, Pop or Rock, the vocals will be the song’s main focus. So, you’re going to want to record them well while also being able to set up the session quickly and easily. In this article, we’re going to look at how to do this in Ableton Live, step by step.
Using Ableton is really easy, so you will be able to get great vocals in no time at all. We’ll see what kind of microphones you can use, how you will get the sound into Ableton, and what plugins you can use to achieve the sound you’re looking for.
How Do I Record Vocals in Ableton Live?
To record vocals in Ableton Live, you’ll need a microphone, an XLR cable, an audio interface, a computer, and the DAW. You’ll need to:
- Set up the mic.
- Set the gain level.
- Define your settings and arm the track in Ableton.
- Press record.
It’s really that simple, but keep reading for an in-depth explanation of each step.
Choose a Microphone
Various kinds of microphones can be used for recording vocals. In general, condenser mics are favored over others as they better document the nuances of the human voice. They are more sensitive to vocal dynamics and allow the singer to move around more freely without influencing the gain too much.
Despite being more common, condenser microphones aren’t the only option. Some singers feel more comfortable with dynamic mics that can be held during the performance or ribbon mics for picking up certain subtleties in the vocals.
No matter which mic you choose, make sure you check if it needs external power to function. This can be with an external amp or phantom power from your audio interface.
Connect Your Mic to a Cable
Most microphones need an XLR cable to function, although some come with a jack output. You’ll need to connect the cable to both the interface and the microphone. Connecting it to the interface first is recommended in case there is a sudden surge of energy that can damage the microphone. Make sure that phantom power is off and all the gain levels are set to zero before making any connections.
Set Up Your Audio Interface
Audio interfaces are devices that will connect your mics to a computer. If yours requires external power, you’ll need to plug it into an electrical outlet. If not, it will be powered by your computer through a USB cable.
Once you have it connected to your computer and have turned it on, you can connect the XLR or jack cable. Again, ensure that the input’s gain level is at the minimum level and phantom power is off.
The interface will have several gain knobs, depending on how many inputs you have. You can start turning them up once the session is set up in Ableton. You’ll also need to make sure your output is connected. This can be speakers or headphones.
Open Ableton Live and Define Your Settings
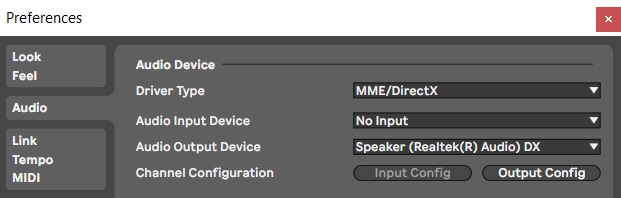
Once you open Ableton Live, you’ll need to select your interface. Here’s how:
- Click Options, then Preferences, or use Ctrl + , (Windows) or Cmd + , (Mac).
- Go to the Audio section.
- Set your Driver Type, then the Audio Device (select your interface).
Next, you can see if the inputs are working on either of the two views. They are:
- Session View
- Arrangement View
The Session view is where you will see the faders for each track. The Arrangement view is where the waveforms will appear. You can select the inputs on either view.


Get Ready to Record
When you’ve selected the inputs, you can arm each track you want to record with. Use the Arm Recording button (⬤) by the Solo button (S) on either view.
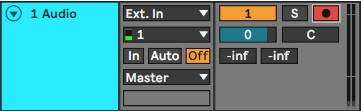
Go to the Session view to see the gain levels. They will appear in the meters. As you turn up the gain on your interface, you will see the meters rise and fall depending on the intensity of the sound being captured by your microphone.
You should aim for a gain level with peaks between -18 and -12dB. These levels are ideal for when you start using plugins. However, it can be hard to always be within this range, especially with vocals, as they are so dynamic. Just try to avoid hitting 0dB, as you will start getting digital clipping, reducing the overall quality of your track.

Aiming for -12dB also gives you more headroom for processing. If all the tracks in the song hit this level, the overall level should be around -6dB. This is a good amount of headroom for mixing the entire song and then moving on to mastering.
You’ll also need to set the BPM for your song. You can do this in the top left-hand corner of the GUI. The default setting is 120 BPM. Then you can choose your time signature and enable the metronome, if necessary.
Start Recording
Once your gain levels are set, you’re nearly ready to record. You just need to press the Record button (⬤) at the top of the screen or use the shortcut F9. If you are on the Arrangement view, you will see the waveform generating as you record.
![]()
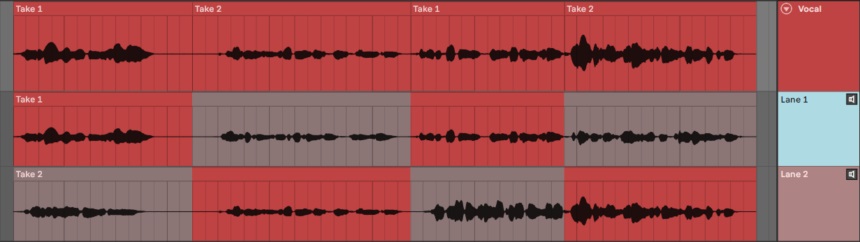
If you’re using Ableton Live 11, you can use Take Lanes to make recording and editing easier. Instead of creating a new track and selecting the input again, you can create a new take lane on the same track and record from the top. You can listen back to each lane by selecting the Audition Take Lane button (🔈).
When you want to comp the final track, select the sections of each lane that you want to keep and press Enter. Each section will automatically be added to the main lane of the track.
What Effects Should I Add to My Vocals?
When recording, you might want to add some plugins or effects to your vocals to make you feel more confident and comfortable. Here are some examples that can make the process smoother.
- Preamp
- EQ
- Compressor
- Saturator
- Reverb
Preamp
In analog recording, all microphones are run through a preamp before the sound arrives at the faders. These pieces of hardware usually compress and saturate the signal and can be used for some basic equalizing.
There are plenty of plugins that emulate preamps that you can use at the start of your vocal chain. Unfortunately, Ableton doesn’t have a stock preamp, but you can use other effects to achieve a similar result.
EQ

Equalizing your vocals can tidy up the signal so that you can better perceive your performance. For example, you may want to remove some low-end rumble or cut harsher frequencies that can become present on sibilants (S sounds). You can also boost certain frequencies that enhance your vocals, making them warmer or more present.
Ableton’s EQ Three is a very simple stock plugin with basic equalization controls. If you want to dig a little deeper, try out EQ Eight.
Compressor

Seeing as the human voice is so dynamic, using a compressor can help you control some of the highs and lows in terms of volume. This can make your vocals more present and direct, setting them at the front of the mix.
The Compressor and Glue Compressor stock plugins are easy to use and come with great presets.
Saturator

Analog preamps tend to add harmonic content because of the materials used within them. Using a saturation plugin can give you similar results, making your vocals more present or even distorted if you raise the level too high.
Ableton’s Saturator plugin can quickly add these extra harmonics, making your vocals sound warm and giving them more presence in the mix.
Reverb
Listening to your own voice in a dry environment can seem strange, as your ear is used to hearing it in the context of a room. Adding some reverb to your vocal track can make it feel more natural. You can choose from smaller spaces like rooms and larger ones like halls.
The Reverb plugin included in Ableton has so many presets for different sounding spaces. It can quickly transform your track and make you feel more comfortable hearing yourself sing.
Is There Any Other Gear I Need to Record Vocals?
There are a few more essentials for recording vocals that are sometimes overlooked. For example:
- Microphone stand
- Pop filter
- Headphones
You should use a sturdy stand to hold your mic for the best results, especially when using condenser or ribbon mics. With condensers, you should also use a shock mount so that the microphone doesn’t pick up vibrations from nearby steps, cars passing outside, air conditioners, etc.
You should also have a pop filter to remove the power from plosive consonants. They are caused by P sounds and are picked up by the microphone with more intensity. As a test, try placing your hand about 7 or 8 inches (20cm) away from your mouth and saying a sentence with lots of Ps (for example, Peter played ping-pong with Patrick). Then place the pop filter between your mouth and your hand, try again, and notice the difference.
Finally, when recording, you should use closed-back headphones to listen to the track you’re singing over and to hear your vocals. Speakers should be avoided as the mic would pick up the sound from them or even feed back in some cases.
Conclusion
You can use Ableton for recording if you have a microphone, a cable, an interface, and a computer. It’s a simple DAW to use, especially for laying down vocals. It has all the functions you need, including gain meters, a metronome, and effects. You can even create take lanes to make recording easier. So, if you want to record vocals for your latest song, try out Ableton and enjoy the results.

The Integraudio Editorial Team consists of experienced music producers, audio engineers, and plugin enthusiasts dedicated to providing in-depth reviews and guides for music production software.