
AI Plugins in 2026 aren’t gimmicks anymore, they’re practical tools that actually pull their weight. I’ve tested a lot of them, and I’ve noticed the best ones don’t try to replace producers; they focus on speed, workflow, and smart assistance.
I’ve found the strongest AI tools to feel more like studio helpers than robots writing your album while you nap. I like how they handle things like vocal cleanup, harmonic generation, mix balance, and stem separation without turning everything into one-click chaos.
I’ll be honest, I don’t want AI finishing my tracks, I want it saving me time and sparking ideas when my brain says “nah.” And when it does that well, I’m keeping it installed. So let’s dive into the world of the best AI plugins that can help you on your musical journey!
iZotope Neutron 5
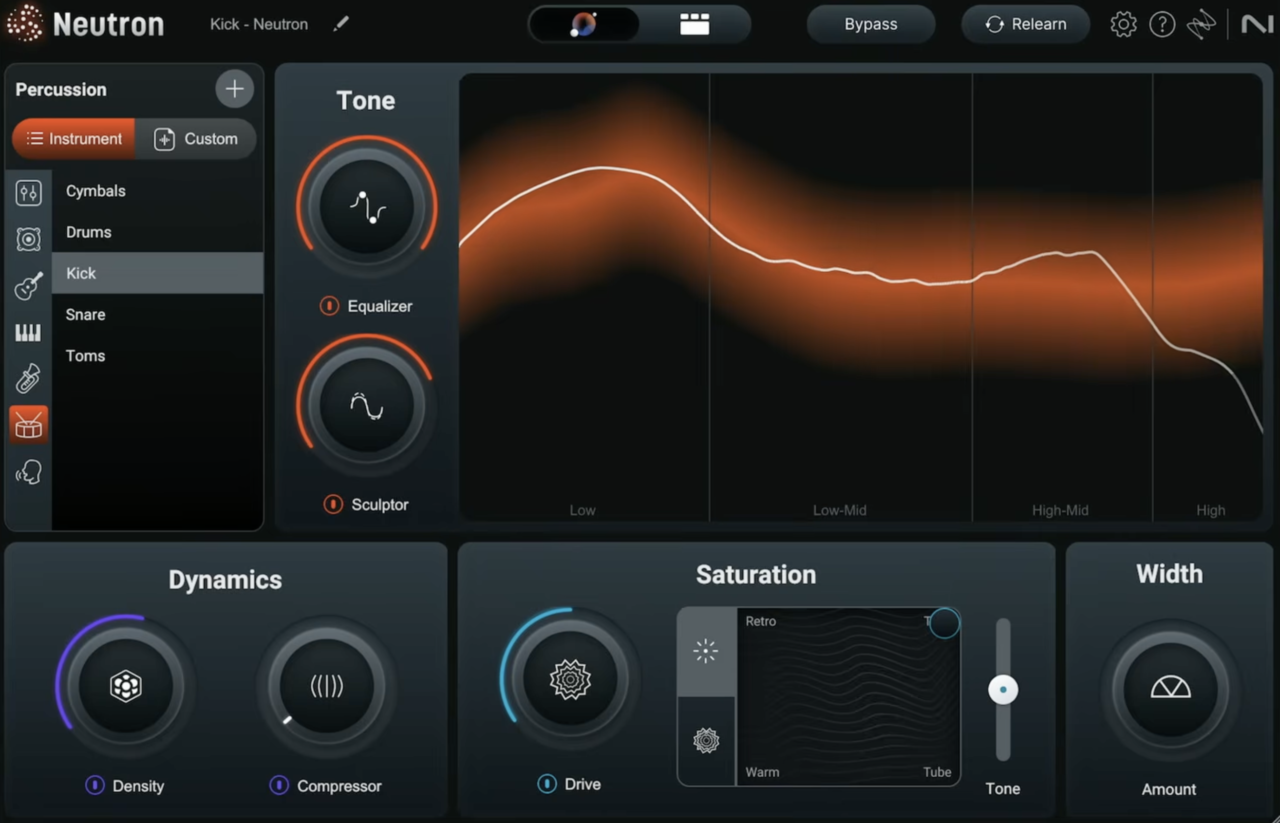
Neutron 5 feels like a smarter evolution of an already serious mixing suite.
I’ve been using it across different sessions lately, and I’ve found the updated AI genuinely helpful rather than flashy for the sake of it. I like that I can let the assistant get me 70% there fast, then I take over with full control.
At its core, Neutron 5 still covers essential mix duties, EQ, compression, transient shaping, saturation, unmasking, but the workflow now feels clearer and more focused. I’ve noticed that the interface pushes me toward decisions instead of endless tweaking.
- Mix Assistant & Intent Controls
The refined Mix Assistant now groups macro controls into Tone, Dynamics, Saturation, and Width panels.
I appreciate how these “Intent Controls” focus on musical direction instead of technical jargon. In most cases, I’ve found the initial suggestions balanced and sensible, especially on individual instrument tracks.
- New Clipper, Density & Phase Modules
The addition of Clipper, Density, and Phase expands the suite in practical ways. I’ve used Density for upward compression to lift quieter details without flattening transients, and it stays surprisingly clean.
Phase is particularly useful for fixing subtle alignment or waveform issues without getting lost in manual edits.
- Visual Mixer & IPC Integration
The Visual Mixer, powered by Inter Plug-in Communication (IPC), can generate quick static balance suggestions across a session. I don’t rely on it every time, but I’ve found it helpful when opening large projects and needing a structured starting point.
It’s still positioned at a premium price, and there’s no built-in reverb or delay. For me, though, Neutron 5 works equally well as a deep surgical AI plugin and as a fast AI-powered mixing assistant when time matters.
Neutron 5 is available in VST, VST3, AU, and AAX formats for macOS and Windows.
Sonible smart:EQ 4
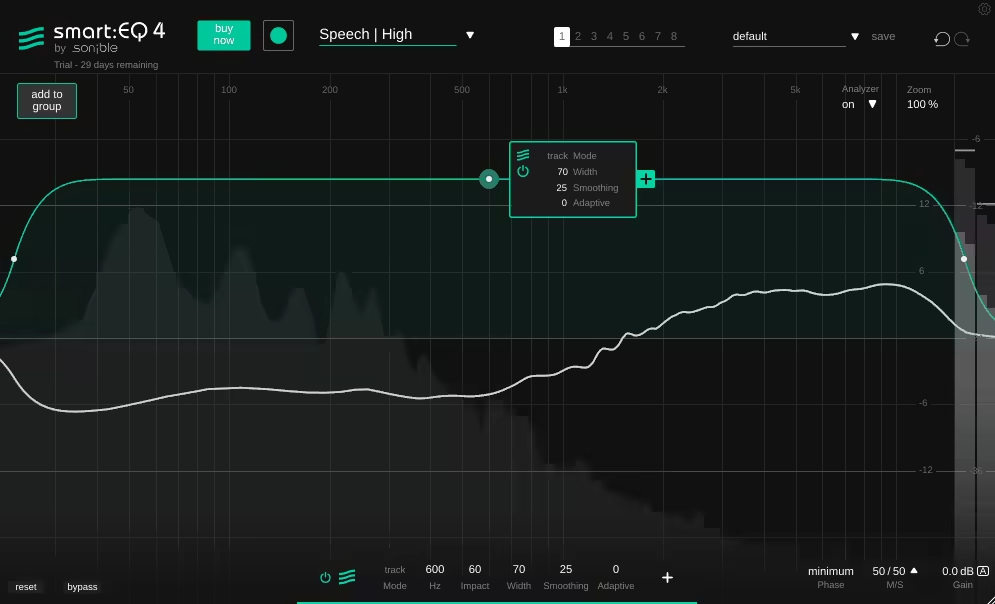
A truly smart EQ is one of the holy grails of mixing plugins. I’ve always wanted a tool that can clean things up fast without me hunting resonances for 20 minutes like I’m on a treasure quest.
The fourth iteration of Sonible’s smart EQ series promises exactly that. I’ve been digging into smart:EQ4, and it’s clearly designed not just to fix single tracks, but to help multiple elements cooperate inside a mix.
- Analyser & Weighting Curve
I like how the interface keeps things familiar with the black and green design, and the Analyser front and center. Once I hit Learn, it generates an EQ curve and a Weighting Curve, which becomes the main playground.
- Mode / Width / Smoothing / Adaptive
These four controls shape how the processing behaves. I usually tweak Width first to decide whether I want broad correction or something focused, then adjust Smoothing if things feel too dramatic, and Adaptive when I want more dynamic movement instead of static correction.
- Impact & Per-Band Controls
The Impact control determines how aggressively the curve is applied, and I often dial this back if things feel overcooked. Per band, you get Filter Shape, Mid/Side, Static/Dynamic Mode, plus Auto Gain and Minimum/Linear Phase, which makes it just as usable as a “regular” EQ when I want full control.
- Track Grouping
This is where things get spicy. I can add up to ten tracks into a group, re-run Learn, and the plugin highlights spectral conflicts between them.
- Front / Middle / Back Layers
I actually love this feature. Assigning tracks to Front, Middle, or Back gives the algorithm context, and I’ve found it surprisingly effective for separating kick and bass or untangling guitars and keys.
- Dynamic Learning Engine
Version 4’s algorithm feels more consistent and reactive. The curve now behaves dynamically in real time, which reminds me a bit of spectral processors like Gullfoss, but here I still feel like I’m driving the car, not sitting in the back seat.
I’ll be honest: this isn’t a magic button. If I don’t know what I’m listening for, smart:EQ4 won’t suddenly turn me into a Grammy-winning mix engineer. But I do see it as a smart assistant. Sometimes I load it when I’m stuck, hit Learn, and go, “Ohhh… that’s what’s clashing.”
If I had to sum it up? It’s a fast-thinking EQ buddy. Not a silver bullet, not a replacement for ears, but definitely a serious time-saver when I need one.
smart:EQ 4 is available in VST, VST3, AU, and AAX formats for macOS and Windows.
Waves Voice ReGen
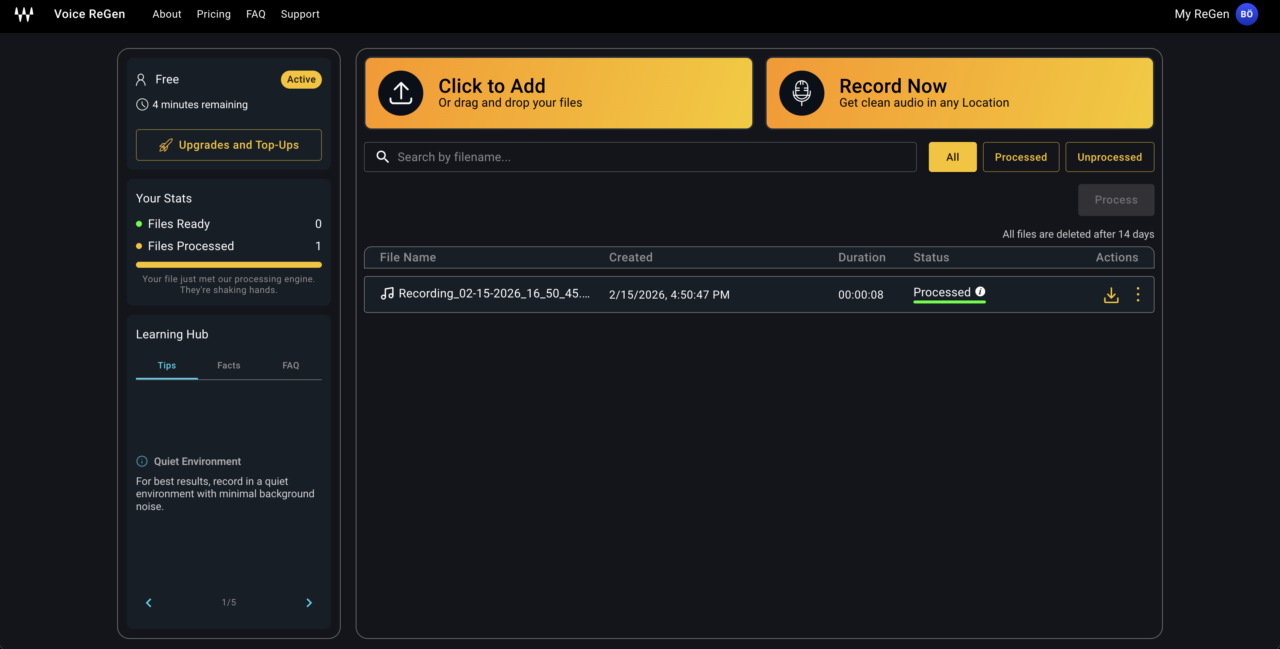
What immediately makes Voice ReGen stand out to me is that it’s not a plugin at all, it’s an AI-powered online voice enhancement service.
I love that it removes the need for technical setup entirely; you just upload your audio or video and it delivers a polished, broadcast-ready voice in seconds. What I enjoy most is how it brings pro-level cleanup to creators who don’t want to touch EQs, compressors, or noise reduction tools.
- AI Voice Cleanup Engine
This is the heart of Voice ReGen. It automatically removes background noise, reduces room echo, restores missing frequencies, evens out levels, and enhances vocal presence in one go.
I’ve seen tools that do one or two of these tasks well, but having all of it handled in a single pass is huge for speed. If I were working on fast YouTube content or podcast episodes, this would be my “upload and done” solution.
- Frequency Restoration & Presence Enhancement
What I really like here is that it doesn’t just clean audio, it rebuilds tone. Restoring missing frequencies and boosting clarity helps thin or dull recordings sound fuller and more confident.
I’d use this especially for remote interviews or phone recordings that need that extra body without sounding over-processed.
- Built-In Teleprompter & Creator Workflow Focus
The inclusion of a teleprompter is surprisingly smart. It shows that Voice ReGen is built for content creators, not just audio engineers. I appreciate that it reduces retakes and helps keep delivery tight, especially for scripted content where pacing matters.
The main downside is that it’s an online service rather than a traditional DAW plugin, so it doesn’t integrate directly into a mixing session.
For me, Voice ReGen makes the most sense for podcasters, YouTubers, course creators, and social media content where speed and clarity matter more than deep manual control.
Voice ReGen is available as a web-based service for creators worldwide.
LANDR Mastering Plugin PRO
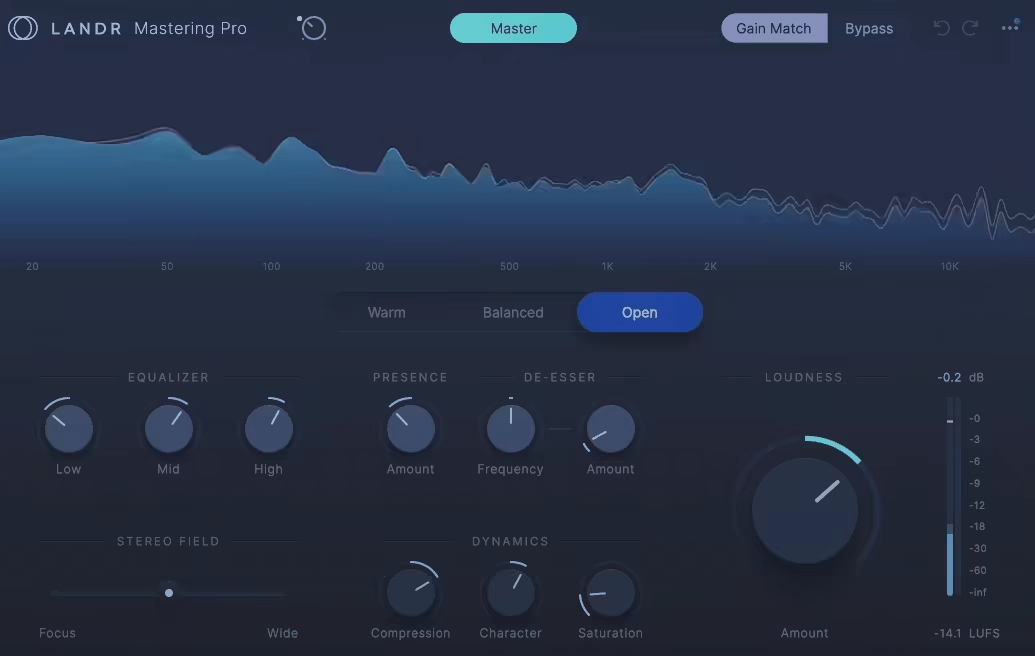
LANDR Mastering Plugin PRO brings LANDR’s AI mastering engine directly inside your DAW, no cloud upload, no bouncing, no waiting.
I love that it analyzes your mix locally and builds a custom processing chain based on its own reference matching, instead of forcing you to pick a genre or preset. I’ve used automated mastering before, but having it fully integrated and tweakable in real time feels way more practical.
- AI Analysis & Custom Target Profiling
As the heart of the plugin, the AI analyzes frequency balance, dynamics, stereo width, and more, then generates a mastering chain based on an internal reference comparison system.
I really like that I don’t have to choose a style first; it decides what fits the track and just gets to work. In my experience, it usually makes tasteful moves rather than overhyped ones, especially on already solid mixes.
- Warm / Balanced / Open Targets
The three global tonal targets are simple but genuinely useful. I’ve switched between Warm, Balanced, and Open depending on the vibe, and the internal processing adjusts instantly. When a mix felt slightly too bright, Warm pulled it back in a musical way without killing clarity.
- Refinement Controls (EQ, Presence, Stereo, Dynamics, Loudness)
The built-in controls give you just enough power without overwhelming you. The three-band EQ, Presence, Stereo Field, Compression, Character, Saturation, and Loudness knobs let me fine-tune results quickly. I rarely felt the need to drastically tweak things, but when I wanted a bit more edge or width, it responded smoothly.
For me, this is a go-to when I need fast, polished masters for demos, indie releases, or client previews without diving deep into a full manual mastering chain.
LANDR Mastering Plugin comes in AAX, VST3, and AU formats for macOS and Windows users.
iZotope Ozone 12
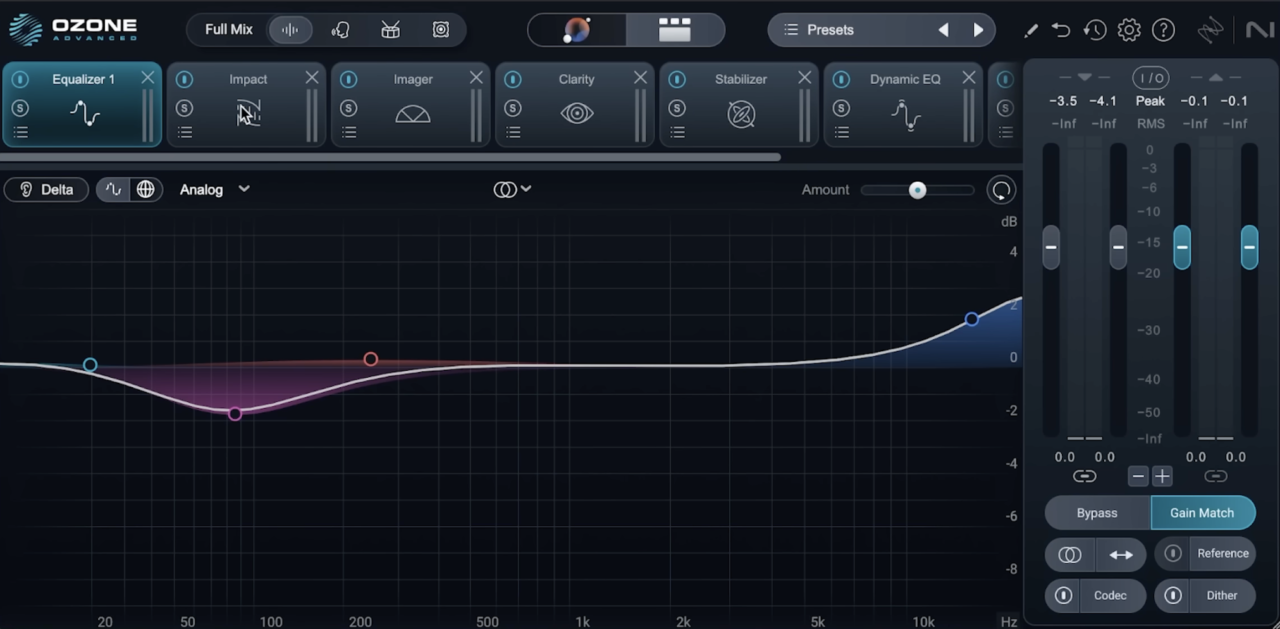
Ozone 12 Advanced feels less like a routine update and more like a smarter evolution of an already heavyweight mastering suite.
I’ve always relied on Ozone for deep control, but this version makes me faster without taking away precision. I like that I can lean on the AI when I’m moving quickly, then dive into the surgical stuff when I want total authority over the final result.
- Customizable Master Assistant & Genre Targets
The upgraded Master Assistant now lets you define your own signal flow, adjust Analysis Time (up to 60 seconds), and guide the Maximizer toward your preferred loudness direction.
I love being able to save a custom chain and reuse it across an EP for tonal consistency. In my workflow, I’ll usually let it build the first pass, then refine modules manually.
- Bass Control Module
The new Bass Control module is seriously impressive. Controls like Balance, Punch, Sustain Power, and Peak Control make shaping low-end energy feel intuitive rather than technical.
I’ve used it to tighten modern 808-heavy mixes and to add weight to older recordings without muddying the low mids.
- Stem EQ (Real-Time Stem Separation)
Stem EQ separates a stereo master into vocals, bass, drums, and other in real time. I’ve used it to gently brighten vocals or rebalance drums without asking for a remix, which is huge in mastering scenarios. It’s not perfect stem extraction, but it’s shockingly usable when you need inside-the-mix adjustments.
- Unlimiter (Peak Restoration)
The Unlimiter module attempts to reconstruct transients lost to over-limiting. I’ve tested it on squashed mixes and, while the changes can be subtle, restoring even a bit of punch can dramatically improve feel. It’s one of those “thank God this exists” tools when you receive a crushed mix.
- Maximizer with IRC 5
The new IRC 5 mode in the Maximizer lets me push loudness a little further with fewer artifacts. I’ve compared it to earlier modes, and in many cases it feels smoother under pressure. Still, I always toggle through IRC modes, my ears make the final call.
The only downside is that the Advanced edition can feel intimidating if you’re not comfortable with detailed mastering tools.
For me, Ozone 12 Advanced is great for serious mastering sessions, stem-level repair, and projects where I need both AI speed and deep manual control.
Ozone 12 Advanced comes in VST3, AU, and AAX formats for macOS and Windows users.
Waves Clarity Vx
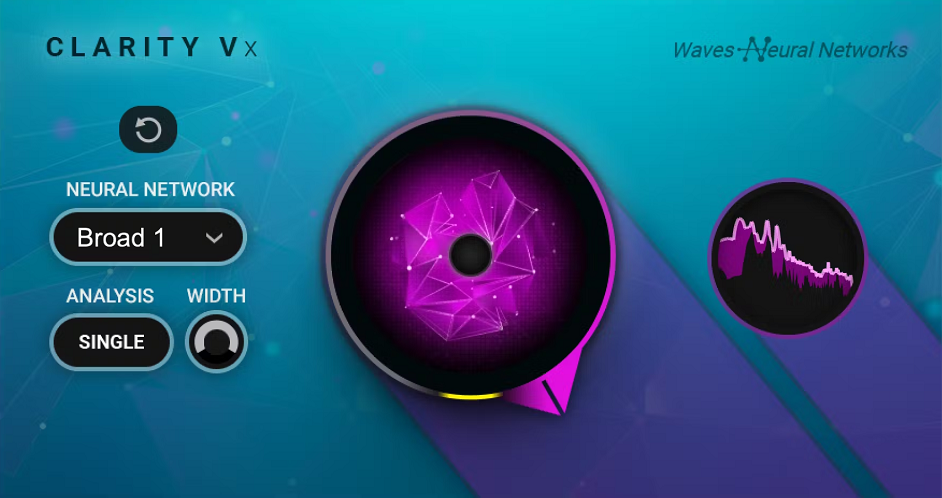
AI dialogue cleanup has become one of the most practical uses of machine learning in post, and I’ve found Clarity Vx to be one of the simplest and most affordable ways to rescue problematic recordings.
What I like most is how it removes noise without that hollow, over-EQ’d sound traditional tools often introduce. It feels more like it’s separating voice from noise rather than carving frequencies away.
- One-Knob AI Voice Isolation
This is a classic Waves one-knob design, but don’t let that fool you. You simply dial from 0–100% to control the intensity of background removal.
In my workflow, I rarely push it to 100%, I usually sit around 50–75% to keep things natural. It’s incredibly fast for dialogue edits where you need results now, not after tweaking ten parameters.
- Selectable Neural Networks (Broad 1, Broad 2, ECO)
You can switch between Broad 1 (general use), Broad 2 (better for background voices/extreme noise), and Broad ECO (lighter CPU). I’ve used Broad 2 on chaotic room recordings with background chatter and it genuinely surprised me. Broad ECO is useful when you’re stacking instances and need to conserve CPU.
- Mono & Stereo Versions
Most dialogue is mono, but the Stereo version adds stereo analysis and image control. I’ve used it when cleaning up stereo camera recordings, and the ability to reduce stereo width while denoising can tighten things up nicely.
- Tone Preservation vs Traditional Denoisers
Compared to tools like iZotope’s Voice De-noise, I’ve noticed Clarity Vx often keeps the natural tone of the voice more intact, especially with complex or changing background noise.
Yes, heavy processing introduces artefacts, but it’s far cleaner than classic EQ-based noise reduction in difficult scenarios.
For me, Clarity Vx is a solid choice when I need fast, convincing dialogue cleanup without diving into deep restoration workflows, especially for YouTube, interviews, podcasts, and quick-turnaround post jobs.
Clarity Vx comes in VST, VST3, AU and AAX formats for macOS and Windows users.
Baby Audio TAIP
Buy here and support Integraudio
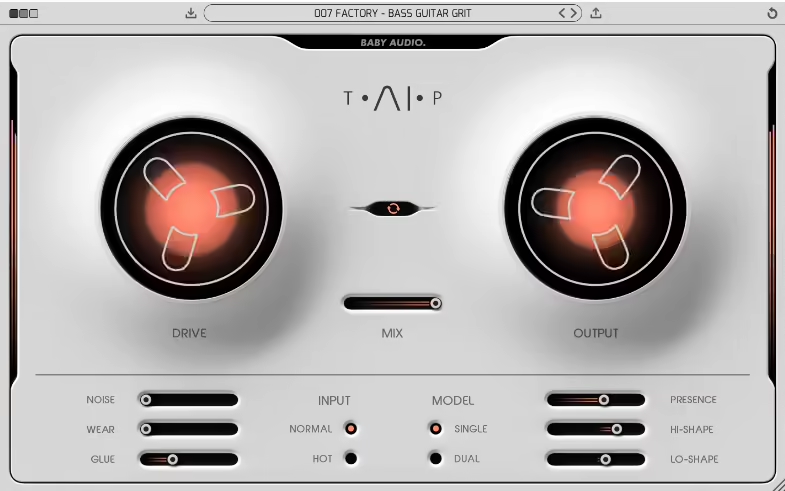
Tape emulations are everywhere, but TAIP stands out because it wasn’t built with traditional DSP modeling. Instead, Baby Audio trained an AI neural network using dry vs real tape recordings.
I’ve got to say I was skeptical at first, but I’ve genuinely been impressed. It doesn’t feel like it’s copying one specific machine; it feels like it captures the behavior of tape itself, which makes it way more flexible in modern sessions.
- AI-Trained Tape Engine
This isn’t just “AI” slapped on the box for marketing. The neural network approach gives TAIP a very natural saturation curve, especially when pushing Drive.
I’ve used it on drums and synth buses, and it reacts dynamically in a way that feels less static than some classic tape sims. It can go from subtle warmth to crunchy chaos pretty quickly.
- Single & Dual Mode
You can run Single mode (one tape stage) or Dual mode (two chained stages sharing the Drive). I really enjoy Dual on mix buses, as it adds density without immediately sounding smashed. It’s slightly weightier and smoother, especially when you want thickness without harsh distortion.
- Glue Compression Control
The Glue knob controls how much tape-style compression you get. I’ve used it across drum stems, and it genuinely tightens things up in a cohesive way. Push it hard, and it almost behaves like a compressor with personality.
- Wear, Hiss & Tape Character Controls
The Wear parameter introduces wow, flutter, and high-end loss, and it’s surprisingly musical. Blending Wear with the Mix knob creates a gorgeous tape flanging effect, seriously addictive on guitars and pads.
Add controllable Tape Hiss and adjustable Presence, and you can dial in everything from pristine tape warmth to worn-out cassette vibes.
The only real downside is that it’s a bit heavier on CPU than classic DSP tape plugins, and those spinning reels look cool but do add graphics load.
Baby Audio TAIP comes in VST, VST3, AU, and AAX formats for macOS and Windows users.
LALAL.AI Stem Separator
LALAL.AI built its name in the browser world, but now it’s finally inside the DAW, and honestly, I’ve been waiting for this, as it’s one of the best stem separators out there.
I’ve used their online tool before, and the biggest workflow killer was exporting, uploading, downloading, renaming… repeat. Now the stem separation happens directly in your session, and that alone makes this release interesting.
- Local AI Processing (Lyra Model)
The new plugin runs on a locally optimized Lyra AI model, meaning no more constant tab-switching or cloud uploads. I really like that it’s designed to run on “virtually any hardware,” which makes it accessible.
The tradeoff is that Lyra isn’t as advanced as their Andromeda model online, so separation quality is slightly reduced compared to the web version.
- Real-Time Vocal / Instrument Split
Right now, the plugin splits audio into two stems: vocals and instrumental. I’ve found this super useful for quick acapella extraction, remix prep, and vocal cleanup inside a mix session.
Multi-stem separation (up to six instruments) is reportedly coming, which would make this way more competitive.
- DAW-Centric Workflow
This is the real win. I enjoy how fluid it feels to isolate vocals or create an instrumental without leaving the project. It keeps you in creative mode instead of bouncing files back and forth. For producers working fast with remixers, editors, and content creators, this matters a lot.
Downside? It’s currently Pro tier only ($15/month) and limited to VST3 (AU is still in beta), so access is gated.
For me, this is a practical tool for remixing, sampling, and quick vocal isolation, especially when speed and workflow matter more than surgical perfection.
LALAL.AI Stem Separator comes in VST3 format plugin or standalone app for macOS, Windows, and Linux users.
iZotope Neoverb
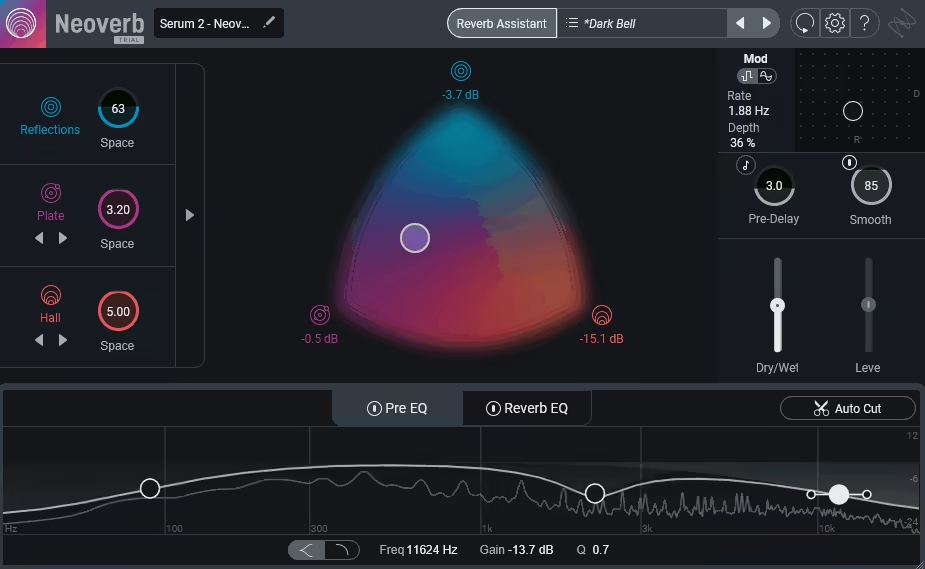
Neoverb stands out because it doesn’t model a single legendary unit, it lets you blend 3 independent reverb engines in one space.
I love how the tri-colour Blend Pad makes complex routing feel immediate and musical instead of technical. Rather than forcing a plate or hall identity on you, it gives you early reflections and two tail engines to shape exactly the depth you need.
- Tri-Engine Blend Pad (Blue / Violet / Orange)
I really enjoy how quickly I can sculpt space by dragging between Reflections (Blue), Medium Tail (Violet), and Long Tail (Orange).
The separation between early reflections and tail gives me way more control than a typical single-algorithm reverb. I’ve found this especially useful on vocals and drums, where I want definition up front but width and bloom behind.
- Angle & Attack Controls
The Angle parameter in the reflections engine is one of those weird-but-brilliant ideas, it redistributes reflections toward the front or back of the decay.
I’ve used it on percussive synths to push reflections away from transients without just cranking pre-delay. On the tail engines, Attack lets the reverb bloom gradually, which I’ve leaned on heavily to avoid washing out punchy sources.
- Reverb Assistant + Auto-Cut & Unmask
I’ll admit it, I actually like using Reverb Assistant here. Drag between “realistic” and “dramatic,” pick a size and tone, and you’re already 80–90% there.
The Auto-Cut and Unmask tools are genuinely helpful; I’ve seen them clean up muddy overlaps without me having to hunt frequencies manually.
The only real downside is the lack of stereo width and panning controls inside the engines, which would have made it even more flexible.
For me, Neoverb is a go-to when I want fast, modern, mix-friendly reverb that works across vocals, synths, drums, and post work without sounding tied to one vintage personality.
Neoverb comes in AU, AAX, VST2, and VST3 formats for macOS and Windows users.
Supertone CLEAR
Buy here and support Integraudio
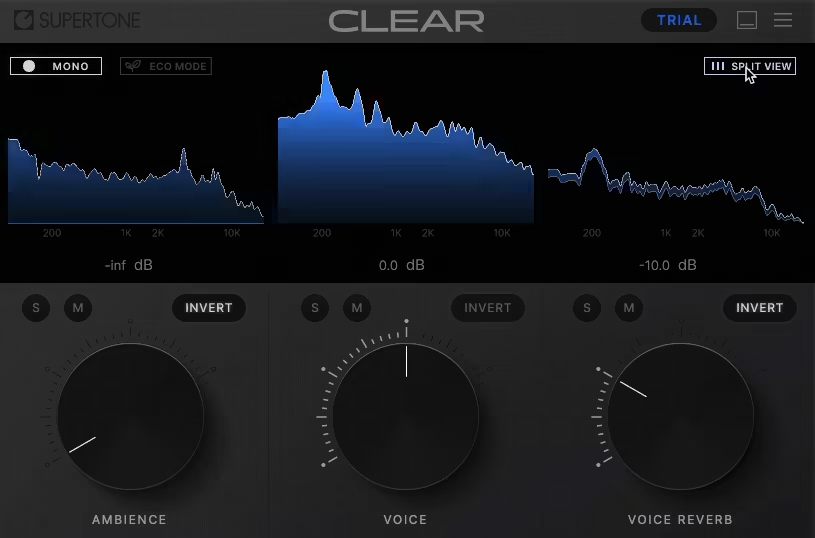
Supertone Clear is an AI powered de-noise and de-reverb voice separation plugin that makes cleaning up dialogue and vocal tracks crazy simple and I mean literally three knobs and you’re mostly there.
It uses a neural network voice separation algorithm to split audio into voice, ambience, and reverb components, letting you dial out noise, room reflections, or just boost clarity without digging into technical settings.
- Three-Knob Simplicity (Voice, Ambience, Reverb)
This is where Clear shines. I’ve dropped it on messy dialogue and simply twisted the Voice knob to bring the speaker forward, pushed down Ambience to kill background hum, and backed off Reverb to tame room echo and often it cleaned up the track in under a minute.
- AI-Driven Noise & Reverb Separation
Clear’s proprietary neural network separates these components with surprisingly few artifacts, so the voice feels natural instead of “gated” or hollowed out. Reportedly it performs better on reverb than some rivals and often feels more transparent in noisy situations.
- Real-Time Processing & Visual Feedback
I enjoy being able to hear results instantly, which matters for quick turnaround work like podcasts, interviews, or UGC projects. Clear even shows you the split between voice, reverb, and ambience so you can see what you’re affecting as you tweak.
- Light on CPU With Low-CPU Mode
Unlike some earlier AI tools that ate CPU, Clear can run multiple instances if you need to clean up several tracks at once, especially handy in larger sessions.
On the flip side, it’s mainly focused on vocals/dialogue and doesn’t have deep manual controls beyond its three main parameters, so you won’t style-EQ or batch process entire mixes with it.
For me, Supertone Clear works best as a no-fuss cleanup tool when you need voice recordings to sound clear and intelligible fast, especially on podcasts, field recordings, interviews, or rough dialogue tracks.
See my more in-depth review HERE
Supertone Clear comes in AU, VST, VST3, and AAX formats for macOS and Windows users.
Bonus: Suno

If you are into music production, you must have heard about Suno, which feels less like a toy AI generator and more like the first serious attempt at an AI DAW.
I’ve tried plenty of prompt-based music tools before, but this is the first time I’ve felt like I can actually intervene, rearrange, extract, and reshape what the AI creates instead of just hitting “generate” and praying.
- Browser-Based Generative Audio Workstation
I like that it runs entirely in the browser, which means I can jump into it from anywhere without installing anything. The interface splits creation, library, arrangement, and clip detail sections in a way that feels surprisingly DAW-like once you get used to it.
- Granular Stem Editing & Arrangement Control
This is where it gets interesting. I can split generated tracks into stems, adjust volume and panning, rearrange sections, and even apply a basic six-band EQ, which makes it feel far less “black box” than older AI tools.
- Downloadable Stems & MIDI Extraction
Being able to export stems and extract MIDI from audio massively increases its usability. I’ve generated chord stabs, pulled the MIDI, and rebuilt them inside my own projects with cleaner instruments, which turns Suno into more of an idea machine than a finished-product engine.
- Remix & Inspo Features
The Remix audio function is genuinely useful when I’m stuck, and Inspo lets me generate new material based on up to four reference tracks. I’ve found this great for breaking creative dead-ends, even if it sometimes takes multiple attempts to get something usable.
- Persona Voice Profiles
The Persona feature lets you reuse a trained voice across tracks, but in my experience it can sound a bit too polished and generic. It’s clever, but not always convincing if you’re chasing something raw or characterful.
The downsides? Results are inconsistent, artefacts creep in, and prompting well has a surprisingly steep learning curve.
For me, Suno Studio works best as a creative catalyst and idea generator rather than a full replacement for traditional production workflows, especially when I’m stuck and need something unexpected to spark momentum.
Suno Studio runs entirely in the browser and requires the Premier Plan subscription for full Studio access.
Last Word on AI Plugins
AI plugins aren’t here to replace your ears, your taste, or your creativity, and honestly, that’s a good thing. What they are doing is speeding up workflows, surfacing ideas you might not have tried, and handling the boring stuff so you can focus on the fun parts.
The best AI tools right now feel less like “auto music buttons” and more like smart assistants sitting next to you in the studio. Some are mix problem-solvers, some are inspiration machines, and some are straight-up time savers. Used well, they don’t make you less creative; they give you more room to be creative.
Whether you’re a beginner looking for guidance or a seasoned producer chasing efficiency, AI plugins are becoming part of the modern toolkit. The trick isn’t avoiding them, it’s learning how to use them on your terms.

Berk is a multi-instrumentalist musician from Istanbul, Turkey. He has been playing guitar, handpan, and percussion for over ten years, developing a sound that blends melodic sensitivity with rhythmic depth.
He began his musical journey as a teenager, learning guitar and performing in several bands. In 2016, he discovered the handpan, an instrument that immediately resonated with him on a deeper level and gradually became central to his artistic identity.
Since then, he has performed in streets, festivals, bars, and concert venues across different countries, connecting with diverse audiences through both intimate and large-scale performances.
Alongside his live work, Berk is deeply involved in studio production. He works from his home studio, where he composes, records, and produces his own music. His studio serves as a creative space for layering handpan, guitar, and percussion with modern production techniques, allowing him to shape fully realized, atmospheric compositions from start to finish.
His music explores a wide range of genres and textures, combining organic acoustic instruments with detailed studio production to create immersive and expressive soundscapes.