
When it comes to FL Studio, it is a relatively lightweight DAW compared to other professional-level software. However, it can still be quite resource-intensive, especially when working with large projects or using many plugins and virtual instruments.
FL Studio’s high memory usage is usually due to the amount of data it needs to process, store, and manipulate the plugins, samples, and other processing. Additionally, the quality of your computer’s hardware, buffer size settings, and the number of plugins you have installed can all impact FL Studio’s memory usage.
Further, it’s also affected by the data in your session. The more elements you add to your project, FL Studio will use more memory. Next, background and parallel running applications and software in your system determine how much RAM the DAW uses.
FL Studio is designed to be a feature-rich DAW, and as a result, it can handle many different elements in a single project. Each audio track, sample, and plugin you use in your project will consume memory, and the more elements you add, the more memory FL Studio will use. Furthermore, if you’re using high-quality samples and plugins, the memory needed will increase significantly.
It also depends on where you’re transferring your data. For example, if you are using a slow HDD to draw samples from, the data will be read significantly slower than reading samples or plugin data from the C: Drive.
How do I fix RAM/memory issues in FL Studio?
To fix RAM/memory issues in FL Studio, you can upgrade your computer’s hardware, reduce the number of audio tracks, close unused plugins, adjust buffer size settings, disable unused features, use 32-bit versions of plugins, optimize your sample library, and use disk streaming.
If these steps do not resolve the issue, you may consider upgrading your computer’s hardware or using a different DAW. Primarily, RAM overload issues are caused by heavy processing. So if you lighten up the processing, these issues will be resolved automatically.
Let’s address all issues by starting with Buffer Size settings. The buffer size settings can also affect memory usage in FL Studio. The buffer size determines the audio data the computer receives at once. If the buffer size is set too low, the computer may struggle to keep up with the demands of FL Studio, causing audio dropouts and glitches.
So you can set the buffer length higher, so the computer has more time to process the data. That will make the session less heavy on the system. To change the buffer length in FL Studio, the first step is to open the program and go to the Options menu. Select Audio Settings, where you will find the Buffer size or Latency setting.

To adjust the buffer size in Audio Settings, access the Buffer Length option and modify its value. Decreasing the buffer length will lead to lower latency but may result in audio interruptions while increasing it will lead to increased latency but a more stable audio output.

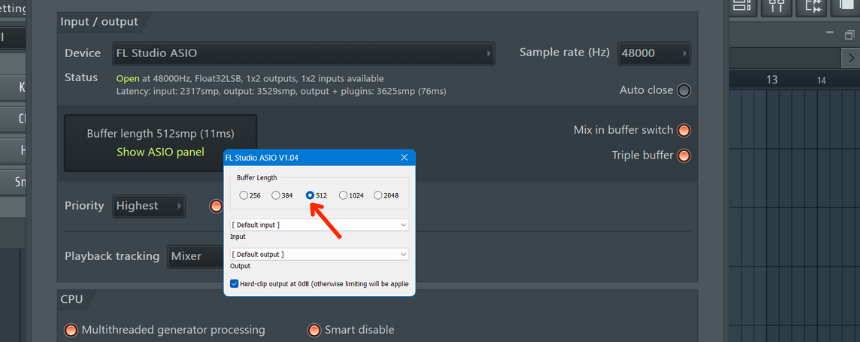
To increase the buffer size, follow these steps. First, navigate to Options > Audio Settings > Input/output > Buffer length. Next, after making the necessary changes, close the window by clicking on the cross sign.
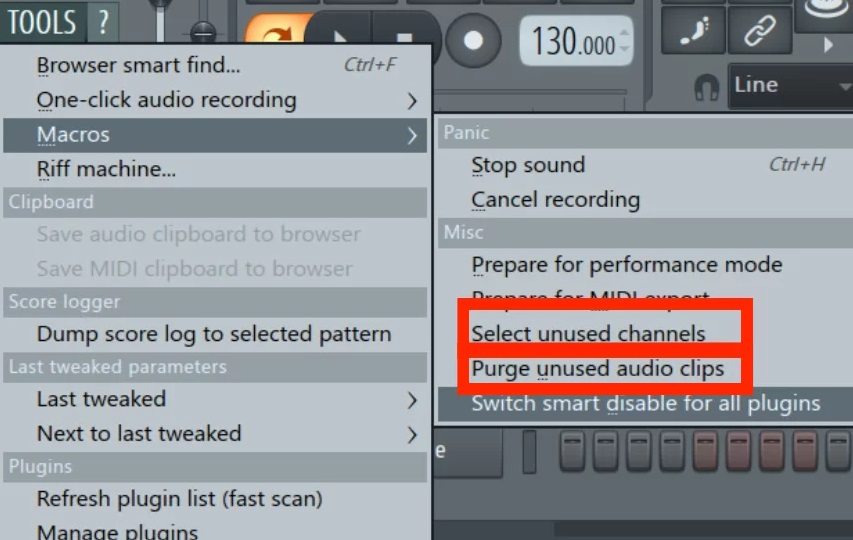
Next, you can reduce the number of audio tracks or samples in the session. Each audio track in your project consumes memory, so reducing the number of audio tracks can help reduce memory usage in FL Studio. To delete all unused audio tracks, you can use an interesting FL Studio MACRO, eliminating all unnecessary audio tracks in one go.
Go to Tools, then select Macros, and then click on Select unused channels, and then delete them. Alternatively, you can also go to Tools > Macros > Purge unused audio clips. This will select all idle samples or loops not being used in the session and allow you to remove them in one go.
Another factor affecting memory usage in FL Studio is the number of plugins you have installed. Some plugins are more resource-intensive than others and can consume a significant amount of memory when running. To reduce memory usage, you can close plugins you are not using or adjust their settings to use less memory.
Also, stock plugins are less RAM-intensive as compared to third-party plugins, as they are designed to be more compatible with the plugin. So you can also use more stock plugins.
Further, to optimize the performance of plugins in FL Studio and prevent latency issues, adjust the settings for each plugin, synth, or sampler in your session by opening the plugin, going to Settings, and navigating to the Processing tab. Enable “Allow threaded processing” and “Allow smart disable” under the Options section.
Additionally, select “Process Maximum size buffer” and “Use maximum buffer size from the host” from the “More” drop-down menu next to the “Use fixed buffer size” switch.

Next, if you have too many plugins loaded or use plugins with high processing requirements, it can slow down the performance of FL Studio and cause latency issues. To delete any plugins, go to the mixer channel, select the desired insert, open the drop-down menu to the left of the plugin you want to delete, and then select delete.
Another tip to improve the playback of your playlist and make the session lighter on the CPU is that you can reduce the ticks/pulses per quarter and adjust the playlist window resolution. This can be achieved by lowering the Timebase/PPQ value. Go to Options > Project Settings > Timebase (PPQ) and change the default value of 96 to a smaller number.

Next, you’re more likely to encounter the problem of heavy sessions if you work on high sample rates. Hence, I suggest using a 44.1 or 48 kHz sample rate to prevent issues. Higher sample rates, such as 96 kHz or 192 kHz, may result in heavier sessions. To set the sample rate, go to Audio Settings, open the “Sample rate (Hz)” drop-down menu, and choose your desired value.

Further, to improve the performance of your plugins and sound generators, turn on “multithreaded mixer processing” and “multithreaded generator processing” in your CPU settings. This allows them to run on multiple cores instead of just one. To do this, go to the CPU tab in Audio settings and activate both options.

Next, to optimize the audio response, lower your resampling quality to 24-point sinc. In Audio Settings, go to the “Mixer” tab and select “Resampling quality.” Keep in mind that a higher resampling results in better sample quality but puts more strain on the CPU. So setting it to 24-point sinc provides an ideal balance.

FL Studio’s memory usage can also be impacted by the quality of your computer’s hardware. If you have a computer with limited RAM, you may experience performance issues when running FL Studio, such as slow load times and frequent crashes. On the other hand, if you have a high-end computer with plenty of RAM, you may be able to run FL Studio easily, even with complex projects.
Lastly, there are also some hardware upgrades that you can do so FL Studio doesn’t load your CPU much or eats less RAM. Some of those include:
- Processor (CPU)
Upgrading to a faster and more powerful CPU can greatly enhance the performance of FL Studio, especially when running multiple plugins and samples simultaneously. For FL Studio 20 and later, a 64-bit processor is required, and it is recommended to have at least an Intel Core i5 or equivalent processor with a clock speed of 2.5 GHz or higher.
- Memory (RAM)
Increasing the amount of RAM will also help improve FL Studio’s performance, allowing for larger projects and more plugins to be run without slowing down the system. Imagine Line recommends 8 GB of RAM as sufficient memory for FL Studio.
- Graphics card (GPU)
A dedicated graphics card can help offload some of the processing from the CPU and provide a smoother, more responsive user experience in FL Studio.
- A solid-state drive (SSD)
Installing an SSD can significantly speed up the load times of FL Studio and your projects and the time it takes to save and access files.
- Audio interface
An audio interface can improve the quality of your audio output, especially when recording and producing music in FL Studio. It can provide additional inputs and outputs for external instruments and sound modules.
Conclusion
We have encountered all the different reasons that cause FL Studio to consume so much RAM. We have also seen different ways to tackle these problems within the software and hardware settings. All that information should guide you in the right direction toward dealing with FL Studio memory problems.
To summarise, FL Studio’s high memory usage can be caused by several factors, such as the data in your session, the quality of your computer’s hardware, buffer size settings, and the number of plugins installed. To optimize the performance of FL Studio and reduce memory usage, you can upgrade your computer’s hardware, reduce the number of audio tracks and samples, close unused plugins, adjust buffer size settings, and optimize the settings for each plugin in your session.
Additionally, you can use disk streaming and 32-bit versions of plugins and reduce the number of ticks in your playlist to lighten the processing load. If these steps do not resolve the issue, you may consider upgrading your computer’s hardware. I hope the article was of help. Thank you for reading.

The Integraudio Editorial Team consists of experienced music producers, audio engineers, and plugin enthusiasts dedicated to providing in-depth reviews and guides for music production software.