In this post, we’ll talk about Noise Gate, explain the process of gating, what it is, how to set it, when to use it, and much more! Also, we’ll give you six tips on how to use a noise gate in your mixes effectively.
What Is A Noise Gate Effect?
Noise Gate is a versatile tool used in audio production to eliminate unwanted sounds by lowering the volume of anything below the threshold. It exists in both hardware and software formats and is one of the most relevant dynamic processors in music production. Noise gate helps clean up a busy mix.
You can use Noise-gating creatively or for fixing problems in the recording. They were created to help engineers achieve better separation during live multitrack recording. Nowadays, noise-gating is highly relevant in-studio and live situations.
Producers and engineers working anywhere from the world’s largest arenas and studios to the smallest home studios rely on gating. Let’s find out why.
What Does A Noise Gate Do?
A noise gate lowers the volume of low audio peaks that may be unwanted or unnecessary. It uses the gate metaphor because every time a peak opens the gate, the system works to close it again. This process secures only the loudest peaks are heard, creating a clearer and more focused sound.
This simple dynamic processor makes it possible for several musicians to record simultaneously with minimum leakage between instruments. This implies several beneficial effects, such as a wider stereo image and more effective compression.
What is a noise gate used for?
Noise Gate is used during the recording and mixing of drums to isolate each piece from the other. Also, it is used on vocals or other instruments during live recordings or performances to minimize unwanted bleeds. It can also remove any headphones or click track leakage when a musician is overdubbing.
Anyone who’s recorded and mixed drums is aware of the spillage that happens between pieces. When these artifacts are undesirable, a noise gate will do the job perfectly. Similarly, in a live scenario, you can gate every microphone on stage if necessary. However, you’ll generally only need it on the drums, the vocals, and noisy guitar amplifiers.
At the studio, you can also use the noise gate effect creatively. Over the years, engineers and musicians developed several techniques using gating. Famously, it has been used together with other effects to create interesting results. Phill Collins’ snare drum sound in 1981’s In The Air Tonight was the first recorded attempt of using a gate on the reverb’s tail. Similarly, David Bowie’s Heroes, from 1977, has a vocal captured by three microphones with different gate settings.
How do you set a noise gate?
When setting a noise gate, you need to listen to the source material and adjust attack, hold, and release times accordingly. Similarly, to set the gate’s response, you also need to turn the Knee and Ratio knobs. Finally, lower the threshold until you hear only the desirable sounds.

Attack, hold, and release times can be challenging, depending on the source material. Therefore, a drummer playing too many ghost notes would require a fast attack, a considerable hold, and a fast release. A singer who stretches notes too much needs a more prolonged hold to hear the words’ ending. Similarly, an acoustic guitar could benefit from a fast attack, long hold, and gradual release.
The threshold also presents its challenges, although it can be very straightforward depending on the source material. A live recording with a lot of leakages will require extra care when it comes to threshold-setting. In other words, even a slight mistake could mean a missing note at the end. On the other hand, the recording of an isolated vocal doesn’t require much effort. In this case, you’ll only be using the gate possibly to eliminate the sound of breathing or feet tapping.
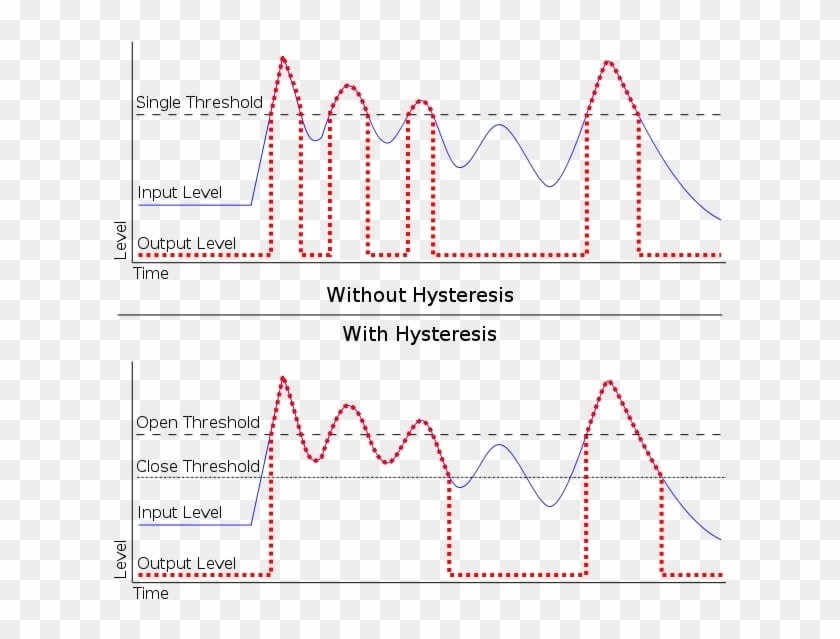
Some noise-gates also have an extra parameter, called Hysteresis. It works as a second threshold, placed at a lower value than the first, and informs the gate when to close. Using it to determine the dynamic range the gate will work in prevents unwanted artifacts caused by the gate’s malfunction.
These settings can be overwhelming for some producers while recording, so they prefer applying noise gate later during mixing. However, more experienced engineers prefer tracking with all effects on, including the noise gate. This way, the recording sounds more ready, and the later part of processing takes less time.
Both ways have their advantages, but the main goal should be finding the settings that best fit the instrument, the performance, and the song.
Does Noise Gate Affect The Tone?
Noise-gating does nothing to the tone, although badly set parameters can cause clicks, pops, or unwanted fade effects. Since a gate is a dynamics processor that doesn’t compress or limit, it doesn’t even need input or output knobs. This transparent process guarantees no tone-shaping happens.
If you’re a guitarist and just bought a noise gate pedal, expect it to cut out the electrical hum. Noise-gating is a straightforward effect that doesn’t change how any instrument sounds.
Is A Noise Gate Necessary In Your Mix?
The noise gate effect has become a standard in modern music, but that doesn’t make it necessary—the advantage of noise-gating is allowing you to process drums and vocals without worrying about leakage. Nevertheless, you can still mix without using a noise gate, and it can sound professional.
A noise gate is essential if a guitarist’s amplifier is buzzing due to excessive signal chain gain. In this case, whenever the guitar is quiet, the amp starts buzzing loudly. A gate can solve this problem and is essential in a live situation. However, during mixing, the producer might want to avoid using an extra plugin, so they can also do it manually.
Where Does A Noise Gate Go In Your Signal Chain?
A gate at the beginning of the chain is excellent to achieve a clean sound for processing later. You can use a gate at the end of the chain when something is causing too much noise. It is not ideal to use a noise gate after a delay in the chain, though, since it can mute some of the repeated notes.
When choosing where to place the gate in your chain, focus on the undesirable sounds. Anytime an amp simulator is causing unexpected buzzing, use a gate after the amp plugin to cut out the sound. When you have a lot of leakage in a snare drum, you need the gate to go before the compressor. Otherwise, the gate would have a lot less dynamic range to work with, risking being triggered by unwanted sounds. However, in a guitar pedalboard, place it at the end of your signal chain and leave it on so it intercepts the sound when you’re not playing.
Will A Noise Gate Stop Feedback?
Feedback happens when input and output sources generate a looped signal at unity gain. A noise gate can help the input remain quiet, thus avoiding feedback. If the problem is happening with a guitar and an amplifier or between a microphone and the PA, connect a noise gate.
Should I Put Noise Gate On The Effects Loop?
When the signal connected to the preamp is causing too much static or distortion, placing a noise gate in the Effects Loop will stop the noise. From there, whenever the threshold is crossed, the gate will open, and the sound will go from the preamp to the power amp uninterrupted.
Here’s an example of how to add a noise gate to your Effects Loop:

Source: Rolandcorp.com
Noise Gate vs. Expander – What’s The Difference?
The differences between a Noise Gate and an Expander are the knee and ratio curves. On an Expander, both settings are way softer than in a Noise Gate. The goal of both techniques is different as well. While noise-gating prevents low sounds from being heard, expanding makes loud peaks more apparent.
You can set an expander within the same interface as the gate. Harder ratios that allow less sound to come through will make it a Noise Gate. If you’ve set the ratio and knee, but you can still hear some of the lower sounds, pay attention. The odds are that your loud peaks are getting louder, so now you have an Expander.
Noise Gate vs. Compressor – What’s The Difference?
Both tools are dynamics processors based around a threshold. The difference is that a gate eliminates anything below the threshold, and a compressor uses it as a ceiling. Everything that hits the ceiling is tamed down, producing a more even performance from the recorded instrument.
Other parameters present in both processors also perform different functions. The attack in a compressor is used to determine how fast the transients will be lowered in volume. In a Gate, on the other hand, the attack will determine how fast the gate will let the transient come through. The release in a compressor will set the amount of time the volume will take to go back up. In a gate, the release determines how long it will be before it starts muting sounds below the threshold again.
Noise Gate vs. Noise Suppression – What’s The Difference?
There’s a major difference between what a noise gate and a noise suppressor do. A noise suppressor takes away the offending noises from the entire recording, cleaning up your whole audio in the process. A noise gate only blocks noises when nothing is crossing its threshold.
In other words, you can’t apply noise suppression to eliminate leakage from a live recording. You will use it to remove electrical hums, excessive room from a vocal, or even hiss from an analog tape. Similarly, you can’t use a noise gate for any of these previous examples.
6 Tips When To Use Noise Gate In Your Mix
As we’ve seen in this article, Noise Gate is a handy and versatile tool for your productions. Here are a few tips on how to get started with it and achieve better clarity in your recordings and mixes. We’ll show you how to set your gate with a few images from FabFilter’s Pro G.
1. The Drums
Let’s start with the basics. Some engineers like the sound of gated drums because they feel more present, accurate, and punchy. This happens because the noise gate helps the processes added later in the chain to focus and perform better. So, if you feel like that will suit your production, begin by trying out a gate on the kick, the snare, and the tom-toms. You’ll notice how much more control you’ll get over the sound of each drum.
Example – Gated Kick Drum
In this case, I recorded the kick with a microphone pointed towards the drum, an inch above its center. This helps create a punchier and more robust sound but is not good for separation. Also, I decided to use a dynamic microphone on the kick to make it cut better through the mix.
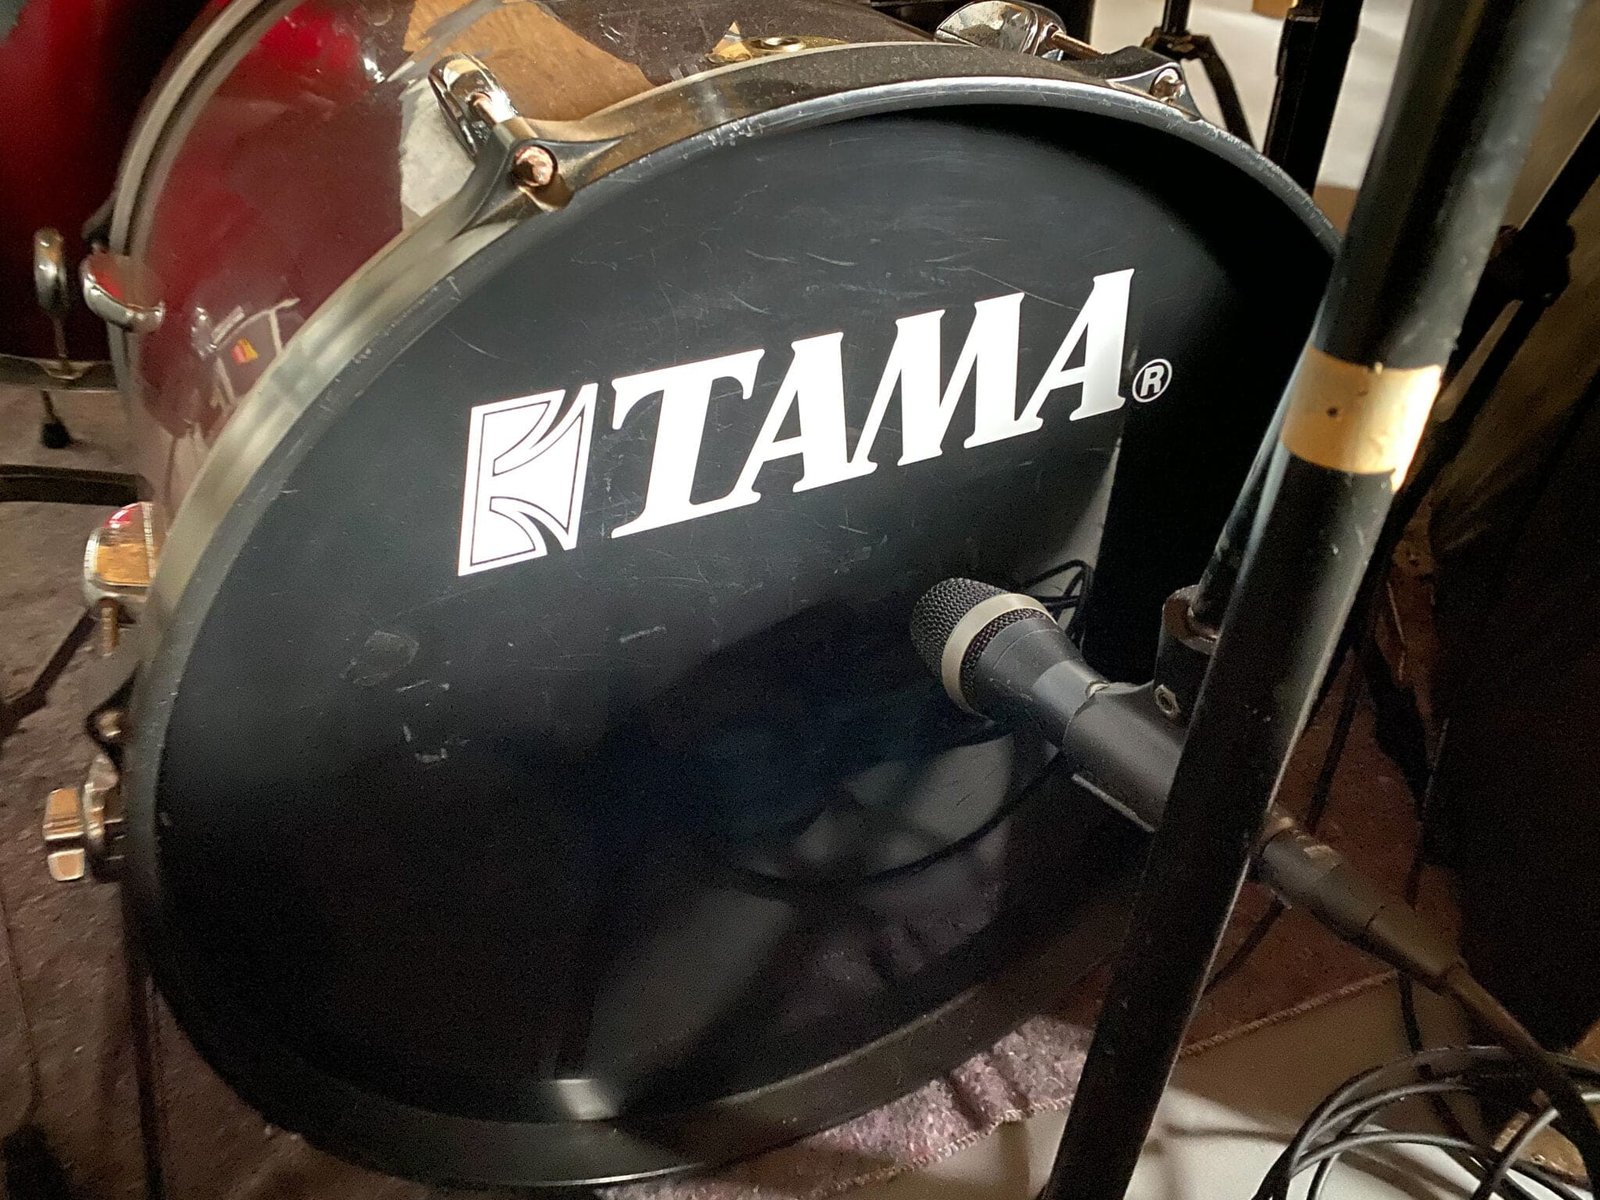
Here’s a picture of the microphone technique used for this particular kick drum.
To achieve a separation that would benefit the mix, I decided to use FabFilter’s Pro-G and started by adjusting the attack. By default, as you open the plugin, it is at 1ms, but I lowered it to 0ms.
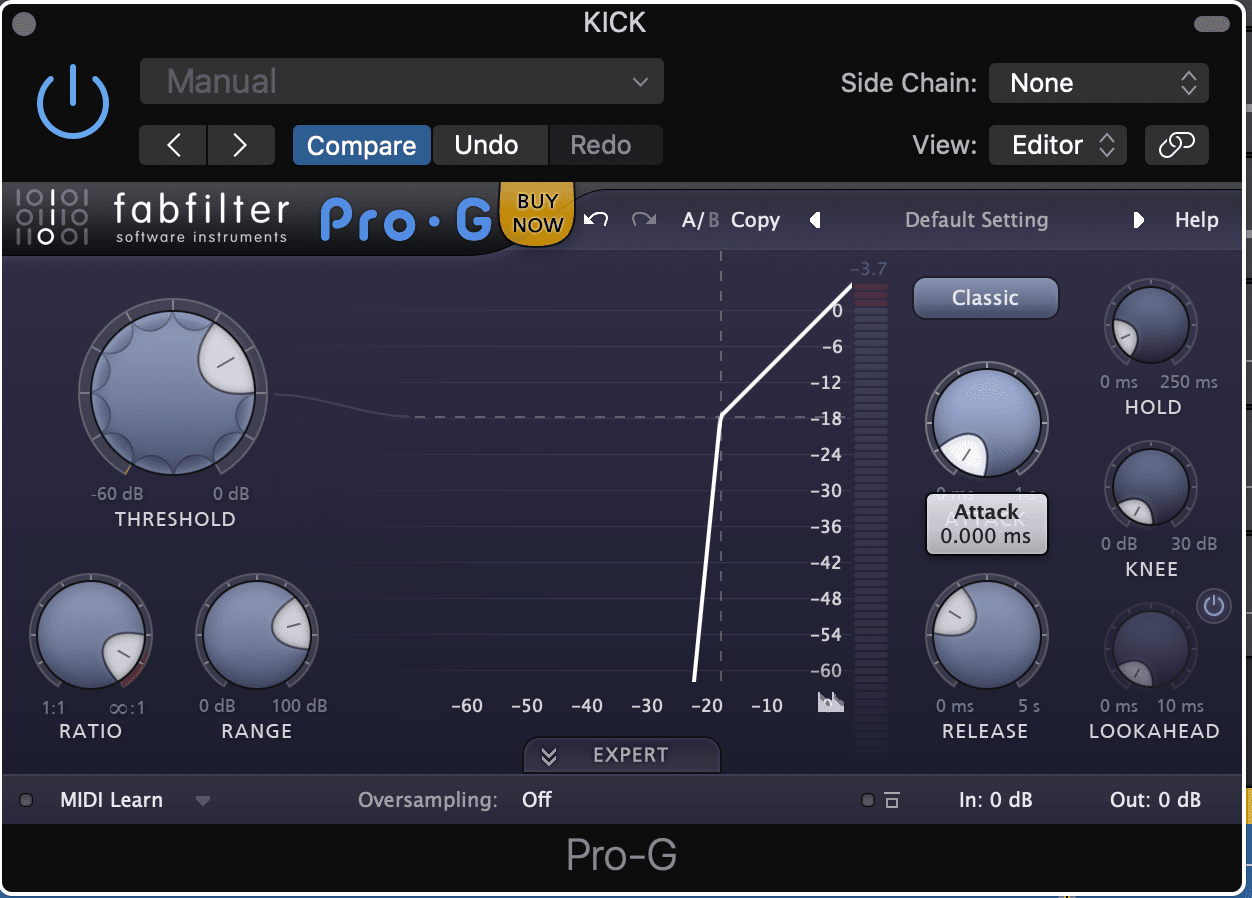
Then, to make the attack even faster, I used the Lookahead function and rolled it all the way up. Tip: Avoid using the lookahead while recording because it creates latency and can confuse your drummer.
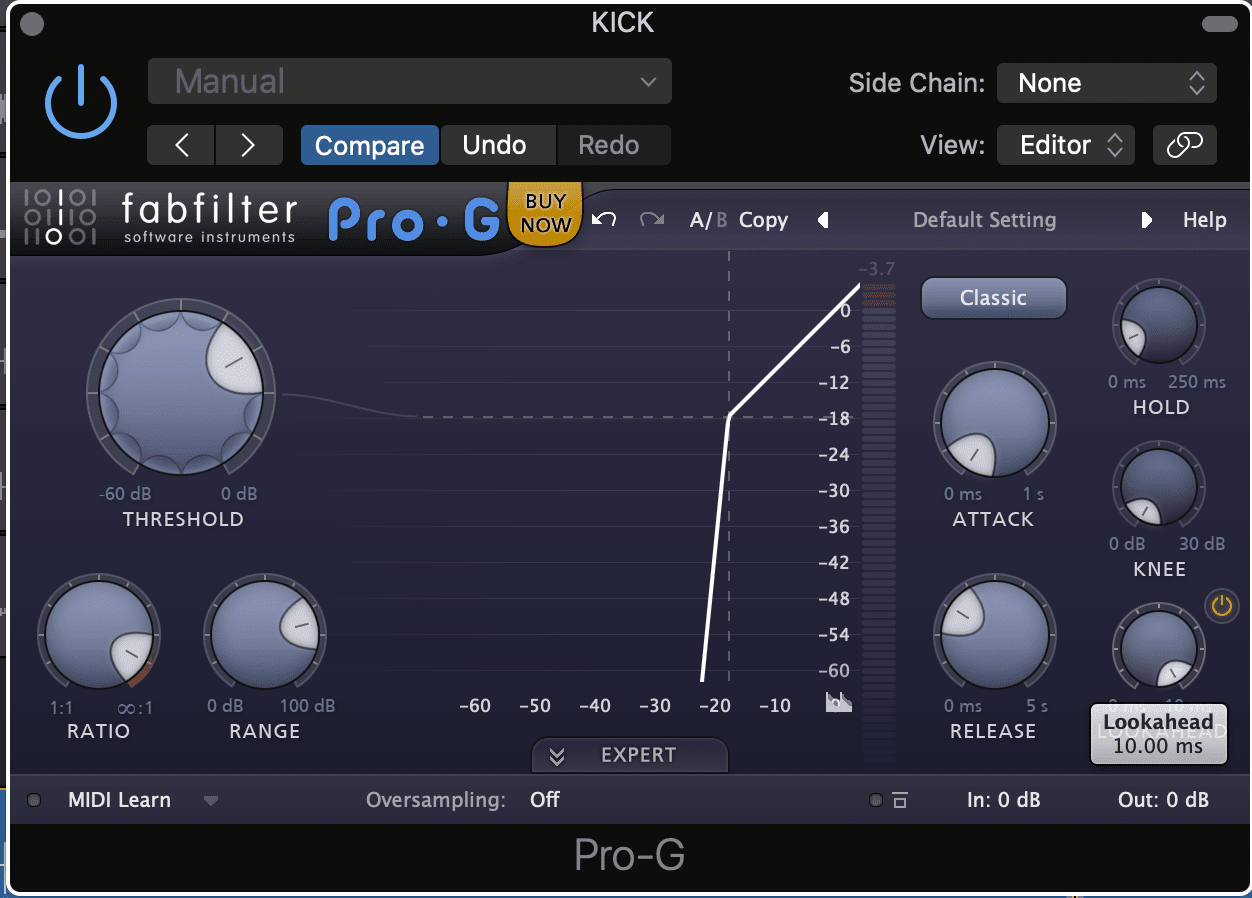
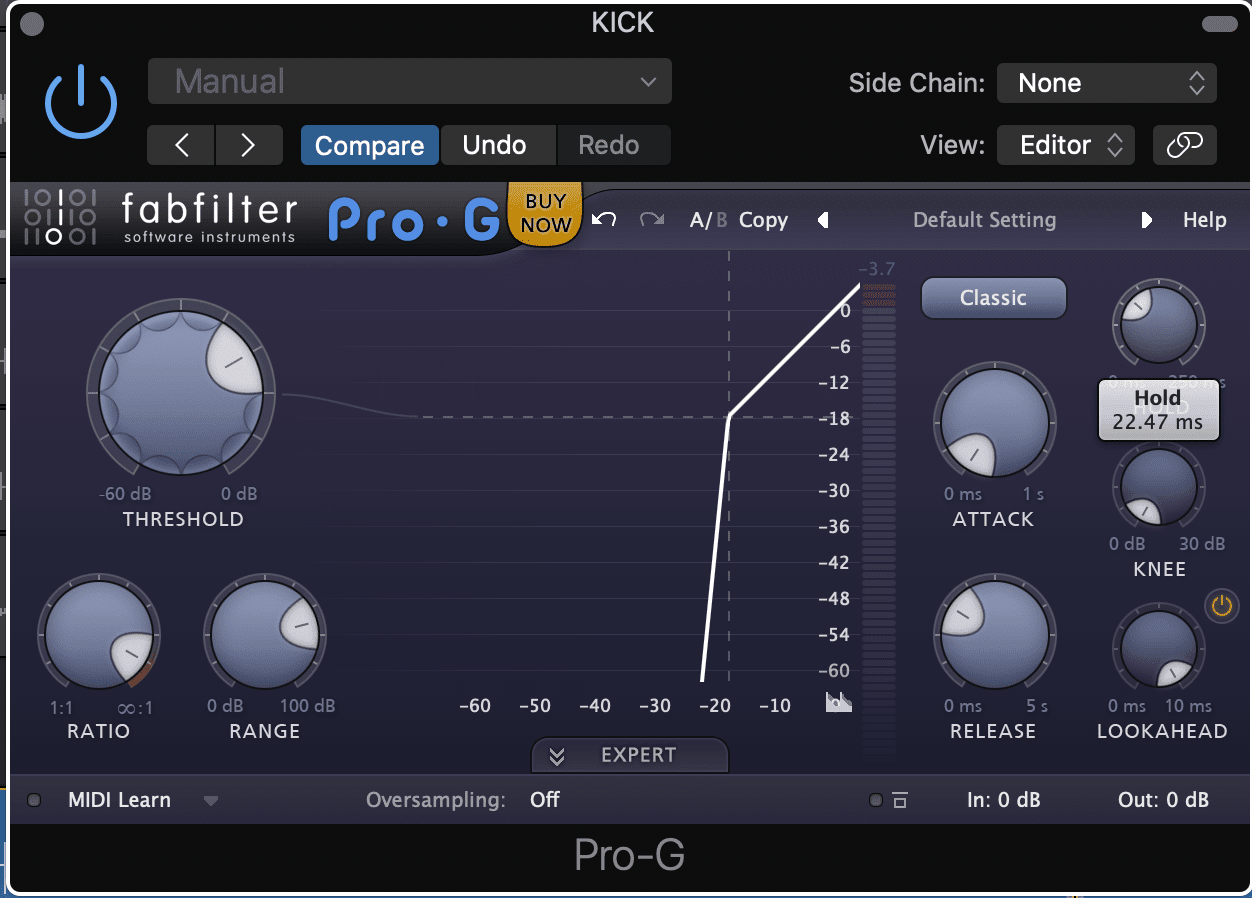
Next was the hold function. By default, the Pro-G sets it at 2ms, but I needed the kick’s resonance to come through, so I raised it to 22.47ms.
To set the release time, I listened carefully to the kick’s decay time and placed it at 1337 ms. The Pro-G lets you go up to 5 seconds of release time.

After the attack, lookahead, hold, and release times were set, the correct threshold search began. By default, Pro-G gives you a -18dB threshold, and that was working well, but some spill from the cymbals was still noticeable. I lowered it to -15.45, and it worked! I also raised both the Ratio and Range all the way up to create an even harder knee. This is how the plugin looked after all adjustments:

And this is how the kick sounds before and after the Noise Gate:
Before:
After:
2. The Bass
This is especially useful if the bass was recorded live with the band, although it also works for DI recordings. The goal here is to eliminate anything that isn’t a bass note. Sometimes the bass player will rest his hands on the strings or the instrument’s body, and that can cause unwanted artifacts. Using a gate can solve this problem.
3. The Vocals
Great for both lead and backing vocals, using a gate can help reduce ambiance or percussive sounds a singer might make while recording. The final result will be a tight vocal, free of any unwanted chit-chat while there isn’t supposed to be any.
4. The Guitars
Either electric or acoustic guitars can benefit from gating when used moderately. For the electric guitars, the most obvious reason is the electric hum from the amplifier or some cable in the pedal box. Sometimes guitars are just noisy, what can you do? Use a gate, obviously. And here’s how:
Example – Electric Guitar
This particular guitar was a very noisy one. Compressed by a stompbox and plugged into the amp, the goal was getting a constant fingerpicked sound. The room’s natural reverb sounded good, so I placed a dynamic microphone 4 feet away from the amp.
This is how it sounded before the gate:
Using FabFilter’s Pro-G, this was an uncomplicated fix. I only raised the attack to 18ms and lowered the threshold to -38.36dB. To make sure, I also raised the Ratio and Range all the way up.
The graphics inside the Pro-G make it really easy to visualize where to best place the threshold, especially in noisy situations like this. This process is also useful for vocals, basses, and other instruments that might carry a noisy background. You can see the faded waves below the threshold in this image; this is the electrical noise from the guitar:

And this is how the guitar sounds after the gate:
Acoustic guitars can also be gated but more subtly. If you have a guitar that is not constant and comes in a few times, a gate can do the same thing that it does on a vocal. Just be gentle on the settings. Otherwise, you might get loads of clicks and pops from a badly-set gate.
5. The Reverb
If you’re producing any eighties-throwback music, chances are you’ll come across the snare with a gated reverb. As previously stated, Phill Collins paved the way back in 1981 with In The Air Tonight, and this effect became famous. Here, you’ll add a very loud and long reverb to your snare, only to have it cut by a noise gate. Try doing this via an auxiliary channel. Send the snare into its own aux and add reverb and a gate. Sync the gate to the tempo of the song and voilà.
6. The Side-Chain
You can use your noise gate’s side-chain link creatively for various effects. But you can also use it to keep your vocals always up in the mix. By sending the entire arrangement and the vocals into two different auxiliary tracks, you can use the gate to duck the rhythm a little when the vocals come in. This takes a bit of tweaking, but our good friend Dylan at Musician on a Mission explains how:

The Integraudio Editorial Team consists of experienced music producers, audio engineers, and plugin enthusiasts dedicated to providing in-depth reviews and guides for music production software.