
This article will discuss the seven steps towards mixing electronic and acoustic drums.
Electronic and acoustic drums can create various sounds and styles in music production. Electronic drums are digital instruments that use electronic pads or triggers to produce sounds, while acoustic drums are traditional drums that use physical heads and cymbals to create sound.
One advantage of electronic drums is their versatility and flexibility. Electronic drum kits can produce a wide range of sounds and can be easily programmed and manipulated using software and MIDI controllers. That makes them a popular choice for producers who want to create electronic and hybrid styles of music.
On the other hand, acoustic drums have a unique and organic sound that is difficult to replicate with electronic instruments. Acoustic drums have a natural resonance and dynamic range that can add depth and texture to a drum mix. They are often used in live performances and recordings for their authenticity and character.
When mixing electronic and acoustic drums, it’s important to consider the balance between the two types of instruments. Electronic drums can add precision and consistency to a drum mix, while acoustic drums can add warmth and character. By combining the two types of instruments, producers can create unique and interesting drum sounds that complement the rest of the music.
Now let’s get to the main topic of discussion.
7 Steps To Mix Electronic and Acoustic Drums
1) Start with good recording/samples
A good recording or samples is essential for achieving a great drum mix. The quality of the recording or samples will directly affect the quality of the final mix, so it’s important to take the time to get it right. If you’re recording acoustic drums, make sure to use quality microphones that are specifically designed for recording drums.
Using the right microphone for each drum element can make a huge difference in the overall sound. For example, a dynamic microphone for the kick and snare can help capture the punch and attack. In contrast, a condenser microphone is better suited for capturing the nuances of cymbals and overheads.
Some mics are designed specifically for certain drum parts. Below is an image of a drum recording in a studio, with specialized mics for capturing the snare and the tom.
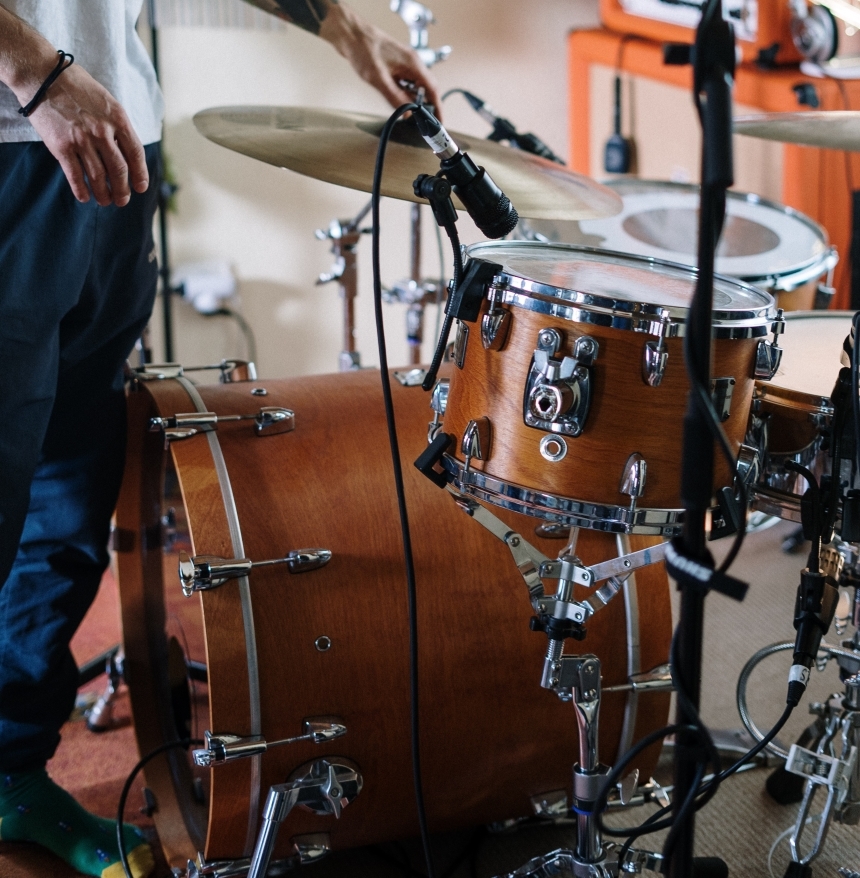
Proper microphone placement is also important for achieving a good recording. Experiment with different placements to find the sweet spot for each drum element. Tuning the drums before recording is also crucial for achieving a good sound.
If you’re using samples or synthesizers for electronic drums, it’s important to use high-quality recorded samples. Look for samples recorded with quality equipment in a well-treated studio environment. Poor recorded or compressed samples can sound thin, muddy, or distorted in a mix.
In either case, ensuring a good starting point will make achieving a great drum mix easier. Once you have a good recording or samples, you can balance the levels, apply EQ and compression, and add reverb and panning to create a polished and balanced drum mix.
2) Setup the tracks and do level-balancing
Setting up the tracks and level-balancing is critical in achieving a well-balanced drum mix. Creating separate tracks for each drum element, including acoustic and electronic drums, is essential when setting up the tracks. This approach allows for more precise control over the sound of each drum element during the mixing process. You should also name each track and group them for easy processing.
Once the tracks are set up, the next step is level balancing. When starting with the kick and snare, ensure they are at the right levels and sit well together in the mix. These two elements are essential as they provide the foundation of the drum sound. To balance the levels, use your ears and adjust each track’s volume until it sounds good.
After the kick and snare, add the toms, cymbals, and other drum elements, such as electronic drum samples. Make sure to balance each drum element and adjust the levels as needed. Remember that some drum elements may need to be brought up or down in the mix to make them more or less prominent.

It’s also crucial to pay attention to the overall balance of the drum mix. Make sure that each drum element is audible and contributes to the overall sound of the drums. Use your ears and adjust the levels to ensure the drums sit well together.
For electronic drums, usually, the kick dominates the groove, which may not be the case for acoustic drums. Secondly, hi-hats are significant in electronic drums and should be carefully balanced. Thirdly, the snare in electronic drums is usually snappier. However, all that could vary in different genres and contexts.
3) Frequency balancing
EQ and frequency balancing is essential to achieving a balanced and polished drum mix. These techniques allow you to shape the individual drum sounds, cut unwanted frequencies, and balance the overall frequency spectrum. To begin EQ and frequency balancing, you should start with the kick drum, which is the most prominent element of the drum kit.
Use an EQ to remove unwanted low frequencies and boost the mid-range frequencies to give it a punchy sound. Next, address the snare drum, which typically sits in the mid-range frequencies. Use an EQ to boost the lower-midrange frequencies to give it a fuller sound and cut any high frequencies that sound harsh or sibilant.
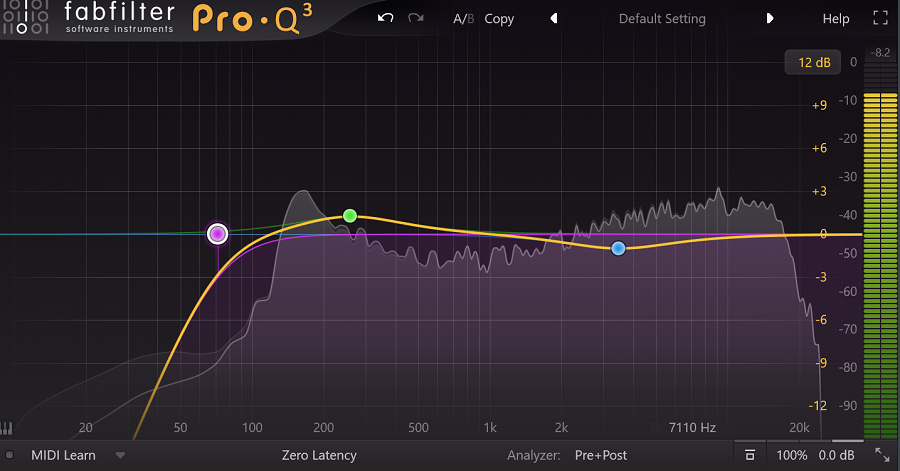
You can also use EQ to remove resonances and other frequencies that build up in a room. So, for example, given below is a surgical EQ for a drum kit recorded in a studio. All the frequencies are surgically removed from the drum bus to eliminate any room resonances and frequency build-ups.

Further, when it comes to toms, they can often sound boomy if not EQ’d correctly. Use an EQ to cut any low frequencies that aren’t needed and boost the mid-range frequencies to bring out the toms’ tone.

Cymbals, on the other hand, can often sound harsh and overpowering in the mix. Use an EQ to cut some high frequencies to reduce unwanted hiss or sizzle.

After addressing each drum element, it’s essential to check the overall frequency balance. Use a spectrum analyzer to visualize the frequency spectrum and adjust the EQ to ensure each drum element has its own space in the mix. That will help achieve a balanced drum mix that complements the rest of the music and provides a polished and professional sound.

4) Dynamic Processing
Dynamic processing is another important technique in achieving a well-balanced drum mix, particularly for electronic and acoustic drums. It involves using tools such as compression, gating, and transient shaping to manage the dynamic range of the drum sounds.
Compression is a popular dynamic processing tool used to control the level of each drum element. It helps even out the volume of the drum sounds by reducing the peaks and boosting the quieter parts. That creates a more consistent and polished drum sound. When applying compression to drums, set the attack and release times to ensure the compressor doesn’t squash the transients or make the drums sound dull.
For example, I use the Pro-C2 compressor for drum mixing, as it has great presets for individual drums like Kick, Snare, Drum Bus, Overheads, etc.

In addition, it also has a versatile range of compression algorithms like Clean, Classic, Opto, Mastering, Vocals, etc.

Gating is another dynamic processing tool useful for drums, particularly electronic drums. It helps remove unwanted noise or bleeding from other drum elements. For example, you can use a gate to isolate the kick drum sound and remove any unwanted snare drum bleed.

To use a gate on drums, you first need to set the threshold level to determine which parts of the signal you want to keep and which parts you want to remove. Then, adjust the attack and release times to control how quickly the gate opens and closes.


The plugin also allows you to change the algorithm and decide how the plugin operates. That allows you to shape the sound of the drums by removing any unwanted noise or sustain, creating a tighter and more defined sound.

Finally, you can adjust the range or depth of the gate to fine-tune the effect and achieve the desired sound for your mix.
Transient shaping is another useful tool for shaping individual drum sounds. It allows you to control the attack and decay of each drum element, helping to shape the overall sound of the drums. For example, a transient shaper can enhance the snare drum’s attack or reduce the cymbals’ sustain.

When applying dynamic processing to electronic and acoustic drums, it’s important to use your ears and apply each tool judiciously. Overusing compression, gating, or transient shaping can produce an unnatural or overly processed drum sound. The key is to balance processing and natural sound to create a well-balanced and polished drum mix.
Lastly, electronic drums tend to be more squashed and have more attack as compared to acoustic drums, which are generally mixed to be more dynamic and less punchy than electronic drums.
5) Harmonic Processing
Harmonic processing is a technique used to enhance the musicality of drum sounds by adding harmonic content to the drum sounds. That technique can be used for electronic and acoustic drums and help create a more interesting and unique drum sound.
One of the most common types of harmonic processing used for drums is saturation. Saturation is a process where harmonic distortion is added to the drum sounds to create warmth, depth, and character. This technique can be applied to the entire drum mix or individual drum elements, such as the kick or snare drum, to create a more prominent and exciting sound.
Sometimes the distortion is used as a creative effect on electronic drums. For example, many trap songs have a distorted 808 kick. Similarly, many Kanye West songs have an extreme distortion effect on drums. On the other hand, acoustic drums use distortion and saturation more subtly and primarily for a particular tone or texture.
To understand how to use saturation/distortion, we will use Fab Filter’s Saturn, a versatile harmonic processor. It is a multi-band distortion and saturation plugin that can add warmth, character, and color to drum sounds.

To use FabFilter Saturn on drums, first, insert it onto the drum track and choose a saturation mode, as shown in the image below.

Then, adjust the Drive and Mix controls to add harmonic distortion and blend the effect with the original sound.

You can also use the built-in EQ and multi-band processing to target specific frequency ranges and shape the distortion effect.

Additionally, you can use the envelope follower to modulate the distortion amount based on the dynamics of the drum track, adding further variation and interest to the sound. Experiment with different modes, settings, and automation to achieve the desired saturation effect for your drum mix.
Lastly, when applying harmonic processing to drums, it’s important to use your ears and apply each tool judiciously. Overusing saturation or other harmonic processing techniques can produce an unnatural or overly processed drum sound. The key is to balance processing and natural sound to create a unique and interesting drum mix that complements the rest of the music.
6) Add reverb & other time-based effects
Adding reverb and other time-based effects is a common technique to enhance the sound of electronic and acoustic drums. You can use these effects to create a sense of space, depth, and ambiance, making the drum mix sound more polished and professional.
Reverb is the most common time-based effect used for drums. It simulates the natural sound of a drum being played in a room by adding a series of echoes to the original sound. That creates a sense of space and makes the drum sound more natural and immersive.
When adding reverb to drums, it’s important to consider the size and type of the virtual space being simulated. Small rooms will create a tight and intimate sound, while larger spaces will create a more spacious and open sound. Delay is another time-based effect that you can use to create a unique and interesting drum sound.
For example, Valhalla VintageVerb is a high-quality reverb plugin that can add space, depth, and character to drum sounds. To use Valhalla VintageVerb on drums, first, insert it onto the drum track and choose a reverb mode and the plugin’s color.
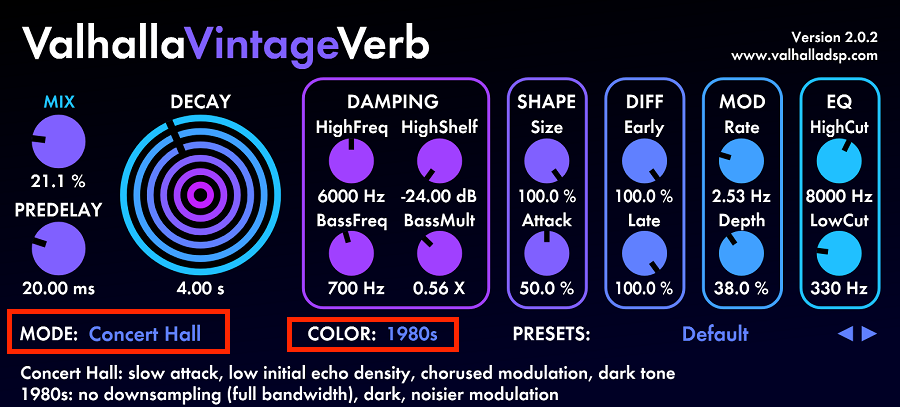
Then, adjust the Pre-delay and Decay times to set the length and size of the reverb tail. You can also use the high and low cut filters to shape the frequency response of the reverb effect and the Mix control to blend the wet and dry signals.


Additionally, you can use the modulation controls to add movement and variation to the reverb effect or the Diffusion and Early Modulation settings to shape the different reverb’s early reflections. Experiment with different modes, settings, and automation to achieve the desired reverb effect for your drum mix.
Next, the delay effect adds a series of echoes to the original sound, but unlike reverb, each echo is distinct and not blended. That creates a rhythmic and repetitive effect that you can use to add excitement to the drum sound. When adding delay to drums, it’s important to consider the delay time, feedback, and other settings to create a sound that complements the rest of the music.
We will discuss all that by using the example of H-Delay, a delay plugin that can create rhythmic and spatial effects on drum sounds. To use H-Delay on drums, first, insert it onto the drum track and choose a delay mode (ping pong, mono, stereo, etc.).

Then, adjust the Time and Feedback controls to set the delay time and amount of regeneration. You can also use the Mix control to blend the wet and dry signals and the high and low cut filters to shape the frequency response of the delayed signal. Additionally, you can use the Modulation controls to add movement and variation to the delay effect or the Ping Pong and Dual settings to create stereo and multi-tap delays.

Experiment with different modes, settings, and automation to achieve the desired delay effect for your drum mix.
Other time-based effects that you can use for drums include chorus, flanger, and phaser. These effects add a sense of movement and modulation to the drum sound, creating a unique and interesting effect. When using these effects, it’s important to use them judiciously and consider how they will affect the overall sound of the drum mix.
First, to use chorus on drums, insert a chorus plugin onto the drum track and adjust the Rate and Depth controls to set the speed and intensity of the modulation effect. You can also use the Mix control to blend the wet and dry signals and the high and low cut filters to shape the frequency response of the modulated signal. To use a flanger on drums, follow the same process but adjust the Delay and Feedback controls to set the time and amount of the flanging effect.

Both effects can create subtle or pronounced variations of the original drum sound, adding interest and dimension to the mix. Experiment with different settings, automation, and combinations of effects to achieve the desired modulation effect for your drum mix.
For example, many 80s-based dance songs have interesting chorus effects on percussions. Acoustic drums typically need more reverb and delay to create a feel of the room. On the other hand, electronic drums generally need only a modest amount of the room sound or ambiance unless that’s the aesthetic you’re going for.
7) Use panning
Panning is a technique to position sounds in the stereo field and create a sense of space and depth in a drum mix. You can create a more immersive and interesting sound that complements the rest of the music by panning individual drum elements, such as the kick, snare, and cymbals.
When panning drums, it’s important to consider the position of each element in the drum kit. For example, the kick and snare drum are usually positioned in the center of the stereo field. At the same time, cymbals and other percussion elements can be panned to the left or right to create a sense of movement and separation.
In the image below, you can see how different elements of drums are panned to give the listener a good visualization, a three-dimensional space, and aural localization of drums in the space.

You can use panning to create a sense of depth, with elements such as overhead microphones or ambient microphones panned to the left or right to create a sense of space. Another important consideration when panning drums is to avoid over-panning. Over-panning can create a disjointed and unnatural sound, making it difficult for the listener to focus on the music.
A good rule of thumb is to pan drums in a way that reflects their physical position in the drum kit. For example, a cymbal positioned to the drummer’s left should be panned to the left in the stereo field. It’s also important to consider the overall balance of the drum mix when panning.
For example, if the kick and snare drum are panned too far to the left or right, that may create an unbalanced sound. A good approach is to start by panning the kick and snare in the center and then experiment with panning other elements to create a sense of space and separation.
Bonus
Adjust the final mix (automation)
One important consideration when adjusting the mix is to listen to the drum mix in the context of the entire song. That means listening to how the drum mix interacts with other elements in the music, such as vocals, guitars, and synths. Adjustments can then be made to the overall level of the drum mix, as well as to individual elements within the mix, to ensure that the drums sit well within the overall mix.
Another important consideration when adjusting the mix is to use your ears and trust your instincts. That means making small tweaks and adjustments to the mix, listening to the result, and making further adjustments as needed. It’s important to avoid making large changes simultaneously, leading to an unbalanced and disjointed sound.
Some common adjustments that can be made when adjusting the mix include adjusting the overall level of the drum mix, adjusting the panning and stereo width of individual elements within the mix, and adjusting the EQ and compression settings on individual drum elements.
By making small adjustments to these elements, you can achieve a balanced and polished sound that complements the rest of the music. Next, automation is a powerful tool that you can use to add movement and dynamics to a drum mix.
Automation involves adjusting the level, panning, EQ, and other settings on individual drum elements over time, allowing you to create a dynamic and interesting drum mix that complements the rest of the music.
One common use of automation is adjusting the level of individual drum elements in different song sections. For example, you should increase the level of the snare drum during the chorus to create a more driving and energetic sound or decrease the level of the hi-hat during a breakdown to create a more sparse and atmospheric sound.
Another use of automation is adjusting individual drum elements’ panning over time. That can create a sense of movement and space in the drum mix as individual elements move from one side of the stereo field to the other. For example, you might pan a crash cymbal from left to right during a drum fill to create a sense of excitement and energy.
Automation can adjust individual drum elements’ EQ and compression settings over time. For example, you might use automation to increase the compression on the snare drum during the chorus to create a more aggressive and punchy sound. The key to using automation effectively is to experiment and use your ears.
Conclusion
In conclusion, this article has discussed the seven steps towards mixing electronic and acoustic drums. Electronic drums offer versatility and flexibility, while acoustic drums have a unique and organic sound that is difficult to replicate with electronic instruments.
To mix the two, one must start with a good recording or samples, set up the tracks, balance the levels, and use EQ and frequency balancing techniques. Panning, compression, and reverb are additional steps that can help create a polished and balanced drum mix. By following these steps, producers can create unique and interesting drum sounds that complement the rest of the music.
I hope the article helps. Thank you for reading.

The Integraudio Editorial Team consists of experienced music producers, audio engineers, and plugin enthusiasts dedicated to providing in-depth reviews and guides for music production software.