
CPU performance while working on FL Studio is determined by plenty of factors. We will discuss 18 hacks by which the CPU performance in your sessions can significantly increase. We will also be discussing how good your CPU must be and what are its suitable specifications for you to be able to run FL Studio on it without encountering any problems or glitches.
So let’s dive right in.
1. Select an ‘ASIO’ Input/Output Device
ASIO drivers in almost every soundcard give you high-fidelity audio with low latency, hence decreasing CPU load. You can select an ASIO driver by going to Options > Audio Settings > Input/ output and selecting any ASIO driver as an input/output device.

The drop-down menu under Device will give you options for DirectSound and ASIO devices. Under devices, you can select the ASIO device of your Audio Interface or FL Studio ASIO. DirectSound has a lot of unnecessary layers of processing which could be bypassed by selecting an ASIO driver.
2. Increase Buffer Length
Increasing buffer length can substantially increase the performance of your CPU. For example, a buffer length of 1024 or 2048 samples will optimize your system for higher performance. However, this buffer length is only recommended when mixing-mastering a song.

Buffer length or buffer size is the number of samples it takes for your computer to process any incoming audio signal. Hence, a buffer length of 128 or 256 samples will be more optimal for recording purposes. That is because a higher buffer length will result in lags and delays when you’re trying to do real-time monitoring of what you’re recording.
To change the buffer rate, go to Options > Audio Settings > Buffer length and select the required buffer length.
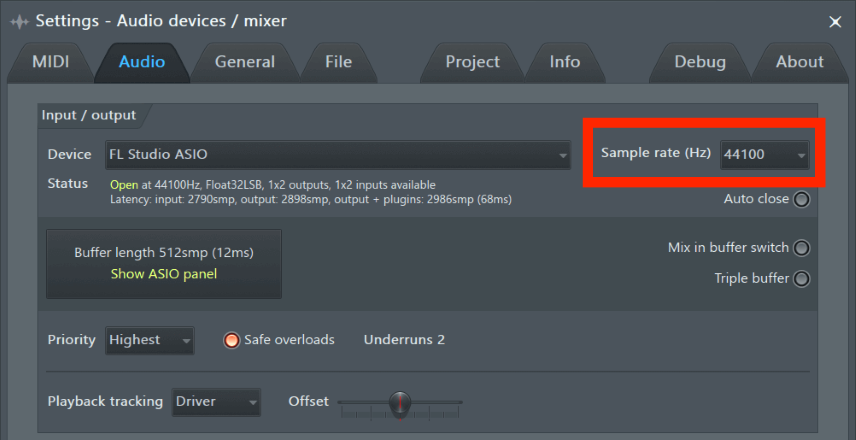
3. Change the Sample Rate of your session
Any sample rate including and beyond 44.1 kHz will result in good quality audio. However, higher sample rates consume more CPU power. Hence, if you’re operating at a higher sample rate, it will not result in any audible differences. It may give you some processing capabilities for specific plug-ins, but nothing more.
So you can bring your session’s sample rate down to 44.1 or 48 kHz. That will also give you all the capabilities you need for good processing and optimizing your session. You could change your sample rate by going to Audio Settings and selecting the sample rate from the Sample Rate dropdown menu in the right upper corner of the Audio Settings window.
4. Buffer Settings
Under the audio settings, turn on ‘Mix in buffer switch’ and ‘Triple buffer’, below Sample Rate settings. That will allow some audio devices to reach lower latencies and reduce audio underruns, that is, audible clicks and pops when the CPU load climbs too high.
The triple buffer option will allow the CPU more time to process the audio signals but will result in latency. That is most useful when working with a CPU load equal to or close to 100.

5. CPU Settings
Under CPU in Audio Settings, turn on:
- Multithreaded generator Processing
- Smart Disable
- Multithreaded mixer processing
Multithreading is a type of execution method the CPU uses to process information. That will let the CPU use more cores and multiple logical processors, which means the CPU has less load on any particular core. Hence we can enable multithreaded processing for generators (synths & oscillators) and the plug-in chain in the mix window.
Smart Disable turns plug-ins off when they are not in use. That reduces the CPU load substantially. You can also switch smart disable for all plug-ins by going to Tools > Macros and selecting “Switch smart disable for all plug-ins”. So if you load up a plug-in but don’t end up using it, enabling this will delete that plug-in.
6. Mixer Settings – Resampling Quality
By selecting a lower Resampling Quality, one can significantly free up the CPU’s work. You can do this by going to: Options > Audio Settings > Mixer > Resampling quality and selecting the value. The recommended value for resampling quality is 24-point sinc or above, as a lower value may result in lower quality of the resampled audio.

Let’s understand this further. Sometimes the audio clips we use in our session are recorded at a sample rate different from the session’s sample rate. So FL Studio resamples that audio clip to match its sample rate with the session we’re working on. Resampling quality allows us to select a value for the sync point at which the samples in the audio clip are interpolated while being resampled.
7. Timebase (PPQ) Settings
Go to Options > Project General Settings > Time Settings > Timebase PPQ (Pulses per quarter) and select a lower value than what’s already selected. Reducing the PPQ value will reduce the number of ticks per beat in your playlist window, resulting in lower editing resolution.

With higher PPQ settings, you can zoom in to a waveform widely in the playlist window. However, you don’t need that kind of editing resolution while mixing a song so that you can reduce the PPQ value in that case. That will significantly reduce the CPU load.
8. Setting Data Folder
Under the Project settings tab, select a Data Folder where you want the audio waveforms and projects to be saved. It is default set to Auto, saving the project files to the general USER folder. However, you can choose a folder by clicking on the folder icon and selecting the location.

Using a location on the SSD drive on your system is recommended if you have one. Or you can use a location in the primary C Drive of your system, where you can easily access information about the project every time the FL Studio session opens up.
9. Work with the right plug-ins
Stock plug-ins are more optimized and most compatible to be used in FL Studio as compared to third-party plugins. In addition, they consume less CPU power as compared to third-party plug-ins. For example, you can use the Fruity Parametric EQ for EQ 2 purposes, Maximus for multiband compression, Fruity Delay 3 for adding versatile delay effects to your sounds, etc.
Also, fewer plug-ins will result in a lesser load on the CPU. Hence, wherever possible, you can freeze the processing and lower the number of plug-ins used. Lastly, some plug-ins are heavier than others, so selecting them accordingly and using stock plug-ins wherever possible is more efficient.
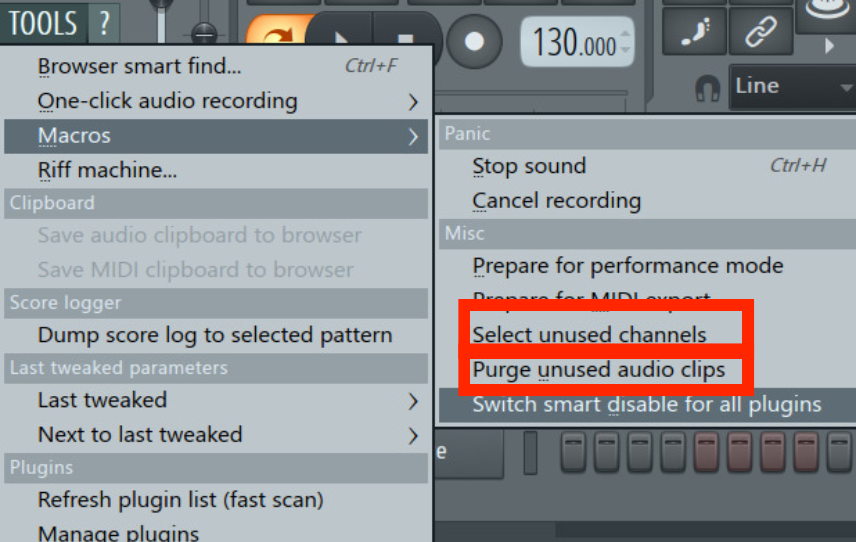
10. Purge unused Audio Clips
Going to Tools > Macros and selecting “Purge unused Audio Clips” will delete all samples, loops, and consolidated audio clips not being used in the session on the playlist window. That will free up the RAM in your system and declutter your projects. Alternatively, you can also select unused channels and delete them.
Go to Tools > Macros > Select unused channels to select unused channels. That will select all samples or loops that are idle and not being used in the session so that you can delete them together from the session.
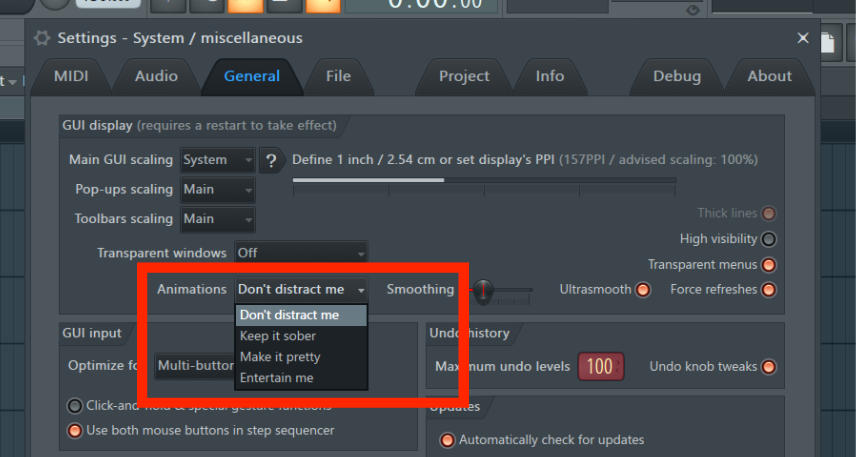
11. Turn off animations
Go to Options > General Settings > GUI Display > Animations, and you will see that the option selected here by default is “make it pretty.” However, these fancy graphics are heavy on the CPU, so you can free up CPU space by selecting the “Don’t distract me” option.
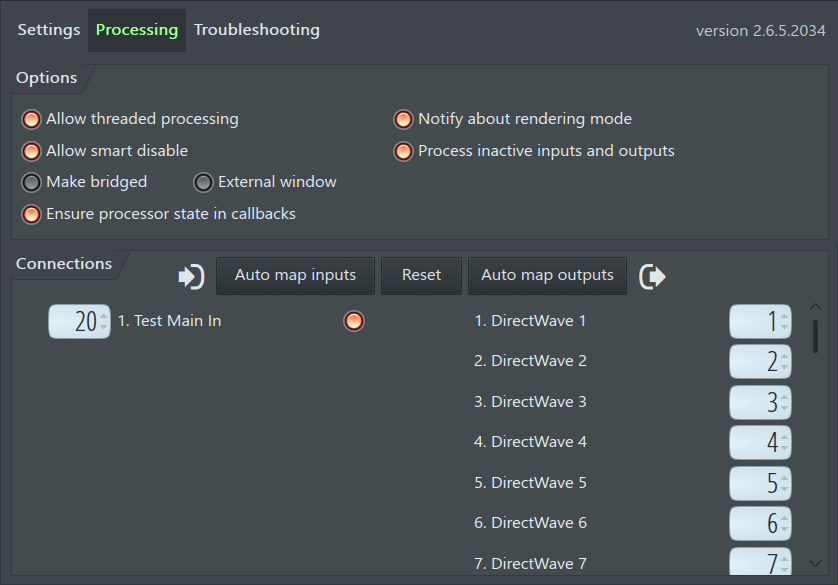
12. Adjusting plug-in settings
When you open a plug-in in FL Studio, click on the Settings icon and open the Processing tab, and in that, select Allow threaded processing and Allow smart disable under Options. That can be done for every plug-in, synth, or sampler you use in your session.
Plug-ins, both stock and third party, can also be optimized by changing a few settings here and there. For example, if you’re using a synthesizer, you can check if you can bring down the number of voices used in the oscillator of that plug-in.
Another example, while using a FabFilter Pro-Q3, you can turn off its piano animation after you’re done using it and turn the plug-in from Zero Latency mode to a Natural or Linear phase mode to save some CPU processing. Similarly, plug-in quality modes can be adjusted while you’re using the session and can be changed back to the highest quality settings just before exporting the audio.
13. Consolidate MIDI patterns and audio clips
When you’re done with processing an audio clip or have finalized the sound of a MIDI pattern to a level that you can commit to, you can consolidate that particular pattern or track. Just loop the part you want to commit to, right-click on the track that the pattern or clip is on, and select Consolidate this track > From track start.

When you’re done consolidating a pattern or a clip, you can delete the plug-ins and processing related to it. Just make sure to enable insert effects when you’re rendering the audio. Similarly, you can render or render and replace a pattern as an audio clip.
Right-click on the pattern you want to render as the audio clip and select render as an audio clip to convert the MIDI pattern into an audio clip. By clicking on the render and replace option below it, you will render the pattern into an audio clip and replace it with the audio clip wherever it’s being used.
14. Use an external audio interface
An external audio interface or a sound card will unload your computer of a lot of computing power and give more breathing space to your CPU. Using an external soundcard has a lot of other benefits too, which will result in an efficient workflow. Just make sure that the interface is ASIO compatible.
15. Update FL Studio
Updating your software is an obvious way to improve the performance of both the DAW and the CPU. FL Studio 20 and above versions are way faster and more efficient than any previous versions of the DAW like FL Studio 12. In addition, since all updates in FL Studio are free, anyone can update the software quickly and cost-free.
16. Create effects sends
Instead of loading up different instances of the same plug-ins for effects like delay, reverb, etc., in different mixer channels, we can create send of these effects, in which the tracks or inserts for which we need these effects can be routed. That will free up the CPU load to a great extent.
17. Task manager settings
By opening Task Manager and clicking on the Performance tab (graphs icon in Windows 11), you will get a more elaborate insight into what’s going on with your CPU consumption. So you could analyze this to understand CPU usage instead of relying on FL Studio’s CPU load meter.
Further, in the Processes tab, you can end all unnecessary tasks that consume your CPU power. You could also disable some Startup apps by going to the Startup apps tab in the Task Manager and right-clicking to disable the app. That will prevent unnecessary apps from running in the background or opening in the system when your system starts.
18. Turning CPU-hungry plug-ins into Direct Wave sampled instruments
Some synth plug-ins like Spectrasonics Omnisphere, Serum, Nexus, etc., are quite heavy on the system and may slow our sessions. We can sample these virtual instruments to improve CPU performance using Direct Wave.
That can be done by right-clicking on the channel we want to sample and clicking “Create Direct Wave instrument.” Of course, that will give you plenty of options by which you can select the sample’s length, keyboard range, velocity range, etc. But this will give you the same MIDI capabilities while taking down the massive CPU load of the plug-in.

How good CPU do you need for FL Studio?
Audio processing is one of the people’s most CPU-heavy activities on their systems today. That is because it relies on real-time processing. In addition, music production software like FL Studio relies heavily on sequential or serial processing, unlike video processing software that relies heavily on parallel processing.
Hence, while selecting a CPU, the most important factor to consider is the single core performance of the CPU. Therefore, one should go for a CPU with maximum single-core processing, tied up with 8-12 physical cores. However, the number of cores is still a secondary factor compared to single-core processing performance.
For example, a 6-core CPU with a high single-core processor is better than an 8-core CPU with lower single-core processing. Core processing scores for CPUs with 12 or fewer cores are graded as follows:
| Core processing scores | Grades |
| < 4,900 | Weak |
| 5,000 – 9,900 | Medium |
| 10,000-19,900 | Strong |
| > 20,000 | Very Strong |
Another important parameter, after a single score processing score, to consider while selecting a CPU is multi-core processing. Yet, the single-core processing capabilities of the CPU are still the more important factor. For example, an 8-core CPU (15,200) with a single core score of 20,00 is probably less suited to music production than a 6-core CPU (13,000) with a single core score of 2800 since audio-processing is computed sequentially and not in parallel.
This is summarised in the below-mentioned table. Consider the following CPUs with their single-core and multi-core processing scores. These CPUs are ranked from best(1) to worst(3).
| No of cores in the CPU | Single-core Processing score of the CPU | Multi-core processing score of the CPU | The rank of the CPU |
| 6 | 28,000 | 14,000 | 1 |
| 8 | 20,000 | 14,000 | 2 |
| 10 | 20,000 | 12,000 | 3 |
Based on this, intel processors are more favored for music production than AMD processors because of better single core processing performance on intel processes. Intel i9 CPU is the best option one could go for because of a reasonable number of cores, fast clock speed, and high single-core processing.
Recommended CPUs are intel i9-12900 (+K, +KF or T), intel i9-11900K, intel i7-12700K, intel i711700K, AMD – The Ryzen 9 5950X, 9 5900X & 7 5800X and Apple ARM processors (M1, M1 Pro and M1 Max). Apart from CPU, RAM, HDD, and Audio Interface will also determine the performance of FL Studio.
A RAM of 8GB is recommended, while up to 16 GB RAM is considered more than sufficient. Regarding Hard Disk Drives (HDD), SSDs (Solid State Disks) are great for achieving faster boot times and loading up projects faster. Lastly, Audio Interface, which supports ASIO drivers, will increase the efficiency and performance of FL Studio by a great deal.
Conclusion
As you can see, there are several ways you can improve CPU performance in FL Studio. If you follow the above guidelines, consolidate and commit to tracks as much as possible, use as few third-party plug-ins as possible, work with optimal project settings, and have a decent processor, you should not face any problems with CPU load.
Investing in a good machine is always a good idea, but investing wisely is also very important. The article mentions in detail what you should be looking for while buying a CPU. Optimizing your software and your system is essential for everything to work smoothly.
Settings will vary depending on what stage of music making you’re in. For example, the settings for the production stage will be different from those for the mixing stage, which will be different from the settings in the recording stage. Make sure you understand the engineering behind the settings so you can adjust them according to your stage of creation.
Having separate recording, production, mixing, and mastering sessions is not a bad idea. You can always render and export your audio tracks and import them into the session for a different stage. Working with new sessions may be time-consuming but gives you a fresh perspective on your music.

The Integraudio Editorial Team consists of experienced music producers, audio engineers, and plugin enthusiasts dedicated to providing in-depth reviews and guides for music production software.