
This article will discuss fixing MIDI latency/delay issues in FL Studio.
MIDI lag or delay can be caused by several factors, including the processing power of the computer or device receiving the MIDI signal, the complexity of the software being used, the quality of the USB or MIDI cable being used, and any other devices connected in the MIDI chain.
The operating system and its current state (such as available memory and background processes running) can also affect MIDI performance. Furthermore, some audio interfaces and soundcards may introduce latency in converting MIDI to Audio signals.
Let’s discuss how to resolve this:
How to fix MIDI latency/delay in FL Studio
You can fix the MIDI latency/delay issues in FL Studio by adjusting the DAW settings like buffer length/size, optimizing your computer’s performance, using a low-latency interface, using multi-core processing, or turning off any unnecessary plugins in your session.
Buffer Length
Buffer length in digital Audio refers to the amount of time it takes for audio data to be processed. It is expressed in samples and is often set in the audio settings of FL Studio, audio interface, or operating system.
The buffer length determines the size of the Audio buffer, which is a region of memory used to store audio data as it is being processed temporarily. When an Audio signal is received, it is stored in the buffer and processed in real-time. The buffer length affects the system’s latency, with a smaller buffer length resulting in lower latency and a higher risk of audio dropouts.
In most cases, you can adjust the buffer length to balance the tradeoff between latency and stability. A buffer length that is too small may cause audio dropouts, while a buffer length that is too large may result in excessive latency. The optimal buffer length for a given system depends on the hardware and software used and the desired balance between latency and stability.
Hence, to reduce latency, you need to reduce the buffer length. To change the buffer length in FL Studio, the first step is to open the program and go to the Options menu. Select Audio Settings, where you will find the Buffer size or Latency setting.

In the Audio Settings, open Buffer Length and set its value. A smaller value will reduce latency but may increase the risk of audio dropouts, while a more significant value will increase latency but improve stability.

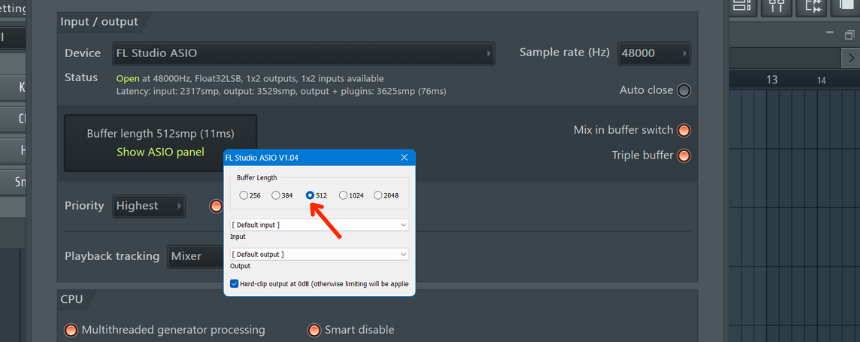
Once you have set the buffer size, click on the cross sign of the window. To summarise, go to Options > Audio Settings > Input/output > Buffer length. So if you’re finding latency issues while recording MIDI data, go to Audio settings and reduce the buffer length. Lastly, setting the Buffer length value to anything above 512 will result in latency and delay issues.
Decrease Sample Rate
The sample rate is the number of audio data samples taken per second in a digital recording. It is expressed in Hertz (Hz) and determines the resolution of the recording, with a higher sample rate providing better audio quality. Standard sample rates in digital audio production are 44.1kHz, 48kHz, and 96kHz, with 44.1kHz being the standard for audio CDs. The choice of sample rate depends on the audio recording’s intended use and final destination.
Various factors, including buffer size, processing time, and the speed of the hardware and software components involved, cause latency in digital audio production. Reducing the sample rate can reduce processing time, but this reduction may be offset by increased latency from other sources, and it will also lower the audio quality.
To reduce the sample rate, go to Options > Audio Settings, click on Sample Rate, and select the desired sample rate from the drop-down menu.

Simplify the processing in your session.
You can uncomplicate the processing in your session in many ways, like deleting unused tracks and samples and unnecessary plugins, reducing the tick size, and more. For example, plugins can impact both processing and latency in FL Studio. Processing refers to the number of computer resources (such as CPU and memory) used by the plugins to run their functions.
If you have too many plugins loaded or use plugins with high processing requirements, it can slow down the performance of FL Studio and cause latency issues. To delete any plugins, go to the mixer channel, select the desired insert, open the drop-down menu to the left of the plugin you want to delete, and then select delete.

Secondly, you can also bounce down or consolidate MIDI patterns of the plugins that are too heavy. So, when you’re done with processing an audio clip or have finalized the sound of a MIDI pattern to a level that you can commit to, you can consolidate the pattern or track that’s taking up a huge chunk of processing.
To do that, loop the part you want to commit to on the playlist window, right-click on the track that the pattern or clip is on, and select Consolidate this track > From track start.

Alternatively, you can go to the playlist, right-click on the pattern, and select “render to audio clip” or “render and replace.”

Next, upgrading to the latest version of your software is an effective way to enhance the performance of both the Digital Audio Workstation (DAW) and the Central Processing Unit (CPU). The latest versions of FL Studio, such as FL Studio 20, are much faster and more efficient than earlier versions, such as FL Studio 12. Moreover, all updates for FL Studio are free, as it is simple and cost-effective to upgrade the software.
You can simplify your FL Studio projects and free up RAM by eliminating unused audio samples through the Macro function. Go to the Tools menu, then Macros, and select “Purge unused Audio Clips” to accomplish this. All audio clips, samples, and consolidated clips not used in the current playlist session will be removed.
You can remove unused channels by selecting them via the Tools > Macros > Select unused channels option. This will highlight all idle samples or loops not being used in the session and permit you to remove them all at once.

Next, you can optimize plugin settings in FL Studio to avoid latency issues. So, to optimize the performance of plugins, you can adjust the settings for each plugin, synth, or sampler in your session by opening the plugin, clicking on the Settings icon, and navigating to the Processing tab. Then, select “Allow threaded processing” and “Allow smart disable” under the Options section.
To summarise, to adjust the plugin/VST wrapper settings in FL Studio for improved performance, open the plugin and navigate to the “Processing” tab in the VST wrapper settings. Select “Use fixed buffer size” and “Make bridged” under the compatibility options.

To further optimize the performance of your FL Studio session, you can adjust settings for specific plugins. For example, in FabFilter Pro-Q3, please turn it off after using the piano animation to save CPU processing. Switch the plugin from Zero Latency mode to a Natural or Linear phase mode.
Similarly, with Sytrus by Image-Line, you can set different quality and oversampling parameters for draft/real-time instances of the plugin instead of the rendering settings.

Optimize your hardware
To ensure optimal performance while using FL Studio, it’s important to have a well-optimized machine, especially the CPU. Image-Line recommends 8-16 cores for the CPU and specific Intel processors such as the i9-12900, i7-12700K, and i9-11900K, as well as specific AMD processors like the Ryzen 9 5950X and 5900X and specific Apple Silicon Processors, like the M1, M1 Pro, and M1 Max.
Additionally, FL Studio is compatible with Windows 8 or higher and macOS 10.13.6 or higher operating systems, and 8 GB of RAM is considered sufficient. Image Line also recommends using an SSD as the primary disk for running the software and the operating system.
Conclusion
In conclusion, MIDI latency can be caused by various factors such as hardware processing time, buffer sizes, and the operating system’s handling of MIDI data. To fix MIDI latency in FL Studio, you can adjust the buffer length in the audio settings, reduce the sample rate, and simplify the processing in your session by deleting unused tracks, plugins, and samples.
The optimal buffer length and sample rate depending on the hardware and software used, as well as the desired balance between latency and stability. To reduce latency, it’s recommended to reduce the buffer length to below 512 and delete any plugins with high processing requirements. Additionally, consolidating heavy MIDI patterns can improve performance and reduce latency in FL Studio.

The Integraudio Editorial Team consists of experienced music producers, audio engineers, and plugin enthusiasts dedicated to providing in-depth reviews and guides for music production software.