
This article will analyze some issues that can often occur in a Live session, such as crackling, freezing, crashing, why they happen, and how to avoid them.
To fix Ableton’s crackling and freezing issues, you must first check your audio driver in your preferences menu. You can most often improve these issues by adjusting the buffer size and sample rate, both located in the preferences menu under the audio. Then, you can focus on your CPU usage for better performance.
Crackling and freezing inside Ableton Live are common signs that your machine has trouble processing audio and handling your Live session, as are audio dropouts. These troubles often occur because your machine isn’t strong enough to handle a big Live session, while out-of-date drivers and malfunctioning software can also be at fault.
Let’s go through some of these reasons and also a few solutions to help you maximize your machine’s performance for smoother Live sessions with minimal freezing, cracklings, and audio dropouts.
Tips To Fix Crackling, Crashing & Freezing
Audio interface
One of the first problems beginner producers are faced with, which causes crackling and freezing when starting their music production journey, is their PC built-in audio cards. Many laptops and PCs don’t have audio cards in them that are made for high-quality audio processing that happens inside DAWs like Ableton, Reason, Logic, etc.
Significant communication and transmissions are happening in a very short time. But, now and again, dropouts are going to happen.
Solutions:
ASIO driver:
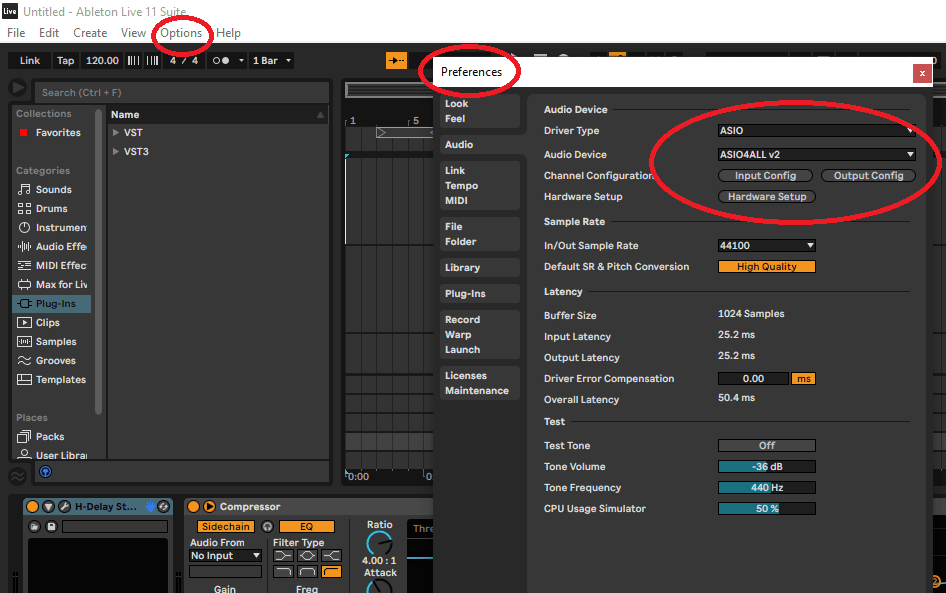
The free option to fix this is to install an ASIO4ALL driver. This is a low-latency audio driver for Windows, which helps Ableton process audio better without major issues. Once you install it, head to the Options panel inside Live, and click Preferences > Audio. Under driver type, select ASIO, and under audio device ASIO4ALL.
External audio interface:
A better long-term solution would be to buy an external audio interface. This piece of hardware will come with its own audio drivers and can handle all audio processing inside your DAW for a glitch-free performance.
CPU overload:
The main reason you get audio dropouts, freezing, and crackling is CPU overload. Your computer’s processor is responsible for carrying out many duties while you produce inside Live, and the bigger your session gets, the more overwhelmed your CPU gets.
If your CPU meter inside Live (top right corner) is pushing over 90%, you are pushing it hard, which may cause these issues.

Ableton Live offers a few different options for relieving your CPU of its load and helping your session run smoother, so let’s go through some of them.
Solutions:
Adjust your buffer size:
An audio buffer is defined parcels in time in which audio is processed inside Ableton Live. The buffer allows enough time for the audio to be processed to have minimal glitches and audio dropouts.
The bigger the buffer size, the more parcels, therefore the easier it gets for your CPU to process audio. As we will mention later, large buffer sizes can lead to latency issues, so be mindful of that.
To adjust your buffer size, go on Options > Preferences > Audio > Hardware Setup.
Adjust your sample rate:
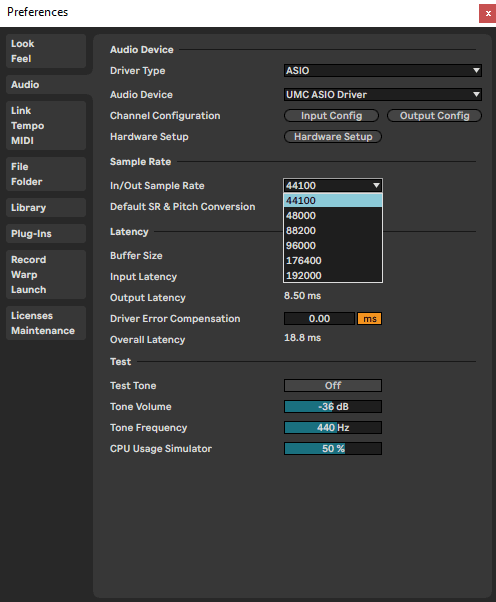
Sample rate is the number of audio samples carried per second. The lower the sample rate, the less demanding it is for Live to produce audio. Ableton’s default sample rate is 44100Hz, so why would anyone risk more CPU usage by going higher?
Some producers prefer to sample at higher rates to achieve maximum audio quality, such as 88.2 kHz or 96 kHz. This is particularly effective in stretching audio; stretching an audio file spreads the samples over a longer time and reduces the sample rate.
So, by having a higher sample rate, you achieve a better-sounding result. Most commercial music, though, is produced on a sample rate of 44100Hz or 48000Hz, so if the former is all your machine can handle, that’s completely fine. To adjust your sample rate, go on Options > Preferences > Audio > Sample Rate.
Multi-core support:
Most modern processors are multi-core, meaning they are a single computing component comprised of multiple CPUs that read and execute program instructions. In simpler words, each individual core can execute various instructions, which does heavy duties your processor has to perform much more manageable.
Ableton 10-11 requires a multi-core processor to run, so the multi-core support function is always active. Ableton 9, on the other hand, is capable of running on single-core processors, so you need to enable multi-core support inside Live.
This will noticeably improve the performance and flow of your session. You can find this option in Ableton preferences, under the CPU tab.
Weak machine:
Sometimes, the issue can be as simple as your PC or laptop isn’t strong enough or capable of handling complex audio processing tasks. The following solutions are essential to read for anyone looking to buy a new machine specifically for producing music or for anyone who wants to upgrade their machine as a long-term investment.
Solutions:
Install more RAM
RAM (short for Random Access Memory) stores data temporarily, meaning it’s used for functions such as running an application, installing a program, or data backup to your Cloud that happens in the background. Live, and every DAW takes up a lot of your RAM.
Every MIDI channel you add, every audio effect, and VST plugin lives inside your RAM, taking more and more space the more your session grows. Therefore, upgrading your RAM would be an excellent investment for your music production future.
Ableton suggests running the 32-bit version of Live if you are on a machine with 4GB or less RAM or on a 32-bit operating system. It also suggests that you run the 64-bit version of Live if you have more than 4GB of RAM and a 64-bit operating system.
I’d say 8GB of RAM is a good minimum for optimal performance; any more you wish to add is a great and well-welcomed bonus.
Get an SSD drive
An SSD drive (Solid State Drives) is a hard drive that stores data using flash memory instead of storing data on magnetic platters. It means they have no moving parts; therefore, they don’t have to move a drive head to different parts of the drive to access data. They can access data much faster than HDDs.
If you can afford an SSD, install your Ableton Live on it, as well as the User Library and VST folder for faster session loading and sample processing. You’ll find that most tasks your computer or laptop does happen faster with an SSD, from startup to loading up a heavy Live set.
While a bit pricey, they are definitely a good investment for your future as a producer.
Ableton session is too complex
Often, even if you’ve successfully applied the above pieces of advice, you still get issues like crackling and freezing while running your session. This usually happens when your session is getting too big for your CPU to handle.
There may be many instances of Serum running simultaneously, a high amount of long audio samples being time-stretched, or simply unnecessary tasks happening you are not aware of.
There are many options and hidden features inside Ableton to fight this, which help unload your CPU’s burden and help your session run smoother. Let’s explore them.
Solutions:
Freeze and flatten tracks:
Freezing and flattening your tracks will significantly relieve your CPU. When a track is frozen, all CPU-intensive tasks are temporarily engaged as recorded audio tracks, meaning you can’t alter any effects and plugins on a frozen track until you unfreeze it.
A frozen track minimizes CPU usage because it plays back a ‘frozen’ audio file instead of repeatedly calculating the effects and plugins applied to said track. If you choose to flatten a frozen track, a new audio clip will replace the original clip and all its applied effects and plugins.
Flatten your tracks when you are 100% happy with the sound you achieved in each track since you’ll no longer be able to tweak the sound further. To freeze a track, simply right-click on it and select freeze. To flatten a frozen track, right-click on it and select flatten.
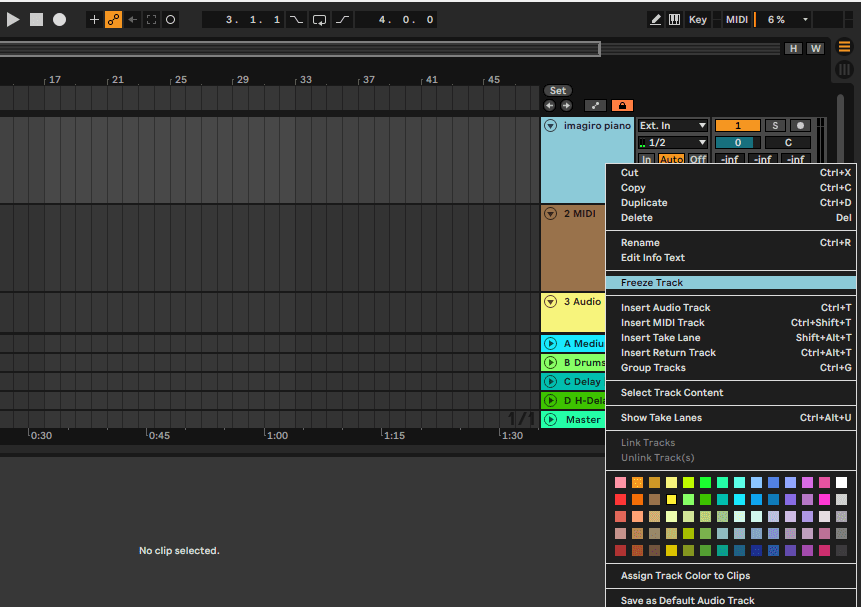
Right click on a track to freeze and then flatten it.
Avoid Warping
Warping is a functionality inside Live that makes time-stretching audio an easy task. This function can cost you some extra CPU usage, which over multiple warped audio file instances, and in combination with the other points on this list, can overload your processor and cause freezing or crackling.
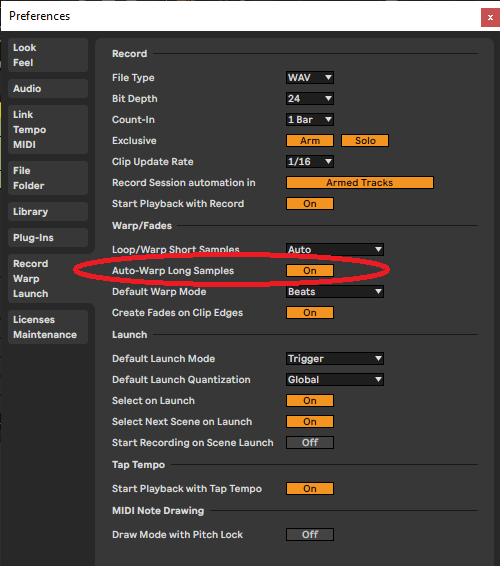
Most long audio files you insert in your session will be auto-warped, something Live does to help you guess the tempo of the audio track. You can find and disable the auto-warp feature under Options > Preferences > Record, Wrap, Launch.
If it’s something you can live without, turn it off to help your sessions run smoother. Generally, avoid warping audio as much as possible, and if you do, try freezing and flattening your warped audio. Finally, the most demanding modes for Live to process are Complex and Complex Pro, so use those only when necessary.
It can be a good chance to experiment with the other warping modes inside Live, they all offer a different sonic character to your audio, and you may discover something cool.
HiQ feature
Ableton Live includes a feature named HiQ, which ensures your audio samples maintain maximum quality. This button is found under the warp section when you enable warping on an audio sample.
By maximizing the quality of your audio samples, HiQ takes up a significant load on your CPU, so keep that in mind, especially if you are a producer working primarily with audio tracks and samples. It’s good to turn it off anywhere you can afford to lose some quality.
For example, when you are after a low-fidelity sound or a genre where audio quality isn’t the main focus, and where you often find yourself in a situation of having to “reduce” a sound’s quality by processing it with a series of VSTs meant to introduce noise and lower the sound’s bit-rate.
In that case, it might be a good idea to turn it off. I’m not suggesting that by turning HiQ off, you will get this effect; it’s just a waste of CPU if you are already going for a low-fidelity sound.

Try to experiment with HiQ off and see how it affects your sound and CPU usage.
Remove stop buttons
Every time you add a new audio or MIDI track to your session, Live automatically creates several clip slots, which you can find on your session view. Each of these clips comes with its Stop buttons, which can take a toll on your CPU.
By simply removing these Stop buttons on all unused clips, you can reduce your CPU usage. Find the unused clip on your session view, right-click on it and select “Remove Stop Button.

Delete unused tracks, clips, and plugins
If you have any tracks, clips, or plugins running in your session that are de-activated and that you don’t need, deleting them would be the best option to relieve your Live session.
Simplifying your session in this way will make sure Live runs more efficiently, and audio dropouts will be kept at a minimum.
Mix with send channels
Something I thankfully started practicing early in my music production journey is mixing with send channels. I always set up two or three send channels with different reverbs, one with a slapback delay and a long delay.
This helps fight CPU overload issues since you only have three instances of reverb running instead of one on every single one of your session’s 30 tracks. I still find myself adding the odd couple reverbs and delays on some individual tracks, but those are used for creative or synthesis purposes rather than mixing.
What’s even better is that it makes for cleaner and more cohesive mixes since when it comes to spatial effects, you want to make sure you craft a natural environment for all your instruments to inhabit. This is achieved easier when all instruments are sent to reverbs set up to build this environment.
Click Ctrl + Alt + T on your keyboard to create a send channel. Ensure the small E button is enabled at the bottom right of your arrangement window to view your send channels.

Plugins that give you the option to reduce CPU usage
Live has a few audio effects that give you the option of deactivating certain features in exchange for lower CPU usage. EQ Eight, for example, lets you disable the spectrum analyzer by clicking the spectrum button on the top right of the plugin’s interface.
If you are done EQing and are happy with the way you set up your EQ, turn the spectrum analyzer off. The visual representation it offers can exhaust your CPU, especially since EQ Eight is usually present in every track in your session.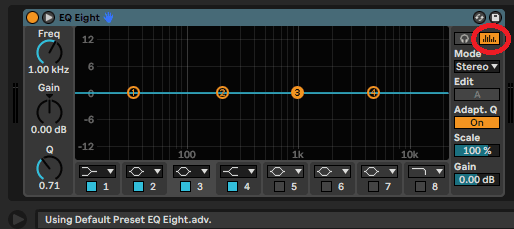
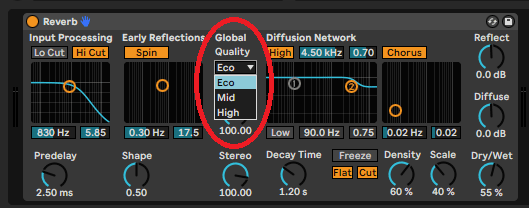
Similarly, Live’s stock Reverb has a Global Quality option, which lets you choose between eco, mid and high-quality modes.
Naturally, the high mode offers the richest reverb sound, but as with the HiQ option, if it’s something that doesn’t necessarily ruin the vibe of your song, turn to echo. Ideally, you can work with eco and only switch to high when exporting your song.
Track delays
Track delays is a handy feature inside Live for offsetting certain tracks a few milliseconds ahead or behind the beat. It’s helpful if you want to compensate for a certain track’s latency or build a more humanized groove.
However, this also takes a toll on your CPU, so try to resample these tracks once you get your track delays values right. Note that if you freeze and flatten your track, the track delays will still be ON; it’s not something you can freeze. So by resampling it into a new track, you free up some space on your CPU.

Multiple applications running:
The more applications you have running and the more windows you have open, the harder your CPU will put to work its multiple cores and possibly run out of RAM to handle all tasks. When you are producing, there’s no need to run other applications anyway, so make sure Ableton is the only thing open.
Another thing to watch is background apps, meaning apps that keep working even when you are not using them. Some of them you can see by clicking on the “show hidden icons” arrow on your toolbar.
You can then right-click on the background app and click Quit. Splice, Discord, and many Adobe applications tend to revert to background work, even when you close the app window, so make sure to double-check.
![]()
‘Show hidden icons’ button.
A more advanced way to check all background apps running on your machine is to go on Start, then select Settings > Privacy > Background apps. Under Background apps, you will see a detailed list of all applications allowed to run in the background. You can go ahead and disable the non-essentials.

Check the background apps page to disable unnecessary background tasks.
How To Fix Ableton latency issues?
Latency issues are common and can be improved by adjusting your buffer size and sample rate inside the audio menu under preferences. There’s a handy visualization of your latency there so you can monitor how short or long it is. Ableton has other features that help reduce latency, which we will explain below.
Audio latency is the amount of time that takes for your MIDI or audio signal to arrive in your interface or machine, converted into a digital signal inside your DAW, and then back to analog to exit through your outputs.
It’s mostly experienced when you try to record vocals, and you hear your voice delayed in your headphones, or, similarly, when finger-drumming on your MIDI device and the sound plays through the speakers several milliseconds after you hit the pad.
It’s something you should work hard to avoid or fix since it can throw you off while recording and even unmotivate you from doing so. A few different reasons can increase your audio latency, and we’ll tackle how to improve your latency in each case.
Wrong buffer size and sample rate values:
As mentioned above, buffer size and sample rate are terms related to how Ableton processes audio and can either overload or relieve your CPU usage. Interestingly, how these values affect your CPU usage and audio latency negatively correlate; the less latency you have, the more your CPU usage increases, and vice versa.
We mentioned that the bigger your buffer size is, the less your CPU usage is. This comes at the cost of latency, and similarly, the less your buffer size is, the less latency you get, but the harder your CPU has to work to cover duties the additional buffer size would. It’s a balancing game since you have to find the optimal values that your machine can handle the best.
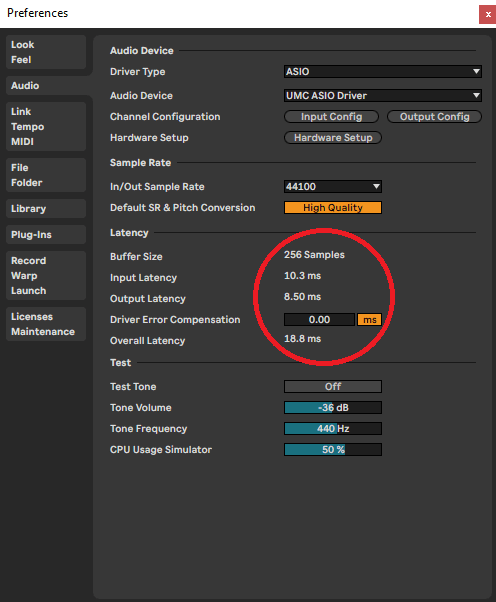
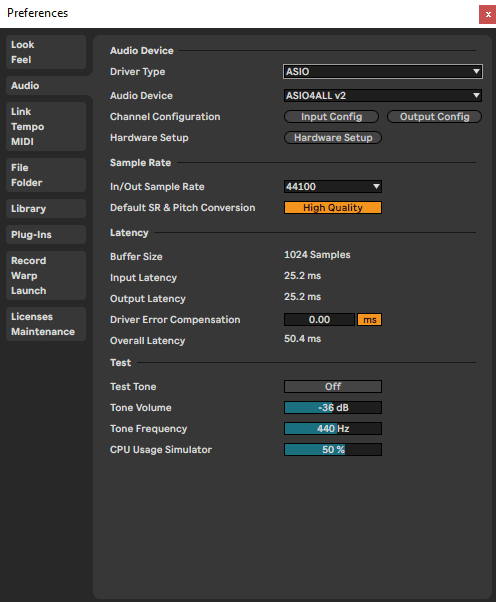
As you can see above, 1024 Samples result in 50ms of latency, while 256 samples to 18.8ms.
Solution:
Experiment with different buffer sizes and sample rate values to find which work best for you. Start with the lowest buffer size your computer can handle in a reasonably busy session and try to record an external audio source or a midi track. Notice how late the audio is generated.
There may be cases where the latency is at great levels, but you get crackling and dropouts, meaning the buffer size is too low, and your CPU is overloading. If this happens, try a larger buffer size and observe the latency when recording once again.
It all depends on your process and what song you are working on. One way I approach this issue is by setting my Buffer size fairly high at the beginning of a project and reducing it as low as my CPU can handle when it’s time to record. This way, I get optimal performance during production and minimal latency while recording.
Other solutions:
You’ll find that adjusting your buffer size and sample rate will more or less fix your latency issues, but there are a few other things you can do to reduce latency.
Reduce latency while monitoring:
It’s good to enable this feature inside Live, but we need to explain how Ableton calculates latency to explain what it does. Under the Options menu, there’s a feature called delay compensation, and it should be turned on by default.
This feature calculates each track’s overall latency and delays all tracks by varying amounts to achieve perfectly aligned playback. For example, track A has one Serum, two Fabfilter ProQs, and a Vallhala reverb, with an overall latency of 100ms, while track B has an EQ with an overall latency of 18ms. Delay compensation will bring both of them at 100ms for smooth playback.
This creates another problem: if you wish to record vocals track B, you will have a latency of 100ms, which is not ideal. By enabling “reduce latency while monitoring,” when you arm track B and click record, its overall latency will drop to its original 20ms, making it more suitable for recording.
You can see a plugin’s latency on the bottom display row by hovering your mouse cursor over it. Enable this feature under the Options menu.

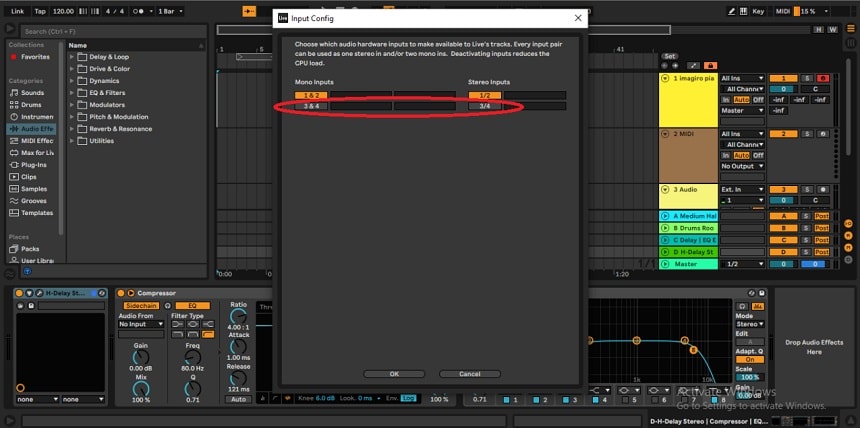
Disable input channels
Any input channels you are not using will overload your CPU and cause additional latency, assuming you have an audio interface that has more than one input.
You should also disable your inputs if you’re not recording for less CPU usage. To disable input channels, go on Options > Preferences > Audio > Input Config.
Use a dedicated audio interface
The biggest step you can take to achieve less latency is investing in a good audio interface. Dedicated audio interfaces have their own native drivers, which will significantly improve your latency values, whether recording from external sources (vocals, guitars, mics) or internally with a launchpad or midi controller.
Previously mentioned solutions
Solutions mentioned above for improving your CPU’s performance can also reduce latency. For example, recording a launchpad performance on a MIDI track with ten different effects is not ideal since they all add latency. Try recording on an empty track and add your effects later. Similarly, the track delays and plugins that give you the option to reduce CPU usage solutions also apply here.
How To Fix Ableton Crashing?
To fix Ableton Live crashes, you need to check your soundcard and audio driver settings inside Live. Adjusting those settings andinvesting in a good audio interface can help minimize Ableton crashes. Other factors such as power issues, problematic VST plugins, and CPU overload can also cause a crash.
Crashing is a problem that can push back your creative work and needs to be troubleshot as soon as it occurs. Although Ableton Live is one of the DAWs with the least crashing issues, crashes can still occur. Crashes signify that Live and your machine can’t work together in harmony, and various reasons can cause this.
Before we get into crashes, it’s important to note that Live has an autosave feature. It will either offer the option to restore a project after a crash or help you locate the most recent autosaved version of the session you lost during a crash.
Reasons that lead to a crash
Your soundcard isn’t strong enough
The first place to start investigating in case of a crash, especially if they happen often, is your soundcard. As mentioned above, your computer’s built-in soundcard is probably not strong enough to handle complex audio processing tasks that happen inside a DAW.
ASIO4ALL is a free solution, but investing in a good external audio interface is highly recommended.
Power issues
If you are working on a laptop, it is highly recommended that you plug in your charger and remove your battery, if possible, while producing music. One of the reasons this will help is that most laptops, in their attempt to improve battery life, avoid high energy-consuming processes deemed unnecessary.
When your charger is plugged in, though, the CPU will use all the energy it needs to perform all necessary tasks. Live, as most DAWs, require complex processing tasks, therefore working off your battery won’t be enough to keep a busy Live session running.
An external device causes Live to crash
A MIDI device might be causing Live to Crash. This may happen, especially if your MIDI device drivers are not up to date. Try to unplug all USB cables connected to MIDI devices and notice if the crashes still happen.
If not, try plugging one by one each MIDI device and notice which one causes the crash. Then you can search for the latest drivers and install them to fix the issue. Other devices connected to your machine could also cause Live to crash, anything from a USB-wired mouse to printers.
Similar to MIDI devices, unplug all of the devices, restart Live, and notice which one causes the crash when you re-plug them one by one.
A VST plugin is causing Live to crash
Monitor your VSTs and try to notice any patterns that reappear. A specific VST might be causing Ableton Live to crash. Sometimes, especially with illegitimate, cracked VSTs, Ableton will crash. You must purchase and install all your plugins legitimately to avoid these issues.
Furthermore, your PC/Laptop may not be powerful enough to run 20 instances of Serum, for example; therefore, it will keep crashing. Keep an eye on the CPU meter on the top right corner to identify which plugins are consuming the most CPU usage and try to run fewer instances of them, or freeze and flatten them to save CPU usage.
CPU overload
CPU overload can also cause Live to crash. In extreme cases of CPU overload, your processor will shut Live to avoid damaging itself. As mentioned earlier, the best solution would be to upgrade your machine and invest in more RAM and an SSD drive or frequently freeze and flatten CPU-intensive VST plugins.
CPU overheating
Make sure you monitor your CPU’s temperature since overheating can also cause Live to crash. An overheating CPU will slow down to avoid damage, therefore being unable to cover Live’s needs. Investing in a better cooling solution in your PC is a good idea, as is getting a cooling pad for your laptop.
None of the above worked
After checking all of the above, if crashing is still an issue, make sure to report the crash to Ableton. When you reopen Live after a crash, you should be greeted with a window that asks if you want to send a crash report to Ableton for evaluation. Follow the steps, and someone from Ableton will check your case and hopefully help you fix your crash issues.
Last Few Words
Crashes, crackling, freezing, and latency issues are issues we all have to face at some point during our music production journeys. There are so many different variables that play a part in these issues, so you’ll need to find your way of tackling them.
Use this article as a guide to troubleshoot audio performance issues that your machine and Live may experience and consistently invest in your PC or laptop; they are the primary tools we use to create our art, and they need to be treated with care.

The Integraudio Editorial Team consists of experienced music producers, audio engineers, and plugin enthusiasts dedicated to providing in-depth reviews and guides for music production software.