
Understanding the difference between a clipper and a limiter can elevate your mixing and mastering game to a new level.
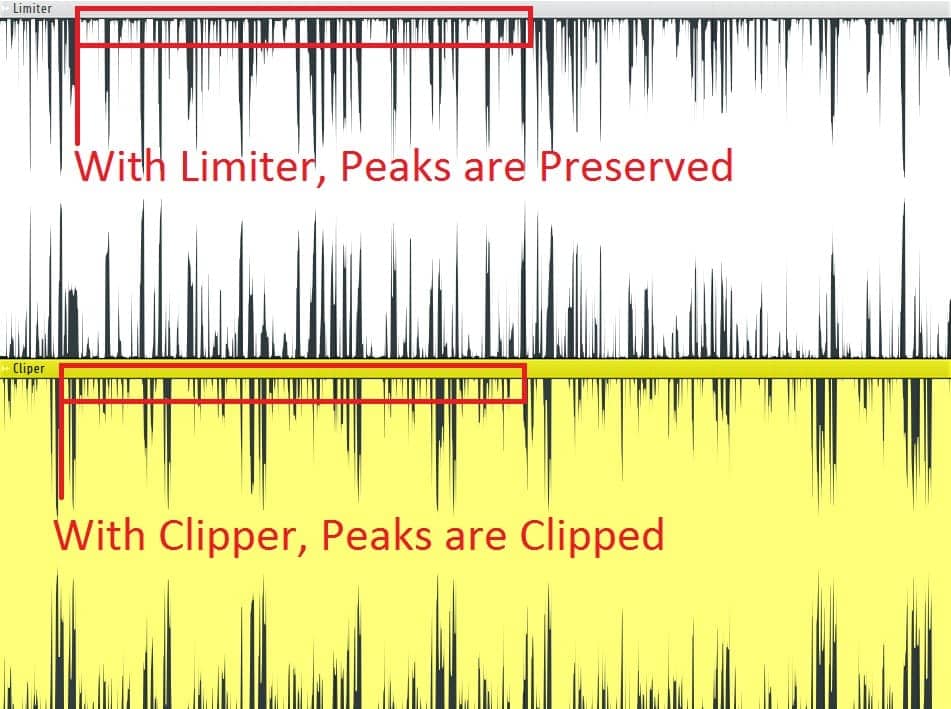
The main difference between clipper and limiter is that the clipper will cut the audio signal at a certain level. It’s simply clipping the audio signal. On the flipside, with Limiter, you can control the audio signal by setting up: attack, release, sustain, look-ahead, style, amount of transient, etc.
With that said, the clipper is clipping the audio signal and sound more aggressive while the limiter is more transparent and customizable.
Come with us to further explain the differences between Limiter and Brickwall Limiter and how to set up a Limiter for Mastering below.
What is a Limiter?
In music production, a limiter is an effect that limits the peaks of the audio signal at a certain threshold in a transparent way. Limiters are used mainly in the mastering as a final effect in the mastering chain. It enables a user to boost the loudness of the mix without damaging the way it sounds. This is done by capturing the loudest signals in a track and lowering them down to a level that prevents distortion and preserves the overall color of the mix.
Additionally, you can also use the Limiter in the mixing for vocals, bass, drums, percussions, guitars, etc. to prevent sudden unwanted spikes that may occur.


What is a Clipper?
The purpose of the clipper is to clip the audio signal by adding distortion and harmonic saturation to an audio signal. There are two types of clipping – soft clipping and hard clipping.


The basic difference between soft clipping and hard clipping is that in soft clipping attenuates the transient peaks first and then clips them whereas, in hard clipping, everything above the threshold is clipped with no attenuation.
The images above show the difference in the signal waveform of a hard and soft clipped signal. We can say that hard clipping produces a square wave sound while soft clipping produces a sin wave sound.
The main feature of the Clippers is also called Slope, Hardness, Knee, or Softness to adjust the character of the clipping. If you still need more information, check this link.
Difference Between Limiter And Brickwall Limiter
A limiter has a ratio greater than 10:1. That is pretty effective. However, it always allows some transient peaks to pass through. This is useful for mixing individual audio tracks where you want to limit the peaking transients but do not want to completely cut the signal which could result in a “monotone” sounding track.
A brickwall limiter uses a ratio of infinity:1 when dealing with signals. This means that absolutely no signal is allowed to pass the set threshold limit. In addition to that, it makes use of a look-ahead delay to apply incredibly fast attack and release on peak transients. A brickwall limiter is comparable to a compressor. Typically, engineers apply a brickwall limiter as an overall signal control in the master bus to ensure that there is no clippings or overs.

Should I Use Clipper Before or After Limiter In Mastering?
Most engineers recommend using a clipper before a final limiter. The reason for that is that most limiter plugins have a function that allows the user to handle ISP (InterSample Peaks).
The right level in mastering comes from a good balance between limiting and clipping. Attempting to use clipping alone causes the track to have some distortion while trying to use Limiter alone introduces muddiness into your track. So getting the right balance between clipping and limiting is very beneficial.
Clipping usually leaves an audio file sounding a bit “gritty” and distorted and raw due to the boost of lower signals and the cutting off the higher signals, using a limiter to take care of how a signal is shaped changes this “gritty” track into sounding a lot cleaner. Feel free to check this post on What’s The Most CPU Efficient DAW? (5 DAWs Compared)
Additionally, most limiters come with a dithering function. Dithering is the deliberate addition of noise signals to randomize quantization error. So having a limiter before a clipper means that you are not just going to be dealing with a “gritty” and distorted sounding signal, but with a noisy signal as well.
With that being said though, certain tracks and certain genres of music could sound a whole lot better when a limiter is used before a clipper. This is because, in some tracks and genres, the listener prefers a “dirty” and mean-sounding vocals and instrumentals.
How To Set a Limiter For Mastering? (LUFS)
In this section, we will be using Fabfilter Pro-L 2 plugin to better explain how to use a limiter. Pro L2 comes with a LUFS (loudness unit full scale) metering system. This system serves as a reference to the different loudness levels of commercial releases. For example, streaming service like Spotify has a loudness level of -14 LUFS, whereas Apple Music has a loudness level of -16 LUFS.
On the right side, you see the LUFS scale, and you get a set of options based on your target output. As you can see, it shows -14 LUFS for streaming, -9 for CD, and so on.

Our aim is to boost the loudness level of our track according to the platform that we wish to release our music on. Ignoring the LUFS and sending a track to Spotify, for example, could ruin the quality of our track because Spotify has a built-in limiter that checks to see if your track is within its LUFS limit and if not, then it forces it to be.
Much like compressors, Fabfilter Pro-L 2 and most other limiters come equipped with attack/release controllers. This is to be used after you set your desired loudness level. Attack controls how strong the Limiter is applied (faster attack=more aggressive Limiter) and release refers to how long should the effect be applied (slower release gives you a smooth track).
Finally, you can also make use of the oversampling feature offered by FabFilter Pro L2 and many other limiters. Oversampling reduces quantization errors and distributes noise signals into high frequencies resulting in cleaner sounding audio. In FabFilter Pro-L 2, you have an option between 2x, 4x, 8x, 16x, and 32x. The higher you go, the more CPU intensive it gets.
Why Do My Tracks Distort When I Use The Limiter Or Clipper On The Master?
To achieve a better, cleaner, and louder master without distortion, you have to pay close attention when you’re mixing the music. A lousy mix is still going to sound bad even if you use the most expensive Limiter on the market.
On the other side, if your mix sounds fantastic, the final limiting and clipping are going to make your track sound more “full” and have more balance and color. Always, always take your time and be extra careful, especially when mixing the low-end to avoid muddiness. A muddy mix is going to sound distorted and out of balance when you apply clipping and limiting to it.
Finally, if you think your track sounds good, and you want to finish it and avoid distortion, adjusting the attack and release times in the Limiter will be hugely beneficial. Also, in case the Limiter has turned on “Transient” functionality, try to turn it off, in case your track already has significant peaks. This would help you to avoid unnecessary distortion. Check our article if you want to know more about how to mix with Convolution & Algorithmic Reverb.
Related Readings:
11 Tips On How To Maximize The Loudness Without Clipping Or Distorting
Top 6 Limiter Plugins (And 4 Best Free Limiters)
Top 7 Clipper Plugins (Best Limiter Alternatives)
Top 7 Drum Libraries For KONTAKT (And 4 Freebies)

The Integraudio Editorial Team consists of experienced music producers, audio engineers, and plugin enthusiasts dedicated to providing in-depth reviews and guides for music production software.