Bring the future to retro music with these top 20 plugins for Synthwave and Chillwave and 3 best Kontakt libraries.
Synthwave and Chillwave have the ability to make you nostalgic for a future that never came about. Using synths in music started with pioneers like Vangelis, John Carpenter, and Tangerine Dream. They used synth leads, pads, sound effects, etc., in science fiction, action, and horror film scores and albums, starting the craze for synths in the 80s.
Furthermore, composer Hiroshi Kawaguchi’s music in the game Out Run started the Synthwave-Esque music with its release in 1986.
20 Best Plugins For Synthwave & Retro Music Are:
In the 90s, dance and pop music employed synths more and more, giving birth to genres like synthpop. Thanks to artists like Daft Punk, electronic dance music became even more mainstream. Then, film and game composers began incorporating synths and upbeat rhythms in their scores for sci-fi, action, and neo-noir films, taking inspiration from the 80s scores. Hence, Synthwave became a recognizable genre, and Chillwave developed alongside it.
The 1980s– Introduction of synths to music, films, and arcade games
The 1990s – Popularization of dance music (most notably house and trance)
The 2000s– Adoption of retro-futuristic Synthwave music by various artists
The 2010s– Drive (film), Stranger Things (TV), etc., popularize the genre further
Now, let’s have a look at the list of plugins for Synthwave and Chillwave music production.
Note: This list includes many synth options so that you can choose a favorite based on your needs, rather than going after the first synth you see. Each synth enlisted includes a trial version that you can check out before spending a dime.
Top 20 Plugins For Synthwave & Chillwave Music 2023
1. ujam Usynth 2080
More Info & Price (Trial Available)
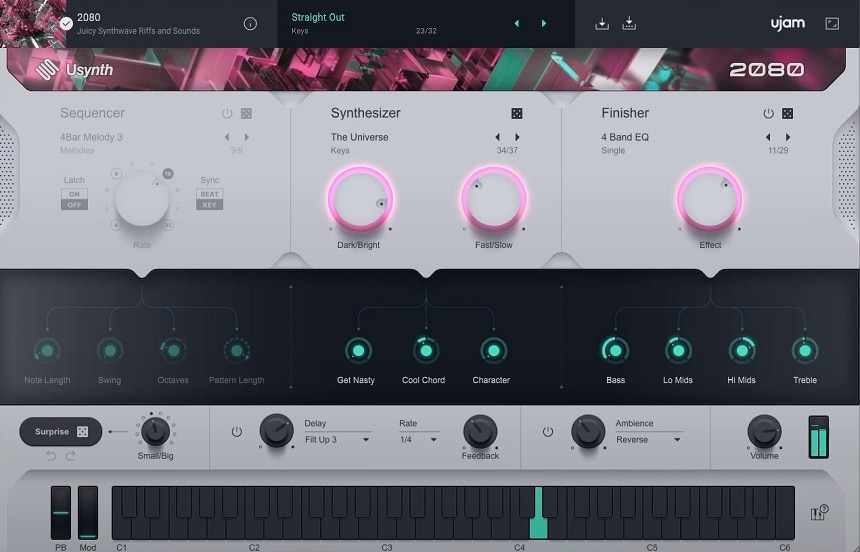
Quite obviously referencing a futuristic style of sound, the ujam Usynth 2080 is a dedicated Synthwave instrument.
The Usynth series is a new series of instruments that offer an easy, intuitive way to design sounds and perform live. It comes in three flavors: Usynth 2080, Caramel, and Euphoria.
Here, the Caramel helps you create ambient soundscapes easily, whereas the Euphoria is dedicated to synth sounds for electronic dance music, including plucks, powerful leads, organs, arpeggios, FX, etc.
However, this review is for the Usynth 2080, which provides a collection of retro-sounding synth sounds with an easy-to-learn user interface. It features built-in patterns and effect processors to help you create polished sounds as fast as possible.
The “Surprise” button is a helpful randomization tool that creates unexpected results with a single click.
Key Features:
- Synthesizer Modes
Usynth 2080 comes with a hundred synth modes. Under the hood, the plugin uses various modules to create its “modes” or presets. So, when you load a Synthesizer preset, you’re actually loading a mini synth that you can customize using the various knobs available on the user interface.
First, you can control the brightness of the synth using the Dark/Bright knob, which controls multiple parameters in the sound engine to change the overall character. Second, the Fast/Slow knob controls multiple envelope generators to change the speed of the sound. However, which parameters it changes depends on the preset type. For example, if you slow down a synth pad, you might get a slower attack and a longer release, but a pluck would only change its release as a slow attack wouldn’t make sense.
Similarly, you’ll find three “software knobs” below the Synthesizer section that control the most significant parameters of the preset. These might be the character, chord, and distortion; character, dirt, and pushed; etc., based on whatever the sound designer decided crucial. And while they don’t provide in-depth control, they do provide you with a way to speed up your workflow significantly. - Sequencer
The Sequencer section lets you load a set of MIDI patterns to play your synth. Usynth 2080 comes with twenty-five sequencer presets. These include melodies, sequences, arpeggios, and chords. Once you’ve selected one, you can play one of the patterns by holding a note on your keyboard. Similarly, you can change the note length, swing, octave, and pattern length using the four knobs available below the sequencer section. - Finisher
The Finisher section is a mixing stage that provides presets for polishing your sound with a minimal set of parameters to control the processing. These presets can have many modules under the hood to provide intricate effects. Usynth 2080 comes with over eighty Finisher modes/presets. Furthermore, you’ll find four “Vari Knobs” below the Finisher section that lets you change some crucial parameters of the effect chain.
The presets are categorized into three groups: single, dual, and quad. The single group features presets using one effect with four controls (the four knobs). Then, the dual group has presets utilizing two effects with two controls each, whereas the quad group features the presets employing four effects with one knob each. - Fundamental Effects
The plugin provides two basic effects for mixing your sound: delay and reverb. You’ll find both at the bottom section of the user interface. The delay features twenty-two presets, from simple ping-pong effects to circle panning, filtering, and tape emulation. Further, you can control the delay rate, feedback, and mix.
Likewise, the Ambience section provides a selection of algorithmic and convolution reverb effects. Like the delay module, the reverb also features twenty-two presets, organized in order of the reverb length with some creative presets at the end.
Compatibility:
Usynth 2080 is available for Windows 10 or higher and macOS 10.14 or higher, both 64-bit only. It comes in VST 2 and AU formats.
Summary:
While Usynth 2080 may look like a beginner’s plugin on the surface, the sound quality and effectiveness prove otherwise. I prefer thinking of ujam’s easy-to-learn designs as timesavers. In most cases, you’d spend hours on a sound only to create what the developers have already designed for you. You’ll find every type of sound, from synth pads and keys to leads, plucks, and sound effects.
And the sequencer presets alongside the Finisher modes help you compose and polish a song rapidly. So, if you wish to make Synthwave or Chillwave music, try this plugin out and see if it saves you time and effort (spoiler: it does!).
2. ujam Beatmaker Vice
More Info & Price (Trial Available)
UJAM Vice is a drum machine dedicated to making beats for retro genres like Synthwave and Chillwave.
Vice is a part of the brand’s Beatmaker bundle, a collection of beat-making plugins that prioritize intuitiveness. You can also find the bundle featured on my best plugin bundle list. The bundle provides several plugins like Vice, each dedicated to a specific genre.
Vice comes with ten retro-sounding drum kits. Similarly, it features built-in loops, fills, and grooves that help you create your drum patterns quickly.
Furthermore, some parameters allow you to make basic mix adjustments and add effects to change the sound rather impressively.
While the minimalistic user interface may look like a beginner’s tool on the surface, advanced users will appreciate the speed at which it delivers results.
Key Features:
- Library
As I’ve mentioned, you’ll find ten drum kits in this plugin. These feature authentic samples based on revered analog drum machines from the 80s. Similarly, there are 690 groove patterns over 30 styles of music. These include the fundamental New Wave-style beats that define Synthwave and Chillwave genres as well as modern interpretations. Each style includes intro, verse, fills, chorus, breakdowns, and ending pattern variations. So, you could finish the entire drum part of a song using the built-in patterns. - Perform
You can either use the built-in library of loops and grooves or make custom beats. The user interface features two virtual keyboards. The left one shows the MIDI mapping of the drum kit, which you can play with your MIDI controller keyboard. Similarly, the virtual keys on the right show the loops, and you can perform these using a MIDI keyboard. I prefer working with some loops and creating custom fills to save time while maintaining uniqueness. - DAW Integration
While mixing loops and your custom patterns are cool, the real fun begins when you modify the built-in grooves to match your taste. Drag the MIDI pattern straight from the virtual keyboard on the plugin’s interface into your DAW to get the pattern on your timeline. Next, you can duplicate it, edit it, make multiple copies with subtle changes to add variations, or move the snare notes to another plugin entirely. The possibilities are endless! - Mix
Vice allows you to make basic mix adjustments to each instrument (kick, snare, hi-hat, etc.) of the kit. These include volume, decay, pitch, and filter (low-pass/high-pass). Similarly, you’ll find some more mixing parameters on the upper half of the user interface. On the left, you’ll find a Lo-Fi effect called Time Machine, a slider that goes from 1980 to 2080. Furthermore, you’ll find mixing presets on the right. Vice comes with twelve mixing presets that change the sound of each kit drastically. You can also change the level of the effect using the Amount slider. And next to it, you’ll find a Beat Intensity control, which changes the dynamics of the plugin.
Furthermore, Vice features multi-outputs. So, you can send the audio of each instrument in the kit to a different track and mix them in your DAW. This handy feature lets you customize the sound using your favorite effect plugins.
Compatibility:
Vice is available for Windows 8 or higher and macOS 10.11 or higher, both 64-bit only. It comes in VST 2/3, AU, and AAX formats.
Summary:
UJAM’s Beatmaker series is a lifesaver if you have trouble making drum patterns, and Vice is proof of that. Similarly, its high-quality sound is a fantastic addition to an experienced user’s arsenal.
And if you are looking to make Synthwave and Chillwave music for a film or game, Vice will help you ensure that the drums aren’t the reason for you to dread deadlines.
3. Arturia Modular V
More Info & Price (Trial Available)
Explore the roots of modular synthesis with this emulation of a renowned hardware synth.
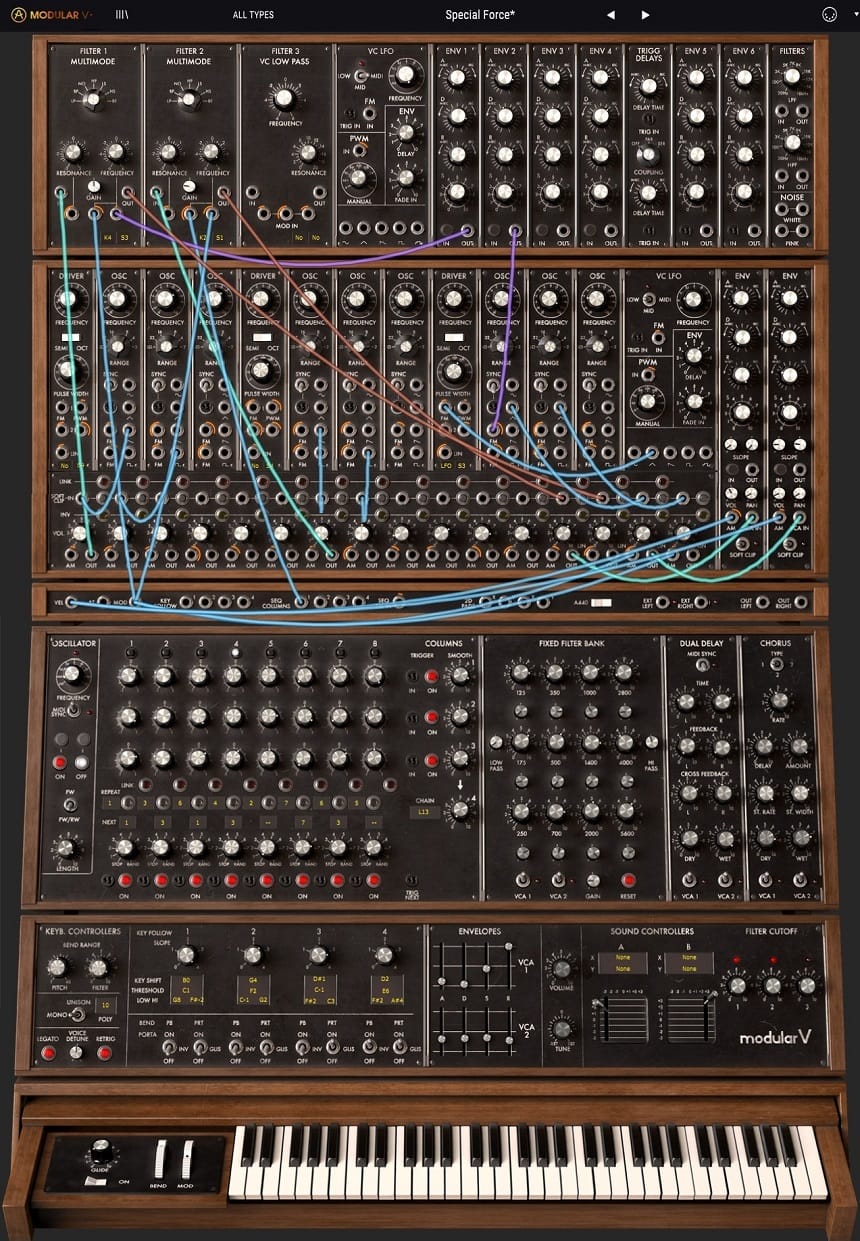
Arturia’s Modular V is based on a vintage mid-60s synth called Moog Model 55 with independent modules and patching cables. It was a revolutionary two-voice polyphonic modular synth that allowed musicians to explore worlds of synthetic sounds when most synths were monophonic.
Notable users in the 60s included The Doors, The Rolling Stones, The Beatles, Wendy Carlos, etc., and Tangerine Dream, Emerson Lake, and Palmer, etc., in the 70s.
The software iteration by Arturia adds some modern features to the original design, making the synth better fit contemporary needs. These include formant filtering, a 64-voice polyphony, a ring modulator, and presets, of course.
However, the user interface is similar to the original design with virtual wires and modules.
Key Features:
- Versatile Generators
Modular V has a total of nine oscillators, each of which can produce sine, triangle, saw, and square waves. In addition, they include frequency and amplitude modulations. However, since there isn’t a dedicated unison feature, you’ll probably use up many of the oscillators with similar parameters and a little detune. And if you want to design sound effects, you’ll find a while and pink noise generator too. - Built-In Effects
Modular V comes with three effect processors. First, you’ll find a chorus module with a toggle to switch between three types of effects. Next, it features a 12-stage phaser effect and a stereo delay effect. You can sync the delay rate with your DAW and configure separate parameters for each channel. While these effects aren’t comprehensive enough for mixing, their analog character helps keep the sound cohesive at the fundamental level. - Authentic Filters
Arturia takes hardware emulation very seriously. So, the Modular V synth features three deeply emulated Moog-style filter modules. Each module lets you select between low-pass, high-pass, notch, and band-pass filter types. And like the original hardware, all three filters are fixed at 24 dB/oct slope steepness. And if you need to sculpt the master output, the plugin features a 14-band EQ called a Fixed Filter Bank (fixed frequency per band). - Sequencer
The Sequence Generator module is an 8-step sequencer that lets you program patterns similar to the original model 960 sequencer. Other than the sequencing part, the module also features a low-frequency oscillator and an output controller. The oscillator is for changing the playback rate, and you can also sync it with your DAW.
Compatibility:
The plugin is available for Windows 7 or higher and macOS 10.11 or higher, both 64-bit only. It comes in VST 2/3, AU, and AAX formats.
Summary:
As tedious as hardware modular synths were, nothing compares to the tactile feel of creating custom sounds by turning knobs and patching cables. Modular V offers the same experience but with a modern approach.
You can create presets of new sounds or basic patches that get you started. Furthermore, it has a built-in library with over 600 presets, including basic subtractive synth-style sounds to sound designing marvels.
The sequence presets are ideal for Synthwave and Chillwave music, and the excellent emulation of Moog’s sound makes the experience even better. The only critic I have is about its large user interface that might cover your screen if you aren’t using a high-resolution monitor.
Although, the design is important to retain the original hardware’s appearance.
4. Wavesfactory Cassette
More Info & Price (Trial Available)
Experience the cassette tape era all over again, except you won’t need a pencil to rewind this time.
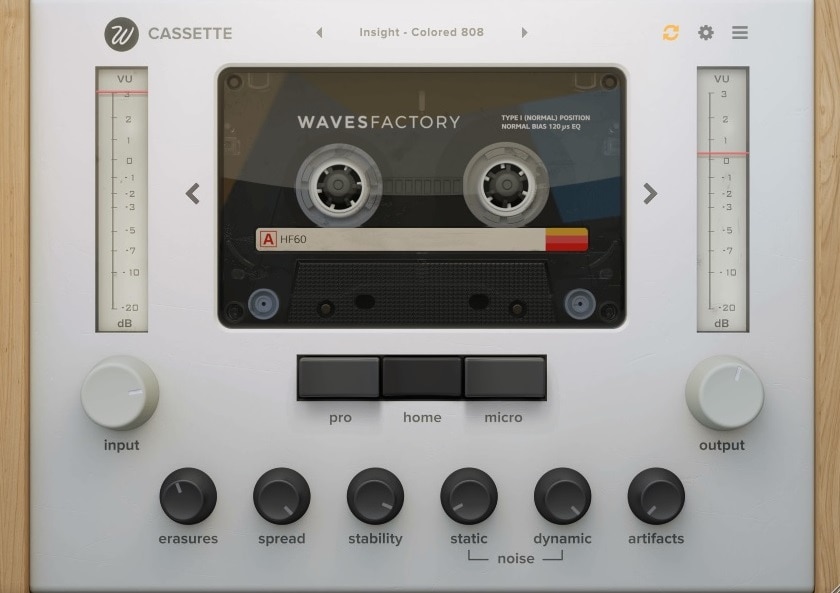
Wavesfactory Cassette is a tape saturation and emulation plugin modeled after a high-end tape machine. On top of the authentic sound, Cassette showcases a vivid tape player design on its user interface.
It features multiple tape types and player models, which can help you nail the exact vibe you’re after, from high-end studio sound to a humble portable recorder.
Since Synthwave and Chillwave are essentially futuristic music from the 80s, it only makes sense to utilize the Lo-Fi sound of cassettes.
Drums, in particular, tend to favor the smooth, warm sound of tapes, and synth pads can feel like they’re “drifting” due to hysteresis and tape warbling.
These are essential qualities of authentic Chillwave music. And Cassette allows you to control the exact amount of each element that gives the tape effect. Let’s have a look at its features.
Key Features:
- Tape Types
Cassette features four types of tape, selectable using the arrows next to the tape image on the interface. First, Type I is a standard cassette format with ferric-oxide (Fe2O3) coating on the tape that gives it the renowned warm sound. It is often the most favored sound style because of its sheer popularity. Second, Type II emulates a Chromium Dioxide (CrO2) tape, introduced in the early 1970s. It has more high frequencies and a thinner sound than the previous type.
Next, we have the Type III Ferro-Chrome (FeCr) tape, which came around the late 70s and early 80s. It has a very warm sound with decreased high frequencies. And finally, Type IV features the metal-formulated tape with thicker low-end and the most high-frequency sounds, forming the smiley face spectral response. - Machine Types
The plugin employs three types of tape machines labeled Pro, Home, and Micro. The Pro type emulates an expensive, high-quality tape machine with a lower noise floor and better frequency response. Conversely, the Home type emulates a typical tape player that was most popular in the 80s market. And if you switch to the Micro type, the sound changes to mid-heavy tiny cassette players that people often use for transcription. It’s ideal for Lo-Fi sounds. - Tape Erasure
The Erasure parameter is an unusual one. Since a reused cassette tape wouldn’t sound the same as a brand-new blank tape, this parameter controls how many times the tape has been reused. You can turn up the Erasure and emulate a tape reused twenty times. The more times the tape has been erased, the more it loses high-frequency content and becomes characterful with audible dirt. - Stability
Another important feature is the stability knob. Setting it at 100% removes all wow and flutter, emulating a perfect tape machine. However, if you set it at 0%, the machine becomes unstable with lots of pitch fluctuations. Furthermore, you can control detailed parameters of this feature on the settings page. You’ll find the following parameters: Wow Depth, Wow Rate, Flutter Depth, Flutter Rate, and Stability Randomness. - Noise & Artifacts
Cassette’s noise section features two controls: static and dynamic. The Static knob controls the level of noise the tape generates. And the tape and tape machine type change the character of the noise. So, you should experiment to find which noise you prefer the most if you want to introduce noise to your track. Similarly, the Dynamic knob adds a grainy, noisy distortion on the audio resulting from the tiny imperfections on the tape surface.
The next parameter is Artifacts. It simulates an old, chewed-up tape full of creases. That causes the sound to have uneven high frequencies. Sometimes, the sound becomes clearer, whereas other times, it becomes muffled. However, the exciting thing about this feature is how realistic it sounds. Furthermore, you’ll find in-depth controls of this feature on the settings page. There are Degradation Depth, Degradation Rate, Dropouts Depth, Dropouts Rate, and Random Snap.
Compatibility:
Wavesfactory Cassette is available for Windows 7 or higher and macOS 10.7 or higher, both 64-bit only. It comes in VST 2/3, AU, and AAX formats.
Summary:
Cassette is a highly effective tape emulation and saturation plugin. Hence, you’ll find the plugin enlisted on our best saturation plugins list too. It has an undeniably gorgeous user interface that displays your track name and a realistic model of your selected tape type.
Similarly, in addition to the features mentioned above, the plugin features many more on the settings page. For example, you can add intermodulation, crosstalk (channel bleed), a delay between the stereo channels, etc.
Moreover, the Spread knob on the main interface lets you change your audio’s stereo width. Overall, if you want the warm, analog sound of the 80s, Cassette is hard to beat.
5. Arturia Jup-8 V
More Info & Price (Trial Available)
Arturia’s take on this classic synthesizer is sure to take you back in time when the change from analog to digital was the most evident in the history of music.
The esteemed manufacturer Roland introduced the Jupiter 8 synthesizer in early 1981. So, you could say it pretty much kickstarted the 80s sound. Arturia’s Jup-8 V plugin aims to recreate the same synth in great detail.
And I must say it’s quite a wild success, both sonically and visually. It has a thick, powerful sound and every ounce of the original synth’s versatility.
The plugin uses component-level modeling and sampling to deliver all of the controls in the original hardware. Furthermore, Jup-8 V modernizes the classic with added quirks and features.
Go beyond the antique limitations with multiple LFOs, better modulation, contemporary sequencing, effects, and 16-voice polyphony.
Key Features:
- Dual VCOs
Like the original hardware, the plugin features two oscillators. The first oscillator allows you to change the range and waveform, whereas the second features a fine-tune knob too. You can also switch to a low range to use the second VCO as a sub. Another notable feature is cross-modulation from the second oscillator to the first, creating sci-fi and powerful sonic landscapes to explore.
Similarly, you can set either oscillator as the sync leader or disable the feature altogether. Syncing forces the follower oscillator to retrigger every time the sync leader’s oscillator cycle (waveform) ends, regardless of the follower’s position. It results in a harmonically rich sound. - Filters
The original Jupiter 8 synth was much loved for its dual filter design. And this faithful emulation by Arturia features the same. You’ll find a 6 dB/oct high-pass filter with a cutoff fader and a low-pass filter. The low-pass has faders for cutoff, resonance, key follow, etc. You can also switch the low-pass filter’s slope steepness between 12 dB/octave and 24 dB/octave. - Modulators
First, the plugin features an LFO that controls the pitch at the top left of the user interface. It lets you add subtle vibrato or even wobbles. Similarly, it employs two envelope generators with the standard attack, decay, sustain, and release controls. Moreover, the first envelope can modulate the pitch, pulse-width modulation (PWM), and low-pass filter’s cutoff, whereas the second one can modulate the pitch, cutoff, and volume. You can select what to modulate using toggle switches on the target sections.
You’ll also find two more LFOs in the advanced panel, which weren’t available in the original hardware. Similarly, an advanced modulation mixer lets you use various algorithms to sum multiple modulation sources and manipulate three destinations. The result is evolving synth pads or chaotic basslines. - Arpeggiator & Sequencer
Jup-8 V employs the Jupiter 8’s arpeggiator with a range of four octaves and some new modes that weren’t available originally. The arpeggio modes include up, down, played order, reversed, up-down including highest/lowest notes, up-down excluding the highest/lowest notes, and random.
Furthermore, Jup-8 V features a 32-step sequencer alongside a modulation sequencer. You can create dynamic backing melodies that work together with the modulation sequencer. Similarly, you can choose a scale for the sequencer; set up accent settings, glide, octave range, pitch routing between (first, second, or both oscillators). - Effect Processors
While the 16-voice oscillators alongside Arturia’s unison detuning make the synth sound grand by itself, these additional effects bring yet another layer of beauty to your sound. It has three FX slots and eleven digital effects, including reverb, delay, compressor, chorus, bit-crusher, etc. Of course, if you prefer the old-school sounds, you can turn off these effects with the click of a button.
Compatibility:
Arturia Jup-8 V is available for Windows 8.1 or higher and macOS 10.13 or higher, both 64-bit only. It comes in VST 2/3, AU, and AAX formats.
Summary:
Roland Jupiter 8 is one of the most important synthesizers of the 80s. It shaped the sound of many hit albums and even films. So, the excellent emulation in Arturia’s Jup-8 V allows you to bring classic sounds to your DAW instantly.
Furthermore, it features many modern additions like unison, more modulation possibilities, sequencer, etc. Similarly, the “note dispersion” feature emulates the subtle changes that voltage fluctuations in the synthesizer’s components bring.
It helps make the plugin sound even closer to the original hardware.
6. ujam Beatmaker CIRCUITS
More Info & Price (Trial Available)
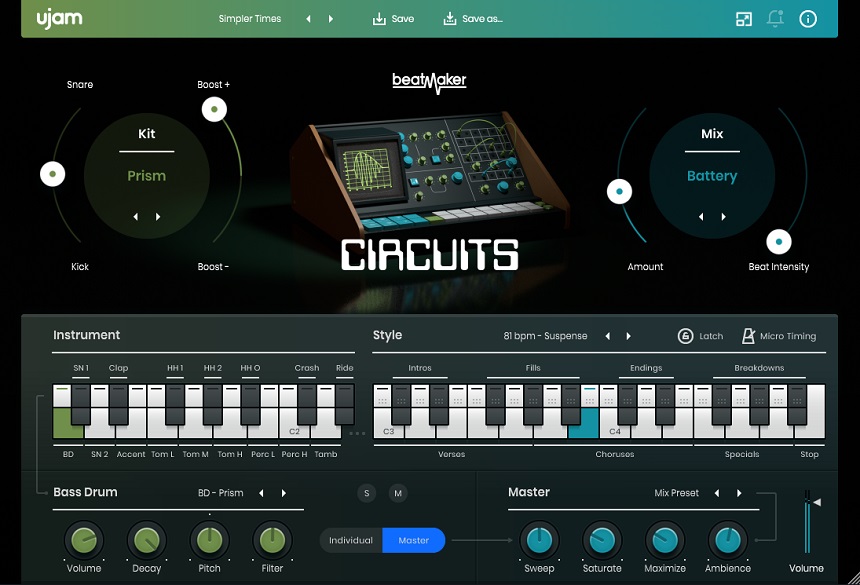
Ujam Beatmaker CIRCUITS is a virtual instrument designed to emulate the sound and style of classic analog drum machines.
The plugin features a user-friendly interface, making creating and customizing drum patterns easy. The drum machine includes ten drum kits covering various genres, including electronic, industrial, and hip-hop. Each kit contains 16 drum sounds that can be edited and manipulated to create unique drum patterns.
Key Features:
- Drum fx
In addition to the drum sounds, Beatmaker CIRCUITS includes many onboard effects, including a filter, distortion, compressor, and delay. These effects can add extra character and texture to the drum sounds or create new sounds. The plugin also includes many performance features, including a step sequencer, pattern controls, and a mixer, making creating dynamic and expressive drum patterns easy. - Humanize your drums
CIRCUITS can create variations of patterns on the fly, using the built-in “Swing” and “Humanize” controls. These controls allow you to add subtle variations to the rhythm, giving the patterns a more natural and organic feel. - Genre fluidity
The software brings classic electronic drums and grooves to any genre with 20 styles, 50 presets, ten drum kits, and 460 patterns. It is designed to be versatile and adaptable, allowing you to easily create drum patterns that fit your specific genre or style.
Additionally, CIRCUITS offers vintage samples that add punch and sparkle to drums in a mix without taking up essential space. That feature allows you to add a layer to their drums and enhance their sound, regardless of the genre they are working in. - Presets
You can use various preset patterns as starting points or inspiration for your patterns. These patterns cover a range of genres and styles and can be easily customized using the pattern sequencer. - Intuitional & attractive GUI
UJAM’s Beatmaker CIRCUITS has a user-friendly and intuitive interface, making it easy to quickly program drum patterns and create custom beats. The interface is designed to resemble a classic drum machine, with individual pads for each drum sound, a pattern sequencer, and a mixer section. - Easy programming
To program a pattern, you click on the pads to trigger the corresponding drum sound at the desired time in the sequence. The step sequencer allows you to easily create complex patterns by adjusting the timing and velocity of each drum hit. The mixer section provides controls for adjusting each drum sound’s volume, pan, and effects, allowing you to fine-tune the mix.
Compatibility:
To run the plugin, you must have at least 4 GB of RAM and 720 MB of free disk space, a 1280x768px display, and an internet connection. Further, it is available in VST 2, VST 3, AU 2, and AAX formats, with the AU 2 version only compatible with Logic Pro X and newer. The plugin is 64-bit and compatible with Windows 10-11 and macOS Catalina (10.15) – macOS Monterey (12.5).
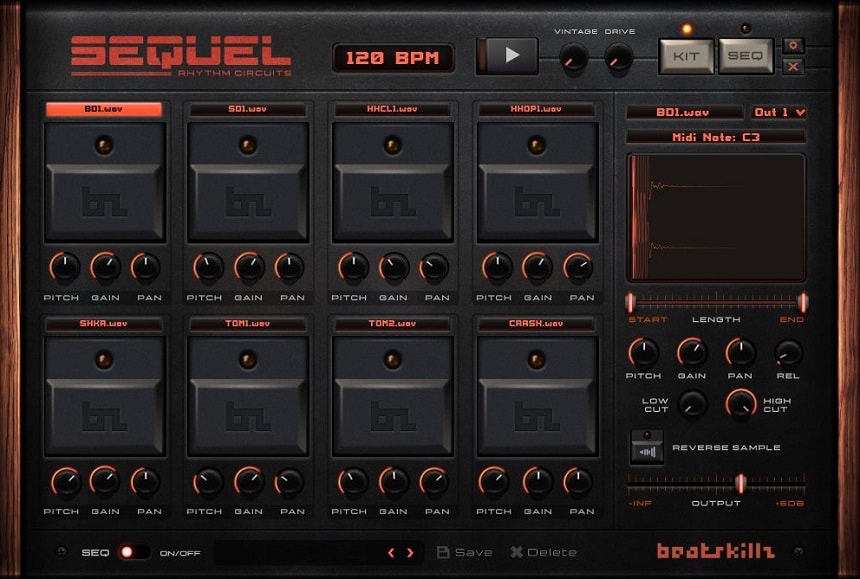
7. Beatskillz Sequel
Beatskillz Sequel is a sample-based drum machine presenting vintage sounds and modern sequencing features.
The warm drum sound from the 80s drum machines is an essential factor in a Synthwave or a Chillwave song.
And while you might find a Synthwave song with modern-sounding electronic drums, Chillwave tends to stick to vintage sounds, whether by using authentic samples or Lo-Fi sound processing. This plugin helps you avoid extra steps in your drum production.
Beatskillz Sequel is a sampling drum machine employing a large library of famous 80s drum machines. There are over a hundred drum kits in the plugin’s library.
And you’ll hear these sounds on almost every hit electronic/pop music from the 80s, not to mention the many Synthwave, Lo-Fi, or hip-hop albums made nowadays. Let’s check out some of its features.
Key Features:
- Library
The drum machine comes with a huge library of over six hundred drum sounds and over 150 patterns and fills. The MIDI patterns come as MIDI files, however. So, you can open your DAW’s browser and drag the MIDI files straight into your track, where you can edit the pattern to suit your needs.
Furthermore, Sequel employs a built-in sample browser that lets you drag and drop the sound you like into a drum pad. It allows you to modify the preset kits easily and experiment with new sounds. However, you cannot load any custom sound into the plugin. - Sample Editing
Once you have loaded the samples you like, the next step is editing the samples to taste. Sequel provides the following parameters per pad: pitch, gain, pan, release, low-cut, high-cut, reverse sample, output volume, and sample length. Among these, the pitch, gain, and pan knobs are also available below each sample pad for easy access. And note that the sample length parameter only changes the start and end position of the sample. It doesn’t stretch samples to modify their length. - Turn Back Time
You’ll find these two knobs at the top of the user interfaces: Vintage and Drive. Turning up Vintage emulates the sound of old hardware by adding down-sampling, bit-crush, and filter to your sound. It’s an awesome way to age your drum machine, ideal for Chillwave music and Lo-Fi productions. Similarly, the Drive knob boosts the drum machine’s preamp gain. It adds rich saturation that you might find appealing. - Multi-Out
Sequel lets you create sends from each drum pad to another track in your DAW. This is an essential feature in a drum plugin that lets you add third-party effects to the drum samples, establishing mixing freedom. Setting the output number of a drum pad is as straightforward as selecting an output from the dropdown menu at the top-right section of the user interface. - Sequencer
The SEQ button at the top right corner of the interface switches it to the Sequencer page. Here, you’ll find a 32-step sequencer with a similar workflow as FL Studio’s Channel Rack if you’re familiar with it. You can change the length of the sequence, adjust the playback rate, add swing, mute/solo/clear each pad, clear the pattern, click-drag to fill or erase steps in a sequence, save patterns, etc.
Furthermore, clicking on the drum pad name reveals three per-step sequencing parameters: pitch, note length, and velocity. The pitch modulator lets you change the pitch from -12 to +12 semitones of each step. Once you’re done creating a pattern, drag from the MIDI Drop button and drop the MIDI clip into your DAW. You can make further adjustments from the piano roll, but make sure you turn off the plugin’s sequencer first!
Compatibility:
Beatskillz Sequel is available for Windows 10 or higher and macOS 10.14 or higher, both 64-bit only. It comes in VST 3, AU, and AAX formats.
Summary:
If you don’t already own a sample pack of drums and MIDI patterns, Sequel’s comprehensive library will provide you with plenty to use in your Synthwave or Chillwave song. It provides enough controls to help you customize the sound but stays straightforward.
So, it’s an ideal drum instrument for both beginners and experienced producers. Furthermore, the step sequencer with per-step pitch, note length, and velocity editing provides much more control than the standard sequencers in hardware drum machines.
And while there are no effect processors built-in, the multi-out feature lets you mix your drums with any effect plugin you want.
8. Pulsar Audio 1178
More Info & Price (Trial Available)
This plugin is a FET compressor modeled after the original hardware of the same name, but it offers many twists along the way.
The Pulsar 1178 is an emulation of the esteemed Urei 1178, a stereo version of the better-known Urei 1176 mono compressor. Thanks to the FET (Field Effect Transistor) design, the hardware is known for its punchy and aggressive sound.
Many hit records have used this compressor on everything from bass, vocals, snares, etc. Hence, the Pulsar 1178 brings the classic sound to your studio with modern tweaks to ease the workflow.
As you can see from the screenshot below, the user interface is super sleek and modern. While most emulations tend to maintain the traditional design and limitations of the hardware, Pulsar has gone the opposite route.
You’ll find a sleek sidechain EQ, an alternative saturation stage, and a mix knob in addition to the revered tone of the hardware.
Key Features:
- Stereo Processing
The original hardware was a stereo compressor, but it shared the attack and release parameters. However, Pulsar’s 1178 compressor features individual attack and release parameters for each channel, providing greater control. In addition, you can process the signal in mid/side mode, which is ideal for controlling the stereo image of a bus. You can also link the channels to get the result you’d get with the hardware compressor. Similarly, inverting the channels makes the compressor compress one channel based on the audio of the other. - One Ratio Or All
Same as the original Urei design, 4, 8, 12, and 20:1 ratio options are available in this plugin. The “All” button activates all the ratios simultaneously. It transforms the compressor into a near-brick-wall limiter with an aggressive, saturated personality. An awesome trick is to use the All mode alongside the mix knob for a quick NY/parallel compression to add snap and body to drums. - Sidechain EQ
The plugin features an intuitive sidechain EQ with four bands, each capable of being a peak, shelf, and cut-off filter. The cut-off filters have slopes adjustable from 6 dB/octave to a steep 48 dB/octave. Furthermore, you can set the sidechain source to Internal, making the EQ act like an input filter. It’s excellent for working with buses. - Saturation
The plugin features a complete saturation stage with four kinds of saturation: Clip, Warm, Triode, and Tape. Here, the Clip mode adds a clipper with a crisp sound, whereas the Warm mode sounds like a transformer saturation. Similarly, Triode emulates tube amp saturation, whereas the Tape mode adds tape saturation. The saturation characters apply even with the compressor disabled. Furthermore, you can control the saturation with the calibration knob.
Compatibility:
Pulsar Audio Pulsar 1178 is available for Windows 7 or higher and macOS 10.10 or higher, both 64-bit only. It comes in VST 2/3, AU, and AAX formats.
Summary:
With so many added idiosyncrasies and features like individual controls per channel, mid/side mode, and sidechain EQ, the Pulsar 1178 compressor gives even the most hardcore purists a reason to own an emulation plugin.
Many people prefer the sound of the 1176 compressor over 1178 for its transformer saturation. If you are one of them, Pulsar 1178 should be highly tantalizing for its saturation stage with four types of saturation, including transformer.
Furthermore, high-quality oversampling avoids any high-order harmonic distortion, a trait dreaded by Class A output fans.
9. E-Phonic Invader 2
More Info & Price (Trial Available)
Invader 2 is a polyphonic synthesizer that works and sounds similar to many hardware synths but maintains modern ease of use.
The foundation of the Synthwave and Chillwave genre is classic, subtractive synthesizers. You’ll likely use them for pads, bass, keys, arpeggios, and melody. Invader 2 is one of the most intuitive analog modeling synthesizers with a high-quality sound and resizable user interface.
It provides a straightforward single-page workflow and all the fundamental tools you need to create polished synth sounds without tweaking too many parameters.
Besides the sound design possibilities, Invader 2 provides over two hundred highly usable presets. From dramatic, evolving synth pads to melodious sequence patterns, the preset library features everything.
Similarly, the HQ button at the top right of the UI enables and disables 4x oversampling mode, which helps remove any aliasing the synthesizer has generated.
Key Features:
- Dual Oscillators
The synthesizer features two identical oscillators. Each of them offers triangle, saw, pulse, sync pulse, sync saw, and saw-to-pulse waveforms. Next to the selector, you’ll find a Freq knob, which controls the oscillator’s pitch. The knob next t it changes depending on the waveform you have selected.
So, with the pulse waveform selected, you’ll find pulse width control, and with either of the syncing waveforms, you’ll find sync amount (soft sync to hard sync). Similarly, the saw-to-pulse waveforms provide a shape knob that transitions between the two waveforms. - Filter
The synth employs one filter with three types: low-pass 1, low-pass 2, and band-pass. The first low-pass filter is a clean low-pass filter and offers a high-pass knob, which you can deactivate if you don’t want it. Conversely, the second low-pass filter emulates a gritty analog-style filter that provides a drive knob instead of a high-pass filter. - Modulation
Invader 2 comes with a dedicated filter and amp envelope. Similarly, you’ll find two LFO modules with beat-sync and multiple shapes: sine, triangle, saw, saw (unipolar), pulse, pulse (unipolar), random, and noise. It provides a delay knob too. Now, another thing worth mentioning is that you can modulate an oscillator’s pitch, the waveform-dependent knob, and the filter cutoff using either of the two envelopes, the LFOs, and the LFO’s delay envelope (attack). - Unison
While most modern synths provide a unison module, Invader 2’s unison is particularly powerful. It provides two, four, and six-voice real unison alongside four and eight-voice emulated unison to save CPU. Furthermore, you can also select six-voice real unison with eight-voice emulated unison. Doing so makes Invader 2 create a six-voice unison first and then multiply the sound by eight, resulting in a massive sound. Creating a super-saw patch couldn’t have been easier! - Mixer & Effects
The Mixer lets you control the volume of the oscillators and the synth itself. However, you can also add a sub-oscillator featuring triangle, saw, and square waveforms. A transpose drop-down menu lets you change the sub-oscillator to -1 or -2 octave. Furthermore, you can dial in ring modulation and white noise.
Next to the unison module, you can choose from six types of delay effects: delay, ping pong, diffused delay, tape delay, phase delay 1, and phase delay 2. The diffused delay lets you add an effect similar to reverb, although it sounds less smooth. And the phase delay effects sound like a delay mixed with a phaser. - Arpeggiator/Sequencer
No analog-modeled synthesizer would be complete without an arpeggiator. Hence, Invader 2 comes with a simple arpeggiator with up, down, and up-down modes. You can change the playback rate and the range between one to four octaves. This module is ideal for creating Synthwave or Chillwave-style arpeggio backing patterns.
However, if you’re feeling adventurous, Invader 2’s Sequencer should interest you. Instead of providing you a step-sequencer with a grid that we’re so used to, the plugin offers a 16-step sequence recorder. So, set the module’s mode to Sequencer Record and play your notes in sequence (timing is irrelevant). Then, set the mode to Sequence Play (Poly) or Sequence Play (Seq) and press any note on your keyboard to play the sequence from the starting note. The Poly mode lets you play the sequence with multiple notes simultaneously.
Compatibility:
Invader 2 is available for Windows 7 or higher and macOS 10.13 or higher, both 64-bit only. It comes in VST 3 and AU formats.
Summary:
As you can see, despite the simple user interface, Invader 2 provides an incredible number of features. Furthermore, it sounds crisp and way higher quality than what its humble pay-what-you-want pricing scheme would have you believe.
You can even add Drift at the top of the interface to make the synth have fluctuations that you’d hear on a hardware synthesizer. As soon as I fired up the plugin and listened to its presets, I spent an hour just playing it!
So, I’m confident the presets will inspire you as well. Invader 2 could be the ultimate bang for your buck if you don’t already own an analog-style synth.
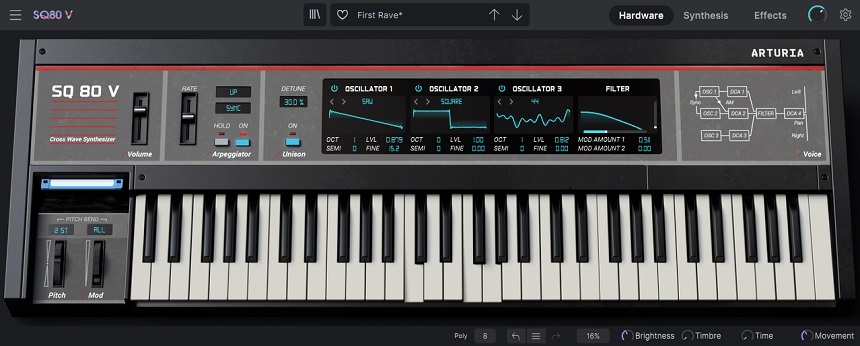
10. Arturia SQ80 V
More Info & Price (Trial Available)
This plugin complements the analog rave of the 1980s with digital complexity and flexibility.
Arturia SQ80 V is based on the Ensoniq SQ-80 CrossWave synthesizer, released in the late-80s around 1987. It was a build-up on the classic ESQ-1 synth with more waveforms, an enhanced sequencer, and preset storage.
And it was a far easier synth to program when digital synths were infamous for being challenging. Generally, musicians used the synth to create digital organs, sound effects, pads, and even analog-type sounds.
It offered multi-sampled transient attack waveforms like a violin bow, plectrum picks, mallets, breath, percussion, and hammer. Such samples led to the hybridization of acoustic sounds with digital synthesis.
Arturia’s take on this vintage marvel offers even more waveforms, an easier workflow, and other idiosyncrasies that only make the synth better.
One of the biggest changes is the 16-voice polyphony instead of merely eight. Similarly, Arturia SQ80 V employs an eight-voice unison option, which helps create enormous sounds and immersive pads.
Key Features:
- Powerful Oscillators
Arturia SQ80 V features three 8-bit oscillators, each capable of loading a unique waveform and employing a deeply modeled 5503 DOC chip. And like the original hardware, they feature hard sync and amplitude modulation. You’ll find the original seventy-five waveforms and so much more. Hence, Arturia classifies the waveforms into four groups: SQ80 Waveforms, Transwaves, ESQ-1 Hidden Waveforms, and SQ80 Hidden Waveforms.
The SQ80 Waveforms include the classic factory waveforms, ranging from primitive waves like sine and pulse to acoustic transients. Similarly, the Transwave group showcases the technology from Ensoniq’s synthesizers after the SQ-80, including Transwaves. Conversely, the Hidden Waveforms include the waveforms discovered by unearthing the respective hardware’s operating software and manipulating the code. - CEM 3379 Filter
The plugin features an analog low-pass filter that lends imperfections and a harmonically rich tone to the digital oscillators. Furthermore, the output amplifier is also an analog system that provides sonic fluctuations that impart life to the otherwise overly-precise sound of digital synthesis. In addition, Arturia’s subtle analog dispersion technology helps bring the organic nature of the sound to reality. - Modulation
The plugin features four analog amp envelopes, one for each oscillator and one for the master output. Furthermore, there are four polyphonic envelopes with three modes: SQ80, DADSR, and MSEG. Here, the SQ80 envelope is traditional, DADSR adds a delay parameter to control when the envelope starts, and MSEG lets you write envelopes freely using a node-based editor.
Next, you’ll find three LFOs with six waveforms, eight MIDI sources, and a modulation mixer. The Mod Mixer, a solid addition by Arturia, lets you combine two modulation sources to get creative with your patches. There are six algorithms to combine the modulators like add, multiply, etc. - Arpeggiator
Arturia SQ80 V features an arpeggiator module that lets you easily create melodies and backing patterns. It comes with a standard set of controls like arpeggio direction, sync, octave range, and hold/latch. There are seven arpeggio directions or modes. - Mix Ready
The plugin features an Effects tab that lets you add four effect processors across two busses, configurable in series or parallel. And there are fifteen effects built into the synth. These include stereo pan, bit-crusher, phaser, pitch-shift delay, delay, compressor, flanger, tape delay, parametric EQ, multiband compressor, JUNO chorus, reverb, multi-filter, overdrive, and chorus.
Compatibility:
Arturia SQ80 V is available for Windows 8.1 or higher and macOS 10.13 or higher, both 64-bit only. It comes in VST 2/3, AU, and AAX formats.
Summary:
If you want more creative freedom than what an analog synth offers but still want to retain the vintage vibe, Arturia SQ80 V could be the ideal synth for you.
It comes with digital oscillators that combine multiple waveforms, analog filter, output stage, and modern modulators and effect processors.
Furthermore, the sound designing process is easy to understand, which is a feature that sets the original hardware apart from other digital synthesizers. And if you don’t want to bother creating custom patches, you can use the built-in collection of 160 presets.
These include everything from exquisite, ethereal pads, punchy retro bass, and analog-style powerful brass sounds.
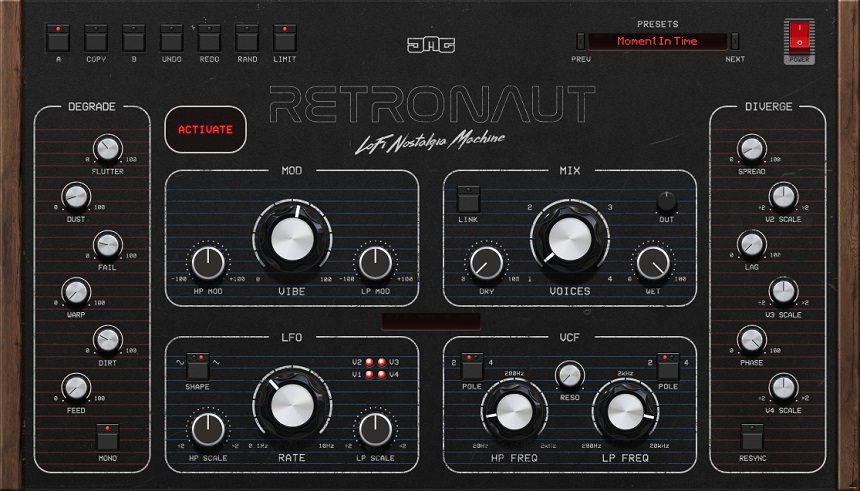
11. United Plugins Retronaut
More Info & Price (Trial Available)
The United Plugins Retronaut is a versatile multi-effects plugin that emulates vintage analog processors, specifically focusing on vibrato and chorus effects.
It has a powerful multi-voice modulation engine ranging from a single vibrato voice to a rich 4-voice chorus. Retronaut also features a dedicated degrade section with various lo-fi effects, including warm dirt and grit, wow, and flutter dusty crinkles and crackles. Furthermore, the plugin includes analog-style resonant filters that can be used to shape further and customize the effects.
Key Features:
- Multi-voice modulation engine
You can access a range of modulation effects from a single vibrato voice to a rich 4-voice chorus. This means that you can achieve a variety of sounds, from subtle pitch shifting to more complex and rich modulation effects. Blending the effect from vibrato to chorus enables you to customize the intensity and character of the modulation effect. - Lo-fi effects
The Degrade section of the Retronaut plugin allows you to add various LoFi effects to your sounds. These effects include warm dirt, grit, wow and flutter, dusty crinkles and crackles, and more. This feature lets you add character and texture to your sounds, creating a vintage and analog feel. - Diverge Section
You get a set of controls to change the voice behavior of the modulation effect. These controls include Spread, Lag, and Phase controls, allowing you to control each voice independently. This feature provides greater control over the modulation effect, enabling you to create unique and interesting sounds. - More Than Modulation
The More Than Modulation feature of the Retronaut plugin enables you to create tape saturators and crossfeed each voice back into each other to create complex feedback networks. This feature gives you a powerful tool to create interesting and complex modulation effects, adding depth and richness to their sounds. - Interesting stereo effects
The plugin has a “Crossfeed Into the Aether” feature, a creative effect that allows you to blend the wet and dry signals, creating a unique stereo image. This feature enables you to create various stereo effects, from subtle widths to more extreme and unusual stereo sounds. - Virtual Analog Filters
Virtual Analog Filters in the Retronaut plugin allow you to shape the sound further with high-pass and low-pass resonant filters. This feature gives you greater control over the sound, enabling them to cut or boost certain frequency ranges and shape the overall tonality of the sound.
Compatibility:
The United Plugins software plugins are compatible with Mac and Windows PCs and support AAX Native, VST2, VST3, and AU formats. The minimum system requirements for using the plugins are a display resolution of 1440 × 900px or 1280 × 960px or higher and a minimum of 2GB RAM.
Summary:
Retronaut is a versatile multi-effects plugin that emulates vintage analog processors, focusing on vibrato and chorus effects. It has a multi-voice modulation engine, lo-fi effects, controls to change voice behavior, tape saturators, analog-style resonant filters, and creative stereo effects.
12. discoDSP – OB-Xd
More Info & Price (Trial Available)
One of the most iconic hardware synthesizers in history is reborn with modern features in software form.
As the name suggests, discoDSP’s OB-Xd is modeled after a real Oberheim OB-X synthesizer. It emulates the sound and personality of the original.
However, as with any software interpretation of classic synths, you’ll find some added features and quirks. All of them are quite handy and enhance the user experience.
The Oberheim OB-X synth was beloved for many classic sounds you hear on hit records from the 80s. For example, I’m a fan of its triangle lead sound with glide. Similarly, you can create awesome pad sounds with its individual voice pan controls.
And thanks to the slight detuning effect that occurs randomly, the synth sounds convincingly analog and dynamic.
Key Features:
- Dual Oscillators
The plugin features two oscillators, each capable of producing a saw, triangle, and square wave. The square wave offers a pulse width control. However, unlike the original design, OB-Xd doesn’t have a frequency modulation with the second oscillator modulating the first. Instead, the first oscillator modulates the second. Similarly, a mixer section next to the oscillators section lets you control the volume of each oscillator and add white noise. Conversely, the original design had fixed volumes.
The Step switch allows you to make precise pitch changes by semi-tone steps. If you’d rather tune the oscillators manually or want to create pitch sweeps, you can turn the switch off. Similarly, the Bright control adjusts the clarity of the higher harmonics. - Multi-Mode Filter
Unlike the original design’s single 12 dB/oct low-pass filter, the OB-Xd offers a multi-mode 12 dB/oct filter akin to the Oberheim SEM module. You can crossfade between low-pass, band-pass, and high-pass by turning the Multi knob from left to right. It also features a 24 dB/oct mode, although it will then switch to a fully low-pass mode. Then, the Multi knob controls the filter slope from 24 dB/oct on the complete left and 6 dB/oct on the complete right instead. - Further Controls
The plugin offers a maximum of 32-voice polyphony, but you can change it on the fly in the global section. You’ll also find a unison mode that stacks a monophonic voice to all the polyphonies available. And there’s a glide feature with four types of legato mode. Next, the voice variation section lets you generate random changes on various parameters.
While the original hardware wasn’t velocity-sensitive, this plugin lets you alter the envelope depth of the filter and amplifier using velocity. Furthermore, the voice variation section also features eight pan knobs, one for each voice when you aren’t in unison mode. This feature lets you create ultra-wide pad sounds or narrow but convoluted lead sounds.
Compatibility:
discoDSP OB-Xd is available for Windows 7 or higher and macOS 10 or higher, both 64-bit only. It comes in VST 2/3, AU, and AAX formats.
Summary:
Any hardware synth fan will appreciate the revitalization of the iconic Oberheim OB-X synth. And the new features in the software iteration make OB-Xd much more flexible, making it feel better suited for contemporary uses.
Of course, without built-in effects, the synth sounds unashamedly raw. However, you’ll find its sound on par with or better than any modern synth with a little mixing. You can use this synth to create bass sounds, massive pads, and even plucky arpeggio sounds for Synthwave and Chillwave music.
And if you want the authentic vibe, avoid adding chorus and instead let the rawness of the synth seep through.
13. u-he Repro 1
More Info & Price (Trial Available)
Repro 1 is u-he’s take on the esteemed Prophet 5 synth’s monophonic counterpart featuring component-level modeling.
After releasing Diva, an acclaimed analog modeling synth, u-he turned their eyes on the Sequential Circuits’ hit synthesizers from the 1980s: the Prophet 5 and Prophet Pro One.
The resulting plugins were the Repro bundle, including two synths: Repro 5 and Repro 1. Repro 5 is an eight-voice polyphonic synth, whereas Repro 1 is proudly monophonic.
The main user interface of Repro 1 resembles the Pro One synth, especially how the parameters are laid out. Although, you’ll undoubtedly find plenty of modern changes introduced by u-he.
The fundamentals of the synth are fairly basic, which is expectable from a synth designed nearly four decades ago. However, exciting features like Tweaks and Sequencer, not to mention a collection of presets, help make the synth as relevant as ever.
Key Features:
- Multi-mode Oscillators
Repro 1 features two oscillators, each capable of generating one or multiple types of waveforms. Oscillator A generates saw and pulse waves, whereas Oscillator B generates saw, triangle, and pulse waves. You can change each oscillator’s frequency (pitch), octave, and pulse-width to control the cycles of the pulse wave. Furthermore, you can hard-sync the Oscillator A to Oscillator B with a toggle.
You’ll find a switch that changes the Oscillator B into “Lo Freq,” which slows the oscillator down to inaudible speeds. This feature lets you use the second oscillator as an LFO. The rest of the typical oscillator features are in the Mixer and Glide section. The Mixer section lets you change the volume of each oscillator and add a feedback circuit to boost the bass or introduce white noise. - Filter & Modulation
Repro 1 features a single four-pole (24 dB/oct) low-pass filter, a replica from the original hardware. The filter includes keyboard tracking and a dedicated filter envelope. The exciting part is that you can use the filter envelope as a modulator. Other than that, you’ll find the following modulators: Oscillator B’s Lo Freq LFO and a dedicated LFO. The three modulators can modulate both oscillators’ frequency and pulse width and the filter cutoff frequency. - Arpeggio & Sequencer
The main interface of the plugin sports a primitive arpeggiator that lets you switch between up and up-down modes. So, like with the original hardware, you’ll also find a sequencer. As groundbreaking as the original hardware’s sequencer was for its time, u-he’s design surpasses the original on every front.
For starters, the sequencer lets you add two 32-step patterns per instance of the plugin, resulting in sixty-four total steps. Furthermore, editing the sequencer is straightforward, and it features multiple types of steps with adjustable velocity per step. Moreover, you can save the patterns separately and copy the patterns between multiple instances of Repro 1. Of course, if you’d rather record the steps, you can do so straight from the Arpeggiator panel. - Tweaks
Switch to the Tweaks panel, and you’ll essentially remove the cover of the synthesizer to reveal the components within. Here, you can change the very behavior of individual elements. You can try out different models for the oscillators, filters, etc. The filter models include crispy, rounded, driven, and poly, whereas the filter envelope features piano, one-shot, high sustain, etc.
Similarly, you can invert Oscillator B’s saw wave, make the LFO’s square and saw waves bipolar, and even set the filter cutoff to track the pitch-bend when keyboard tracking is enabled. Overall, while the main user interface is as clutter-free as it could get, the Tweaks page is all about being extra with control. - Stomp-Boxes
At the bottom right of the main user interface, you’ll find a tab called Effects, which takes the place of the virtual keyboard on the synth. You’ll find five effect processors in this section. These effects include Jaws wave-folding distortion, Lyrebird delay, RESQ three-band EQ, Drench plate reverb, and Sonic Conditioner stere saturator & transient designer. You can reorder these plugins by dragging their names in the FX Chain list.
Compatibility:
U-he Repro 1 is available for Windows 7 or higher, macOS 10.9 or higher, and Linux, all 64-bit only. It comes in VST 2/3, AU, and AAX formats. Note that macOS AAX is temporarily unavailable at the time of writing.
Summary:
If you’re a fan of the Pro One synthesizer, u-he’s Repro 1 is pretty much the best emulation yet and probably in the future too.
It truly digs deep into the components of the synth to unearth every nuance and quirks the original hardware has while adding contemporary features like a comprehensive sequencer page, in-depth control over the sound, and high-quality effect processors.
Sure, it may not have the same flexibility as modern software synths. However, when it comes to creating mono leads, bass, and arpeggio patterns, Repro 1’s delightfully rich sounds might just come out on top for you.
14. Waves Retro Fi
More Info & Price (Trial Available)
Waves Retro Fi is a Lo-Fi plugin that helps you age your music and make it sound retro or even vintage.
Lo-Fi plugins emulate various old hardware players and samplers; common themes include vinyl records and tape.
It adds a nostalgic value to your music. Among the many excellent Lo-Fi plugins that offer specialized audio processing, Waves Retro Fi is one that provides multiple kinds of processing to add versatility.
You can use this plugin to make modern instruments like synths or drum samples sound vintage.
And while it’s not really a thing in Synthwave or Chillwave music, you can also make your instruments sound like you sampled them from old recordings, best suited for hip-hop, trap, and Lo-Fi music.
The plugin features four modules, each with a different purpose. Let’s check out each in brief.
Key Features:
- Device
The Device is the first section of this plugin and the most significant. The Device knob lets you select from four sets of impulse responses (IR), each of which you can brighten or darken using the Tone knob below. The four IRs include A the brightest, B the muddy/nasally, C the boxy, and D the flat (no device). Similarly, the Styler knob lets you select the sound era: 50s, 60s, 70s, and 80s. You should try various eras with different devices to get unique results.
The rest of the parameters are Squash and Ringer. Squash is a saturated compressor or an expander, depending on the direction you turn the knob. Similarly, Ringer adds ring modulation. Control the amount of the overall effect using the Mix knob. - Space
Space, the second module, features Echo and Reverb. The Echo section sports a standard delay with a ping-pong mode and DAW sync. Similarly, the Reverb section lets you add either a spring reverb or a plate reverb. I enjoy using the spring reverb on vocals, although it doesn’t quite sound like a typical spring reverb. However, the plate reverb has a lot of character and feels suitable for plate snare reverb. - Noise
This section lets you add some noise to your audio, whether it’s vinyl crackle, tape hiss, or something completely different. You see, Waves Retro Fi has one of the largest collections of noise I’ve seen yet. Cassette, digital, electric, FX, mechanical, synth, and vinyl are the seven types of noise included. There are three types of sounds in the cassette category, whereas the others have many more. There are six record noises and twelve electric noises, which sound retro yet futuristic.
The parameters on this section allow you to control how sensitive the noise module is and whether it should constantly play or when the audio isn’t playing. Similarly, you can change the position of the noise module from pre-space to post-space. - Mechanics
The Mechanics module holds two nearly identical sets of three knobs: wow, wobble, and speed. However, the first set of controls emulates a cassette tape, whereas the second set sounds similar to vinyl records. Generally, you want to stick to either one or the other, but you could use both of them for creativity too.
The wow knob adds random fluctuations in pitch caused by a faulty pinch roller in a tape machine. Similarly, natural aging causes vinyl records to warp, resulting in fluctuations. Next, the wobble knob creates amplitude variations, and the speed knob controls the rate of the variations.
Compatibility:
Waves Retro Fi is available for Windows 10 or higher and macOS 10.14.6 or higher, both 64-bit only. It comes in VST 2/3, AU, and AAX formats.
Summary:
Waves Retro Fi is a unique Lo-Fi plugin that employs impulse responses to recreate the sound of many eras of music production and playback gear. It provides only the crucial parameters, making it easy to use for beginners and snappy for expert users. A reverb/delay section is also available. So, it’s a good Lo-Fi plugin if you are after a versatile all-in-one. Although, you won’t find standard features like bit reduction and digital quantization in this plugin.
15. TAL Software TAL-U-No-LX
More Info & Price (Trial Available)
Complementing the Jupiter 8 emulation on my list is the TAL-U-No-LX, providing incredibly authentic analog sounds.
As you probably guessed by its name, this plugin is an emulation of the Roland JUNO 60 polyphonic synthesizer. It’s essentially a younger sibling of the Jupiter 8 and came with a more streamlined interface.
TAL-U-No-LX sports a user interface that appears similar to the original design but has noticeably gone under some reordering alongside added features.
The plugin features detailed character emulation alongside carefully calibrated controls. So, you can essentially dial in preset patches from your old JUNO 60 preset book and get near-identical results, making the TAL-U-No-LX an excellent counterpart or even replacement for the original hardware.
Furthermore, added idiosyncrasies like portamento and filter LFO waveforms push the ambition of this beloved synth even more.
Key Features:
- Oscillator
The plugin features a single oscillator with a pulse and saw wave generator. It lets you control the pulse width when set to pulse wave. Similarly, you can enable a square wave sub-oscillator and a noise generator, which feature individual volume controls. Since TAL-U-No-LX is a single-oscillator synth, the oscillator has no pitch control. However, you’ll find a master tune and level control. - Filters
TAL-U-No-LX features a high-pass filter next to the oscillator section. Then, the next section is a low-pass filter with frequency and resonance controls. It features keyboard tracking to change the frequency cutoff depending on the note you play. Both of these filters have a fixed 24 dB/octave slope. - Modulation
The plugin employs a single envelope and an LFO. You can set the envelope to control the volume, the filter frequency, and the pulse width. You can also modulate the envelope amount using velocity. Similarly, the LFO can control the oscillator pitch and the pulse width. You can change the LFO shape, add a delay before the LFO starts, and invert the shape. And finally, the portamento section lets you add pitch glide. - Arpeggiator
This section has seen a few changes compared to the original design. Like in JUNO 60, you have three modes of arpeggiation: up, up & down, and down. It has up to three octaves of range. And you can sync the arpeggiator to your DAW and enable hold or latch. Originally, the JUNO 60 didn’t support MIDI, which meant you couldn’t sync the synth to a MIDI clock. So, the sync feature is a welcome change. - Effects
You’ll find the original JUNO chorus effect, which defined the synth’s sound for many users, at the top right of the interface. However, deviating from the hardware design again, TAL introduces two extra effect processors at the bottom right of the user interface: a delay and a reverb. The delay can sync to the DAW and provides a spread feature to widen your stereo image. Similarly, the reverb effect is a simple yet effective digital reverb with fundamental controls only.
Compatibility:
TTAL U-No-LX By TAL Software is available for Windows 7 or higher and macOS 10.9 or higher, both 64-bit only. It comes in VST 2/3, AU, and AAX formats.
Summary:
TAL-U-No-LX is a 12-voice iteration of the Roland JUNO 60, and it’s incredible how close they sound to each other. It comes with over three hundred factory presets and includes the original Factory Bank A patch library.
Furthermore, the synth supports micro-tuning, MPE, and parameter automation, allowing a world of exploration for contemporary music producers.
If you’ve been looking for a replica of the JUNO 60 synthesizer in software form, the TAL-U-No-LX plugin is undoubtedly one of, if not the best.
16. u-He Diva
More Info & Price (Trial Available)
When you want the distinct analog sound but don’t want to be restricted to hardware emulation plugins, u-he Diva is the way to go.
Most analog plugins are hardware emulations rather than being their own thing. So, Diva seeks to offer a new way to get analog warmth in your synth sounds by providing multiple types of components alongside a full-featured subtractive synth engine.
It provides standard features you’d find in a general synthesizer plus menus for detailed modifications.
When making Synthwave and Chillwave, you need analog-sounding synths to generate sounds from the 80s. And Diva is one of the few synths that sound very authentic while offering a variety of sounds.
So, you make it sound similar to many iconic synthesizers from the retro era with some tweaking.
Key Features:
- Sound Generators
The plugin features two analog-modeling oscillators, and each provides five models, which offer a wide range of characteristics. And while they each share common controls like waveforms, octave range, volume, and a noise generator, you’ll find small GUI changes that make the models feel distinguished.
Here are the five types of oscillators: Triple VCO with an FM engine, Dual VCO, DCO with a single oscillator and a sub-oscillator, Dual VCO Eco for CPU-efficiency, and a Digital oscillator that breaks the analog theme. You can mix and match these models with other components in the synth to create a unique sound style. - Filter
Diva uses real-time circuit simulation with zero delay feedback (ZDF) design to generate remarkably pristine yet characterful sound. If you’d like to learn more about ZDF, have a look at this article by the developer. Furthermore, like with the oscillators, Diva models five types of filters you can find in various hardware synths. And while they may appear similar, some evident quirks and options provide a wider field of sonic exploration.
These filters include Ladder with 12 dB/octave and 24 dB/octave low-pass filter and FM, Cascade, Multimode with low-pass, high-pass, and band-pass modes, Bite with intense resonance, and Unbie with crossfading high-pass/low-pass filter. - Modulation & Effects
Diva has two envelopes, each with three models. The first envelope is for the amplifier, whereas the second applies to the filter. Similarly, you’ll find two LFOs with multiple waveforms, delay, depth, rate modulation, etc. However, the first LFO is fixed to the pitch of the oscillators, whereas the second one lets you modulate various other parameters.
Once modulation is done, you can add two effect processors using the slots at the bottom right of the main interface. These effects include chorus, phaser, plate reverb, delay, and rotary speaker. - More Features
So far, I’ve focused on the main interface that appears when you open Diva. However, there are many other features hidden in tabs at the bottom of the UI. The Modifications panel showcases more modulation features and modulation mixing algorithms, including rectify, quantize, multiply, invert, lag, and add.
Similarly, the Trimmers panel lets you make your sounds feel even more analog using voice detuning per oscillator, round-robin, drift, stack tuning, etc. These offer an authentic analog experience by emulating component fluctuations in a hardware synthesizer.
Compatibility:
U-he Diva is available for Windows 7 or higher, macOS 10.9 or higher, and Linux, all 64-bit only. It comes in VST 2/3, AU, and AAX formats. Note that macOS AAX is temporarily unavailable at the time of writing.
Summary:
Diva has far too many exciting features to cover in a short review like this. However, what I’ve enlisted above probably gave you an idea of how vast yet minimal this synth can become. Furthermore, it comes with over 1,200 presets, a treasure hoard of inspiring sounds.
Similarly, it has a host-syncing arpeggiator with real-time rate offset, swing, and multiple progression options. Over everything else, though, my favorite thing about Diva is how natural and beautiful it sounds.
So, whether you’re a beatmaker, electronic music producer, film score composer, or band player, Diva can become your go-to analog software synth no matter which hardware model you want. And it’s one of the best choices for Synthwave and Chillwave production.
17. Arturia Jun-6 Chorus
More Info & Price (Trial Available)
Introduce the iconic, rich character of the Roland JUNO 6 synthesizer in your tracks.
We’ve seen Arturia create in-depth emulations of hardware synthesizers and the JUN-6 V emulated Roland JUNO 6 polyphonic synthesizer. That classic synthesizer happened to have one of the most beloved massive stereo richness, thanks to its chorus effect. You’ll find a similar chorus effect in the JUNO 60 and even the Jupiter 8 synth.
So, it’s no surprise that Arturia provides the chorus effect as a separate plugin. You could use this plugin with a regular software synth to add some Roland spice to the mix.
Similarly, it’s wonderful for widening a mono input like an electric guitar or vocals. And best of all, the plugin is insanely easy to learn and use.
Key Features:
- I, II, Or Both
The plugin accurately recreates the original Roland Juno 6 chorus effect. Hence, you’ll find two buttons that switch between the type I and type II chorus effect like in the hardware design. And while you should generally opt for the one that sounds best in your case, type I provides a slower chorus, and type II provides a faster chorus. Both of them use the triangle wave. So, I prefer the first for something slow and enveloping, whereas the second one tends to add a dramatic flair to the sound.
Furthermore, clicking on the button between the two chorus-type buttons lets you switch to a different type of chorus. It has the fastest rate and uses the sine wave. So, it results in a rich, fast, almost vibrato-like sound that changes subtly over time. It works best when you want the effect to sound prominent. - Manual
The manual mode allows you to create custom chorus effects using fundamental parameters: rate, depth, and phase. The rate controls the speed of the modulation, and you can sync the rate with your DAW. Similarly, the depth controls how much the chorus affects the sound. And finally, the phase inverts the signal of a generated delay line (one of the multiple sounds that form the chorus effect) to create unique variations in the stereo image. Note that the manual mode uses the triangle wave for the chorus effect.
Compatibility:
Chorus JUN-6 is available for Windows 8.1 or higher and macOS 10.13 or higher, both 64-bit only. It comes in VST 2/3, AU, and AAX formats.
Summary:
If you are looking for a simple chorus effect that sounds excellent, Arturia’s Chorus JUN-6 could be an excellent choice. It doesn’t offer an overwhelming number of controls, and the presets are very usable. Moreover, it’s effective and suitable for many kinds of sounds, including synths, keyboards, vocals, and guitars.
18. Synapse-Audio Obsession
More Info & Price (Trial Available)
Let’s take a look at Synapse Audio’s take on the classic Oberheim OB-Xa synthesizer.
We’ve checked out an emulation plugin of the Oberheim OB-X synth, which was the first synth released in 1979 in this series. Conversely, Oberheim OB-Xa was a newer version released in 1981.
It utilized Custis CEM IC generators making it sound contrastingly smoother compared to the raw and wild personality of the OB-X, which used the SEM module instead.
Obsession by Synapse Audio brings the powerful polyphonic vintage synthesizer to your music studio with modern features added to it. It features detailed per-voice controls that no other synth provides. The feature is useful for creating rich, dynamic sound.
Furthermore, the temperature-dependent fluctuations you find on the original hardware are also simulated using the Organic knob. The result is an impressively authentic experience alongside jaw-dropping sound quality.
Key Features:
- Three Modes
Obsession can operate in three modes: single, dual, and split. Single-mode plays one patch and is the default mode of the synth. Conversely, the dual-mode can play two patches simultaneously. It stacks two different patch settings; each is called a “part.” You can access each part by clicking on the A and B buttons at the top left of the interface. Similarly, the fader between these two buttons lets you control the balance between the two parts. And lastly, the split mode lets you load two patches, but you can play each separately. Instead of stacking the two patches, it loads one in the lower region of your keyboard and the other patch in the higher octaves. - Sound Engine
Obsession uses two oscillators and a noise generator. The oscillators can produce saw, pulse, a mix of saw and pulse, and triangle waveforms. While the saw and pulse waves have dedicated buttons, the mix is activated when both switches are turned on, and the triangle wave is selected when no switch is enabled.
Each oscillator features a frequency/pitch control, and the second oscillator employs a pulse width control. You can also hard sync the second oscillator to the first oscillator. - Filter Section
The filter section holds a filter that is a low-pass by default. However, you can also switch it to a band-pass mode. The section has three input buttons: OSC 1, OSC 2, and Noise. The two oscillator buttons toggle whether or not the oscillator is sent into the filter. If you disable it, the oscillator becomes inaudible. Similarly, the Noise button enables white noise at a fixed volume like the original hardware, although you can control it via the modulation matrix. Furthermore, the filter provides a 4-pole mode, which switches the default 12 dB/octave slope to 24 dB/octave. Lastly, it features keyboard tracking. - Modulation
There are two envelopes in Obsession: amp envelope and filter envelope. The amp envelope controls the synth’s volume, and the filter envelope modulates the filter cutoff. However, the latter can also modulate the second oscillator’s pitch if you enable the F-ENV button in the oscillator section.
Likewise, it features two LFOs. They feature three waveform shapes: sine, square, and sample-and-hold (S/H). You can sync the rate of the LFOs to your DAW using the steps button. You can apply the LFOs to the frequency/pitch of the oscillators, the filter cutoff, and the pulse width of a saw wave. - Voice Edit
This feature is the most powerful and exciting one of Obsession. You can differ each voice of the synth in many ways by changing the value of various parameters per voice. So, if you played a C major chord, you could make the C note sound different from E, which sounds different from G.
Entering the Voice Edit mode is as easy as clicking on one of the voices at the bottom left under the Voice Adjustment Edit section. Note that the number of buttons you see here depends on the number of activated voices. For example, in 8-voice polyphony mode, you’ll find eight buttons there. Once you enter the Voice Edit mode, the knobs turn into trim-pots to indicate that you are adjusting a voice alone. So, all the pots are set at twelve o’clock and moving them left or right changes the parameter relative to its underlying value (in the regular, non-voice edit mode).
Note that you cannot edit every parameter per voice. For example, you cannot change the LFO rate per voice. However, you can change the LFO offset, pan, and semitone changes. - Back Panel
The plugin features a “back panel,” where you’ll find the modulation matrix, analog simulation settings, and some effect processors. The modulation matrix has twelve slots that allow you to link a modulation source to a destination parameter. The sources include velocity, key track, modulation wheel, pitch bend, modulation wheel, aftertouch, polyphonic aftertouch, constant values, LFO x modulation wheel, etc.
Similarly, you’ll find two Step Editors, which are 128-step modulation sequencers. These allow you to create tempo-synced rhythms or draw custom envelopes. They’re essentially the modern interpretation of the LFO modules.
The effect processors include reverb, delay, and chorus. Each provides detailed parameters to help you polish your sound and bring the synth sound closer to the modern standard. The reverb also features a shimmer knob, which overdubs the reverb wet an octave higher. And the regen knob adds even more harmonics to the shimmer effect.
Compatibility:
Synapse Audio Obsession is available for Windows 7 or higher and macOS 10.11 or higher, both 64-bit only. It comes in VST 2/3, AU, and AAX formats.
Summary:
Obsession is undoubtedly one of the most powerful virtual analog synths available today. Synapse Audio has convincingly captured the sound and personality of the Oberheim OB-Xa synthesizer while still maintaining a noticeably modern interpretation.
The front panel provides everything you’d expect from a standard virtual analog synth, including two oscillators, a filter, two LFOs, and two envelopes. It has a very warm and fat tone, especially with the VCA Sat button on the back panel switched on, which enables the amplifier’s saturation.
And the Organic control helps simulate the unstable nature of analog components. If you want only one virtual analog synth, Obsession could be the ideal choice.
Related Readings:
Top 10 Analog Compressors For Mixing & Mastering (On Any Budget)
How Does Analog Tape Work? – The Magic Of Tape Recording
Top 12 Reverb Plugins For Musicians (And 5 FREE Reverb Plugins)
19. Valhalla Delay
More Info & Price (Trial Available)
This plugin is one of the most popular delay plugins available, thanks to its no-nonsense user interface and excellent quality.
Anyone who’s searched for a reverb or delay plugin has surely come across Valhalla’s lineup of products. They have created one other delay-like effect called the free FreqEcho, which is a frequency-based delay plugin.
As with a few other Valhalla products, this delay plugin provides you with multiple modes that process the sound with different signal chains.
One of these modes includes a tape emulation. Hence, Valhalla Delay could be considered a tape delay, too, except it has much more to offer.
Such features make it an ideal choice for modern genres like Synthwave and Chillwave that constantly require a variety, even in everyday plugins like delay and reverb.
Key Features:
- Modes
There are fourteen modes built into this delay plugin. These include tape, HiFI, bucket brigade, digital, ghost, pitch, reverse pitch, bucket brigade duck, clarity, duck-tape, pitch-duck, LoFi, quartz, and phaser DDL. Here, the tape mode offers a detailed model of a hardware tape delay, complete with quirks like wow, flutter, and multiple eras: past (dirty), present, and future (cleanest).
Similarly, HiFi mode provides a tape echo similar to reel-to-reel decks found in studios. It tends to degrade the audio less than the tape mode. Next, the ghost mode combines the HiFi tape echo with a diffusion algorithm to create massive sounds. Likewise, the pitch mode lets you create doubles, add harmonies to synths, create shimmering sounds, etc. These are probably the most useful modes in the plugin for Synthwave and Chillwave. However, if you are interested in finding out more, give its demo a thorough try. - Intuitive Interface
Valhalla Delay offers an intuitive, guided user interface like every Valhalla plugin. Point to a parameter on the UI, and the plugin provides helpful information at the bottom. Despite its intricate and numerous features, it helps you learn the plugin without reading the manual or watching a video about it.
Similarly, when you change the mode of the delay plugin, the user interface updates to provide a unique appearance and experience. Of course, the modes provide different parameters. So, the UI change is necessary. However, the esthetic color theme per mode makes for a great change in the user experience and sound. - Styles
Style control allows you to control the relationship between the left and right delay channels. You can make individual channel changes or manipulate both simultaneously. Here are the styles in the plugins: single, dual, ratio, ping-pong, and quad. The single style provides a mono delay, whereas the dual style provides individual controls for each channel. Similarly, the ratio style lets you control the delay time of the left channel, whereas the right channel uses a ratio control on the left channel’s delay time. Next, the ping-pong style creates the classic ping-pong delay sound, where the echoes move back and forth between the two channels. And finally, the quad style is a multi-tap delay modeling the multi-head tape echoes from the 60s and 70s. You can get up to four delay taps on each channel.
Compatibility:
Valhalla Delay is available for Windows 10 or higher and macOS 10.8 or higher, both 64-bit only. It comes in VST 2/3, AU, and AAX formats.
Summary:
The biggest selling point of this delay plugin is its flexibility through simplicity. Instead of providing you with a large number of controls and parameters, it provides the fundamental ones alongside fourteen modes. The modes change their internal configuration and signal chain to provide interesting features like pitch shift, tape emulation, saturation, artifacts, etc. Generally, such effects would be difficult to create without a specialized plugin. So, you’re essentially buying fourteen delay plugins for the price of one!
20. Relab Development LX480
More Info & Price (Trial Available)
Get convenient access to the same luscious space of a classic hardware reverb used in many hit albums.
The esteemed Lexicon 480L digital reverb has long been a secret weapon of many artists worldwide. It is almost the standard of reverb processing.
Initially introduced in 1986, the famous hardware has been used in multiple chart-topping recordings by artists like John Lennon, Michael Jackson, Beyoncé, U2, Stevie Wonder, etc.
The plugin provides many of the algorithms from the original hardware in an intuitive and familiar user interface. Whether you’re looking for a lush, lingering hall for a string section or a bright plate reverb to make the snare slam a little harder, the LX480 Complete delivers.
Furthermore, it features many presets that help you get started as soon as you have opened the plugin.
Key Features:
- Algorithms
LX480 Complete provides many of the algorithms from the Lexicon 480L hardware. Each algorithm uses an intricate system under the hood to emulate various spaces. However, I suggest selecting the one you need based on their character rather than learning how the algorithm works. Let’s have a look at the algorithms:- Hall
This algorithm emulates the effect of reverberation in real concert halls. So, it works best for acoustic instruments to glue multiple instruments together. It provides early reflections and reverb controls. - Plate
The Plate algorithm is designed to sound like a traditional plate reverb. These are commonly used on percussive sounds because they have a high initial diffusion and a vivid, colored tail compared to other algorithms. Plate reverb frequently acts as if it were a part of the music itself, thickening and mellowing the original recording. - Room
As opposed to the Hall algorithm, the Room method simulates smaller spaces. It’s a sound employed in almost every aspect of music creation and video post-production. - Twin Delays
As the name suggests, this algorithm uses two stereo delay processors. It uses filtered feedback on both channels to generate a long reverb tail. Furthermore, cross-panning between the two channels helps create a wide stereo image. - Random Hall
The Random Hall algorithm has a smoother nature, making it excellent for material that needs a massive space simulation or a lengthy reverb. It has a model similar to the Hall algorithm but with random decay components and less metallic ringing. - RHall HD
This algorithm is the same concept as the previous one. However, it provides a more sophisticated design of reverb, thanks to the higher processing power of the CPU nowadays. Changes include greater density, an advanced echo system, better low-frequency reverb, and more stable stereo imaging. - Ambiance
While other models add a distinct signal for the reverb, this algorithm provides a natural-sounding space to the audio without being intrusive. So, it’s ideal for adding a room effect to recorded music or speech. For example, it can add a convincing room ambiance to a studio-recorded dialog.
- Hall
- Dual Engine
The plugin features multiple modes that make the reverb sound like two reverbs in one. There are four routing modes: single, cascade, mono-split, and stereo split. The single-mode is the most common and easiest to handle. However, cascade sends the output of the first reverb engine to the second. Similarly, the mono-split mode adds a reverb on each channel of the stereo input independently. And the stereo split mode passes the stereo signal to both engines and combines the final output into a rich reverb effect. - Presets
The plugin provides a massive library of presets. These include the factory preset collection from the original hardware. Similarly, you’ll find presets from the smaller and cheaper Essentials version of this reverb and the Lexicon PCM 91 compact reverb. It’s handy if you are switching between the two versions. Furthermore, you’ll find many signature presets made by renowned artists and engineers: Joe Carrel, Matt Weiss, Peter Dowsett, Richard Furch, and Shy Keidar. Each preset demonstrates the capability of the Lexicon reverb model and helps you get started without much tweaking.
Compatibility:
This plugin runs in macOS 10.9 or higher (64-bit only) and Windows 7 or higher (64-bit only). It comes in VST, AU, and AAX plugin formats.
Summary:
An excellent translation of a classic, ready to be used in your DAW and improve your mix. The design is very true to its vintage form, and so are the configurations present.
Be it in the presets or the modes, the level of attention to detail is impressive. It’s just as good as the actual unit would’ve been and much easier to acquire and maintain.
11 Best Free Plugins For Synthwave & Chillwave Music 2023
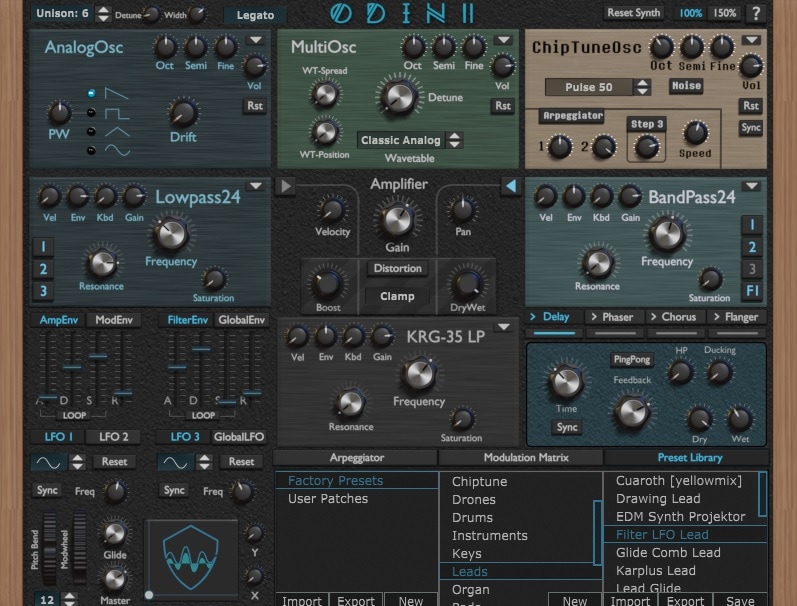
1. TheWaveWarden Odin 2
Odin 2 is a free polyphonic synthesizer that provides modern flexibility while maintaining the design and feel of analog hardware.
That said, this plugin is by no means only an analog emulation. Instead, it provides a wide variety of oscillator types along with multiple modulators, effect processors, a full-fledged modulation matrix, etc.
Furthermore, it uses a semi-modular design to make the synth clutter-free and lightweight. The plugin also features an XY-pad that makes performing live easy.
For a Synthwave or Chillwave music production, you can design every melodic and harmonic element of the genres in Odin 2.
It can create lush pads, grand leads, dark arpeggio plucks, deep bass, sound effects, etc. However, if you want to create authentic retro music, try mostly sticking to the analog oscillators.
Key Features:
- Streamlined UI
As I’ve mentioned, the plugin provides multiple instances of most modules that build this synth. And the user interface’s distinct top-to-down layout helps you understand the signal flow. Think of the boxes on the user interface as various rows. The first row holds the oscillators; the second holds filters and an amp/distortion control—similarly, the third features envelopes, one more filter, and some effect processors. Below the envelope module, you’ll find the LFO, XY-pad, and master controls. - Oscillators
Odin 2 features three slots for the oscillators. Click on the arrow on the oscillator slot to open the list of oscillator types available. These include the following:- Analog Osc
This oscillator emulates the sound of classic analog synths. It offers saw, square, triangle, and sine waveform shapes. Likewise, it has a drift knob to simulate analog fluctuations. - Wavetable Osc
This oscillator allows you to create evolving sounds, which feature more than one waveform. There are thirty-five wavetables in total, and each consists of four waves. The WT-Position knob sweeps through these four waves. - Multi Osc
This oscillator is four oscillators put together in one. You can sweep through them using the WT-Position parameter, and the WT-Spread knob changes the position of each of the four waveforms. - Vector Osc
This oscillator loads four waveforms and allows you to sweep through them using an XY-pad. It’s an intuitive version of the Wavetable Osc with four dimensions instead of only two. - Chiptune Osc
As you’d expect, this oscillator emulates the sound of a 4-bit sound chip you find on vintage gaming consoles. Some examples of such consoles are Nintendo Entertainment System (NES) and Nintendo Gameboy. The oscillator features a built-in arpeggiator. - FM Osc
The FM Osc allows you to utilize FM synthesis. It comes with two oscillators: the carrier and the modulator. The modulator modulates the carrier, and the sound changes. It’s a complex process that is best done by using your ear. - PM Osc
This is the phase modulating oscillator, which involves modulating the phase of a carrier oscillator using a modulator. It’s similar to the FM oscillator but produces a different sound. You can also use an oscillator waveform from a Draw Osc, which we’ll get to in a moment. - Noise Osc
This oscillator generates white noise. It features a high-pass and low-pass filter, which are handy for creating sweeps and risers without using a filter module. - WaveDraw & ChipDraw Osc
These two are similar types of oscillators. Essentially, they let you draw a custom waveform using your mouse/pen. The difference is that WaveDraw has a higher resolution than ChipDraw, the lack of which gives the chiptune-style oscillator its distinct sound. - SpecDraw Osc
Finally, the SpecDraw Osc is an additive oscillator. It uses bands of sine waves to generate various kinds of waveforms. So, this oscillator allows you to draw in the harmonics/sinewaves to create your unique waveform shape.
- Analog Osc
- Triple Filters
The plugin features three filter slots, each of which can load one out of nine types of filters. These include low-pass, band-pass, high-pass, SEM-12, diode ladder, KRG-35 LP/HP, comb filter, formant filter, and ring modulator. The first three are standard filter types with 12 or 24 dB/oct slopes. Then, the next three emulate analog filters with distinct characters. And the final three offer various effects that are handy in sound design. - Modulation
Odin 2 features an extensive number of modulators. There are four envelopes and LFOs. Also, some of the modulation sources and destinations are polyphonic. So, you can modulate them per voice. The rest are monophonic and similar to most other synths.
The envelopes include amp envelope, modulation envelope, filter envelope, and global envelope. As you might expect, the amp and filter envelopes are hard-wired to their respective parameters. The modulation envelope is freely assignable and is a polyphonic modulator, whereas the global envelope is monophonic.
Similarly, three LFOs are polyphonic that you can use per voice. And the one called global LFO is monophonic and applies to all the voices. The other modulation sources include the XY-pad, modulation wheel, and pitch bend.
You can use these sources and assign destination parameters on the modulation matrix with nine slots. Each source can modulate up to two target parameters. You can assign a scaling source (like a modulation wheel) too. - Sequencer
Odin 2 features an arpeggiator and a 16-step gate sequencer. The arpeggiator lets you arpeggiate in these directions: up, down, up-down, down-up, crawl-up, and crawl-down. Furthermore, it features two modulation sequencers that you can use in the modulation matrix. - Mixing
Odin 2 features the following effect processors: delay, chorus, phaser, flanger, and reverb. Each provides detailed controls to customize the effect to your liking. And you can also change the order of these effects by drag-and-dropping them in the FX section.
Compatibility:
The plugin is available for Windows Vista or higher, macOS 10.11 or higher, and Linux, all of them 64-bit only. It comes in VST 3, AU, and LV2 formats.
Summary:
By now, you probably understand how vast an instrument Odin 2 is. It features three oscillators (11 types), three filters (9 types), four envelopes, four LFOs, a nine-slot modulation matrix, and five effect processors.
Furthermore, it lets you create variations on many parameters per voice, instead of only globally as most other synths do. Incredibly, such a powerful synth is available for free. There could be no better time to make music!
2. MaxSynths DR-910 Drum Machine
This plugin is an emulation of the well-known TR-909 drum machine by Roland.
After the highly successful TR-707 and TR-808 drum machines, Roland introduced the TR-909 in 1983. It was the first Roland drum machine to use samples for some sounds. Furthermore, it also employed MIDI, which allowed it to sync with other MIDI devices. Despite the groundbreaking updates, the hardware failed to achieve as big a success as its predecessors.
Still, it has become an influential part of modern music history. Hence, the DR-910 drum machine plugin seeks to emulate the sound of the iconic instrument in software form.
Each section of the plugin is designed after the original hardware, from appearance to sound. Furthermore, it adds a few extra features to help aid production.
Key Features:
- Eight Instruments
The plugin features eight sound generators. These include kick, snare, three toms, rimshot/clap, hi-hat, and cymbal. Furthermore, each of them provides a pan, tune, level, and other sound-specific controls. - Effect Processors
DR-910 features three effect processors: a reverb, compressor, and Lo-Fi. The reverb has eight types of preset effects: three rooms, a church, a cathedral, and three halls. You can send each drum sound to the reverb using a slider below the pan control. Similarly, the IDP circuit-based compressor provides a threshold, normal/parallel, and soft/hard knee toggle. And lastly, the Lo-Fi effect lets you choose from 8-bit, 6-bit, and 4-bit effects. - Multi-Outs
The plugin provides four audio outputs. You can assign each generator an audio output and create sends from the track in your DAW. This feature allows you to use third-party effects individually on your drum sounds. And while there are more generators than just four, the limited output count makes sense because the three toms, the two cymbals (including hi-hat), and the two snares (including rimshot/clap) could each be grouped.
Compatibility:
The plugin is available for Windows XP or higher, 32-bit only. It comes in VST 2 format.
Summary:
The Roland TR-909 was an iconic drum machine used by many artists like Jean Michel Jarre, Moby, The Prodigy, Faithless, etc. And since Synthwave and Chillwave genres are all about using the sounds of the 80s, it makes sense to have the DR-910 plugin handy.
It’s unfortunate that the plugin is 32-bit. However, most modern DAWs offer 32-bit compatibility. So, it should run smoothly.
3. Pianovintage 707
Let your music have a little retro vibe with this iconic drum machine.
As the name mentions, Pianovintage 707 is a sampled instrument based on the Roland TR-707. It features sixteen samples and provides basic controls over the sound with some effect processors. It’s a straightforward plugin that should make sense at a glance.
Key Features:
- Sampled Recordings
Instead of emulating the sound with synthesis, Pianovintage 707 uses recorded samples of the original hardware. In a way, this method provides the most realistic and accurate sound of the drum machine. However, it does feel limiting as you cannot customize the sound individually. - Controls
There are no individual controls for the drum pads other than the volume. However, you can apply some distortion, a low-pass filter, chorus, and delay effect on the master output. The delay effect can synchronize with your host.
Compatibility:
The plugin is available for Windows XP or higher, 32-bit only. It comes in VST 2 format.
Summary:
Pianovintage 707 is abashedly primitive as a virtual instrument. In all senses and purposes, the plugin merely puts a user interface on the samples, which helps keep your workflow smooth and organized. However, if you already own the samples of Roland TR-707, you could skip this plugin without missing much.
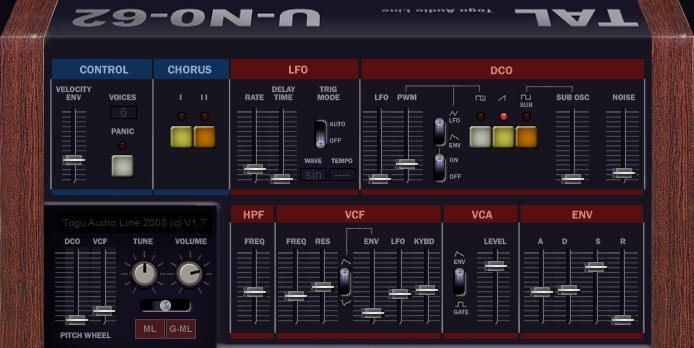
4. TAL-U-No-62
TAL-U-NO-62 is one of the most famous free vintage analog synth plugins, much loved for classic yet high-quality sound.
As the name suggests, not at all subtly, TAL-U-NO-62 is an emulation of the Roland JUNO 60 synthesizer. It provides a minimalistic user interface encompassing all of the controls necessary in an analog synth. You’ll find one oscillator with a sub-oscillator and noise generator.
And the Juno-style chorus will provide the tell-tale sound of many hits from the mid and late-80s.
TAL-U-NO-62’s sound is most suitable for creating pad and arpeggio sounds. For example, create a short, plucky saw sound, add some sub oscillator sound and a low-pass filter, and change the filter envelope.
Next, write some arpeggio sequences in the piano roll or use a MIDI sequencer plugin. You’ll instantly find yourself taken to a retro-future with neon colors.
Key Features:
- DCO
As you can see from the screenshot, the plugin features one oscillator that can generate saw and square waves. The square wave employs a pulse width control. Furthermore, you can add a sub-oscillator and a white noise generator, each with a separate volume fader. The sub-oscillator produces a square wave an octave below the main oscillator. - Filters
Filters are the heart of analog synths. A digital oscillator can sound much livelier, thanks to analog filters. So, like the original JUNO 60 design, the plugin employs a 24 dB/oct high-pass filter with only a cutoff frequency fader. Next to it, you’ll find a low-pass filter with cutoff, resonance, and keyboard tracking. The 24 dB/oct slope steepness makes any filter sweep sound intense and captures the feel of the hardware sound. - Modulation
The plugin features one envelope and an LFO. The envelope applies to both the amplitude and the filter. However, you can set it to only one using a toggle switch on each section. Similarly, the LFO can modulate the oscillator’s pitch and the filter cutoff parameter. You can sync the LFO with your DAW and change the waveform as required. - Authentic Chorus
From its appearance to the sound, you’ll find the authentic Juno 60-style chorus built into this software synth. Type I features a slow chorus, best suited for synth pads and other evolving sounds. Conversely, type II provides a much faster chorus effect. Similarly, you can activate both buttons simultaneously to get an even faster vibrato-style effect. Individually, the choruses use a triangle waveform, whereas the third mode changes the movement into a sine wave.
Compatibility:
This plugin is available for Windows 7 or higher and macOS 10 or higher, both 32-bit only. It comes in VST 2 and AU formats.
Summary:
TAL-U-NO-62 is a polyphonic analog software synthesizer that uses a real Roland JUNO 60 for reference. The filters provide a unique sound with an envelope and LFO modulation. Furthermore, you can invert the envelope shape in the filter section to get creative results. Similarly, since the filter is an analog-modeled design, you can automate it and still get ultra-smooth results. Overall, this plugin is an excellent download for anyone enthusiastic about hardware synthesizers.
5. Cymatics Origin (LoFi, Saturation, Chorus)
Origin is a Lo-Fi plugin that makes your audio recordings sound like they were sampled from an antique tape recorder or vinyl player.
The plugin sports an elegant user interface with straightforward controls. It uses multiple processors based on vintage hardware to provide an authentic experience. You could use this plugin on contemporary synth sounds, vocals, drums, and other instruments to make them sound more retro. Let’s have a look at the different parts of this plugin:
Key Features:
- Resampler
The Resampler knob changes the sample rate of your audio in real-time. And since the process creates bit-crusher-style artifacts, the plugin uses special filters to remove them. That results in a distinctive sonic character that has recently grown popular among some mainstream artists. - Saturation & Sample
The top left knob adds saturation to your audio. It helps emulate a hardware amplifier system and results in a warm, rich sound. Next, the top right knob lets you add various noise samples to your audio. They include simple white noise, vinyl crackles, tape hiss, etc. - Movement
The Movement knob adds wow and flutters to the audio. It uses a randomizer algorithm to generate authentic tape pitch wobbles. This effect alone lends a nostalgic vibe to any audio sample, making it handy for genres like Chillwave, hip-hop, trap, and Lo-Fi. - JUNO Chorus
The bottom right knob adds the classic JUNO chorus effect. It also features both styles of the classic effect: slow and fast chorus. You can use this effect on software synths to add stereo width and a familiar charm to their sound. It’s a good free alternative to the Arturia JUNO-6 Chorus effect I’ve enlisted in this article.
Compatibility:
Origin is available for Windows 10 or higher 32-bit and 64-bit and macOS 10 or higher 64-bit only. It comes in VST 2, AU, and AAX formats.
Summary:
Origin is an excellent choice when you want a straightforward plugin that lets you age your audio samples. It rocks a beautiful user interface, which is always a plus. And the effects are quite convincing. I’d recommend downloading it for the JUNO Chorus and Movement effects alone.
6. GSI Varispeed Copicat IC400
This plugin is an emulation of an early tape echo machine without any enhancements or changes.
Built with a DC belt-driven motor, the Watkins IC400 Copicat echo machine is more commonly known as the Varispeed. And the reason for that is rather obvious: the motor speed can be adjusted, allowing for an endless range in echo delay durations within the motor’s limitations.
It featured three replay heads that “read” what the real-time recording head “wrote” on a tape that the DC motor spun around.
GSI Varispeed Copicat IC400 emulates the same machine as it is. It even has a very similar user interface design with animated tapes, making it a fun plugin to work with. Let’s have a look at its features:
Key Features:
- Tape-Stop
Since the plugin is tape-based, you can get a tape-stop effect when you power it down. You can do so by using the on/off toggle at the top of the interface. If you want a faster effect, increase the motor speed using the Varispeed knob at the bottom right and vice versa. This knob controls the delay feedback rate of the plugin. You can also automate it for creative results. - Tone Controls
There are four buttons around the middle of the user interface. The green, white, and red buttons switch the tape heads to result in tonal changes. You can pick one by deciding which sounds best. Similarly, the fourth button disables a knob labeled Echo Tone.
Echo Tone is similar to a low-pass filter, except it works a little counterintuitively. You have to turn it right to make it darker, whereas turning it left makes the delay effect brighter. - Other Controls
The Swell knob controls the mix level of this delay, whereas the Repeat knob adjusts the feedback amount. Automating the Repeat parameter results in some crazy, out-of-this-world effects. And finally, the plugin features a pair of input level controls on the left. You can use these as “send” levels or drive the saturation.
Compatibility:
GSI Varispeed Copic at IC400 is available for Windows 7 or higher, macOS 10.11 or higher, and Linux Ubuntu 20.04.1 or higher, all of them 64-bit only. It comes in VST 2/3 and AU formats.
Summary:
This plugin is a truly vintage-sounding echo effect. It creates tiny fluctuations in speed and pitch to emulate the sound of tape, not to mention the tonal characteristics caused by the tape heads.
You can use it for general delay effect purposes or creative results when you automate its parameters. For example, dialing up the Repeat results in a type of “frozen” sound, where you can control the pitch of the audio by increasing the Varispeed knob. And you can produce gated effects on such results if you automate the Swell knob.
7. Caelum Audio Cassette
Tape Cassette 2 is a free audio plugin that replicates the flavor and sounds of vintage cassette tapes, complete with an impulse response activation option for added realism.
Cassette tapes offer a distinct warmth, loudness, and personality that has a type of cult following. You can get all of that and more with Tape Cassette 2. The plugin features saturation, noise, wow, and flutter engines for processing. First, an input saturation stage gives any audio fed into it a distinctive warmth.
Similarly, a low pass filter simulates a dirty cassette tape head with oxide and dust. The lower you go, the dirtier the head becomes.
Then, the noise parameter generates a genuine tape noise sample. The wow and flutter emulations give movement and variations to your audio, including the noise. And finally, an “IR” toggle switch enables an impulse response of a cassette tape.
The result is a convincing cassette tape-style warmth, character, and tone. You can use this plugin to add an analog appeal to contemporary software synths and samplers.
Key Features:
- Tape Saturation
A warm input saturator in Tape Cassette 2 simulates the sound of a cassette head and its sound circuit. One of the best uses of this feature is on drums. Try this plugin’s saturation if you have peaky drums that sound too snappy and sharp. The tape effect was best known for its warm, smooth sound. So, it tames unwanted sharpness and leaves behind pleasant drum sounds. - Impulse Response
An impulse response is a sound sample of a controlled noise called an impulse entering a specific situation. The situation could be a cassette tape, as in this case, or a real-life location like a bathroom. So, you can use a properly sampled impulse response in a convolution effect to simulate the sound of various settings. Tape Cassette 2 uses the same technology to emulate the sound of cassette tapes. - Oversampling
Any kind of saturation creates copies of sine harmonics at the top end of the frequency spectrum. This phenomenon is known as aliasing, and it occurs because the sample rate isn’t enough to process all the new harmonics generated by saturation. So, oversampling is a feature that temporarily increases the sample rate of a plugin to avoid aliasing. Tape Cassette 2 features 2x, 4x, 8x, and 16x oversampling modes, of which the highest is the most CPU-intensive, especially when used with the impulse response emulation.
Compatibility:
Tape Cassette 2 is available for Windows 7 or higher and macOS 10.11 or higher, both 64-bit only. It comes in VST 3, AU, and AAX formats. It is also available for iOS 11 or higher for iPad.
Summary:
Tape Cassette 2 is a free version of a paid product called Tape Pro, which offers twelve types of tape machine emulations. So, the sound quality of Tape Cassette 2 is top-notch and convincing.
It has an excellent, resizable user interface, and the high oversampling modes provide pristine quality. And despite the fairly limited number of controls, it offers enough features to make it very usable.
You can use this plugin to age your final music, create convincing sampled sound, and saturate vocals, drums, keys, and bass.
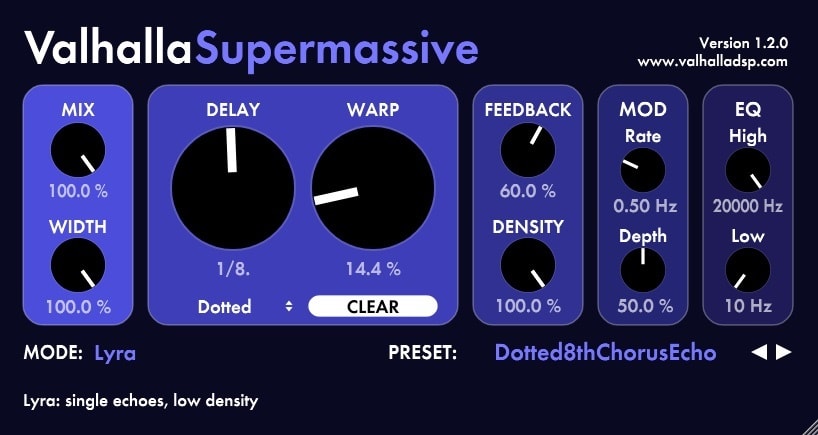
8. Valhalla Supermassive (Reverb/Delay)
Bring colossal-sounding rich reverb, grand delays, and incredible sonic spaces to your mixes with this plugin.
With a relatively small set of controls, Supermassive delivers incredibly enormous effects. Of course, every delay plugin should include standard controls, but this plugin also features Warp and Modes. Warp modifies the duration of the delay feedbacks, transforming the effect from basic echoes to lush reverbs.
Listening to your delay effect diffused and modified into a reverb is a rewarding experience, which is what makes Supermassive so beloved. In a Synthwave or Chillwave music production, I recommend Supermassive on the pads and the arpeggio synth.
The latter would highly benefit from lush spaces, whereas synth pads should only have a gentle touch to enhance their stereo width.
Key Features:
- Multiple Algorithms
Supermassive comes with fourteen reverb/delay algorithms called modes. It employs intricate techniques like feedback and feedforward in each algorithm’s signal chain, resulting in unusual but exquisite sounds. These bring changes in the envelope, repetition, and density of the effect. So, some of the modes are more suited to extended, luscious reverbs, while others are better suited to brief delays. Trying out each mode and adjusting the warp and density settings is sure to provide intriguing results. - More Massive
The delay/reverb plugin includes a modulator for adding chorus and ensemble effects, making the sound even richer and bigger. The section allows you to adjust the modulation effect using rate and depth settings. However, such effects can make the sound muddy easily. Hence, it includes a low-pass and high-pass filter to assist in cleaning up the sound. - Convenient
Apart from having a minimalistic set of controls, Supermassive offers an excellent guided user interface. A small description appears at the bottom of the interface when you hover the mouse pointer over a parameter. This handy feature eliminates the need for a user manual by showing you what the parameter does intuitively. - Built-In Presets
There are many presets nicely organized into Echoes, Mod, Reverbs, and SFX categories. You can find even more under Designer Presets. Furthermore, it lets you copy/paste your preset parameters from one Supermassive instance to another or send the copied text to a friend to share your preset.
Compatibility:
Supermassive is available for Windows 7 or higher and macOS 10.8 or higher, 64-bit only. It comes in VST 2/3, AU, and AAX formats.
Summary:
Supermassive is a worthy contender regardless of whether you’re comparing it with free reverb/delay plugins or paid ones. It offers a variety of sounds, thanks to its multiple modes.
And the convenient user interface makes it suitable for both beginners and experienced users. Even if you prefer other reverb or delay plugins for general mixing, Supermassive is undoubtedly useful when it comes to designing sound effects.
9. Analog Obsession NOS Bundle
The NOS Bundle comes with three classic plugin emulations from a vintage era.
It features a preamp, a compressor, and a passive equalizer. All of these plugins impart some character and saturation similar to hardware gear.
Hence, you’ll find a 4x oversampling feature when you click on the Analog Obsession logo on the plugins’ user interfaces. This option removes any aliasing that might arise from the saturation.
You can use these plugins to add an analog personality to your modern instruments or audio recordings. So, if you were using the Serum synth, for example, the preamp and EQ from this bundle would lend it warmth. It makes digital instruments sound less lifeless while not being as intrusive as a tape emulator.
Key Features:
- Tuba
The Tuba is a mic/line preamp with a simple two-band EQ. It is based on the esteemed Putnam 610 preamp found on many hardware consoles. You can change Tuba’s input gain to low or hi to change its input gain range. Next, the LF and HF knobs adjust shelf filters around 100 Hz and 8 kHz.
Below the EQ, you’ll find a Mic/Line toggle, which changes the character and color of the preamp. Similarly, a -20 dB pad switch increases headroom and avoids input saturation and a phase inversion switch. Drive the large Level knob to get more saturation. - TuPRE
The TuPRE is a tube line-amp passive equalizer with minimal controls. It isn’t based on any hardware. So, you might want to give it a try even if you own many of the famous hardware emulations. The plugin features four knobs, where the first knob controls the input gain. It adds audible saturation if you turn it up high enough. Next, the knob labeled Low controls a 100 Hz shelf filter, boosting or cutting gup to 10 dB. Similarly, the High knob adjusts a 10 kHz shelf. The Output knob is a clean level control without any character/saturation. - Kolin
The Kolin is a vari-mu limiting amplifier. It takes inspiration from the Collins 26U-1 vari-mu compressor from the 1960s and adds an attack and release control. Here, you can adjust the attack from 1 ms to 50 ms and the release from 1 second to 3 seconds. It supports an external side-chain source with a 20 Hz to 500 Hz high-pass filter. Other controls include input, output, and mix. If you want more compression, dial in the input and vice versa.
Compatibility:
The plugins are available for Windows 7 or higher and macOS 10.9 or higher, both 64-bit only. They come in VST 2/3 and AU formats.
Summary:
Analog Obsession has been creating vintage gear emulations and custom analog effect plugins for a while now, and the NOS Bundle showcases their quality well.
It offers a preamp, a vari-mu compressor, and a passive EQ, each with a distinct character and personality. Both electric and acoustic instruments benefit from these plugins.
10. Analog Obsession BritBundle
This bundle emulates the sound of classic British audio gear responsible for many sensational records.
The BritBundle comes with three plugins, including an EQ, a preamp, and a compressor. These are all based on the designs by Rupert Neve. And Analog Obsession’s emulations are undoubtedly some of the best, especially considering they are free. So, I highly recommend getting these to add analog tones to your recordings.
Key Features:
- Britpressor
The Britpressor emulates a dynamics controller from a Neve console. It features a limiter (white) and a compressor (orange). The limiter has the following release modes: 50ms, 100ms, 200ms, 800ms, auto1, and auto2. Similarly, the compressor provides the following release settings: 100ms, 400ms, 800ms, 1500ms, auto1, and auto2.
Furthermore, the compressor provides six ratio settings, ranging from 1.5:1 to 6:1. You can use the Mix knob to create NY/parallel compression effect easily. And lastly, it supports an external side-chain source with high, mid, and low-frequency controls for the side-chain input. - BritPre
This plugin is a preamp modeled after the Neve 1272 mic/line preamp. It features a mic preamp switch, input gain, phase inversion, output gain, and a filter. The filters include a high-pass and a low-pass with a fixed frequency selector. The original design didn’t have a filter. Hence, you can power it off to emulate just the preamp system. Or, you can power off the preamp to utilize the filters alone. - BritChannel
The BritChannel is a plugin featuring two device emulations: the Neve 1073 EQ and the Neve 1272 mic/line preamp. The EQ is much loved for its pristine sound quality and classy air. It is ideal for EQing vocals, drums, bass, and other acoustic instruments. Similarly, just adding the preamp system to digital instruments lends slight analog traits, making the instrument better suited for retro genres like Synthwave and Chillwave.
Compatibility:
The plugins are available for Windows 7 or higher and macOS 10.9 or higher, both 64-bit only. They come in VST 2/3 and AU formats.
Summary:
Rupert Neve’s designs have remained a standard in music technology for decades. And Analog Obsession’s plugins provide excellent emulations of the famous gear for free.
Furthermore, since the plugins utilize saturation, you can activate a 4x oversampling feature by clicking on the Analog Obsession logo on the user interface.
11. Surge XT
Surge XT is one of the most powerful free digital synths available today, even surpassing many paid synths.
Surge XT is a free and open-source hybrid synthesizer, meaning the code is open to everyone with a knack for programming. Hence, it provides a large number of features developed by many people. It comes with 2,779 factory patches and 614 wavetables for you to explore. The latest user interface update with a dark mode and resizable UI has made Surge a visual eye-candy too.
For Synthwave and Chillwave music producers, Surge provides sophisticated sound generators, built-in effect processors, and an advanced but intuitive modulation system. However, it doesn’t feature an arpeggiator (yet). Still, the synth is way too awesome to pass for something you can add using your DAW!
Key Features:
- Scenes
Surge provides two “scenes” per instance. You can use one of the scenes in the Single-mode while using the second scene as another preset for performing live. Or, you can switch to Key Split, Channel Split, and Dual Mode to use both scenes simultaneously. Key Split lets you play Scene A on the lower part of your keyboard while playing Scene B on the higher octaves.
Similarly, Channel Split separates the two scenes by MIDI channel. This mode is helpful when you are playing two types of sound at once using two MIDI keyboards. And finally, the Dual mode lets you stack the two scenes to get more oscillators and complementing components. - Subtractive Hybrid Oscillators
Each scene in Surge features three oscillators. And each oscillator provides twelve powerful algorithms, changing the behavior of the oscillator entirely. These include the following:- Classic
The classic oscillator algorithm consists of a subtractive oscillator that can generate a pulse wave, a sawtooth wave, a dual-saw wave, or anything in between. It also features a sub-oscillator generating a pulse-wave an octave below the primary oscillator. This oscillator is ideal for emulating analog-style sounds. - Modern
This algorithm is similar to the classic version, except it generates low-aliasing waveforms with unison and sub-oscillator capabilities. - Wavetable
A wavetable oscillator features many waveforms in one oscillator. Surge XT provides up to 4,096 single-cycle waveforms per oscillator, making it possible to easily create ultra-smooth sweeps or dramatic changes. - Window
The window oscillator is similar to the wavetable synthesis, but it differs in key ways. Instead of changing a waveform itself, it multiplies the waveform using another waveform (the wavetable). This method results in dramatic timbre changes. - Sine
This oscillator generates a sine wave (very surprising!) and its variants. It’s helpful for creating 808-style bass quickly and bell-like sounds. - FM2 & FM3
These oscillators use frequency modulation to generate sound. Each oscillator features one carrier, which is the sound we hear, being modulated by either two (FM2) or three (FM3) modulators. - String
The string oscillator uses physical modeling to generate string-like sounds. It can emulate both plucked and bowed strings. - Twist
This oscillator provides an emulation of a famous Eurorack macro-oscillator designed by Émilie Gillet. It is slightly more CPU-intensive than the other algorithms. - Alias
This oscillator deliberately generates aliasing signals. So, it sounds extremely digital and features an 8-bit mask to generate chip-tune sounds. - S&H Noise
Sample & Hold Noise oscillator generates a variety of noises ranging from white noise to bright pulse waves. - Audio Input
This oscillator allows you to route external audio into Surge XT. This feature is useful for applying Surge XT’s processors to external audio. Similarly, you can use it to route audio from Scene A to Scene B.
- Classic
- Filters
Surge XT provides two filter units with multiple algorithms like low-pass, high-pass, notch, band-pass, comb, hardware emulations, wave-shapers, etc. These filters can self-oscillate and react super-fast to cutoff frequency automation. So, you can use them for modern growling basses, and dynamic lead sounds with no trouble. - Modulation
Surge XT features an impressive twelve LFO units, of which six are per-voice, and six are global for the whole scene. Every LFO features an envelope generator with Delay, Attack, Hold, Decay, Sustain, and Release parameters. Furthermore, they feature seven deformable LFO waveforms, a multi-segment envelope generator (MSEG – to draw custom waveforms/envelopes), and a formula modulator. And you can route a modulator to a destination parameter by dragging and dropping. - Effects
The plugin comes with twenty-seven effect processors. These include a three-band EQ, eleven-band graphic EQ, exciter, distortion, tape saturation, chorus, flanger, rotary speaker, delay, reverb units, multi-effects with as many as 56 effects in one, etc. You can load four effects per scene, four as sends (for each scene), and four globally. So, you can load sixteen total effects in an instance of Surge XT.
Compatibility:
Surge XT is available for Windows 7 or higher, macOS 10.11 or higher, and Linux, all of them 64-bit only. It comes in VST 3 and AU formats.
Summary:
Surge XT is probably the most powerful free synth currently available. Sure, there are other options like Vital, but there are way too many features in Surge XT to take it lightly.
I haven’t described many of its other features like MPE support to avoid an overly long review. So, regardless of the kind of music you make, I suggest downloading Surge XT with your eyes closed – you won’t regret it!
Top 3 Kontakt Libraries For Synthwave
1. Native Instruments Analog Dreams V2
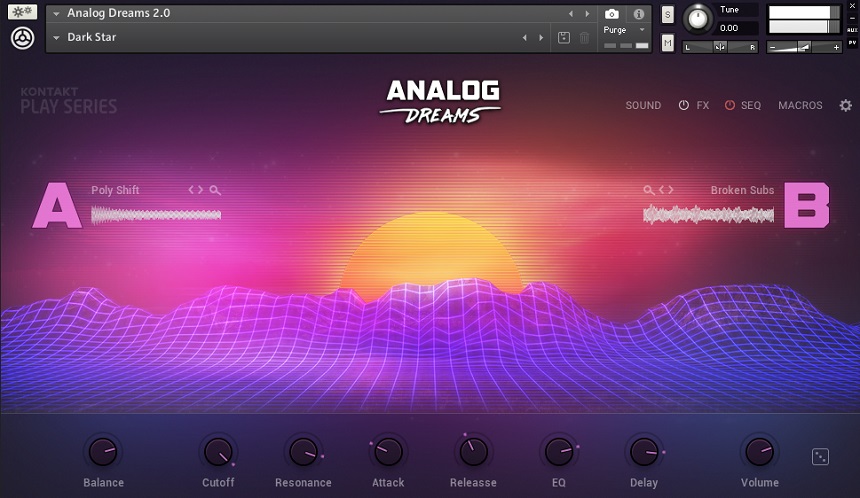
Analog Dreams is a Kontakt library for vintage synths and keys.
It sounds warm, aesthetic, modern, and huge, and it has some incredible sounds inspired by the 80s and 70s synth wave. The plugin’s workflow is simple, having two sound layers: A and B, and eight MACRO knobs. You can edit each layer individually, change its pitch, transpose it, tune it, pan it, add color, and apply filters and modulations.
Key Features:
- Filter
The plugin allows you to select the cutoff frequency, resonance, and key track. In addition, you can select different filter algorithms, whether low pass, high pass, band pass, etc., and their variations. - Modulations
The plugin allows you to add modulations using two LFOs, one MOD envelope, one AMP envelope, velocity, aftertouch, and the modwheel. The modulation process is easy and intuitive, with responsive controls. - Effects
You can add multiple effects like EQ, Bus compressor, limiter, and more. You can go within the effects and change their settings to fit your sound and the color you want to add to the sound. - Sequencer
The sequencer window lets you edit the rate, swing, and steps and select a key (the root note and the scale). In addition, you can adjust the movement of the sequencer and its amount.
Compatibility:
Analog Dreams is compatible with the free Kontakt version and requires a minimum of Kontakt 6.1 and 3.6 GB of hard disk space.
Summary:
Analog Dreams is a part of the Play Series by Native Instruments and has 100 presets and 150 sounds, with preset categories like Bass, FX, Lead, Pads, Plucked, etc. Overall the interface is pretty, streamlined, and highly tweakable. The sounds in the library are perfect for creating modern pop, EDM, R&B, Dance, and hip-hop music.
2. Splash Sound Retrowave
More Info & Price (Trial Available)
As the name suggests, Retrowave is a dedicated sample library for Synthwave and Chillwave music production.
The library features samples of over a dozen vintage synthesizers and drum machines, resulting in a total size of 12 GB.
It offers preset sounds specifically made for futuristic retro music and minimalistic controls. So, it is suitable for both beginners and advanced users. Let’s take a look at it in more detail:
Key Features:
- Sound Collection
The library employs esteemed hardware instruments like Yamaha DX7, Roland Jupiter 8, Ensoniq Mirage, Roland JUNO-106, Roland D-50, LinnDrum, Elektron Machinedrum, etc. The collection exceeds over eight thousand samples and includes 105 instruments: 22 leads, 24 basses, 19 pads, 25 plucks, 11 keys, and 4 drum kits. - Authentic
Since Retrowave is a sampled library, you can expect fully authentic sound straight from the hardware sources. It doesn’t use programmed algorithms to emulate oscillators and fluctuations. Instead, you will get the real thing as it sounds on hardware.
Compatibility:
This library is available for Kontakt 5.6.8 (NOT the free Kontakt Player). Kontakt requires Windows 7 or higher and macOS 10.13 or higher, both 64-bit only. It comes in VST 2/3, AU, and AAX formats.
Summary:
If you are after an authentic sounding, deeply-sampled collection of analog synths and drum machines, Retrowave is one of the best choices available. It features over a dozen vintage instruments, each programmed to produce sounds ideal for Synthwave and Chillwave.
So, it makes for an easy way to get the ideal retro sounds without much tweaking and sound design.
3. Native Instruments Retro Machines MK2
More Info & Price (Trial Available)
This sample library provides an elegant user interface alongside a comprehensive collection of sampled vintage instruments.
Synths defined the sound of the 70s and 80s electronic pop music. Hence, this library covers the most usable presets and many customization features that help you create retro-style music fast.
Furthermore, each preset comes with eight “sound variations,” which provide production-ready sounds with specific parameter changes. You can also tweak each variation and end up with eight custom sounds, ideal for live performance.
Key Features:
- Synth Page
The main Synth Page provides many parameters that let you customize your sound. These include oscillator controls, filters, envelopes, and LFOs. So, it’s evident that the library uses samples with programmed emulation to generate its sounds.
The eight sound variations buttons let you create different styles of the same preset by changing the available parameters. Once you’re done, you can use the Morph slider to transition between the variations. You can also automate this parameter. - Performance
Switch over to the Arp/Chord page, and you’ll find a 12 (triplet) or 16-step arpeggiator with velocity control per step. You can double the speed, add swing, change note duration, octave range, etc. Likewise, you’ll also find a Chord section below the arpeggiator. This lets you create chords from single notes. You can play chords with up to four notes, and it includes chord presets. - Effects
The library features primitive effects that help you preview the sound with some effects. These include reverb, echo, and phaser. Each comes with one knob that controls the mix amount.
Compatibility:
This library is available for Kontakt 6.6.0 or Kontakt Player 6.6.0. Kontakt requires Windows 7 or higher and macOS 10.13 or higher, both 64-bit only. It comes in VST 2/3, AU, and AAX formats.
Summary:
Retro Machines MK 2 is a collection of sixteen analog synths and keyboards covering the classic sounds of 70s and 80s pop music. These include dramatic synth pads, fancy basses, powerful leads, etc. The best part is how pristine the recording quality is. It’s a great choice for making Synthwave and Chillwave music.
Bonuses:
1. BeatSkillz RetroHit – 80s Drum Machine
Rediscover the popular drum sounds from the 80s music charts with this massive drum collection.
BeatSkillz RetroHit is a drum machine dedicated to sounds inspired by the hit songs in the 1980s. It focuses on the contemporary Synthwave, Chillwave, Synthpop, etc. genres and provides a retro yet a modern-sounding collection of drums.
So, if you don’t already own a collection of drum samples or a simple plugin, RetroHit could be your ideal drum machine, especially considering its affordable price.
The user interface is straightforward. You’ll find twelve drum pads, each capable of loading a drum sample and some parameters above each. Similarly, there are some more parameters at the bottom alongside a preset selector.
The panic button at the top left of the interface forces all sound to stop in case of glitches.
Key Features:
- A Large Collection
The drum machine features over six hundred drum samples, including raw/dry samples and processed sound. They were collected from the following vintage drum machines: EMU SP12, OB-MX, Linn Drum, and Fairlight. These include 100 kick drums, 204 reverb snares, 103 dry snares, 44 hi-hats, 30 claps, 74 percussions, 12 reverse sounds, 12 Latin percussions, 12 sound FX, and 18 high percussions. You’ll find these samples used in 50 drum kits included with the plugin. Each kit utilizes twelve of these samples. - Controls
The plugin features the following global controls to customize the kit sounds: attack, release, reverb, and pitch. Note that all of these apply to the entire plugin. Other than these, you’ll find a pan knob and a volume fader above each drum pad. Unfortunately, the plugin doesn’t have a multi-out feature. So, you can only apply mixing effects to the entire plugin. Still, the official website mentions that a future update will provide multi-outs, but I can’t find any mention of when.
Compatibility:
RetroHit is available for Windows 10 or higher 32-bit and 64-bit and macOS 10.13.6 or higher 64-bit only. It comes in VST 2 and AU formats.
Summary:
If you need a straightforward drum machine that provides the hit sounds from the 80s, RetroHit could be a worthy choice, considering its price. However, the lack of multi-out presently makes it difficult to mix in a contemporary track where processing is crucial.
Still, it offers many pre-processed sounds. So, if saving time is essential, these samples could help you skip mixing entirely.
2. audiolatry RetroVibes
More Info & Price (Lite Version Available)
RetroVibes is a sample-based virtual instrument plugin (ROMpler) that takes inspiration from the 80s.
A collection of samples gathered from hardware and software sources form the foundation of the system (synths, emulators, etc.). There are a total of 48 instrument-presets, encompassing a broad range of sounds such as brasses, leads, keys, basses, percussion, etc.
Each sound has a very retro vibe and offers a degree of customization with modulators and effects.
I find this plugin best suited for Chillwave music, which uses the retro-era sound more. However, you could undoubtedly use the sounds for Synthwave, too, although you might want to add some chorus or reverb to make them sound a little more futuristic.
Other genres that would benefit from this plugin are Synthpop, Future Pop, hip-hop, house, some pop music, etc.
Key Features:
- The Fundamentals
You’ll find a preset selection drop-down menu at the top of the interface. And once you’ve loaded one, you can change the gain, pan, and reverb amount using the three knobs at the right of the UI. Similarly, you can switch between polyphonic, monophonic, and legato modes. There is also a glide time knob for the monophonic and legato modes. - Modulation
The plugin features an amp envelope and an LFO. The LFO lets you set the pitch, expression, and pan as the destination. Similarly, you can modulate the LFO amount using the modulation wheel (CC1), aftertouch, and velocity. And finally, there are triangle, sine, saw, square, and exponential shapes as the LFO waveforms. - Filter
The filter section offers either a low-pass or a high-pass filter. There is no resonance or drive control. However, since the parameters are automatable, you can use your DAW’s features to create sweeps and dynamic changes.
Compatibility:
RetroVibes is available for Windows 7 or higher and macOS 10 or higher, both 64-bit only. It comes in VST 2/3 and AU formats.
Summary:
If you don’t want to spend time creating patches or customizing sounds in detail, RetroVibes offers a swift way to find the right sounds for your song without spending a lot of time. And while forty-eight presets may not sound like much, these offer a wide variety.
So, you will find it covers a lot of your needs, especially if you add some mixing plugins. I wouldn’t recommend using its reverb a lot because it’s too primitive. Instead, try using the plugin for its raw sounds and add effects inside your DAW.
3. AL D2 Drum Machine
AL D2 Drum Machine by Audiolounge provides the sound of the famous drum machines by Roger Linn.
If you listen to music from the 80s often, there’s no doubt you have heard the LinnDrum many times. Even nowadays, you can hear the drum machine in releases by Daft Punk, Kanye West, Thunder Cat, etc.
The LinnDrum LM-2 was one of the first drum machines to use samples instead of synthesis to generate its drum sounds.
AL D2 provides a high-quality emulation of the drum machine with a very similar user interface design. However, instead of a rhythm sequencer at the top right, you’ll find the rest of the instruments there.
In the hardware design, you had to press the “percussion” button to switch the regular drum kit with the percussive sounds like conga, cowbell, claps, etc.
Key Features:
- Controls
The left half of the user interface is dedicated to drum pads. You’ll find each instrument of the drum machine in this section, from the regular drum kits to the percussions. Conversely, the right half features all the customizing parameters. The top section features a global pan, velocity range, global tuning, a reverb send, and a master volume. - Mixing
The plugin features a basic mixer that lets you adjust the volume and panning of each drum instrument. Furthermore, the plugin supports multi-out. So, you can create sends from your drum track to individual tracks for each instrument in the drum machine. This feature is handy for mixing the drum sounds using third-party effects.
Compatibility:
AL D2 is available for Windows 7 or higher 32-bit and 64-bit and macOS 10 or higher 64-bit. It comes in VST 2 and AU formats.
Summary:
Following its huge success in the 80s, LinnDrum LM-2 remains a much sought-after drum machine even today. Audiolounge AL D2 lets you own the sound of the famous drum machine at a very affordable price. Take a listen and see if you like the sound. It could be the defining drum sounds of the 80s for you.
4. Cherry Audio DCo-106
Cherry Audio has slowly gained ground as one of the reputable plugin developers ever since their release of Voltage Modular synth, and the DCO-106 only strengthens that fact.
Introduced in 1984, the Roland JUNO-106 synth was the third and most advanced model in the JUNO series. It was also the first to employ MIDI, which meant beat-synced arpeggio in a hardware synth. Furthermore, it featured the standard JUNO chorus effect.
Cherry Audio sought to recreate the sound of this classic synthesizer, and the resulting plugin is the DCO-106. It emulates the sonic personality of the Roland design in minute detail and enhances many of the features to make it feel more contemporary.
The user interface is elegant and straightforward, but a little exploration soon reveals the power underneath. Let’s take a look at its features:
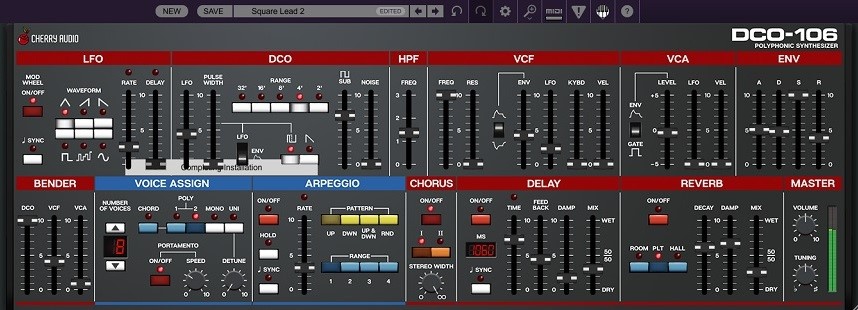
Key Features:
- Single Oscillator
You’ll find DCO-106’s only oscillator in the DCO section. It accurately models the JUNO-106 oscillator’s sound and character, most of which come from the unique waveform shapes. The oscillator provides the following controls: range, waveform selectors, pulse width control, sub-oscillator volume, and noise fader. As in the original synth, the sub-oscillator plays a square wave an octave below the primary oscillator. - HPF & VCF
DCO-106 features one high-pass filter with no control except for a frequency cutoff fader. The fader sets the frequency from 0 Hz to 800 Hz. Conversely, the voltage-controlled filter (VCF) section holds a low-pass filter with a 24 dB/oct slope. It’s an accurate emulation of JUNO’s self-resonating filter design with the original nonlinearity. This filter provides resonance control, keyboard tracking, and velocity modulation. - Moving Parameters
The plugin features one envelope generator and one LFO. You can apply the envelope to the amplitude in the VCF section, the pulse width, or the filter cutoff frequency. Similarly, you can modulate the oscillator pitch, pulse width, amplitude, and filter cutoff frequency with the LFO generator. The LFO features triangle, saw, reverse-saw, square, random, and sine waveforms, and the rate can sync with your DAW. - Perform
DCO-106 features voice-assign modes at the bottom right of the user interface. These include poly 1, poly 2, mono, unison, and chord memory. The poly 1 mode is the standard polyphonic mode that keeps the oldest notes playing and replacing the most recent notes when the polyphonic voice runs out. It lets you hold a bass or chord with your left hand while you play melodies with your right without the harmonic notes disappearing when the voices run out. Then again, you aren’t playing the original JUNO-106 with merely 6-voice polyphony. With DCO-106’s 16-voice polyphony, I doubt you’d run out of voices that easily.
Similarly, the poly 2 mode is ideal for using the portamento feature. This voice-assign mode intelligently decides which note to glide from/to when playing live. Next, the chord memory mode lets you play chords with one note. When you click on the Chord Memory mode, the LED flashes to indicate Learn Mode, which records the chord. Once you play the chord (up to 16 notes), the chord is memorized. Play the first note of the chord to make the synth play the chord. - Arpeggiator & Effects
The arpeggio section features a straightforward arpeggiator that lets you play the following patterns: up, down, up & down, and random. Unlike other JUNO synths, the 106 could sync to the MIDI clock, and the feature is available in DCO-106 too. Further, you can change the rate, range and activate hold/latch.
DCO-106 also features a chorus, reverb, and delay effect. The chorus features two types: the slower type I and the type II with a faster chorus rate. It also employs a stereo width knob to change the stereo image. Similarly, the delay is a typical mono delay with beat-sync, whereas the reverb provides three types of effects: room, plate, and hall. Both of these effects aren’t available in the original hardware.
Compatibility:
Cherry Audio DCO-106 is available for Windows 7 or higher and macOS 10.9 or higher, both 64-bit only. It comes in VST 2/3, AU, and AAX formats.
Summary:
Due to its simplicity and characteristic sound, the JUNO-106 became widely popular in the mid and late-80s. So, musicians creating retro music like Synthwave and Chillwave keep this hardware high up on their wish list. However, the hardware is difficult to find nowadays, even if you are willing to invest a large sum, not to mention the frequent tune-ups necessary to keep it shipshape.
Cherry Audio’s DCO-106 allows you to achieve the near-identical sound of the esteemed gear while also providing a higher number of polyphony and built-in effect processors.
Furthermore, it provides a variety of voice assign modes and a portamento feature. Likewise, smaller features like modulating the pulse width with the envelope generator provide more sound designing possibilities than the hardware.
Why is Synthwave so popular?
Synthwave is popular thanks to various films, games, and TV shows with a retro-futuristic style using Synthwave music. The visual media is most notable with its 80s costume, cars, neon lights, and bold patterns. With so many media appearing in that style, it’s no surprise the music genre is equally popular.
The 2011 film Drive, TRON: Legacy, and 2016 Netflix show Stranger Things are the most notable contributors to the Synthwave music genre. The very anthem of futurism and science fiction became Synthwave, thanks to their incredible popularity.
Furthermore, their soundtracks have inspired many artists to try their hand at creating Synthwave music. And the genre has split off into many sub-genres and derivations like Chillwave, Vaporwave, Dreamwave, etc.
How Do You Make Synthwave & Chillwave Melodies & Beats?
Synthwave/Chillwave involves analog synth bassline, arpeggio, keys, pad, and risers. The tempo is often between 80 to 140 BPM. Use retro kick and snare in the New Wave pattern, and add reverb on both. Further, write two quarter-length bassline notes at the end of each chord progression to emphasize the beat.
Most Synthwave and Chillwave music follow the following pattern:
Section |
Bars |
Intro |
4 |
Verse I |
16 |
Pre-Chorus |
4 |
Chorus |
8 |
Verse II |
16 |
Pre-Chorus |
4 |
Chorus |
8 |
Bridge |
4 |
Chorus |
8 |
Ending |
4 |
Once you’re familiar with the structure, the next step is choosing a key. You could select any key, but try to stick with major or minor scales only. A major scale might make your song lean towards the Dreamwave genre, a brighter version of Synthwave and Synthpop.
Furthermore, unlike in pop or rock songs, Synthwave and Chillwave often use the same chord progression in the chorus part as the verse part. It keeps the music predictable and hazy, which is the essence of these genres. And if you want to emphasize the dreamy vibe, try using Maj7 and Suspended chords in your progression.
Once you have a chord progression ready, go ahead and build the basslines, arpeggios, and synth pads. Make sure you select analog synths emulations or at least subtractive synths to keep the retro sound. Pluck saw sounds are the staples of Synthwave basslines and arpeggios.
Furthermore, you can also use a kick-side-chained compressor on the synth pads and arpeggios to enhance the rhythm.
While most Synthwave and Chillwave music tend to be instrumentals, you can add some vocal samples to make it sound more interesting. Adding plenty of reverb and a soft, low-pass filter helps keep the sample non-intrusive and dreamy.
Furthermore, you can also use some natural instruments like the piano or electric guitar in Chillwave music.
What Is The Difference Between Chillwave and Synthwave?
Chillwave sounds more retro than Synthwave, thanks to filtered and Lo-Fi sounds. Similarly, Chillwave is usually slower and softer than Synthwave, and it might use a natural instrument or two. Conversely, Synthwave music is upbeat, more “modern-sounding,” and might have harsh synth sounds.
Conclusion
Here we are at the end of this gargantuan article; covering the needs of two entire genres is sure no easy task. However, this list of plugins should have provided you with a good idea of what you are going to need to delve into Synthwave and Chillwave.
I’ve enlisted the plugins that make production easier, as well as those that offer a wide range of sound designing features.
For example, ujam Usynth 2080 and Vice are certainly the easiest plugins to use on this list. The prior covers the harmonies and melodies, whereas the latter is for beat-making.
Similarly, Analog Dreams for Kontakt is an awesome sample library that is also straightforward and full of inspiring sounds. It features authentic samples from hardware synths processed with modern effects and modulation systems.
Contrariwise, if you happen to be like me and enjoy having as much control over your sound as possible, I highly recommend u-he Diva and Synapse Audio Obsession. These two synths are insanely powerful and let you create sounds that would be near-impossible to program in a typical synthesizer.
Furthermore, the free Odin 2 by TheWaveWarden is also a must-have for all the producers who enjoy sound designing. It offers many types of oscillators that range from analog emulation and chip-tune to FM, wavetable, and additive synthesis, not to mention its filter types, five effect processors, and many modulators.
Likewise, Surge XT deserves mention as another excellent free synth.
There’s one more synth collection I’d like to mention: the newly-updated Syntronik 2 by IK Multimedia. Previously, Syntronik was more of a sample-based synth library, but the second version adds an Edit page, among others.
It lets you make detailed changes to your sound and create hybrids. The included sound library features thirty-three vintage synthesizers and keyboards like Roland JUNO-60, Jupiter 8, Yamaha GS1, Korg DW-8000, Oberheim Matrix-12, Prophet VS, Korg Trident, etc.
With that, we reach the end of this article. I hope I could share an intriguing plugin in your journey to create Synthwave and Chillwave music. And until the next article, happy music-making!
Readings that you may like:
Other Plugin Roundups:
Genre Focused:
Top 10 EDM Plugins (And 10 Best FREE Plugins For EDM)
Top 10 Plugins For TRAP Beats (And 5 Best FREE Trap Plugins)
20 Best Plugins For Rock Musicians (+ 6 FREE Plugins)
Top 14 Trance Plugins (Uplifting, Tech, Progressive, Vocal, Dream, Hard)
Top 10 GOA & PsyTrance Plugins (Best Psychedelic Trance Tools)
Top 7 Plugins For Dubstep (With 10 Best FREE Effects & Synths)
Top 20 Synthwave Plugins (+ 11 Best FREE Plugins)
Top 15 Plugins For Techno, House, Electro, Tech House, UK Garage
Top 6 Plugins For Latin Music (And 4 FREE Tools)
Top 12 Plugins For Hip-Hop (+ Best Kontakt Libraries)
Top 7 Plugins For Game & Film Scoring (+ 6 Best Kontakt Libraries)
Top 10 R&B And Pop Music Plugins & KONTAKT Libraries
30 Best Free Plugins For DnB, EDM, IDM & Experimental Music
EQ Plugins
Top 12 Free EQ Plugins For Precise Mixing & Mastering
Top 9 Mid/Side EQ Plugins For Mixing & Mastering (+ 2 Free Tools)
Top 7 Graphic EQ Plugins (With 3 Best Free EQs)
Top 7 EQ Plugins For Mastering In | And Best FREE Mastering EQs
Top 6 Passive EQ Plugins (Klevgrand, SPL, UAD, Waves, IK Multimedia)
Top 11 Plugins For Making Metal (Best Guitars, Drums & Effects)
Metering:
Top 5 Audio Metering Plugins (LUFS, RMS, LRA, True Peak)
Top 6 Spectrum Analyzer Plugins – Spectral Analysis Tools
Top 6 Oscilloscope Plugins To See The Waveforms
Top 5 Key Detection Plugins & Software (+ Best FREE App)
Kontakt Libraries
20 Best Kontakt Libraries For All Categories (Synths, Drums, Vocals)
Top 7 Drum Libraries For KONTAKT (And 4 Freebies)
Top 7 Trap Music Kontakt Libraries (And Best Lo-Fi Kontakt Library)
Top 7 Metal & Rock Kontakt Libraries (Best Guitars & Drums)
Top 10 Guitar Libraries For Kontakt (Acoustic, Electric, Bass & Freebies)
Top 7 Trailer Scoring Plugins & Kontakt Libraries
20 Best Free KONTAKT Libraries For Various Instruments
Top 9 Piano Kontakt Sample Libraries (And 5 Best Free Pianos)
Top 10 Percussion KONTAKT Libraries (And 3 Freebies)
Top 7 Kontakt Libraries For Horror & Thriller Scoring (No VSTs)
Audio Restoration, Calibration & Utility:
Top 6 Noise Reduction Plugins (And 3 Best Free Tools)
6 Best Audio Restoration Plugins & Software
Top 7 Phase Alignment Plugins To Fix Your Bass & Drums
Top 10 Room Calibration & Headphones/Speakers Correction Plugins
Instrument Plugins:
Top 6 Vocoder Plugins (Effects & Synths + FREE Vocoder)
11 Best Rhodes VST Plugins (AND 5 Free Rhodes Plugins)
Top 12 Randomizer Plugins Including FREE Plugins
Top 6 Kick Drum Plugins (Best Kick Designer Tools)
Top 12 Woodwind Plugins (And KONTAKT Libraries)
Top 10 Double Bass Plugins (Best Upright Basses)
Top 5 Strings VST Plugins (AND 4 Best Free Instruments)
Top 6 Sampler Plugins (And 3 Best FREE Plugins)
Top 6 Classical Guitar Plugins & Kontakt Libraries (And FREE Guitars)
Top 12 Sub Plugins (Best 808 & Bass Tools For Massive Low End)
Top 10 Plugins On PluginBoutique (And 7 Best Free Plugins)
Top 11 Plugins On Plugin Alliance
Top 7 Acoustic Guitar Plugins (And 4 Best Kontakt Libraries)
9 Best Bass Guitar Plugins (And 2 Best Freebies)
Top 6 Electric Guitar Plugins (Best PAID & FREE Picks)
Top 10 Arpeggiator VST Plugins (Best Synths, MIDI Effects & Tools)
Top 10 Modular Synth Plugins (And 3 Best FREE Plugins)
Top 6 Choir Plugins & Sample Libraries (And 3 Best Free Plugins)
11 Best Percussion & Drum VST Plugins (And FREE Plugins)
Top 8 Piano Plugins (Best Sounding Pianos & 5 FREE Piano Plugins)
Top 6 Organ Plugins Ever Made (And 3 Best Free Organs)
Top 14 VST Plugins For Beginners (And 9 FREE Plugins)
Top 9 Drum Machine Plugins (And Groovebox Plugins)
4 Best Banjo Plugins (Best Banjo Instruments)
The 5 Best Ukulele Plugins & Kontakt Libraries
Top 13 Synth Plugins (And 5 Best FREE Synths Plugins)
Top 13 Sequencer Plugins (Synth, MIDI & Step Sequencers)
The 10 Best Multi-Effect Plugins (And 3 Best Free Plugins)
Top 12 Plugin Bundles For Musicians (Synths, Mixing & Mastering)
Processing & Sound Design:
8 Best Lo-Fi Plugins (PAID & FREE)
Top 11 Plugins For Mixing Vocals (For Home Studio)
Top 12 Saturation Plugins (Best Mixing & Mastering Tools)
Top 6 Pitch Shifter Plugins (And 3 Best FREE Pitch Shifters)
Top 6 Chorus VST Plugins For Musicians (And 3 FREE Plugins)
Top 6 Limiter Plugins For Precise Mastering & Mixing
The 8 Best Filter Plugins For Precise Cuts & Boosts (+ 5 Free Filters)
6 Best Autotune Plugins To Improve & Enhance Your Vocals
Top 10 Transient Shaper Plugins (VST, AU, AAX)
Top 7 Enhancer Plugins (For Bass, Drums, Vocals & Harmonics)
Top 6 Flanger Plugins (And 5 Best FREE Flanger Emulators)
Top 7 Phaser Plugins (And 3 Best FREE Phasers)
Top 10 Plugins For Mixing Drums (And 3 Best Free Plugins)
Top 7 Bitcrusher Plugins (And 4 Best FREE Bitcrushers + 3 Bonuses)
Top 6 Plugins For Voice-Over & Dialogue Cleaning (Post Production)
Top 10 Stereo Imaging Plugins (Best Old & Modern Picks)
Top 5 Multiband Limiter Plugins
Top 7 De-Esser Plugins For Better Vocals (And 4 FREE Plugins)
Top 7 Clipper Plugins (Best Limiter Alternatives)
Top 6 Chord Generator Plugins That Inspire Melodies (+ FREE Tools)
7 Best Exciter Plugins For Mixing & Mastering
Top 7 Channel Strip Plugins (And 2 Best Free Plugins)
Top 11 Distortion Plugins (And 4 Top Free Plugins)
Top 5 Comb Filter & Resonator Plugins | Melda, Kilohearts, Tritik
The 7 Best Vibrato VST Plugins | Audec, Audiority, Melda
The 7 Best Tremolo Plugins | Eventide, Melda, SoundToys, Kuassa…
The 7 Best Harmonizer Plugins | Eventide, Melda, Aegean Music
7 Best Sidechain Plugins (VST, AU, AAX) | Xfer, Cableguys..
Top 10 Noise Gate Plugins (And 6 FREE Free Gate Tools)
The 6 Best Ring Modulator VST Plugins | KiloHearts, Melda
7 Best Autopan VST Plugins | CableGuys, Melda, Waves, Soundtoys
The 6 Best Frequency Shifter VST Plugins
Top 11 Granulizer Plugins For Future Sound Design
29 Best Sound Design VST Plugins
Compressor Plugins
Top 11 Free Compressor Plugins (VCA, Vari-Mu, FET, Digital)
Top 7 Multiband Compressor Plugins (And 4 FREE Plugins)
Top 5 Diode-Bridge Compressor Plugins
Top 6 Mastering Chain Plugins: Complete VST Solutions
The 7 Best VCA Compressor Plugins (VST, AU, AAX)
Top 11 Mastering Compressor Plugins (And 2 FREE Plugins)
Top 10 Opto Compressor Plugins For Transparent Sound
The 7 Best Vari-Mu Compressor Plugins (And 2 Best FREE Tools)
Reverb & Delay Plugins:
Top 12 Reverb Plugins (And 5 FREE Reverb Plugins)
The 6 Best Spring Reverb VST Plugins | AudioThing, GSi, u-he, Eventide
Top 12 Delay Plugins For Music Production In (VST, AU, AAX)
Top 10 FREE Delay Plugins (VST, AU, AAX)
The 10 Best Convolution Reverb Plugins
Amps & Preamps:
Top 10 Guitar Amp Plugins (And 5 Best FREE Simulators)
Top 10 Bass Amp Plugins (And 5 Best Free Simulators)
Top 9 Preamp Plugins (For Vocals, Guitars & More!) + Free Preamps
Other Recommended Gear:
Top 12 NearField Studio Monitors On Any Budget
Top 10 Midfield Studio Monitors For Home Recording
Best Biggest Studio Monitors (FarField Monitors)
Top 10 Guitar Pickups for Low Tunings
Top 10 Analog Compressors For Mixing & Mastering (On Any Budget)
Top 12 USB Audio Interfaces Under 150$, 200$, 300$ 400$ (Any Budget)
Top 12 Hardware Equalizers (Analog EQs For Mixing & Mastering)
Top 6 Analog Hardware Limiters
Top 6 Solid State Bass Amps (On Any Budget)
Top 6 Ribbon Mics On Any Budget (For Vocals, Drums & Guitars)
Top 6 Cheap Dynamic Mics For Vocals Under 50$, 100$, 200$ & 300$
Top 6 Chorus Guitar Pedals (On Any Budget)
6 Best 61-Key MIDI Keyboards (On Any Budget)
9 Best 49-Key MIDI Keyboards Under 100$ & 200$
Top 5 Best 25 Key MIDI Keyboards (On Any Budget)
Top 12 Acoustic Drums (Best Kits/Sets On Any Budget)
Guitar/Amp Focused:
Can I Put Nylon Strings on a Steel-string Guitar?
Do Electric Guitars Sound Good Unplugged?
Buying Your First Guitar: 2 Things To Know
Are Tube Amps Worth It? (Tube vs Solid-State Amps)
How Often Does A Guitar Need a Setup?
Can I Play Classical Guitar On A Steel-String Guitar?
How often guitar necks need reset?
Can You Play Two Guitars Through One Amp?
Can a 6 String Bass Be Tuned Like A Guitar?
Can I leave My Guitar Tuned Down a Step? Yes, But Is It Safe?
Should I Learn 4, 5 Or 6 String Bass Guitar & Why?
How To Know If your Guitar Amp Is Broken?
How To Fix Distorted Bass Guitar Sound?
Do Fender Guitars Appreciate In Value?
Should You Put Stickers On A Bass Guitar?
How Acoustic And Electric Guitars Are Made?
Is Electric Guitar Too Loud for an Apartment?
Does a Preamp Improve Sound Quality?
If I Learn Acoustic Guitar Can I Play Electric Guitar?
How Many Hours A Day Should You Practice Bass Guitar?
Do I need an AMP/DAC To Run Bookshelf Speakers?
How to Record Electric Guitar Into Logic Pro X?
Do headphones get worse with age?
DAW Related:
Best DAWs For Musicians Available (With FREE DAWs)
What’s The Most CPU Efficient DAW? – 5 DAWs Compared
How To Make Music Without Using A DAW?
Pro Tools Guide: How To Use AutoTune & Pitch Correction?
Ableton Review: Is It Worth The Money? (Cons & Pros)
Logic Pro X Review: Is It Worth It? (Cons & Pros)
How To Use Auto-tune & Pitch Correction In Cubase?
How To Fix Ableton Crackling, Crashing & Freezing? Step By Step
Plugin Related:
What Are Audio Plugins? Different Types of Plugins Explained
What Are The Best Tools To Develop VST Plugins & How Are They Made?
Cost of Developing Audio VST Plugin: Several Factors (With Table)
VST, VST, AU and AAX – What’s The Difference? Plugin Formats Explained
Complete Guide To Noise Gate – What It Is, What It Does & How To Use It?
How To Clip My Drums? Here Is How & Audio Teasers (Before/After)
Complete Guide To Limiter: How To Use It (+ Best Plugins & Analog Limiters)
Mixing With Reverb: How To Add Life To Your Mixes
Linear Phase vs Minimum Phase EQ – Full Guide
Difference Between LUFS, RMS & True Peak Loudness Meters
How And When To Use Algorithmic And Convolution Reverb In Your Mix?
Difference Between Active EQ, Passive EQ and Dynamic EQ
Headphones & Studio Monitors:
Do headphones get worse with age?
Monitors vs Studio Headphones For Mixing & Mastering
Top 10 Room Calibration & Headphones/Speakers Correction Plugins
Are Noise-Canceling Headphones Good For Music Production?
Can Headphones Break in Cold Weather?
Why do headphones & cables get sticky?
Can Wearing Headphones Cause Hair Loss?
How Do I know If My Studio Monitor Is Blown?
Side Effects Of Sleeping With Your Headphones On
Do You Need Music Amplifier For Studio Monitors or Studio Headphones?
Do Headphones or Earphones Damage Your Brain?
Can Headphones or Earphones cause Deafness or Toothache?
FarField, MidField & NearField Monitors – Their Uses, Pros & Cons
MIDI & Synths:
Should I Buy A MIDI Keyboard Or Synth? (Are Synths Worth It Anymore?)
Why Is Audio Gear So Expensive? (Especially Synths)
Top 12 Synth Brands – Analog, Digital & Modular Synth Manufacturers
11 Tips How To Choose MIDI Keyboard
Should I Buy MIDI Controller Or Keyboard? Cons, Pros & Tips

K. M. Joshi is a multi-award-winning composer and sound designer, specializing in film, game, and TV audio. He enjoys making cinematic music, rock, blues, and electronica. Read more..