Ableton Live is an incredible DAW for recording, producing, mixing, and mastering.
And even though it has so many fantastic stock plugins, some effects and instruments can be added to it to make it an even better creative tool. So, we’ve put together a list of 20 paid and 14 free plugins that will increase your artistic possibilities in Ableton.
Top 20 Plugins & Kontakt Libraries For Ableton 2023 (+ 14 Free Plugins)
1. Arturia Dist COLDFIRE (Creative Dual-Distortion Unit)
More Info & Price (Trial Available)
The Arturia Dist Coldfire is a revolutionary dual distortion plugin featuring a powerful modulation engine and a wide variety of distortion types that you can swap in and out.
There are two independent distortion engines in Dist Coldfire, and you can use them in whatever combination you like. A variety of pre-and post-distortion filters are available for each distortion type. Analog-modeled and purely digital distortion types are both available.
With assignable parameter modulation and dynamics processing, Dist Coldfire can dish out virtually any dirt you want.
Key Features:
- Distortion Types
There are 150 factory settings to help you get started, some of which are meant to transform ordinary drum loops into snarling, ripping monsters. A total of eleven distinct kinds of distortion are available in the various distortion menus, with more options available in some categories.
For example, bit inverters and bit crushers are just two of the eleven primary flavors. Other examples include wave folders, wave shapers, rectifiers, tape and analog saturation, driven transformers, and so on. In addition, there is a delay section in the processing, with feedback, filtering, and tempo sync as options. - User Interface
The distortion engines sit opposite sides of the interface, while the master, band split, and dynamics controls sit in the middle. Tooltips explain what each control does and show the current setting. The input and output level controls can be linked to keeping the volume under control when cranking up the distortion.
You can independently adjust the overall output level and wet/dry ratio. A horizontal fader controls the volume of each distortion engine independently. - Modulators
The pre-and post-distortion filters, multiband/feedback, and extensive modulation section are all accessible via the advanced panel’s tabs, wherein you can choose LFO, Function, Follower, or Sequencer options. Because of its modulation capabilities, Coldfire is a potent tool for improvising with drum loops, and its modulators can be assigned to virtually any control in Dist Coldfire, including other modulators.
However, the sequencers and function generators can also transform rhythmic elements from sustained instrument parts. The output filters can be set to a high pass or low pass, while the pre-filters can be set to a bandpass, notch, or one of two combs. - Oversampling
Studio and Render oversampling modes are offered. The latter uses higher resolution but at the expense of increased CPU overhead. Whichever is selected, it will apply to both online and offline renderings despite the different titles. - Dynamics And Feedback
Arturia includes a dynamics and feedback component to round out the signal chain. Compressors, multiband compressors, and a limiter that can be placed before or after the distortion make up the dynamics section. Instruments that assist you in reining in and smoothing out your distorted audio.
Whether you find these instruments too simplistic or the entire dual distortion doesn’t have enough bang; feedback is always there to help. Dist Coldfire incorporates a feedback processor, which you may access through the panel’s advanced settings. It uses a filter to delay the feedback, and you can change the beat rate.
Compatibility:
The OS requirements for this plugin are Windows 7 or higher for PC and macOS 10.9 or higher for Mac. It comes in VST/RTAS/AU/AAX formats and supports 32 and 64 bit systems.
Summary:
Arturia’s Dist Coldfire is yet another innovative plugin that aims to expand traditional sound design. That goal was met, too. One of the best features they provide is a dual distortion plugin that sets them apart. From traditional saturations and distortions to techniques like wave folding/waveshaping and bit-flipping, you’ll find it all here.
2. Knif Audio Knifonium (Tube-Driven Rare Analog Synth)
More Info & Price (Trial Available)
Knifonium is an emulation of the hardware synth of the same name.
The hardware Knifonium is a monophonic analog synth that employs 26 vacuum tubes, which also drive its two oscillators. It was designed by John Knif and featured meticulous craftsmanship with a musical and inspiring sound.
Brainworx designed plugin Alliance’s Knifonium emulation, and there are a plethora of modern features that make the already impressive hardware more versatile and accessible.
The most important addition would be the eight-voice polyphony. Not only can you enjoy the sound of the Knifonium, but you can create pads that sound uniquely atmospheric and enveloping. And we haven’t even covered the new effects that enhance the sound further yet.
Key Features:
- Effect Processors
Knifonium features some of the most-loved effect plugins by Plugin Alliance built into the synthesizer. They include a digital delay, the Maag exciter plugin, reverb, flanger, chorus, the Metal 666 amp, an EQ, filter, and a phaser. However, I must mention that since they are designed as outboard plugins to the synth, you cannot modulate the parameters of these effect processors. - 208 Vacuum-Tubes
That’s right, each voice of the 8-polyphony features 26 carefully modeled vacuum tubes, resulting in a whopping 208 virtual vacuum tubes in total. Furthermore, Brainworx’s proprietary Tolerance Modelling Technology recreates the natural variations in envelope parameters, pitch, LFO, speed, and other parameters you’ll find in the original hardware. - Stereo Features
Unlike the hardware synth, Knifonium features a unison mode, mid-side editing, and stereo spreading features. They are essential for creating pad sounds and a larger-than-life lead sound. I love the sound of spacious arpeggios and pads with an analog tang. - Performance
There are over 300 excellent and usable presets in the synth. And if you want some exciting motions in your sound, you can use the envelope, LFO, aftertouch, and MIDI-CV modulations, as well as the built-in arpeggiator, to create evolving sounds. Furthermore, the synth also has a ring modulator for broader sound design possibilities.
Compatibility:
Knifonium is available for Windows 7 or higher and macOS 10.9 or higher, both 64-bit only. It comes in VST 2/3, AU, AAX, and RTAS formats.
Summary:
Knifonium is an ultra-high-quality synthesizer that emulates the sound of individual vacuum tubes to recreate the fat, classic analog sound. However, doing so does make it quite CPU-heavy.
So, if you intend to use many Knifoniums in a project, you might have to freeze or render the instrument to free up the CPU resource.
Besides the synth itself, the preset manager is also excellent – it lets you filter presets by category and mark favorites for future recall. Overall, I suggest giving this plugin a try if you love the sound of hardware synths.
3. BabyAudio Crystalline (Next-Gen Algorithmic Reverb)
More Info & Price (Trial Available)
Crystalline is an algorithmic reverb by BabyAudio.
Crystalline is inspired by iconic reverb units of the past, like the Lexicon hardware units, and packages that top-tier quality in software. There is only one reverb type that you can adjust and modify through the various controls Crystalline offers.
I find it ideal for vocals because it feels like a plate reverb but much brighter, while the controls help add clarity and definition, which will help any vocal stand out.
Key Features:
- Reflections
Crystalline’s interface is slick and divided into five panels. The first one is reflections, a place to tweak the overall character of your reverb. The first parameter is size, which I’m sure you’ve seen in all reverb plugins. It comes with five different modes which determine the size of your space. The second parameter, sparkle, will add air to your reverb by boosting its high-end. This is one of the features that make Crystalline sound excellent on vocals. Use it right, and you’ll add a third dimension of clarity to your lead vocals. Finally, the width will determine how narrow or wide the reverb sound is. - Clean up
The second panel is called clean-up. This is where you can sculpt your reverb tone through various EQ, Gate, and Imager processors. The damping parameter will use an EQ to tame the reverb’s top-end, making it darker and warmer. The sides parameter lets you set a frequency focal point. The frequencies below this focal point will remain in mono, so you can push the higher frequencies to the sides without compromising your reverb impact. Finally, Gate works like a Gate. It lets you set a threshold that determines when the reverb comes through. - Depth
The depth panel is where you can start adding interesting effects and processes to make your reverb tone more unique. First, you have a resolution parameter that controls the level of the algorithm inside Crystalline. On its higher setting, Pristine, it can be quite CPU intensive; therefore, you can opt for the Basic mode, which will save you some CPU usage. The second parameter here is modulation, a pitch effect that will add a unique character to your reverb. The final parameter is shimmer, a process that extends the reverb’s decay on the higher frequencies. This is excellent for crafting haunting reverbs that linger and feel angelic. - Shape
The shape panel includes tones and an EQ for sculpting the overall tone of the reverb. There is also a smoothing parameter that will make your wet signal less impactful for more subtle results. Finally, you get a transients parameter. This will help you either emphasize the attack of the reverb or the sustain. It’s great for adding punch to your drums by boosting the attack or adding more atmosphere to your vocals by boosting the sustain. - Utility controls.
The central panel includes a gorgeous visual representation of the reverb. There are the usual wet and dry faders and a sync button to work in note values rather than ms. In addition, you get a start fader that works as a predelay knob and an end fader that determines the reverb’s decay. An incredibly useful function is the ducker which will duck the wet signal while the dry signal plays above a certain threshold. This is important in vocal processing because often, the wet signal drowns out the dry signal, resulting in a confusing mess where you can’t identify what the vocalist is singing about. The ducker will let your singer finish their phrase and then introduce more of the wet signal. Finally, creative parameters like the freeze and reverse buttons are excellent additions for sound designers or those seeking more experimental approaches in their reverbs.
Compatibility:
Crystalline is available on Windows 7 or higher and macOS 10.7 or higher in VST, VST3, AU, and AAX formats.
Summary:
Crystalline is a clean, modern, and beautiful sounding reverb. The sparkle, shimmer, sides, and duck parameters make it excellent for vocal processing, while the interface is slick and easy to understand.
There are also many presets designed by top-tier sound designers who can help you start using Crystalline right away, although I’d suggest you embrace its curious nature by tweaking each parameter yourself and finding out what works best for you.
4. Slate Digital MetaTune (Pitch Correction / Auto Tune)
More Info & Price (Trial Available, Dongle Required)
Or Buy Here (Support Integraudio)
Meta-Tune is a simple auto-tuner and pitch correction plugin that is great for more ‘modern’ genres of music such as Electronic or Hip-Hop.
The easy-to-use interface gives you basic controls that have enormous impact and are bound to save you time in the mixdown. There certainly are more advanced and powerful plugins out there, but this one boasts simplicity with mixed results at a reasonable price.
Key Features:
- User-friendly Design and Interface
Meta Tune offers a highly user-friendly design paired with simple yet effective controls, allowing you to get editing in seconds. By adjusting the speed, sustain, and amount parameters, you can vary the result of your moves from a natural sound to a more robotic fx sound. Use the built-in keys and scales features to select your range quickly. You can also see where the vocals are hitting from the incoming signal of Heatmaps. Additionally, you can see where the outgoing signal is hitting, which means you can also see the level of pitch adjustment. - Negative Speed Processing
The negative speeds function refers to note detection and pitch correction timing. Essentially, it controls the speed at which tuning happens in the transitions between keys. Setting the ‘speed’ control beyond 0, you get into the negative speed region where Meta Tune’s unique algorithm kicks in. Designed to help the vocals pop against the rest of the instruments and note changes, it’s easy to use and can get you some fascinating results. - Groups Function
The ‘groups’ function is handy when working with a lot of vocal tracks in a mix. It allows you to link whichever other instances of Meta Tune you have in your session for multi-track editing. For example, you could connect your background vocals in a group and simultaneously make adjustments that affect the entire group. Grouping is a considerable time saver and a great perk that alleviates a ton of individual adjustments or copy-pasting automation. - Note Stabilizing
This feature has different settings to choose from, which will determine how much stabilization occurs. By employing this feature, you can eliminate the need to open up a graphic editor and manipulate problem areas by hand. By selecting Long, Mid, or Short, you can decide which instance sounds best for the type of music you’re editing. Long allows the singer’s natural vibrato to remain present, whereas the Mid and Short instances adjust faster and more in tune with the desired notes.
Compatibility:
This plugin is available for Windows 8 or higher and macOS 10.12 or higher. It comes in VST, VST3, AU, and AAX formats.
Important Note: Ilok USB dongle required.
Summary:
If vocals are your focus and simplicity is what you’re after, then Meta Tune is an excellent pick for you. Additionally, if you’re on a budget and can’t afford some of the high-end programs, it’s worth checking out.
5. Addictive Drums 2 (Acoustic Drums)
More Info & Price (Trial Available)
If you want to get not just a drum plugin but an entire drum production studio, then Addictive Drums by XLN Audio is for you.
XLN Audio is a reasonably well-known music software company based in Stockholm, Sweden. These guys are trying to provide their customers with plugins and products that will inspire music creation. If we take a look at XLN Audio’s assortment, we’ll find such hits as Addictive Keys, Addictive FX, different MIDI packs, and all that kind of stuff.
As for Addictive Drums 2, the creators made sure that this plugin has high-quality drum samples. That’s why they recorded the real ones, played by professionals in world-class studios. In general, with this software, we will be able to apply ready-made drum grooves and experiment with the sound, thanks to the built-in effects.
You will have a separate mixer at your disposal where you can balance drum kit parts, room, overheads, and more. In addition, you can apply compression, EQ, saturation, noise gate, and anything else you can imagine.
In addition to all this, choose a variety of presets. XLN Audio has taken care to give you separate collections for specific genres, including rock and metal.
Key Features:
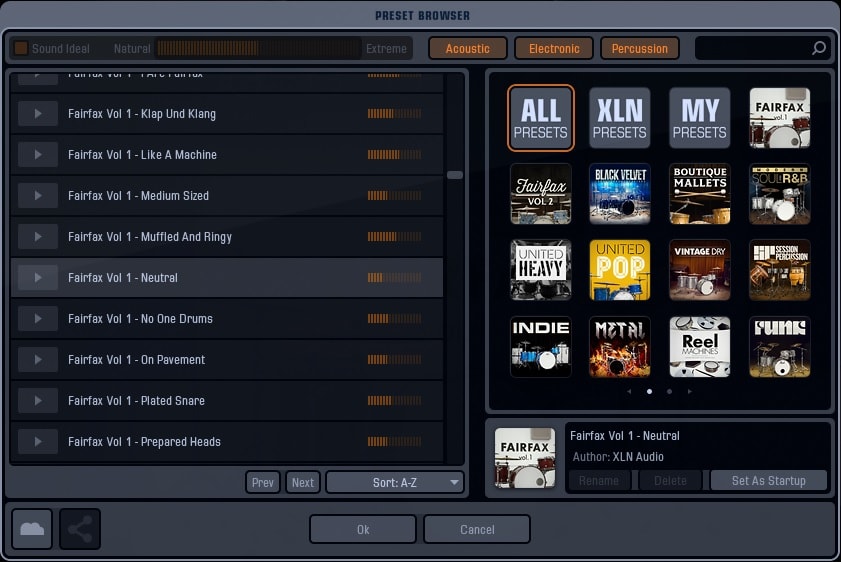
- Otherworldly Kicks and Snares
If you’re not happy with the sound of one part of the drum kit, you can always experiment by mixing it with another. For example, choose one voluminous kick and add to it another that has more punch. The result is a wholly new and unique sound. - Take Snapshots
You can make A-B comparisons thanks to the Snapshot feature. Select the parts of the drum set you want, snap them into slot 1, then others into slot 2, and so on. Eventually, switch between slots and listen to which sound is perfect for your mix. - Complete Output Control
Besides the fact that Addictive Drums 2 already has everything you need for a finished drum sound, you can go further to tweak it however you like. For example, you can send specific drum kit parts as separate outputs to any track in your DAW and apply your favorite plugins. - Customize any Beat
We know that most often, you can influence the velocity in the DAW itself. But Addictive Drums 2 allows you to work on this directly in the plugin. You can affect the beat strength and the randomization to make it sound as natural as possible. - Use Your E-Drums
You can compose songs or have fun in Addictive Drums 2 using your electronic drums. The plugin has a mapping feature that helps you sync the individual parts of your drum kit with the samples in the plugin. Just click the Learn button and select the drum and sample you want.
Compatibility:
The plugin is available for Windows 7 or higher and macOS 10.9 or higher, both 64-bit only. It comes in VST, AU, and AAX formats.
Summary:
Several drum plugins are already considered an industry standard. The fact is that Addictive Drums 2 from XLN Audio can serve you as an excellent alternative to other well-known software. You will have everything you need to provide a mix-ready drum sound or change it however you want. The plugin uses actual recorded drum samples, so the sound quality here is appropriate. This whole virtual studio can surprise you.
6. FAW SubLab XL (Bass & Sub Bass Instrument)
SubLab XL is a bass and 808 instrument by FAW.
The original SubLab was a creative software instrument designed specifically for creating deep bass sounds and 808s. It featured the innovative X-Sub technology by FAW, which guaranteed sub integrity on all sound systems. The XL version includes many more features and fresher sounds.
Key Features:
- Synth engine
The beauty of SubLab lies in its split into three different engines. The synth engine is where you get to design the bulk of the bass sound. You can choose between sinewave, triangle, square, saw, and the new super oscillator. Once you’ve selected the sound shape of your choice, you can set the pitch and detune your sound. As a result, you can achieve subtle and deep bass sounds or buzzy and supersaws with great ease. The super oscillator is an excellent addition to SubLab, and it’s great for creating buzzy sounds with a deep low end. - Sample engine
The sample engine is where you can load different samples to handle the sound’s transient. You can load a kick drum or any other punchy sound that will be the transient of your 808. Additionally, you can choose to sidechain the synth engine to the sample engine so that the transient comes through loud and clear. - X-Sub
The main appeal of SubLab is X-Sub, the psychoacoustic synth engine that guarantees the integrity of your sub bass no matter what playback system it’s heard on. It basically adds a consistent sublayer underneath your bass sound. Of course, you can adjust how much of it you wish to add, but overall it’s very balanced and can help your bass sound stand out and hit hard anywhere, from earbuds and laptop speakers to club sound systems. - Effects and modulation
SubLab offers a few different tools for sound design. You get one LFO that can be assigned to two parameters simultaneously. It can be synced to your host’s BPM or run in Hz and has sine, square, saw, triangle, and noise shapes. Furthermore, there is a filter, perfect for sculpting your high end and boosting your low end with the right amount of resonance. Finally, you get access to new effects, like the waveshaper, which comes with sine fold and linear fold options. This is perfect for creating interesting harmonics on your bass sound so that it cuts through the mix. There are also tape distortion effects with hiss and wobble controls and a bit crusher with decimation and bit mode controls. - Macros
Another great new feature of SubLab XL is the macros. You get two macros that you can assign to various parameters. Once done, you can use a single knob to modulate multiple parameters. This is a great way to turn a basic 808 into something unique and original that suits your music. There is also a captivating macro window with excellent graphics that represent the way the macro behaves with the bass sound.
Compatibility:
SubLab XL is available on Windows 7 or higher and macOS 10.12 or higher in VST2, VST3, AU, and AAX formats.
Summary:
SubLab XL is a great upgrade to the original SubLab. The new super engine offers a new range of bass sounds that can feel synth-like than 808s. The new effects are creative and fun to play with, while everything else that made the original so good is still effective.
If you’re a contemporary hip hop and trap producer, SubLab XL could be the one instrument you need to cover your bass duties.
Related Reading:
Top 12 Sub Bass Plugins (Best 808 & Bass Tools)
Top 12 Studio Subwoofers For Music Producers (Best Value)
How To Avoid & Remove Clicks In Sub Bass? Full Guide
7. FabFilter Timeless 3 (Creative / Sound Design Delay)
More Info & Price (Trial Available)
With plenty of new features and an overhauled GUI, Timeless 3 continues on the legacy of the previous version as one of the most flexible delay plugins available today.
It’s a challenge to try and compile everything this plugin can do in a short piece. The concept is that you can create a traditional delay effect using feedback or a multi-tap delay effect, both with an extensive level of modulation on just about any parameter available.
The resizable user interface of this plugin is incredible — it even shows visual feedback of your delay effect on the left half of the upper section. The rest of the section shows a frequency spectrum and an EQ to filter the wet signal.
Another parameter called Diffusion can create lush reverb-like effects easily. Furthermore, it includes various analog-sounding effects like saturation, lo-fi effect, dynamics, and tape-style pitch modulation.
Similarly, you could modulate the multi-tap delay features in a very short length of time to create custom time-based effects like chorus, flanger, and ensemble. Or you could create the reverb shimmer effect by using the pitch-shifting feature along with Diffuse.
Key Features:
- 6 Filters
There are six filters available in total, and each can be a high-pass, low-pass, band-pass, notch, peaking, and shelf filter in any combination. The first three are designed to emulate analog filters with a smooth sound and internal saturation. In addition, you can change the filter routing to parallel, serial, or per-channel mode. - Multi-taps
Timeless 3 excels as a standard delay plugin, but it shines just as well in the multi-tap delay mode, which you can access by clicking on the Tap Editor at the top left of the interface. With this editor, you can create your delay pattern by intuitively dragging the delay taps on the screen with your mouse. Furthermore, you can save a custom pattern as a preset. - Stereo Control
You can control the delay feedback, cross-feedback, and mix level of each stereo channel independently. Not only that, you can adjust the stereo width and the panning in each filter as well. Combine that with modulation, and the sonic possibilities become endless. - Virtually Limitless Modulation
There are fifty slots available for modulation, and you can modulate almost any parameter by drag and drop. There are five kinds of modulators available:- XLFO
It can generate almost any waveform, including custom ones, and can be synchronized to the host tempo. You can create new waveforms by using the node-based curve editor. - Envelope Generator
It is a regular ADSR envelope, which is triggered by either an audio threshold or midi input. Make sure you turn on the midi input for Timeless 3 for the latter. - Envelope Follower
It generates modulation based on the signal level of either the audio you are processing or external side-chain input. The former is useful when you want the delay only when the vocalist sings louder, for example. - MIDI Source
It transforms any incoming MIDI data, including CC data, into a modulation signal. It becomes insanely powerful when coupled with other modulating effect plugins. - XY Controller/Slider
Control two parameters at once with the XY controller or multiple parameters using a single slider. This one is less a modulator and more a convenient tool for creating macros.
- XLFO
Compatibility:
Timeless 3 is available for Windows Vista or higher 32-bit or 64-bit and macOS 10.10 64-bit. It comes in VST 2/3, AU, AAX, and RTAS formats.
Summary:
Almost every effect plugin developed by FabFilter is faultless, and this one is no different. The only issue it might have is the amount of flexibility it offers making it more sound design delay than a regular delay. However, the new GUI has made Timeless 3 user-friendly and straightforward. So, if you were daunted by the sea of possibilities before, now is the time to reconsider.
8. Tracktion & Dawesome Abyss (Modern Visual Synth)
More Info & Price (Trial Available)
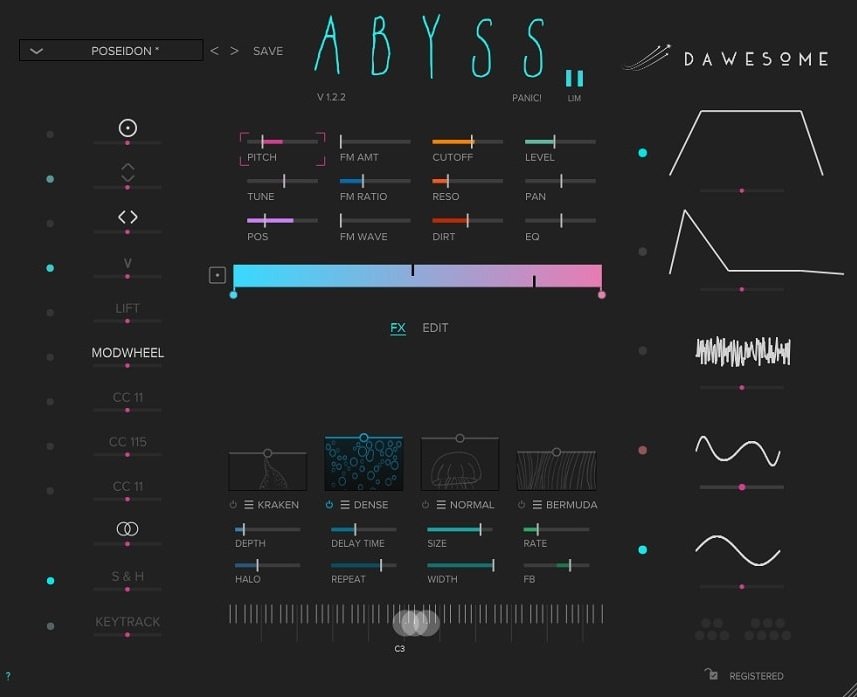
A visual and intuitive synthesizer plugin that can evoke the most varied textures.
Abyss is a synth plugin that relies on a good-looking design interface with a colorful and visually-attractive theme that showcases all controls and configurations in an elegant display. From the first time you open up the plugin, it’s easy to tweak around a good sound messing up the knobs and faders.
The innovative synthesis engine of Abyss represents timbres with color, giving you intuitive
access to easily design your signature sound. And with the powerful modulation system, you can make any patch nuanced and expressive – even more so if you use an MPE controller like the ROLI Seaboard.
Key Features:
-
- Colorful signal flow
The colored stripe on the center indicates the signal flow in Abyss. In essence, each color represents a timbre – the gradient acts as an oscillator, with the main parameters being the timbres placed on it and the playing position along the gradient. The sound generated from the gradient-oscillator is fed into a resonating filter, a tilt-EQ, an amplitude envelope, and from there through four audio effects, namely “Shimmer,” “Delay,” “Reverb,” and “Phaser.” - Frequency modulation
A specific set of parameters will offer great sound opportunities with a specific character, pioneered by the Yamaha DX 7 in the 80s. In Abyss, FM works via an intuitive interface as easy to use as a filter, distributed within three faders: “FM – AMT” determines how much FM you want. When set to zero, the FM section is skipped, and with higher values, the sound becomes more and more influenced by FM; “FM – RATIO” defines the character of the FM sound. Higher values correspond to sharper sounds. Integer numbers create only harmonic overtones, while “fractional” numbers like 1.3271 will create inharmonic overtones – like in bell sounds. You can select integer numbers with right-click from a context menu; finally, “FM – WAVE” brings a second parameter that influences the sound character of the FM. Lower values sound like classical FM, while medium values push the timbres more towards saw-like; this can be used for brass or classical synthesizer sounds. High values introduce spiky dirt and crackles. - Easily alter your timbre
The lower half of the window can display one of two views: FX and EDIT. On the second of these, you’ll find sliders that allow modifications to be made on the currently selected timbre. The controls are labeled “STRAIGHTEN,” which makes the sound more static when pushed to the right, as a classical oscillator voice, “DETAIL,” making the sound softer, thinner, and less detailed if needed, “NOISE,” which adds musical noise to the timbre, and finally “ORGANIC,” a control that offers a slightly moving, chorused sound. - Audition mode
By clicking on the loudspeaker symbol, you’ll switch to “Audition” mode. In this mode, the currently selected timbre does not stop playing. You can edit its parameters or select a different timbre, but playback will continue. To leave this mode and return to normal, simply click the loudspeaker symbol again. This is a valuable tool for checking out multiple timbres and choosing your preferred one quickly.
- Colorful signal flow
Compatibility:
The plugin is available for macOS 10.11 or higher and Windows 10 or higher, both in 64-bit only. It comes in VST3 and AU plugin formats.
Summary:
Beginners will like it for its simplicity, minimalistic design, and not too many overwhelming features (though there are a lot of them anyway!). Simply explained features and effects will help you to shorten the learning curve.
The main goal here is to have multiple timbres at your fingertips, with as many alterations to be made on them as possible. You can easily navigate between these timbres, selecting which is more suitable for you. The modulations, effects, and the FM configurations can make it sound like an authentic instrument from the 1980s, but in much more lightweight packaging.
Related Reading:
Top 13 Synth VST Plugins (And 5 FREE Synths Plugins)
9. Native Instruments Kontakt 7 (Sampler/Instruments Platform)
Images of Full Kontakt 7 version:
KONTAKT 7 is the latest version of the popular sampler, and it includes a reworked HiDPI Factory library and new instruments from companies like Orchestral Tools.
KONTAKT is the best instrument-building tool on the market, and it also serves as a source of quick musical inspiration for composers. This mutating platform is much more than a sampler; it has fueled two decades’ worth of Oscar-winning film scores, Billboard singles, and hundreds of instruments.
We’re taking KONTAKT’s 20-year history into the future with the seventh iteration. First, the new adjustable browser makes it simple to locate any sound. Then, you can experiment with new musical ideas and find new inspiration using the updated Factory Library, new effects, and other audio enhancements.
Key Features:
- Effects
The numerous effects modules in KONTAKT are detailed here, along with information on adjusting their settings. Audio processors that alter the signal in a typically non-linear fashion, such as reverberation, fingering, and distortion, fall under the category of “effects.” Open the drop-down menu of available effects by clicking the plus sign in the lower right corner of each effects slot to access these modules. - New Sound Quality
In KONTAKT 7, the Factory Library has been updated to raise the bar in terms of both sound quality and quantity, and it also brings our flagship sampler up to date with modern features like large, attractive, HiDPI user interfaces. In addition, learn to play and modify an extensive library of acoustic and electronic instruments, including Orchestral Tools’ brand-new collection of sampled, full-orchestra soundscapes. - Faster Interface
It can be difficult to maintain momentum if you’re constantly on the lookout for your preferred tunes. So to make things clear, we’re introducing a brand-new way to search through them. You can now import your independent libraries and homemade instruments and search, filter, and individual audition sound across your collection. - Build Instruments
KONTAKT 7 also comes with brand new libraries like Orchestral, Acoustic, Band, Beats, Choir, Synths and Vintage. It also includes existing Kontakt libraries Ethereal Earth, Hybrid Keys, Analog Dreams and Retro Machines MK2. - Hardware
Load KONTAKT into KOMPLETE KONTROL or MASCHINE to manipulate key settings with specialized knobs, listen to sound libraries, and more. S-Series keyboards have an even tighter integration because all the key switches and zones are conveniently located on the Light Guide.
Compatibility:
This plugin is available for macOS 10.10 or higher (64-bit only) and Windows 10 or higher (64-bit only). It comes in VST/RTAS/AU/AAX formats and supports 32 and 64 bit systems.
Summary:
The music industry is reacting positively to this upgrade. This software improves complexity, efficiency, and audio reproduction every day. Developers have provided us with a rich palette of virtual instruments thanks to their work, and this upgrade will undoubtedly aid in the progress of that effort.
10. Arturia Piano V3 (Piano Collection)
More Info & Price (Trial Available)
The piano is one of the most popular, used, and familiar sounds in music history.
However, finding a good one in the digital era is often challenging, especially if you’re after a realistic and authentic sound. Arturia has created Piano V3 to capture the most authentic piano sounds possible through physical modeling, from mechanical to sonic behavior.
Key Features:
- Wide range of sounds
Piano V3 doesn’t focus on a single piano sound. Instead, Arturia was interested in creating an instrument that accurately portrays various pianos styles. Therefore, with Piano V3, you can access American, Japanese, or German Grand Pianos, Jazz, Classical, or Pop Upright Pianos, plucked Grand Piano, or experimental options like the Glass and Metal Grand Pianos. You can achieve all sorts of sounds and feelings with these models, from shimmery Pop piano sounds to punchy and dark hip hop sounds. - No samples
When you invest in a high-quality piano instrument, you’ll need many gigabytes of space on your hard drive to cover the large sample libraries that come with it. Fortunately, Arturia’s Piano V3 is not sampled-based. Instead, it uses physical modeling to simulate a real piano’s physics and acoustics in real-time. This complex algorithm guarantees consistency and authenticity in your piano sounds. - Tweak the sound
Even though the piano sounds are excellent and authentic, you can still adjust and tweak certain parameters to make them fit your productions. For example, you can adjust the brightness knob for brighter or gloomier sounds, the timbre knob for different sonic and harmonic characteristics, the dynamics knob for a punchier or more sustained feel, and the stereo width knob for customizing your stereo field. Each of these knobs can transform the sound drastically, giving you much room to play with. - Dig deeper
You can dig deeper with the studio page if the above knobs are insufficient to get the piano sound just right. Here, you can adjust the mic positions and create realistic spaces for your pianos to exist in with amazing reverb algorithms. Effects like EQ, compressor, and preamp are further tools you can use to customize your sound. Finally, you can adjust the noises that come through the hammer and pedals, the age of the strings, as well as their exact tuning and acoustic settings like the lid position, soundboard resonance, and sympathetic resonance.
Compatibility:
Piano V3 is available on Windows 8.1 or higher and macOS 10.13 or higher in VST, AAX, and AU formats, 64-bit only.
Summary:
The interface is very simple, with few controls on the main page that help you tweak the basic characteristics of the sound, while the 12 piano models offer plenty of variation and sonic flexibility.
The fact that you can dig deep and adjust some of the more niche controls, like the age of the strings or the soundboard resonance, is a testament to how accurate and meticulously designed this instrument is.
11. Ample Sound Guitar SC (Stratocaster Guitar)
Ample Sound has developed many impressive sampled guitars, and this plugin’s an excellent example.
The Fender Stratocaster is one of the most notorious guitars ever designed. It’s known for its nasally single-coil pickups that suit just about every genre. And the Ample Guitar Stratocaster (AGSC) features samples of the Stratocaster combined with a highly flexible engine.
The samples are divided into three libraries of different pickup setups: neck, neck + middle, and middle + bridge.
As good as the Stratocaster sounds, you might be looking for another instrument. Luckily, Ample Sound has a range of plugins sampling iconic electric guitars like Gibson Les Paul, PRS 24, and even the 9-string Schecter Hellraiser.
The features of most of these plugins are the same as the ones I list below. So, you only need to find out which sound you prefer.
Key Features:
- Tuner
AGSC allows you to tune each string to your liking, although it only lets you tune it down a maximum of 2 semitones. However, it’s enough to achieve popular tunings like Drop-D. The new tuning affects the strummer, tab, and articulations with a natural sound. - Strummer
The strummer mode lets you create strum patterns by programming strokes such as down strum, up strum, muted down strum, etc., on a step sequencer. You can then play chords, and AGSC will play the pattern you have created (or selected from the presets). You can customize the strum time, velocity, release, timing, etc. - Riffer
The Riffer panel lets you create riffs or arpeggio patterns that you can then assign to chords. You can write the pattern the stroking hand plays on each string and assign articulations (mute, open, palm mute, etc.), velocity, vibrato, and legato. - Tablature
The Tab Player can load and play several relevant tablature file formats, including the ones from Guitar Pro 3+. You can use it to export your tabs as audio files in a DAW. However, you cannot export tabs from MIDI clips in your DAW. - Amp And Cabinet
The plugin features six amp-simulations ranging from Fender Twin Reverb and Fender Deluxe to Mesa Boogie Triple Rectifier and Marshall JCM800. You can also change the cabinets, mics and mix them with room mics. The amp selections are excellent; they range from soft clean tones to overdriven lead sounds. So, even if you don’t have a dedicated guitar amp simulation plugin, the built-in collection sounds fabulous and works well. - Effect Processors
AGSC features four effect processors: an 8-band EQ, compressor, delay, and convolution reverb. The EQ is a superb parametric EQ with a sleek interface. The same could be said for the rest of the effects. And the convolution reverb provides four impulse responses: room, studio, hall, and larger hall.
Compatibility:
Ample Guitar SC is available for Windows 7 or higher and macOS 10.9 or higher, both 64-bit only. It comes in VST 2/3, AU, and AAX formats.
Summary:
AGSC is one of the most detailed virtual electric guitars available today. It’s also more detailed than other Ample Sound guitar plugins, proven by the multiple libraries for the pickups. So, whether you are looking to play rock riffs or clean trap melodies, you can use AGSC and get instant results.
Furthermore, AGSC provides many presets to get you started, even if you aren’t experienced in programming guitars.
12. Native Instruments Guitar Rig 6 Pro (Ultimate Amps & Guitar FX Collection)
More Info & Price (Trial Available)
Guitar Rig 6 Pro from Native Instruments is an all-in-one amp sim that gives you many amps, cabinets, and effects.
The first item on our list is ideal for fans of all-in-one software. For example, imagine you’ve recorded a guitar DI and want to transform the sound for any style dramatically. That’s exactly what Native Instruments’ amp sim Guitar Rig 6 Pro lets you do.
You get more than a thousand presets, or you can shape your own guitar circuits. At least you’ll have everything you need for that, including different amps, cabinets, and effects. In addition, the plugin has a large number of studio unit emulations.
Key Features:
- Intelligent Circuit Modeling
You can be sure you’ll get the maximum realism and depth from Guitar Rig 6 Pro because the developers put Intelligent Circuit Modeling technology into it. It is a machine learning process that operates in the software and allows plugin to reproduce analog components’ quality accurately. - Intuitive UI
You do not need much time to understand this plugin’s functionality – everything is quite straightforward. On the right side, you’ll have a browser where you can select the desired preset based on genre, artist, or equipment. If you switch from Presets mode to Components mode, you can compose your own guitar chain. - Amps With Matching Cabs
Guitar Rig 6 Pro has over twenty amplifier emulations, and the cool fact is that they come with matching cabs. That means you get the sound of a full stack. However, you will also be able to add other cabinets and thus experiment with the sound. - Control Room Feature
Another feature worth mentioning is the Control Room. It allows you to experiment with the sound of different microphones. All in all, this panel looks like a mixer. There you can work with eight different microphones. - A Huge Number Of Effects
This article is probably not enough to detail all the effects and tools of this plugin. There are 68 of them in general, and that’s all you can imagine: overdrives, EQs, reverbs, delays, choruses, filters, and many more. You’ll also find SSL board emulations and individual classic studio units here.
Compatibility:
Native Instruments Guitar Rig 6 Pro is available for Windows 10 or higher and macOS 10.15 or higher, both 64-bit only. It comes in VST/3, AU and AAX formats.
Summary:
Guitar Rig 6 Pro from Native Instruments is a wonderful guitar suite that lets you create a full sound from scratch. You’ll have everything you need to provide rhythm and lead guitar tones and experiment with effects. By the way, this plugin can also be suitable for other instruments, for example, synths.
13. Matt Tytel Vital (Essential Go-To Synth)
More Info & Price (Free Version Available)
Vital’s synthesizer brings spectral oscillator warping to add new life to your wavetables.
Acting directly on a waveform’s harmonics, this technology can create drastically different tones and shapes from a signal source. Thanks to this simple tool that creates endless possibilities, what was already incredibly customizable just became even more so.
If you want to import your samples to create a wavetable, Vital’s pitch-splice and vocode converter are two great and easy add-ons to get even more specific on your sound design.
You can also develop wavetables from scratch via the built-in wavetable generator or even directly from the text!
Key Features:
-
- Excellent oscillators
These oscillators have a shallow low noise floor and a sharp cut-off at Nyquist for almost no aliasing, creating the cleanest sounds with the best quality possible. “Nyquist” means that each periodic signal should be periodically sampled at a rate twice the size of your audio signal. So, in order to overcome this, a higher quality sampling is sought after on synths like Vital – and a cut-off might be the simplest tool you’d ever need. - Microtonality at its best
This synth can load .tun, .scl, and .kbd files – which can alter and configure how the tuning’s used will perform – and play in a microtonal setting without any troubles. A brand new tuning system can unlock new possibilities regarding how the samples are performing. This expands not only how you’ll play notes and frequencies, but also how to sample and interact with one another via the oscillators. - Key-tracked LFOs
It’s possible to create key-tracked bass lines with this LFO setting, combining it with an audio-rate modulation and using your LFO as an oscillator modulation source. This enables you to instantly automate certain modulation parameters in relation to whatever notes are being played. - MPE support
If you have a ROLI keyboard, a Linnstrument, or other MPE-compatible gear, Vital offers full support and controls. This way, you can add more expression to your sound and make use of dynamics the way you’re used to. - Audio-rate modulation
The audio modulator kicks in when you have an audio signal or a parameter being varied and brings much more personality to your tones. The variations can be tracked down and edited in the most creative ways possible. The signal whose waveform is used to trigger is modulated accordingly, with extreme precision and character.
- Excellent oscillators
Compatibility:
The plugin is available for mac OS 10.12 or higher, Windows 10 or higher, and Ubuntu Linux 18.04 or higher. All 64-bit only, with OpenGL 3 or higher. It comes in VST, AU, and LV2 plugin formats.
Summary:
Vital Audio brings a different wavetable synth than most ones out there, especially regarding creating new sounds. Most do allow you to develop wavetables based on any audio files, but this is probably the only one on this list that can handle microtonality, text input, and effects like vocoder and pitch-splice too.
The warping oscillator ensures that each harmonic will be shaped at your desire, and this is truly unique to find in a synthesizer.
14. Spitfire Audio – Abbey Road One Orchestral Foundations (Orchestral Suite)
This plugin features samples recorded in a coveted studio room and brings cinematic quality to your orchestral sounds.
Abbey Road’s Studio One has seen a lot throughout its history. This room is famous for its sonic capabilities and adequate space to fit an entire ensemble, from iconic bands to ambitious recordings. Thinking of such big standards, Spitfire Audio carefully recorded a 90-piece symphonic orchestra with excellent microphones, amazing acoustics, top engineers, and the best players available. As a result, every instrument gets the deserved attention, so it’ll sound as it should, with amazing precision regarding sonic details and dynamics.
Key Features:
-
- Five distinct libraries
Each of five distinct Abbey Road One libraries is designed to evoke a particular aspect in your project. “Vibrant Reeds” adds brilliance and color to your track by pairing oboes and clarinets with oboes and Cor Anglais at the same time; “Grand Brass” merges horns and tube with horns and cellos for maximum deepness; “Wondrous Flutes” brings more brilliance with flute and piccolo performances; “Legendary Low Strings” combines the cello and bass sections for a beautiful low-end; and, finally, “Sparkling Woodwinds” adds the deserved higher harmonics to everything. - Articulations and dynamic layers
This collection features 69 different articulations paired with five distinct dynamic layers. You can also find your perfect sound by selecting up to 10 individual mics (with great options like a pair of RM1B and some ribbons mics) with two mix signals. Varying these parameters allows you to enhance the overall sound quality and craft a unique approach to your score. - Iconic spot
Abbey Road is perhaps the most famous recording studio globally, but there’s a reason for that: the unique recording rooms, with their exquisite acoustics, make everything played there sound fantastic. Studio One featured many amazing recording sessions for famous movie soundtracks, such as several “Harry Potter” scores, “Star Wars: Episode VI – Return of the Jedi,” “1917,” and “Avengers: Endgame,” just to name a few. - A cinematic experience
The sections are organized into ensembles, featuring different instrument combinations that can inspire you quickly and easily. The strings are divided into “Low” and “High,” brass section into “Low,” and horns, trumpets, and woodwind into “Low” and “High.” Dividing these instruments into lower or higher sections can instantly help you find great sound as if they were just recorded in your room.
- Five distinct libraries
Compatibility:
The library is available for macOS 10.10 to 11 (64-bit only) and Windows 7, 8, or 10 (64-bit only and the latest Service Pack required). It comes in VST2, VST3, AAX, AU, and NKS plugin formats.
Summary:
Spitfire Audio is an excellent software developer when it comes to orchestral sounds. Attention to detail is always satisfying, and this is definitely a must when it comes to cinematic plugins.
The dynamic variety, allied with the amazing acoustics offered by none other than Abbey Road’s Studio One, undoubtedly makes this a must-have option in your arsenal.
Although it’s more focused on cinematic productions, you can use this excellent collection to add any orchestral bits necessary to make your track sound as good as if you’ve just recorded with an actual orchestra.
15. Arturia Modular V3 (Modular/Moog Emulation Synth)
More Info & Price (Trial Available)
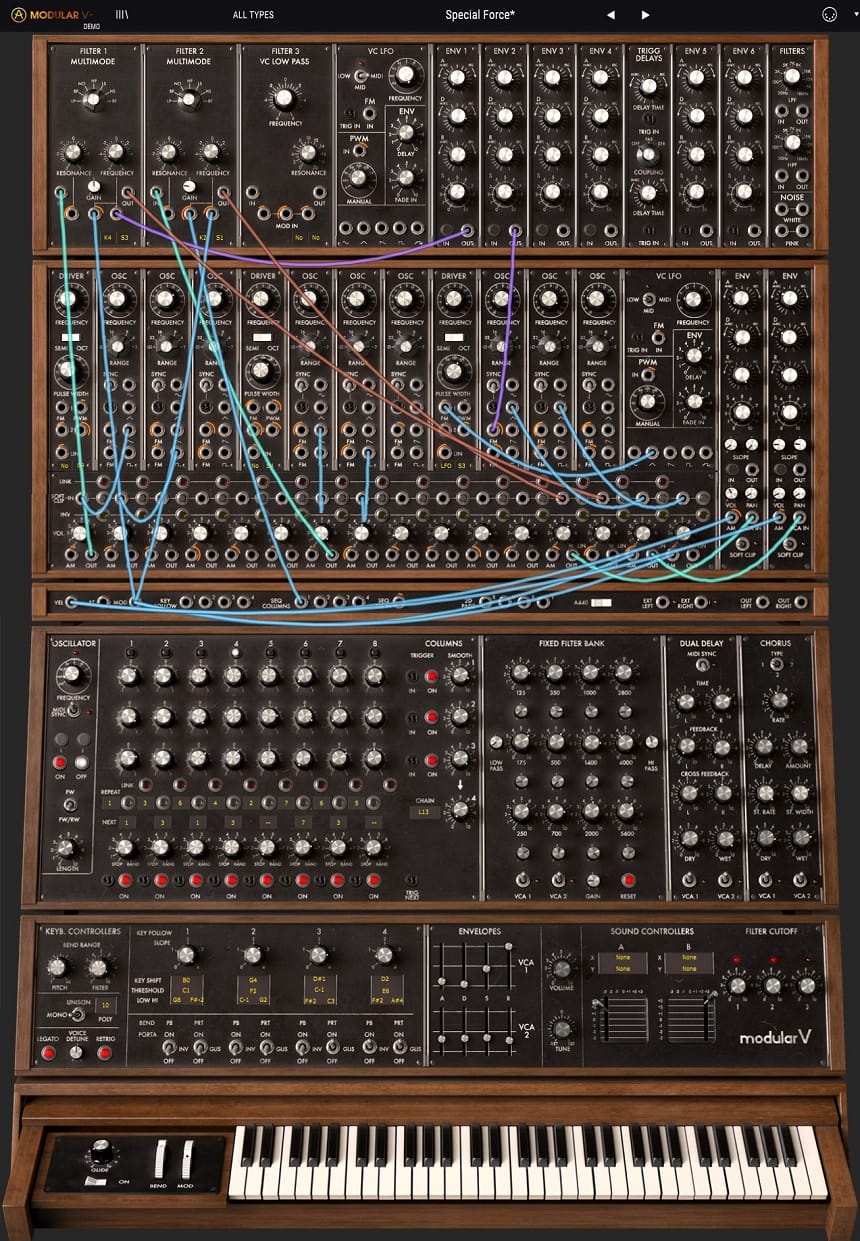
Arturia takes us back to the roots of synthesis with this emulation of a revered classic.
The Arturia Modular V is based on the Moog Model 55 modular synth, which was a two-notes polyphonic synth. This software emulation adds sensible features like formant filtering and 64-voice polyphony to the original design.
The interface, however, remains faithful to the hardware along with the manual patching workflow.
Key Features:
- Powerful Oscillators
Sometimes, more is more in synthesis. Modular V features 9 oscillators in total, and each can generate sine, triangle, saw, and square waves. Furthermore, they also feature frequency and amplitude modulations. While it may seem unnecessary to have so many oscillators, you’ll probably spend most of them for unison as there isn’t a dedicated feature for that. Also, there’s a noise generator. - Moog Filters
There are three filter modules in the plugin, and they accurately recreate the sound of the original filters (low-pass). The plugin lets you select one of four types of filters for each module: a low-pass, high-pass, notch, and a band-pass, all of them with 24 dB/octave slope steepness. Furthermore, you’ll also find a Fixed Filter Bank, where you can equalize the signal coming from the two output amplifiers (VCA) using 14 bands. - Effect Processors
The plugin features chorus, phaser, and stereo delay processors. There are three chorus types selectable with a toggle switch. And you can sync the stereo delay to the host tempo. You’ll probably want to use the delay as an echo effect rather than as a spatial effect. - Sequence Generator
This module, better known as a sequencer, is comparable to the original model 960 sequencer but simplifies programming with internal connections. The low-frequency oscillator, the 8-step sequence manager, and the output controller are the three components of this module. The oscillator sets the playback rate, which can also be synced to the host.
Compatibility:
The plugin is available for Windows 7 or higher and macOS 10.11 or higher, both 64-bit only. It comes in VST 2/3, AU, and AAX formats.
Summary:
Featuring over 600 presets, Arturia’s Modular V is probably one of the most inspiring synths yet.
However, the interface often feels overly large and clunky, especially if you use a smaller screen like a laptop, although it retains the original hardware’s feel. Sound-wise, the emulation is spot-on, and if you like analog sounds, this synth should be at a high place on your list.
16. FabFilter Pro Q3 (Dynamic & Matching EQ With Mid/Side & Linear Phase Features)
More Info & Price (Trial Available)
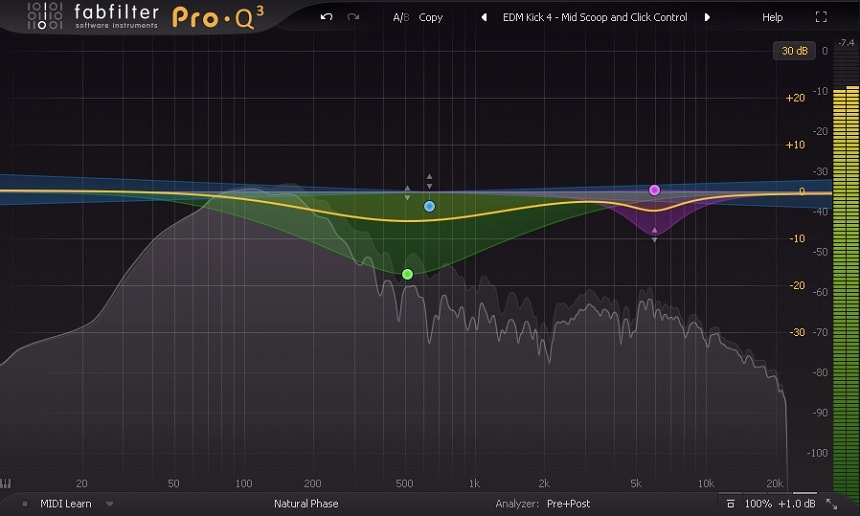
The third and latest version of this powerful EQ now includes dynamic control.
Fab Filter’s Pro Q series has been almost a must-have for engineers at all levels for years. These EQs are perfectly transparent, easy to use, and have different display modes for the spectrogram (pre/post-processing). Still, most importantly, they are the most versatile EQs out there in the market because of their infinite frequency bands, zero latency mode, linear phase processing, fully adjustable parameters, etc.
Now you can control dynamics to specific frequencies, whether you’re boosting and want to control the signal or dipping a particular frequency that’s disturbing you. These fab filter EQs are almost a worldwide standard, mainly because their RTA is very graphic, which is very helpful for those who are just getting started.
This new version of Fab Filter’s Pro Q has a couple of additions that we will talk about, so stay tuned.
Key Features:
- New EQ filters:
Unlike the past versions, Fab Filter Pro Q 3 brings new filters on our equalizers, such as a tilted shelf and a flat tilt. In addition, you can apply and change these filters directly from the box outside of the frequency band, which is a great plus to the previous versions. - Optimized UI:
The new Fab Filter lets you choose whether you want to use the EQ for stereo, mid/sides, and left/right processing on the go. Create a new band and select whichever processing mode you’re interested in using, differently from the older versions, where this option was almost hidden. Additionally, they’ve added a brick wall slope that’s surprisingly transparent and very useful for mixing situations. - Dynamic EQ:
They’ve added a new way of processing that’s entirely new to this plugin: the dynamics control on the EQ. This new feature is perfect in several contexts for mixing and mastering, and it’s perfectly there sitting around the gain knob. - Collisional frequency marks:
Fab Filter includes a visualization of possible areas where frequencies are potentially high. This is used to ease up finding the troubling areas of the spectrum to fix them. Keep in mind that this is not an intelligent feature, so I wouldn’t recommend you to run and try to fix something whenever you see the mark, but to use it as a reference to spot possible issues that you’re looking to address. - Sidechain and EQ match:
Fab Filter added a new way to use the sidechain capabilities of this eq. Typically, you’d use this feature to match a reference track’s tone and spectrum balance, contrasting both tracks’ spectrum and manually matching them. Still, now, Pro Q 3 takes you there automatically with AI assistance.
Compatibility:
Supports Windows 10, supports macOS 10.10 or higher, runs on 64 bit and 32 bit systems, and comes in VST, VST3, AU, and AAX formats.
Summary:
Fab Filter Pro Q 3 is an improvement of both of its predecessors. This EQ has been very well known for its transparency and versatility, and it keeps getting better with each release. This latest plugin version came out in 2018 and is still one of the best equalizers to use regularly.
One thing that you can appreciate from Fab Filter is that they continuously improve their plugins to optimize your performance and, obviously, your workflow. Use Pro Q3 if you want transparency and accuracy, as this is probably the best tool to use when you need precision.
17. AudioThing Motor (Tremolo, Vibrato, Panner)
More Info & Price (Trial Available)
AudioThing’s Motor gives you mechanized tremolo, vibrato, and the ability to blend the two signals for a unique sound.
The next plugin on our list is unique. It is inspired by an experimental unit called the Crystal Palace, which enthusiasts created in the last century. This machine allowed you to mix many signals simultaneously and, thanks to the movement of the motor, get unique sounds.
As for the Motor plugin, there is generally Tremolo, Vibrato, and Panner with Rate setting. But the fun part starts when you feed it a second signal into the sidechain. The two different sounds will overlap based on the effect settings and the selected waveform. Now let’s break down the features one by one.
Key Features:
- Tremolo, Vibrato, And Panner
All in all, you get three effects: Tremolo, Vibrato, and Panner. At the bottom of the plugin, three knobs allow you to adjust the amount of each effect. So the smaller the value, the less noticeable it will be. - Adjust The Rate
In essence, the Rate knob will be responsible for the speed of each effect. You will have the option to set it based on the beat or manually. In the latter case, click on the small note icon to make this possible. - Change A Waveform
Also, a great feature is that you will have the ability to change the wave. The default setting is Sine, but you can click on the icon, and a list opens up, including Triangle, Square, Saw Up, Saw Down, Sine Up, Exp Down, and so on. - Balance Knob
The Balance knob will be the main one if you blend two signals simultaneously. That way, you can go in the direction of the Straight signal or Sidechain or look for the right ratio of both. - Motor Speed
It is also worth mentioning that you can influence the Speed of the Motor. Specifically, how fast it starts or finishes spinning. It would be a good tool to get interesting effects at the beginning or end of songs.
Compatibility:
AudioThing Motor is available for Windows 7 or higher and macOS 10.9 or higher, both 64-bit only. It comes in VST2/3, AU, and AAX formats.
Summary:
AudioThing’s Motor is a pretty cool plugin for experimenting with sound that can give you some extra inspiration. You get tremolo, vibrato, and panner and the ability to blend two signals and get unconventional solutions. All in all, you can safely use it both for mixing guitars and other instruments.
18. Spring (Spring Reverb)
More Info & Price (Trial Available)
You may get inventive with your instruments with Eventide Spring Reverb.
We all bemoaned the harsh assault and metallic sounds of spring-based devices back when they were the only inexpensive way to produce fake reverb, but just like with tape distortion, we found ourselves missing it once it is gone!
Eventide’s Spring is a careful imitation of the type of spring reverb you could find in a guitar combo. It is available as a plug-in that supports the standard Mac OS and Windows plug-in formats as well as an iOS app, and it has a wider range of options than the actual spring reverb.
Key Features:
- Controls
There are controls for adjusting the spring tension, quantity of springs, and low and high damping, in addition to the Wet/dry Verb Mix and Decay knobs. There is a Tank switch to choose between big and small reverb tanks and a separate row of controls for the Tremolo effect with options for speed, depth, and modulation.
Additionally, there is an option for pre- or post-reverb tremolo. While I discovered that setting Tension clockwise and Tank size to the high produced the most realistic reverb sounds, other parameters may be excellent for interesting effects, especially when used with tremolo and modulation. A perfect companion to a spring reverb, the tremolo function may be used to produce an amp-like tremolo. - Modulation Level and Resonance
You may modify the modulation level and resonance, which regulate a fixed-speed pitch modulator to add a chorus-like glow, on the right side of the bottom row of settings. Resonance gives a faint but beneficial edge to the modulated sound and operates wherever the high damping frequency is set.
You may manually adjust, Tempo-sync, tap, or mute the tremolo speed. When switching settings, a Mixlock function at the window’s top lets you balance the wet/dry mix. A comparison feature is also available to compare the current configuration to the previous one. - Morphing
Eventide’s well-known horizontal transform slider, an active switch, Tap Tempo, and a Hotswitch to switch between the two control settings are all located at the bottom of the window. Drag the white dot in the ring of any control to choose the beginning position, and the control will then display a blue arc indicating the range across which the control may travel throughout the transformation.
This allows you to configure the ribbon parameter ranges. In most DAWs, ribbon position may be automated alongside any other control, and in those that offer MIDI control of plug-ins, it reacts to the CC1 MIDI controller when used in conjunction with a pitch bend wheel. - Presets
There is a fair collection of presets that demonstrate the versatility of this plugin, ranging from some really vile and metallic effects to a very believable guitar amp reverb. But maybe what surprises people the most is how, even when the reverb is set wet, as some of the short spring settings do, it still sounds good when blended with the dry sound.
Compatibility:
The plugin is available for Windows 8 or higher and macOS 10.9 or higher, both 64-bit only. It comes in VST2/3, AU, and AAX formats.
Summary:
Additionally, Spring’s applications go much beyond those of a guitar effect. It may be used to produce vibrant voices, textured synth treatments, and some unpleasant percussion sounds.
While the pre-post option, in conjunction with the independent pitch modulation, makes it simple to create movement or even rhythmic pulsations owing to the tempo lock function, the tremolo makes it simple to obtain those classic surf guitar tones. It’s worth looking deeper because this plug-in isn’t overly pricey and provides a welcome diversion from all those polite digital reverbs.
19. XLN Audio RC-20 Retro Color (Saturation/Lo-Fi Tool)
More Info & Price (Trial Available)
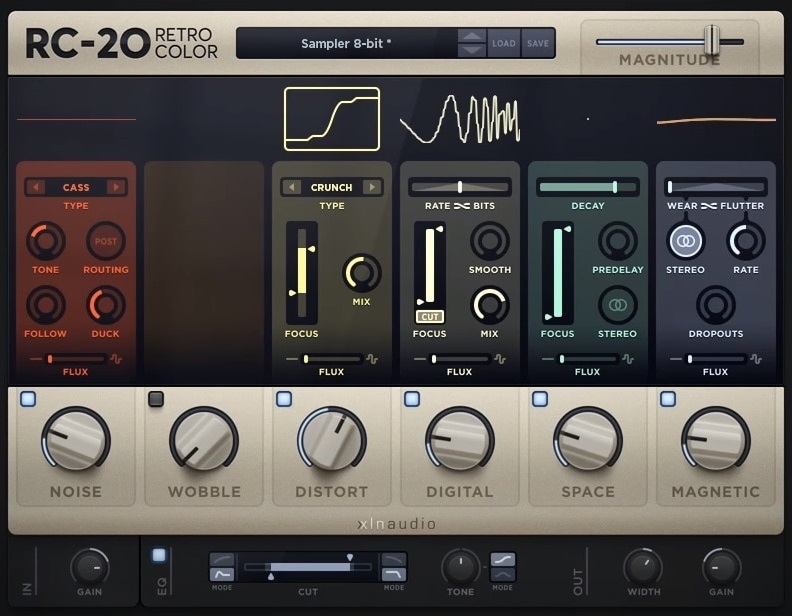
The RC-20 Retro Color from XLN Audio would be a great plugin to give color to instruments or an entire mix bus.
Giving color to the mix bus or individual instruments is always a good idea. The sound becomes more exciting and gets its own “flavor.“ And the next item on our list will give you plenty of opportunities to experiment with this. It is the RC-20 Retro Color from XLN Audio.
You get six different processing modules here, which include various types of effects. In addition, you can either apply all the sections at once or disable individual ones, choosing only what you need. And, of course, there is the section that is responsible for the overall output.
Key Features:
- 6 Sections Of Processing
Overall, the plugin will be divided into six sections: Noise, Wobble, Distort, Digital, Space, and Magnetic. In each of them, you will be able to select different types of effects and apply settings like Flux, Mix, Tone, and more. - Get Control Over Each Section
If you don’t need any of these sections, you can turn them off by pressing the little blue button. Or use the big knobs to control the amount of a particular effect. For example, use them to add that to your liking. - Magnitude Control
The big Magnitude slider in the upper right corner will be like a Mix control. Thus, you will get a completely wet signal in the right position. The more you move this to the left, the more the dry signal will be mixed in. - Master EQ Section
At the bottom of the plugin, you will have a separate section responsible for EQ. Here you can apply Low and High Pass filters and select their slope. In addition, you will get a Tone knob which can be used as a tilt filter or bell. - In & Out Control
And, of course, you will have separate controls for Input and Output. Notably, you also get a separate Width knob in this section to make the stereo picture a little wider.
Compatibility:
XLN Audio RC-20 Retro Color is available for Windows 7 or higher and macOS 10.10 or higher, both 64-bit only. It comes in VST, AU, and AAX formats.
Summary:
The RC-20 Retro Color from XLN Audio is a wonderful processor, or modern channel strip, that allows you to add color to your sound. It has modules including Noise, Wobble, Distort, Space, and others. Also, it has a pretty powerful Master section, where you can adjust the tone and set the width.
20. Soundtoys Radiator (Preamp/Saturation)
More Info & Price (Trial Available)
Or Buy Here (Support Integraudio)
Radiator is a digital model of the classic rack-mounted tube mixer Altec 1567A, turned into a dual drive tube input channel and EQ.
Radiator enables two different ways to load the transformers with its mic/line switch on the left side of the interface. This mic preamp is loud, colored, and warm-sounding. It has a two-knob tone control, bass, and treble, which recreates the frequency response from the original hardware. Its input and output amplification stages are independent to add more character.
Besides the mix knob, which works as a wet/dry control and was included as a feature for the convenience of parallel processing, Radiator meticulously recreates both gears from inside out, even maintaining an internal signal path of one channel of the 1567A.
Key Features:
- Tone:
Radiator is very smooth and warm-sounding. When it is there, it’s pretty evident in the sense of instant improvement of the source as soon as you load it up. Even if you crank up both stages at a time, it’ll still feel very natural and musical. Compared to the Neold plugin, although they share some similarities in their tone, Radiator is warmer and punchier, whilst V76U73 adds a lot of space to the overall sound and gives you more control over the tone and dynamics. - Signal Path:
The input knob controls the level of the signal feeding into the first tube stage, then it runs through the two-band EQ, and finally goes to the output, which measures the signal coming out of the EQ section feeding into the second tube stage. This way, you have two separate saturation stages, which is highly appreciated if you want to add some analog texture but don’t want it to go too far. - Two-band EQ:
Both knobs, bass, and treble provide simple broad curves. The bass curve goes from a smooth wide boost to a more centered cut, whereas the treble offers even more variation, especially as you reach the maximum. - Line/mix switch:
This switch is part of the tone control section and can make up for cool, odd variations. Choosing the mic path will make the unit more transparent, slightly increasing the sense of space, while the line path will have a more consistent frequency response and enlarge the signal making for a fuller sound. - Little Radiator:
Radiator comes with his little brother, but this one is made after another Altec unit called 1566A, a single-channel mic preamp from the ’60s. As with the larger Radiator, they’ve included a mix knob for parallel processing and the Heat knob that controls gain. One attractive trait of this model is its bias switch, which offers the option of different saturation characteristics from several 1566A units. Therefore, when it’s on, you get a more aggressive saturation, and when off, it’ll keep the subtlety of a well-maintained piece.
Compatibility:
Supports Windows 7 or higher, and macOS 10.8 or higher, runs on 64 bit only, and comes in VST2, VST3 AU, and AAX formats.
Summary:
Soundtoys worked hard to make the sound of this digital emulation as realistic, warm, smooth, and you can find some good use for it with drums and percussions, though it works well on anything. The graphic interface is intuitive, to a point where you can sit back and relax and let it do its thing.
Regardless, it is fair to say that Radiator is a lot darker-sounding than V76U73 and PreX7 but offers a cleaner sound. It doesn’t give you too many options to manipulate the sound more freely, as done by its predecessors, but this plugin is best if you look for an exciting color to add to your palette.
Bonuses:
Arturia B-3 V2 (Tonewheel Organ Emulation)
More Info & Price (Trial Available)
B-3 V2 by Arturia offers a highly creative environment with realistic tonewheel organ sounds and a carefully made rotary speaker add-on.
With many modulation options for the sound, the B-3 V2 plugin features all the textures most organs have. With great attention to detail, the B-3 V2 will work on an elite quality physical modeling technology.
With advanced controls to optimize the instrument, the plugin also features a realistic interface with two keyboards and a swell pedal, along with percussion settings.
Key Features:
- Effects
The B-3 V2 will give any producer a complete experience. The Arturia plugin features twelve pedals with different effects: Chorus, Flanger, Compressor, Delay, Distortion, Phaser, Equalizer, Reverb, Stereo Pan, Analog Delay, and Tape Echo. These effects can be combined when added to the four available slots in the Effects panel. By adding specific combinations, you’ll venture to different sounds, aesthetics, and shapes. - Drawbars
The Organ VST by Arturia gives an automation option to the movement of drawbars using envelopes, LFOs, and step sequencers. The highly customizable Drawbars feature possesses ten modulator slots that can individually hold one LFO, multi-point envelope, or step sequencer. The feature, part of the Mod section, is an exciting opportunity to practice sound design and modulate the note’s characteristics to get sharper attacks, improved harmonics, and more. - Rotary Speaker
The amount of work that went through B-3 V2’s rotary speaker is incredible. You can produce subtle variations on the sound with the different cabinet models that you can switch between at any time. These models are Closed, Open, 122 Closed, 122 Open, and 147 Open. You will also have the option to determine the speed at which the horn and drum will be rotating. The speed feature, when active, can be pointed towards a faster or slower setting. Brake, stereo, and balance are also featured in the Rotary Speaker panel. By selecting the values for these many built-in functions, you can easily produce any vibe for your song.
Compatibility:
This plugin is available for Windows 7 or higher and macOS 10.11 or higher, both 64-bit only. It comes in VST 2/3, AU, AAX, and RTAS formats.
Summary:
The B-3 V2 by Arturia delivers versatility and authenticity with a virtual organ instrument. Featuring a unique and modern technology called TAE®, the B-3 V2 plugin effortlessly portrays an analog-synthesizer quality at creating the most detailed and transparent textures of analog oscillators.
You can define an immense array of variables to accurately shape the sound and the adjustments of the organ model. Equipped with an easy-to-use interface, the B-3 V2 is an excellent option for anybody that wants to create and experiment with a high-quality organ synthesizer.
Related Reading:
Top 14 Arturia Plugins For Musicians
Image-Line Harmor (Additive/Subtractive Synth)
More Info & Price (Trial Available)
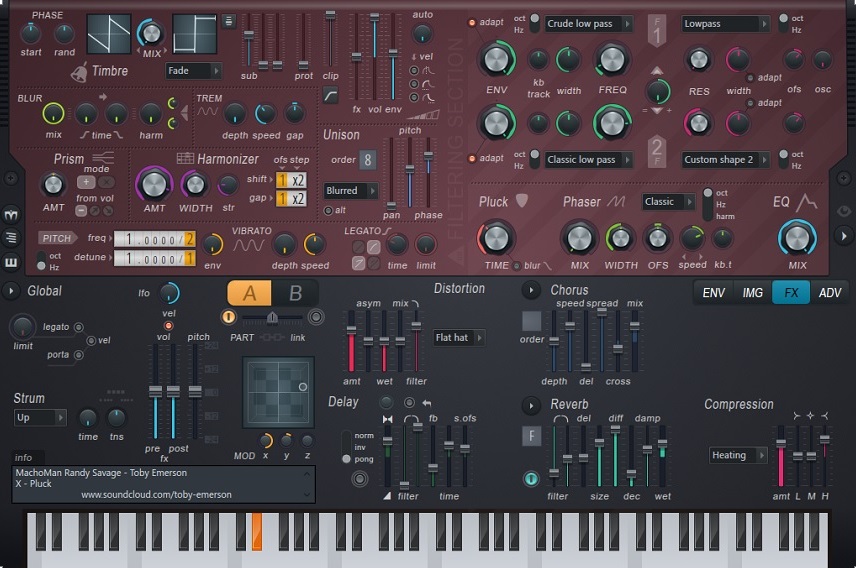
Harmor by Image Line is an additive/subtractive synthesizer, with subtractive features like the filter also taking an additive approach.
Hence, to summarise the sound design process, you can build up your sounds from basic waveshape (like sine, sawtooth, etc.) and add harmonics to it, after which you can take the subtractive approach to subtract unwanted sonic properties from the sound.
Since you can add harmonics and harmonies to the waveform selected in the first step, hence the name – Harmor. However, this instrument’s unconventional design, layout, and terminologies may make you scratch your head at first and read its manual, but it will give you plenty of inspiration. So first, let’s look at the key features of the software.
Key Features:
- Two synthesizers in one
The unique feature of this synthesizer is that it has two parts, which can be the same or different, and you can also use them in a mix. Each of these parts is a separate synthesizer by itself, and you can have different sounds coming from both of these parts. You can also see these parts as the same by linking them. - Easy modulation assignment
You can modulate parameters like Volume, Dry/Wet mix, filter parameters, pluck amount, and a lot of other different options, by selecting it from a simple drop-down menu and then assigning a modulator (like an envelope, LFO, keyboard mapping, velocity mapping, etc.) to it. Hence, there’s no drag-drop option to perform modulation. Further, modulations can be edited, snapped to the grid, and locked to the tempo.
The envelopes in the plugin are multi-stage and powerful enough to double up as sequencers and arpeggiators. In addition, Harmor can also analyze the audio and suggest an envelope based on that. - Dual Oscillator section
Harmor has two oscillators to mix between and select from. You can load up a stock waveform on each of these, edit its phase, and randomize it. You can randomize the waveform itself and load up any complex waveform which you could further subtract from. The two oscillators can be mixed with and into each other using algorithms like fade, subtract, multiply, pluck, etc. - Multiple filter algorithms
You get about 20 filters for the subtractive part, from a classic low pass to a band phaser to a custom shape filter. Further, there are ten more different algorithms like a wide bump, double cone, etc. So there are two filters in total that you could use. - Instant visual feedback
To comprehend and understand the partials and harmonics of the sound, Imagine Line gives you analyzers and charts to monitor the audio visually. Apart from that, the envelopes, LFOs, knobs, sliders, etc., are well-laid out and easily editable, giving you good visual feedback for your actions. - Image Synthesis
You can drag and drop JPEGs and PNGs on this synthesizer, and the Image synth engine will convert that to audio which you could further edit the image, control the speed, mix, loop, and position in time. This synthesis can produce great sounds with sweeping timbres and unconventional sonic movements. - CPU Efficient
Harmor is programmed as a multi-threaded processing software, which gives us some extra CPU core. Hence, even after generating multiple harmonics and partials and using many tools, the plugin is light and not heavy on the CPU.
Compatibility:
Unfortunately, Harmor is written in Delphi and is not available on Mac. However, it can work on Mac and Windows if you use it on FL Studio. Though, Harmor is not a standalone plugin and can only be used on FL Studio, with general FL Studio CPU requirements.
Summary:
When it comes to generating pluck sounds, Harmor is a great choice. It has a unique additive synthesis approach with its interesting subtractive synthesis blend. However, the plugin may appear all over the place because of its complex arrangement and design.
It doesn’t function like other synthesizers but has a huge fan base because of its interesting sets of presets and functionalities. For example, that includes effects like blur, prism, harmonize, tremolo, etc., which may look unfamiliar but are great tools to shape your sound and give them a unique texture.
Soundtoys Little Plate (Plate Reverb)
More Info & Price (Trial Available)
Buy Here (Support Integraudio)
Little Plate is a plate reverb plugin by Soundtoys.
Soundtoys is a beloved audio plugin company that delivers unique and instantly recognizable plugins. Little plate is a plate reverb that was inspired by five unique EMT 140 plate reverbs. Soundtoys gathered inspiration from them and created Little Plate as an easy-to-use and instantly inspiring plate reverb catered to all music producers and engineers.
Key Features:
- Decay
As I already mentioned, Soundtoys was inspired by the iconic EMT 140. One area they decided to push to new boundaries is decay. The maximum decay found on the EMT 140 is five seconds, while on the Little Plate, you can push for 32 seconds or infinity. If you set the decay to infinity mode, the reverb tail never ends. This is very useful for those of us who are into sound design since you can create a long tail and resample it, process it in different ways, and resample it again to create haunting atmospheres and textures. As for classic vocal usage, I’d stick to the 1-2 second realm for dreamy vocals or the 0.5 seconds mode for classic subtle vocal plate reverb. - Mod and EQ
Mod is a switch inside Little Plate that introduces hints of modulation on the reverb tail. It can thicken up your reverb and add a dreamy and vibey quality to it that’s instantly associated with Soundtoys’ brand of sound. The EQ included is very simple and functions as a low cut. You can set it anywhere from 20Hz to 1kHz. It does a great job at cleaning up the low end or removing muddiness in the low-mid frequencies. - Simple to use
The best part about Little Plate is how simple it is to use and how inspiring it can be simultaneously. First, it comes with only four controls, and that’s all you need to create great-sounding reverb tones. Finally, the preset menu is filled with inspiring presets, just like any Soundtoys plugin.
Compatibility:
Soundtoys Little Plate is available on Windows 7 or higher and macOS 1010 or higher in VST2, AAX, and AU formats.
Summary:
Little Plate is one of the easiest-to-use reverb plugins that don’t sacrifice creativity and sound quality for the sake of utility. The decay knob can inspire countless new sounds, and the infinity mode is great for creative effects, atmospheres, and sound design excellence.
Related Reading:
12 Best Soundtoys Plugins For Pro Sound
Waves Clarity Vx Pro (Noise Reduction For Voice)
More Info & Price (Trial Available)
One of the latest additions to the Waves family in 2022, the Clarity Vx Pro is here to eliminate the noise with a simple central knob.
The multi-band processing, Waves’ deep learning technology, and ease of use make this plugin a very good and effective tool for audio engineers. It is worth mentioning that this software is designed specifically for voice de-noising. The algorithms, usability, and results are optimized for that use. Waves also come with a lighter version of this plugin – Waves Clarity Vx.
The main feature is the real-time processing that isn’t common in these plugins. Most of them need to process the audio to show the final result or show a real-time preview at a reduced quality. This time you’ll get instant feedback on the final noise-reduced audio.
Clarity Vx Pro clears the audio using an advanced deep learning algorithm that delivers good results. The main central knob, which activates the suppression, allows you to dial the amount of reduction you want. Besides noise removal, this control shares another interesting feature, the ambiance preserving option.
This function will remove the voice and keep the background noise at a good level. It’s not very commonly implemented, but it will be very effective in cases such as crowd cheering, where you don’t want a predominant voice present.
This suppression is achieved by the aforementioned deep learning technology, which introduces different functionalities. This plugin version comes with three Neural Networks that focus on different aspects. Three separate networks focus on different aspects of noise reduction.
The Advanced Controls differentiates this plugin from its younger sibling, the Clarity Vx. The top added functionalities include a Reflections knob that restores a certain amount of the natural voice reflections without adding extra reverb. The Analysis button will process the audio as mono or stereo, achieving better results with the latter. The stereo processing adds a heavier load on the CPU than the Single mode, so bear that in mind.
We’ll mention the other features, but I encourage you to test the plugin and find out how they work:
- The sensitivity button lets you choose between Normal and High modes.
- Process amount, a slider that changes the amount of general processing.
- Ambiance Gate, Thresh, attack, and release. A bit self-explanatory, but test them and see how they behave.
As a final tip, try not to go extreme with the main suppression knob since it’ll make the voice sound very artificial as soon as you go overboard. Use it with confidence but carefully, and keep in mind that you don’t need a perfectly clean voice track most of the time. The little noise left will likely blend in and be unnoticeable once it’s mixed with instruments, background music, or other sounds.
Key Features:
-
- Neural networks
A neural network is a learning machine capable of storing information with the help of dedicated algorithms in order to make decisions quickly. In this particular case, Clarity Vx Pro uses neural networks to analyze each aspect of your waveform, providing instant corrections to your vocal track. It can automatically detect noises and other unwanted variations in your waveform and correct them on the go. - Main control knob
The main control knob is the biggest one on your screen, and it will be imperative to set the adequate range in which ambiance will be separated from the voice. For example, if you need to remove said ambiance from your speech, the value you set on this knob will be the threshold that the processing mix will work on. - Dedicated faders
There are some “Band Process” faders assigned to each particular frequency band. They are important controls that determine how much of your signal is being affected by the neural network, according to each frequency band. The intention is to reduce any processing per band, not add more. Be aware that the more it’s being used, the more CPU power will be required. - Analysis mode
If your vocal track requires some special stereo treatment, this option might be useful to you. The “Analysis Mode” is introduced after you decide whether you want your tracks in a single or double-channel distribution. The single mode sums up both left and right channels before analysis, and the double mode separates them very clearly – either by different ambiance or the voice quality itself. - Neural network selector
If introducing a neural network sounds too good to be true, Waves decided to go even further: you can choose between three distinct neural networks that differ in values, parameters such as bias and ratios, and statistics.Neural NetworkVoice FocusBroad 1Isolates primary and secondary voices from the ambiance, preserving the main voices.Broad 1 HFSimilar to the previous option, but with an extended high-frequency focus.Broad 2Isolates primary voice from secondary voices and ambiance, focusing on the main speaker or singer only.
- Neural networks
Compatibility:
This plugin is available for macOS 10.14.6, 10.15.7,11.6.2, and 12.3 (64-bit only) and Windows 10 or higher (64-bit only). It runs in VST, VST3, AAX, and AU plugin formats. It’s compatible with M1 MACs only on Rosetta.
For more information on system requirements and authorization instructions, check out the Clarity Vx Pro User Manual.
Summary:
Vocal processing is not an easy task, and removing noises or unwanted elements from a recorded track can be very difficult to achieve. Glady, we have plugins like Waves Clarity Vx Pro, which makes heavy use of neural networks and algorithms to get the job done.
You can isolate the noises, enhance the voice’s qualities, and even separate multiple voices with this technology.
14 Best Free VST Plugins For Ableton Live
1. Waves StudioRack (Plugin Chainer)
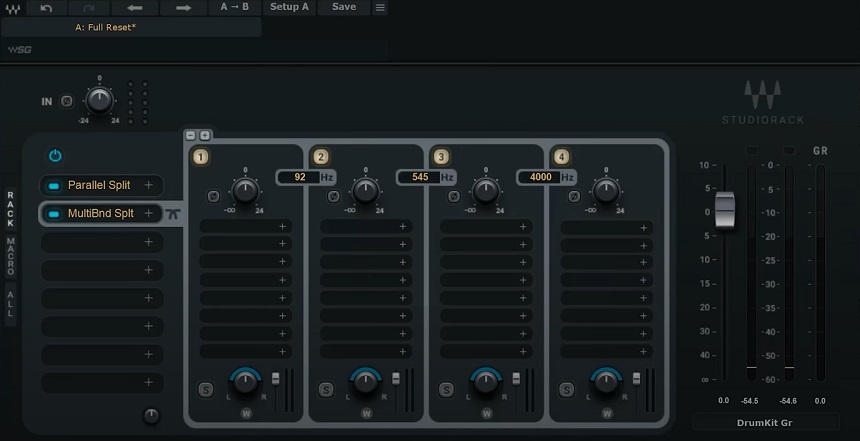
StudioRack, Waves’ plugin chainer, benefits die-hard Waves enthusiasts because it can host plugins from other manufacturers.
StudioRack is a plugin utility originally launched in 2014 by Waves and recently upgraded to allow users to create chains of plugins. The goal is to view them as a unified whole rather than a collection of unrelated plugins.
A processing chain for the vocals or the percussion bus is required. Alternatively, you may build a multi-effects rack to simultaneously process delay, reverb, and pitch shifting. StudioRack is perfect for projects like these.
Key Features:
- Interface
StudioRack can be used like any other effect plugin in your favorite audio editing software. A plugin, parallel processing split, or multiband split can occupy each of the eight available slots in each instance. Copying and pasting plugins and presets are as simple as dragging and dropping.
If you need to flip the phase of the incoming signal, you can use the phase inversion button and adjust the input gain to keep the gain at unity. It’s convenient to access the volume control, peak reading, and gain attenuation meter immediately after the amplified signal. - Parallel Processing
Multiband channels can be separated using the plugin, supporting as many as five separate frequency bands per instance. It’s now possible to make your multiband plugins with this method.
In addition, you can use the bands to apply different plugins, such as a distortion effect to the highs and a saturation effect to the midrange. You can fine-tune the crossover point by adjusting the frequency difference between the channels, though there is no graphical representation of this information. In the same way, you may adjust the volume and stereo balance independently for each. - Macros
Since StudioRack can store many plugins, it could become unmanageable if too many were to be kept in one area. So, in a pleasant twist, it comes with eight customizable macros that you can use to keep everything under control. The Apply button on the macros panel, the plugin controls, and the macros knob are the three ways to assign plugin features to macros.
Macros transform StudioRack from a simple utility plugin into a flexible multi-effects rack. The possibilities are exciting, ranging from offering quick access to, for example, the amount of compression in a vocal chain to delay, reverb or other effects in a chain applied to a breakdown. - More Processing Power
You can use as many plugins as you like while mixing intensive sessions without worrying about crashing your computer. StudioRack facilitates the migration of plugin processing from a local PC to a high-powered SoundGrid DSP server whenever you’re ready to switch.
You can offload all of the plugins in a given StudioRack channel’s chain with a single mouse click. StudioRack can be used with only your computer or with DSP offload via SoundGrid, depending on your needs and preferences. Find out how to use StudioRack in a SoundGrid environment.
Compatibility:
The OS requirements for this plugin are Windows 7 or higher for PC and macOS 10.9 or higher for Mac. It comes in VST/RTAS/AU/AAX formats and supports 32 and 64 bit systems.
Summary:
If you use many digital audio workstations, SudioRack is a good tool for coming up with chain mix ideas that you can easily transfer between them. The plugin’s multi-band capabilities make it even more potent, and its stereo imaging functionality, which works even without loaded plugins, helps the system conserve resources. Thanks to Waves for providing StudioRack at no cost to the public.
2. Slate Digital Fresh Air (Vintage Exciter)
Fresh Air from Slate Digital will help add clarity and brilliance to your vocals and mixes without harshness.
We often want to take the blanket away from our mixes, giving them more presence and spark. For many years this was possible thanks to exciters, special studio units that added content in the upper frequencies. The good news is that now you can achieve this for free.
Slate Digital’s Fresh Air plugin will help you do just that. It’s a dynamic processor that affects the mid and high frequencies, bringing them to life by adding air. The great thing about this software is that it’s as simple as possible since you’ll only have the two main knobs. So let’s take a closer look at it.
Key Features:
- A Simple Operation
It won’t take long to learn this plugin – there are only two knobs with which the main control is performed. In particular, these are Mid Air and High Air. Adjust them and listen to how the clarity level changes. By the way, you can also link and control them simultaneously. - Trim Control
By processing the mid and high frequencies, your signal can get hotter. Therefore, you will need to balance it with the previous level. To do this, the plugin developers implemented a special Trim knob, essentially a regulator of the output signal. - Simple Metering
Despite its minimalistic design, the plugin has a modern-looking Meter at the top of the window. It will give you a clear view of what’s going on with your signal. Also, press the Power button to bypass the plugin and compare the level with the previous one. - Based On Vintage Exciter Technology
The developers of the Fresh Air plugin claim that it is based on Vintage Exciter Technology. It is what allows it to add brilliance and shimmer. Also, several parallel processes are implemented here, which should help bring clarity to the sound.
Compatibility:
Slate Digital Fresh Air is available for Windows 8 or higher and macOS 10.13 or higher, both 64-bit only. It comes in VST2/3, AU, and AAX formats.
Summary:
Fresh Air is a great plugin for adding presence to your sound. The best part is that you can use it on vocals and other instruments and mix buses. In addition, it’s unusually easy to use. The software especially comes in handy for pop vocals, but you can also use it for any other genre, including metal.
Related Reading:
Top 7 Slate Digital Plugins For Mixing & Mastering
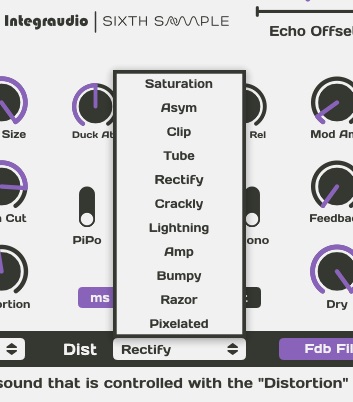
3. Integraudio & Sixth Sample Deelay (Delay, Reverb, Granular FX, Sound Design Tool)
Deelay is a wonderful plugin from Integraudio and Sixth Sample that will surprise you with its many features.
There are stock delay plugins in almost every DAW. But sooner or later, the time may come when their functionality is not enough for you, especially if you want to look for a new sound or are engaged in sound design. In this case, the Deelay plugin will be especially useful. And the good news is that it’s completely free.
The number of different presets here is simply mind-boggling. All of them have a very different sounds. So you can glide through them until you find what you need.
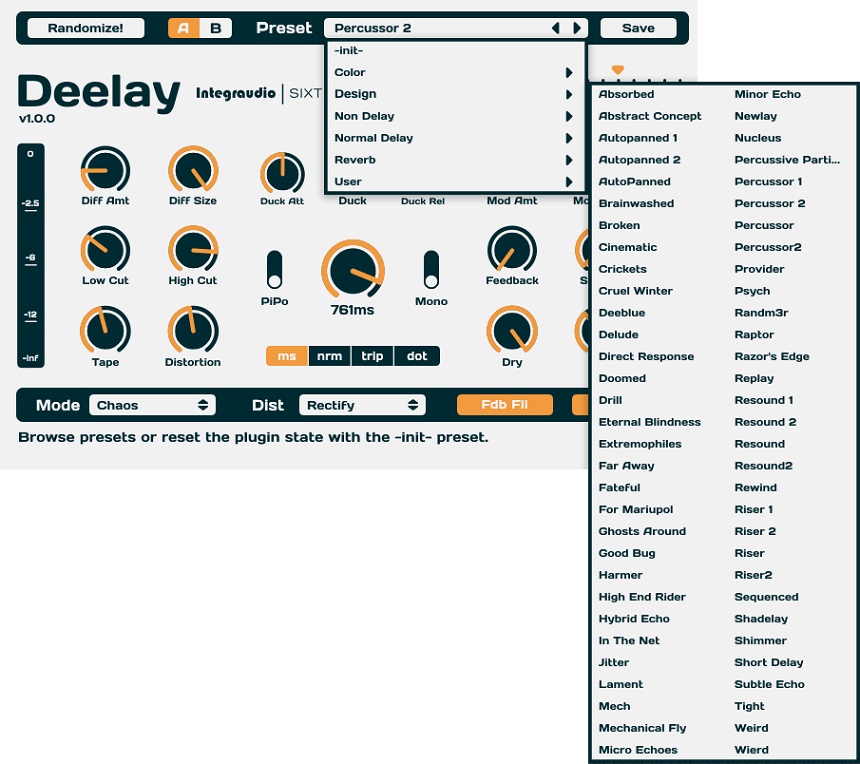
One of the main features of this software is the presence of different types of distortion. Such a variety will be difficult to find even in the well-known paid plugins.
And, of course, the different types of mods. The Deelay plugin has as many as 5 of them. That’s enough for you to get the sound you want. Let’s now look at the features in more detail.
Key Features:
- Balanced Control Layout
When you first look at the settings of this plugin, they may seem a bit complicated to you. But in fact, everything is well-balanced here. For example, in the center, you’ll have the basic parameters that are responsible for the effect’s operation, like the Delay Time, Ping-Pong and Mono switches, and the Ducking settings. You’ll have Feedback, Spread, Lo, and Hi Cut Filters on the sides. - 5 Different Modes of Operation
The mod choice will be fundamental to the operation of the delay. The plugin will give you options such as Normal, Reverse Forward, Pure Reversed, Chaos, and Reversed Chaos. For example, Reverse Forward can produce an inverted echo every second, and Pure Reversed every time. As for Chaos, it changes every echo’s pitch interval. - 11 Shades of Distortion
The number of Distortion types here is also quite extensive. These include Saturation, Asymmetrical, Clip, Tube, Rectify, Crackly, Lightning, Amp, Bumpy, Razor, and Pixelated. Each one sounds appropriate to its name. So, for example, if we say Lightning, you get harshness and white noise. And Tube will give the effect of tube amplifiers. - Extensive Number of Presets
If you don’t want to bother with the settings, you can always choose from many presets. The plugin team created them. For example, they are divided here into subgroups Color, Design, Non Delay, Normal Delay, and Reverb. Of course, you will also have the opportunity to save your custom presets. - Additional Unique Features
The plugin also has many other unique features that make it very versatile. In particular, you can control Echo Offset and Deff Quality. In addition, you can apply a distortion before the output itself. And, of course, there is a separate Randomize button that gives you a random set of settings every time.
Compatibility:
Deelay is available for Windows 8.1 and higher (both 32 and 64-bit) and macOS 10.9 and higher (64-bit only). It comes in VST3 and AU formats.
Summary:
Deelay by Integraudio & Sixth Sample is one of those plugins that is hard to believe that they are free. You get a huge number of different features that help you achieve a unique sound of delay and reverb. And it’s all thanks to the advanced settings, different operation modes, and lots of types of distortion.
4. iZotope Vocal Doubler (Vocal Enhancer)
If you need an easy-to-use solution to enhance vocals, iZotope’s Vocal Doubler plugin may be a good option.
Recording vocal doubles is standard practice in music production. It helps enhance the vocals and gives them more width. But what if you don’t have these tracks pre-recorded? In that case, software like doubler can easily achieve this effect.
Such is the Vocal Doubler plugin from the company iZotope. And the good news is that you can get it completely free. Its main advantage is that it is as easy to use as possible because you will only have a few controls. So let’s take a look at what’s here.
Key Features:
- Add Some Separation
Separation control will determine the variation between the original and processed signals. At the same time, it will add more width to the stereo picture. In addition, you can control this parameter thanks to the main center slider. - Choose The Variation
In turn, the Variation control, which is second, will do pitch variation. Use both of these parameters to delay the doubled vocals from the original, as well as to choose the desired pitch. - Effect Only Button
If you want to hear only the doubler effect, you can click Effect Only. It will exclude the sound of the original vocal, and you will only hear the doubled one. Use this if your plugin is on a separate send. - Doubling Amount
And, of course, the Amount knob will help you determine the relationship between the dry and wet signals. So, for example, you can use it if you don’t want too obvious dubbing effect, but just a bit to get the desired atmosphere.
Compatibility:
iZotope Vocal Doubler is available for Windows 7 or higher and macOS 10.8.5 or higher, both 64-bit only. It comes in VST2/3, AAX and AU formats.
Summary:
iZotope’s Vocal Doubler is an extremely easy-to-use software that quickly provides width to your vocal tracks. You can use it to add dimension to choruses or to highlight individual phrases on verses. It’s perfect for voice, but that doesn’t mean you can’t try it on other instruments.
5. UJAM Finisher Micro (Multi Effect)
UJAM’s Finisher Micro helps you quickly apply the effect and get a little extra inspiration.
Imagine a situation where you feel that a certain instrument needs to add an effect, but you don’t know which one. It can happen especially with beginners. However, UJAM has created a free plugin to help you quickly and easily solve this problem.
This software is called Finisher Micro and is essentially a multi-effect plugin. You get 25 different effect chain Modes and the Amount knob, thanks to which you can determine exactly how much effect you need. The plugin is very simple and interesting. Let’s talk about it more substantially.
Key Features:
- Select The Desired Effect
At the bottom of the window, you will see the Mode knob, which allows you to choose the desired effect. In general, there are 25 of them, and their names are self-explanatory. For example, there is Infinity, SpaceGrinder, Old Radio, Rotor Cab, Flanger, Vibrato, Chorus, and many others. - Choose The Proper Amount
When you select the desired effect, you can use the Amount knob to adjust its value. By the way, it will also affect the way the effects work. For example, they will be faster or simply more expressive. - Input And Output Adjustment
The last controls in the set are the In and Out sliders. With the last one, you can balance how much signal comes out of the plugin. And the first one allows you to send a larger amount to the plugin.
Compatibility:
UJAM Finisher Micro is available for Windows 8 or higher and macOS 10.12 or higher, both 64-bit only. It comes in VST, AAX and AU 2 formats.
Summary:
Thanks to UJAM’s Finisher Micro plugin, you can quickly find the effect you want. There are many of them here, and they all sound pretty good. This software will be a great solution to provide your mixes with ear candy. In addition, it’s extremely easy to use.
6.Analog Obsession BUSTERse (SSL Compressor)
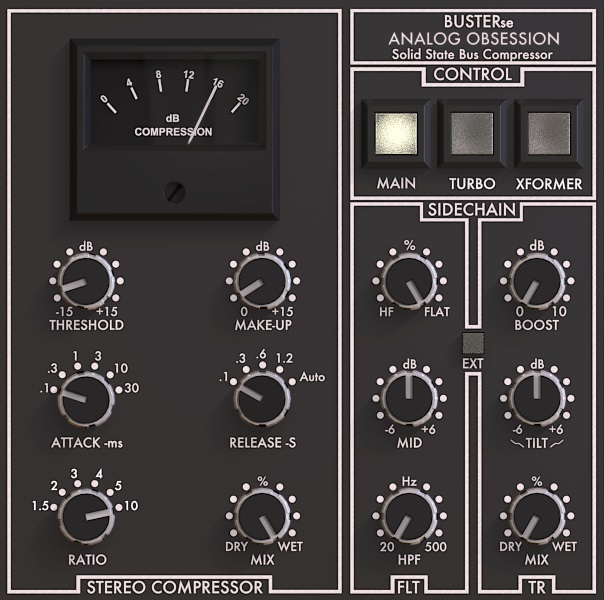
Analog Obsession’s BUSTERse plugin can be your main tool for “gluing” mixes.
Now, what do you use the bus compressor for anyway? First, it allows you to shape transients, and second, to get the effect of “gluing” the mix as a whole. The SSL Bus Compressor is a very popular equipment for this, which was part of the console. But now, there are enough plugins that emulate its operation.
Such is the free software BUSTERse from Analog Obsession. Its main feature is that, in addition to the compressor settings, it has many additional features that will help you affect the character and dynamics even more. Let’s now try to take them all apart.
Key Features:
- Familiar Compressor Settings
If you already have experience with SSL-style compressors, then the set of basic settings will not discourage you. In particular, there is the usual Auto Release, Ratio from 1.5 to 10, Attack from 0.1 to 30 milliseconds, Make-Up Gain, and Threshold control. - Dry/Wet Control
Unlike many paid plugins, the developers have also implemented the Mix knob, which implies selecting the ratio of Dry and Wet signals. This parameter can be very helpful if, for example, you want to do a parallel compression for drums. - Additional Mods
At the top right of the plugin window, you will get three buttons that are responsible for mods. In particular, the first Main will work like the usual bypass. Also, here is the Turbo, which will bring the plugin to work more similarly to the original unit. And in addition, there is an Xformer mode to get more saturation. - Sidechain Filter
The Sidechain section makes your work with the plugin most exciting. You can use it to influence how the compressor perceives frequencies. For example, there is a High Pass Filter here and two Mid and HF knobs. - Transients Shaping
On top of that, the Sidechain section has another set of TR controls to help you influence the transients a bit more. For example, you will find a Tilt control that will boost the high frequencies and cut the lows, or vice versa. In addition, there are also separate Mix and Boost knobs.
Compatibility:
Analog Obsession BUSTERse is available for Windows 7 or higher and macOS 10.9 or higher. It comes in VST/3 and AU formats.
Summary:
Analog Obsession’s BUSTERse plugin may seem a bit complicated at first. But if you learn how to use it, it can become a powerful tool for bus compression. This software will allow you to “glue” the mix and influence the transients in the best way. And the fact that it’s free is wonderful.
7. Caelum Audio Tape Cassette 2 (Saturation/Tape Emulation)
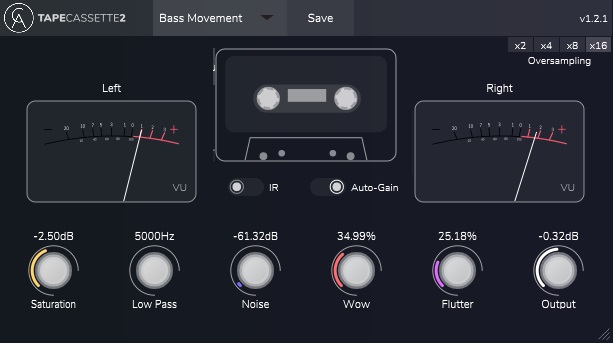
Caelum Audio’s Tape Cassette 2 might be handy for producers who make lo-fi music.
We all remember that warm cassette sound from our childhood. But, remarkably, now we can achieve it directly in our DAW to create lo-fi music. Caelum Audio’s Tape Cassette 2 plugin will help you do just that.
Tape Cassette 2 is a fairly simple plugin with some great features. Thus, you will have full control over creating your custom tape sound because you can adjust almost all of its components, right down to the noise. So let’s see what the creators have hidden under the hood.
Key Features:
- Add Some Saturation
In this plugin, you can adjust the saturation level yourself. A separate knob on the left side of the window is responsible for this. By adding harmonics, you get a crisper and more expressive sound. - Adjustable Low-Pass Filter
You will also be able to apply a Low-Pass Filter – there is a separate control for this. Its operating range is from 5 to 22 kHz. Use this to filter out unwanted frequencies. - Give It Some Noise
Another great feature here is the ability to add noise. By the way, it’s the sampled noise from the Type 1 tape. Again, use the special knob to adjust its level. It should provide the proper atmosphere. - Wow & Flutter Controls
The two Wow and Flutter knobs also help give your sound the right cassette effect. The first is a wobbler, and the second gives a distortion effect. It would be ideal for lo-fi. - IR and Auto-Gain
On top of all this, you will also be able to apply an IR of the Type 1 Cassette. This switch is located at the top. In addition, there is also an Auto-Gain mode, so you don’t have to balance the output yourself.
Compatibility:
Caelum Audio Tape Cassette 2 is available for Windows 7 or higher and macOS 10.11 or higher, both 64-bit only. It comes in VST3, AU, AUv3, and AAX formats.
Summary:
Caelum Audio’s Tape Cassette 2 plugin will give you plenty of options to give your sound an authentic cassette atmosphere. It has all the required features, including noise, saturation, and special effects. The plugin is easy to use and especially suitable for producers making lo-fi music.
8. Analog Obsession LOADED (Channel Strip)
Analog Obsession’s LOADED plugin gives you everything you need to mix almost any instrument, especially vocals.
Using a channel strip plugin is always great because you have all the main tools for mixing a particular instrument at your fingertips. Think of it as a console that allows you to process an individual track from start to finish. That’s exactly what the plugin called LOADED will give you.
It emulates five studio units of the 500 format and one general. Here you get Preamp, De-Esser, Gate, Compressor, and EQ. The last one in the chain will be a module where you can control the input and output signals. Let’s break it all down in more detail.
Key Features:
- Preamplifier Section
The Preamp section will be the first in your chain. Here you will be able to add Gain and, therefore, more harmonics. In addition, here you will find the High-Pass Filter and the Treble and Bass Boost. In addition, you get the XFMR button, which emulates the operation of transformers. - Add Some De-Essing
When you compress vocals, you get a more expressive hissing sound, which can cut the ear. De-Esser is precisely designed to soften them. As for the plugin, you’ll have a Threshold, Release, and Mix knob. In addition, there are two modes, Band and Soft. - Gate Unwanted Sounds
A cool bonus here is the presence of the Gate. Thanks to it, you can mute the sound up to a certain threshold. It can be useful for vocals, guitar, and drums. This section also includes Threshold, Release, and Mix controls. - EQ Section
As for the equalizer, it is similar to other channel strips. In particular, you can boost and cut by 15 dB the high frequencies at 10 kHz. The same goes for the lows; here, it’s at 100 hertz. In addition, you will have two bands for High Mids and Low Mids. - Add Compression
And, of course, you will have a separate compressor. Here you get a Ratio range of 1.5 to 20 and a Threshold down to -60 decibels. There are also Auto-Release and Quick Attack buttons and Sidechain functions. In addition, the compressor has a Mix knob.
Compatibility:
Analog Obsession LOADED is available for Windows 7 or higher and macOS 10.9 or higher. It comes in VST/3 and AU formats.
Summary:
Analog Obsession LOADED is a great choice to get the channel strip plugin flavor of the hardware. You can use this software to mix each of your tracks since everything you need will be at your fingertips. Especially this software is good for those who work on live recordings.
9. Analog Obsession LOADES (De-Esser)
Thanks to Analog Obsession’s LOADES plugin, you can easily get rid of annoying hisses and esses on vocals and cymbals.
We already mentioned the de-esser as part of the LOADED plugin from Analog Obsession above. But the cool thing is that you can also get this software separately. The developers have created a different version of the de-esser called LOADES, and we can say that the plugin is quite effective.
It also looks like the units of the 500 rack series, but there are only two sections. In the first one, you will have a full set of de-essing settings, and in the second one, you will find general parameters. Let’s take a look at what this plugin can do.
Key Features:
- Set Up The Threshold
The Threshold knob will be the main one when working with this plugin. You will use it to select the amount of de-essing. You will notice quite drastic results after 12 decibels of reduction. - Use Shelf or Band
By default, the upper-frequency reduction here is in the form of a shelf. But you can switch this mode to the band and get a more narrow performance character. A separate Band knob helps with this. - Make It Softer
If you think the de-essing is too muffled, you can make it sound more expressive. For this purpose, the plugin’s creators have put the Soft function here. Click this button to see which option suits you best. - Release Control
Another very useful feature here is the Release knob. Its range is from 1 to 500 milliseconds. Thanks to this parameter, you can adjust how fast the plugin releases hissing and essing sounds. But, again, tweak this based on the material. - Mix, Input & Output
The plugin also has other vital controls to help you operate it better. In particular, this is the Mix knob for dry and wet balance. In addition, on the right side, you will see the Input and Output controls.
Compatibility:
Analog Obsession LOADES is available for Windows 7 or higher and macOS 10.9 or higher. It comes in VST/3 and AU formats.
Summary:
The LOADES plugin is a wonderful software that gets rid of annoying high frequencies naturally. There are enough controls to make it work the way you want it to. We don’t know exactly what frequency range this de-esser affects, but we have to admit that it works quite perfectly.
10. Chow Tape Model (Tape Emulation)
The Chow Tape Model plugin from Chowdhury DSP will give you the warmth of tape and the ability to achieve a crazy sound.
We all know that tape saturation is an important part of music production, especially if you want to get some warmth and breathe life into your tracks. And all this will be quite possible, thanks to the free plugin Chow Tape Model.
In general, you will have full control over many parameters of the virtual tape machine. Thus, the plugin allows you to recreate your unique version and get the sound just the way you want. All in all, you can either get very subtle effects or achieve unconventional, creative solutions.
Key Features:
- Gain And Filters
The first section of this plugin’s settings is pretty straightforward. Here you get the Gain section with Input, Dry/Wet, and Output settings. Then, if you click on the Filters tab, you will see two Low and High Cut knobs. - Adjust The Tone
As for the second section, things get more interesting. For example, in the Tape tab, you will have a Bias control to affect the quality of the tape. There are also Saturation and Drive knobs. In turn, in the Tone tab, you will find the Bass and Treble settings. - Loss, Degrade & CHEW Section
The Loss, Degrade and CHEW Section will be responsible for the behavior of the tape player. In particular, you will have control over parameters such as Gap, Thickness, and Speed. In addition, you will be able to provide the sound of old tape that degrades and gets chewed up. - Mess Up Your Sound
At the end of the settings chain, you will see two boxes Flutter and Wow. Thanks to them, you can get weird effects, most suitable for lo-fi music. Each tab will have Rate, Depth, and other settings. - Oversampling And Hysteresis Mode
On top of that, you will be able to change the oversampling, which will affect the quality of the signal. But be careful because this can affect the CPU load. Apart from that, you will also have several Hysteresis mods, which will also provide different sound quality of the virtual tape.
Compatibility:
Chow Tape Model is available for Windows, macOS, and Linux. It comes in VST/3, AU, AUv3, CLAP, LV2, AAX formats, and as a standalone host.
Summary:
Chow Tape Model is a powerful film emulation plugin, and it’s pretty hard to believe we can get it for free. It has incredible settings and will help you sharpen the sound of your virtual tape machine in the best way possible. In addition, there’s a Tip Jar button in the right corner where you can thank the developer.
11. TriTik Crush (Bitcrusher)
TriTik’s Krush plugin is a great audio destructive tool to help make your beats more expressive and aggressive.
Bitcrusher is a popular sound effect that involves applying a distortion by lowering the resolution of the audio signal. It allows you to achieve a somewhat warm sound. On the other hand, it can become somewhat harsh. However, providing an aggressive sound is common, especially for beats or other percussive elements.
The free Krush plugin from TriTik is just the thing to help you achieve this effect. Despite the usual bitcrusher settings, you will also get many additional ones, including modulation and filter parameters. Let’s analyze them one by one.
Key Features:
- Add Some Drive
The Drive control will be the first in your set of settings. It provides transformer-based distortion and saturation. At least it sounds like the effect of analog hardware. Add this to make the signal more expressive. - Crush & DWSP
You also get the two more standard bitcrusher parameters here: Crush and DWSP. The first will reduce your bitrate, and the second will reduce the sample rate. So that gives you a traditional bitcrush sound. - Filter Section
The Filter Section is easy enough to use since nothing is extraordinary here. You will get Low and High Pass Filters with two knobs responsible for adjustable frequency and resonance. - Apply Some Modulations
Notably, the Krush plugin also gives you the ability to modulate distortion. In particular, you can adjust the LFO rate time or synchronize it with the project. In addition, there are four different shapes of modulation and settings: Drive, Crush, DWSP, Freq, and Res. - Dry/Wet Control
And, of course, the developers of the plugin have not left you without the settings of the ratio of Dry and Wet signals. You will see them in the right part of the window. Thus, you can get a completely affected signal or hide it under the original one.
Compatibility:
TriTik Krush is available for Windows 7 or higher and macOS 10.6 or higher, both 64-bit only. It comes in VST/3, AU, and AAX formats.
Summary:
The TriTik Krush plugin can give you a nostalgic bitcrusher effect and take it beyond the usual sound. Here you can get both quite minor effects and pretty bizarre creative solutions. Krush is suitable for beats, but you can also use it for any other instrument that needs distortion.
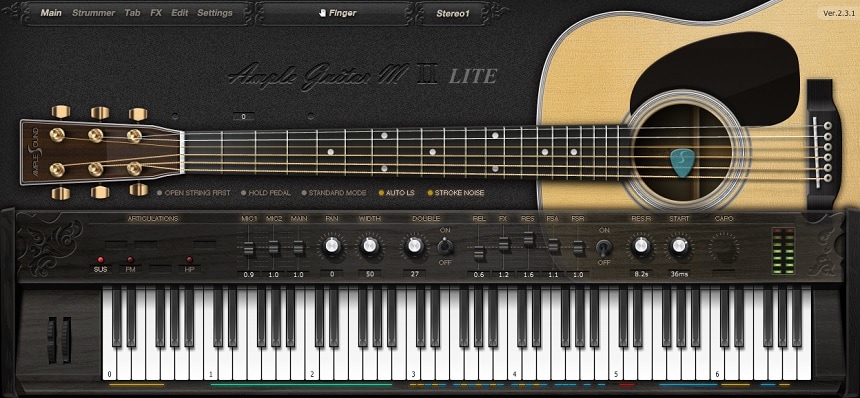
12. Ample Guitar M Lite II (Martin D-41 Guitar)
Ample Sound makes a bold move by delivering a free plugin with virtually no compromises. It is the Ample Guitar M Lite II plugin.
This plugin from the Chinese company Ample Sound is based on the Martin D-41 acoustic guitar, known for its rich sound. Beautiful inlays and the fingerboard make it a dream for many guitarists.
As with their other software, Ample Sound has taken care of deep sampling. The plugin includes Finger Instrument libraries to fit different needs and features rich firing noise, which has become more vivid and realistic. There are Sustain, Hammer-On & Pull-Off, Palm Mute, and Popping five articulations.
Key Features:
- Technology
The plugin is equipped with Capo Logic technology, which provides intelligent play according to guitar rules. It also has Double Guitar, which means different samples at L & R channel. In addition, Ample Guitar M Lite II has Poly Legato, Slide Smoother, and Alternate Tuner. - Strummer
This feature will give you unusually realistic strum samples. In total, there are 14 strum notes with 28 different ways to play each chord. In addition, four humanization settings, strum SEQ with customized rhythm, and delicate presets with drag & drop support. - Tab Player
With the Tab Player, you can download and play several standard guitar tablature file formats. When used in a DAW, the Tab Player also lets you export tablature to an audio file. This feature supports all fingering, loops, chords, articulations, and other markers in the loaded tablature.
Compatibility:
The plugin is available for Windows 7 or higher and macOS 10.9 or higher, both 64-bit only. It comes in VST2/3, AU, AAX formats, and as a standalone host.
Summary:
Ample Sound has made it possible for you to have the Martin D-41 acoustic guitar as a virtual instrument for free. You can use the rich sound of this guitar both in your DAW and as a stand-alone host.
Deep sampling and all possible articulations make this software a gift for beginner producers and experienced ones alike.
13. Ample Bass P Lite II (Fender Precision Bass)
Don’t worry if you don’t have a budget. We’ve got some free plugins for you. The first is Ample Bass P Lite II from Ample Sound.
The Chinese company Ample Sound, from time to time, pleases its users with free products. For example, you can get a virtual instrument based on the Martin D-41 acoustic guitar. Ample Bass P Lite II is also on the list of free plugins.
This software is based on the Fender Precision Bass. More often than not, free plugins can’t surprise you with excellent sound quality. But let’s be honest with you – this one is perfect. At least you can safely try it before you buy similar virtual instruments.
Key Features:
- Over 400 Bass Samples
In total, the plugin uses over four hundred bass guitar samples. It is pretty enough to provide many articulations. Namely, Hammer-Ons & Pull-Offs, Accent, and Sustain. Also, you will hear a rich fingering noise. - Implemented technologies
The creators have introduced the Auto Buzz system, Capo Logic, Customized Parameters Control, Poly Legato, and Slide Smoother technologies. You can also combine several articulations by pressing a few key switches at the same time. - Use Your Tabs
With the Tab Player, you can load and play guitar and bass tablature in the plugin. In addition, you can export the file from the Tab Player. This mode supports all necessary articulations as well.
Compatibility:
The plugin is available for Windows 7 or higher and macOS 10.9 or higher, both 64-bit only. It comes in VST2/3, AU, AAX formats, and as a standalone host.
Summary:
Ample Sound has given you a fantastic opportunity to try a virtual bass guitar for free. It has enough articulation and pretty good sound quality. Therefore, we do not exclude that you can use this plugin for your music production.
14. Voxengo SPAN (Spectrum Analyzer)
Voxengo’s SPAN will help you see what your ears can’t hear.
We all know that in mixing and mastering, it’s important to trust your ears, not your eyes. But what if there may be situations where you need to check what your ears can’t hear? If that’s the case, a visual analyzer can help you. And such a free plugin is SPAN.
It is hard to believe it is freeware because this powerful tool is very powerful. You can use it to compare your master to a reference and check the overall trend of the frequency spectrum. In addition, you will be able to analyze the track in different modes.
Key Features:
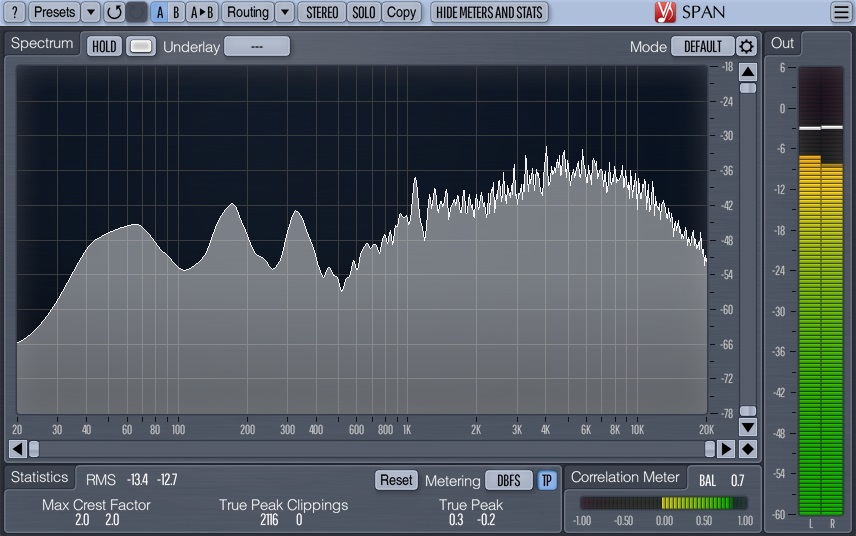
- Smooth The Frequency Spectrum
By default, SPAN will display the frequency spectrum in some detail. It means that you will see many different peaks. However, you can smooth it to see only the general trend. To do this, go into the settings, change the Block Size, and adjust the Smoothing parameter. - Expand The Spectrum
In addition, the plugin will let you see what your ears can’t hear. In the settings, you will also be able to change the display of the frequency spectrum. For example, see what’s beyond 20 hertz and 20 kilohertz. - Check In Different Modes
You will be able to see what happens to the frequency spectrum not only in stereo mode. The plugin has a few display presets. In particular, a Mid-Side Stereo option will help you analyze the information in different areas. In addition, there are also Lo-Freq Inspection, Avg and Max, and Stereo Smoothed modes. - Hold Function
In the upper left corner, you will see a Hold button. Clicking it will freeze the frequency spectrum to see the overall trend better. This way, you can analyze whether the master is balanced and what more needs to be done. - Detailed Metering
And, of course, the plugin provides detailed metering with all the necessary statistics. You will see this information below. In particular, there is Correlation Meter, True Peak, Peak Clippings info, and Max Crest Factor.
Compatibility:
Voxengo SPAN is available for Windows XP or higher (both 32 and 64-bit) and macOS 10.11 or higher. It comes in VST, AU, and AAX formats.
Summary:
Voxengo’s SPAN will be useful in cases where hearing is useless. In addition, it is a great tool to analyze the frequency spectrum if you work in an untreated room. It has all possible indicators and different types of display to customize it the way you want.
Top 7 Kontakt Libraries For Ableton 2023
1. Ethno World 6 Complete (Ethnic Instruments Collection)
For over 16 years, Ethno World has been steadily expanding and improving, culminating in Ethno World 6 Complete.
The sample library Ethno World bills itself as the “ultimate collection of ethnic instruments and voices from around the world.” By “ethnic instruments and voices,” You can take it they mean anything you won’t hear in a standard western classical orchestra or your run-of-the-mill rock, jazz, or electronic band.
Given the immensity of the Earth, it is not unexpected that the library is over 22 terabytes in size, with 28,479 samples and 310 separate sound sources.
Key Features:
- Quick Edit Tab
- The presets in the library are labeled as Hazy Piano, GoTo Piano, Arcade Piano, Icy Piano, Glass keys, Dream Keys, twilight keys, etc. There are 151 presets like these, with 106 sounds and preset categories.
- Microtuning
Microtuning enables the user to fine-tune each note and to create, load, and save customized microtonal profiles. This is a game-changer for world instruments, giving them the punch they require to offer a more authentic feel to tunes that need it. - Interface
The new version features a graphical interface that has been rethought from the ground up to provide lightning-fast response times.
There is a wide variety of customization options and cutting-edge features. Native Instruments Komplete Kontrol keyboards and NI Maschine can be tagged and interacted with in ETHNO WORLD 6 Complete thanks to compatibility with the Native Kontrol Standard (NKS). - Instruments
There are several types of stringed, plucked, and bowed instruments, as well as a wide variety of woodwinds (including many flutes) and, of course, many types of drums and percussion, all of which can be found in the library.
In addition to the aforementioned new mandolin with numerous play techniques, you may now find a Fujara, Concertina, Autoharp, Japanese koto, South American Charango, and many other instruments. - Information Database
Access to the comprehensive IDB-INFO is a standout feature of ETHNO WORLD 6 Complete, as you can access it from any instrument or voice.
In the “IDB-INFO” section of the site’s navigational menu, you’ll find pictures of the instruments and extensive information about their histories, cultures of origin, and distinctive playing styles. There are also instructions on using key switches to produce believable results with the matching instrument. - Loops/Phrases
The instruments are both multi-sampled instruments and instrument effects, and they have a wide variety of performances (loops/phrases) synced to the pace. Most instruments have a nice presence and liveliness during playback. Including each instrument as a multi-sample instrument and the phrase/loops allow users to bring their world or ethnically colored music to life.
Compatibility:
The library is available for Kontakt 5.7 or higher (NOT the free Kontakt Player). Kontakt 5.7 is available for Windows 7 or higher 32-bit and 64-bit and macOS 10.10 or higher 64-bit. It comes in VST 2, AU, and AAX formats.
Summary:
A superb collection of ethnic instruments, Ethno World 6 excels by delivering a nice collection of such instruments allied with relevant parameters and controls. The functionality of this library is very intuitive, and the most difficult part is deciding which instrument sounds best. We can safely say that its samples were carefully recorded and provide a great quality, especially if deeply explored with the built-in effects and general settings.
2. Native Instruments Choir Omnia (Symphonic Voices)
In collaboration with Strezov Sampling, Native Instruments comes with Choir Omnia – 40-voice male and female symphonic choir captured in four independent sections in a virtual instrument.
It’s a rare plugin that allows you to build realistic choir parts with deep customizations beyond a typical virtual instrument. Anything from syllables, intonations, phrases, timings, articulations, vowels, and voices can be customized, creating a wide range of dynamics and emotions.
Key Features:
- High-quality samples
The Kontakt instrument consists of samples recorded by world-renowned vocalists and choirs in six weeks, capturing live recordings at Sophia session studio with a world-class signal chain. The samples create an expressive and deeply customized sound design experience. - Workflow and synth architecture
Choir Omnia contains four main sections: Soprano, Alto, Tenor, and Bass, each section covering different pitch ranges and textures. That allows you to create smooth transitions, realistic choir, and in-depth vocal stacking. In addition, the interface offers eye candy, is easy to tweak, and is simple to work with. You can choose different articulations: Sustain, staccato, marcato, and staccatissimo. - Mic positions
There are four mic positions: close, mid-close, decca, and hall. You can adjust the pan, spread level, and reverb for each of these. That allows you to have flexibility over your room and the overall atmospheric tone. - Keys/Sequencer
The key mode allows you to play the notes individually, whereas the sequencer allows you to combine the notes in order in a complex sequence of syllabi, with adjustable note intervals, articulations, and other parameters. - Expressive capabilities
The plugin is highly expressive, especially with its Dynamic curve that allows you to set how the plugin responds dynamically, and you can set it between soft, normal, and hard. Further, you can adjust the Round Robins and Legato mode settings. Further, the room adjustments using mic positions, genders, articulations, syllables selection, etc., along with forty different voices, allow great expressive capabilities.
Compatibility:
Choir Omnia is a KOMPLETE instrument that requires Kontakt 7 or above and 70 GB of free space to store its library. The Kontakt 7 minimum system requirements are Intel Macs (i5 or higher) and macOS 10.15 for Mac, Windows 1o or higher, 4 GB of ram, and 2 GB of hard disk space.
Summary:
It’s an insane plugin with great features and design. One can create real-sounding authentic choir-based compositions and score in the comfort of working on a laptop/computer from your home/studio without having to do high-budget choir recordings. The plugin is heavy on the system but delivers great quality and sound.
From fantasy to mystery to gritty to dark, you can create almost any emotion with the versatile and expansive Choir Omnia by Native Instruments. It has over 70 GB of content, across four instruments, with 189 presets for smooth and effortless scoring.
3. Heavyocity Symphonic Destruction (Orchestral/Scoring Instrument)
The epic film score and trailer composers receive a treat in the form of this Kontakt instrument.
Heavyocity’s Symphonic Destruction combines traditional and hybrid orchestral sounds with synths, heavy guitars, and impact sounds to deliver a highly usable toolkit for modern film and trailer scoring.
Many of the samples are from Heavyocity’s Novo strings, Forzo brass, and Vento woodwinds libraries, and the distinctive processing from Damage 2 percussions makes them as bombastic as possible.
The library features two classifications of instrument engines: Designers and Performers. Each folder contains engines and instruments dedicated to specific purposes in trailer/film scoring.
From mysterious and malicious quips of staccato passages to action-packed horns and impacts, you’ll find them all. However, there’s more to Symphonic Destruction than merely a collection of samples and loops.
Each engine in the library provides different features that allow you to manipulate and customize the samples or loops to your liking. Furthermore, macros let you control multiple parameters with the turn of a knob or your modulation wheel. This feature makes it a breeze to perform with the library.
Key Features:
- Designer Engine
The Designer Engine allows you to design many kinds of sound palettes, from pad-like hybrid strings to intricate horror drones. Of course, there are numerous factory presets and samples you can use to make new patches. Each patch features three channels where you can load a sample. You can preview, load, and distribute samples across the keyboard in the Source menu at the top left of the interface. Similarly, you’ll find three menus on the top right of the interface: Cycle, Macro Sequencer, and Master FX.
The Cycle page lets you modulate each channel and its start position, velocity, and panning with a sequencer. Similarly, the Macro Sequencer modulates the Macro knob in the middle of the interface that controls six parameters: Envelope, EQ, Filter, Drive, Gate, and Space. Note that you can click on each parameter to find the envelope, filters, and effects editors. - Braam and Loop Designer Engines
These Designer Engines are similar to the main Designer Engine. However, the difference is that you’ll find the menu Designer instead of Cycle at the top right of the interface. And the Designer menu is better suited for braams and loops. Instead of sequencing, you can change the volume, pan, tune, and start position of each channel.
Furthermore, like in the previous Engine, each patch contains three channels. However, the Engine distributes each source/sample you’ll find in this Engine per octave across the keyboard. And the bottom octave plays all three channels simultaneously to give you an epic braam or a complicated loop with a single key. - Performer Engine
The Performer Engine allows you to choose various instrument types like Traditional, Hybrid, Damaged, Soundscapes, Hybrid Pedals, Damaged Guitars, etc. Each of these comes with different sounds and articulations that you can switch using key switches. Also, you can control the dynamics using your modulation wheel or the velocity, depending on what you choose.
In the Engine itself, you’ll find buttons on the left side of the user interface to open an amp envelope, a three-band EQ, and a filter. And on the right side, you’ll find a mixer, a performance editor, and space. In the Mixer, you will find three channels: Main (Dry), Hall, and Reverse FX. And the performance editor lets you add a gate or dynamics sequencer. While the gate sequencer controls the instrument’s volume, the dynamics sequencer modulates the dynamics (velocity) of the sample. And finally, the space page lets you add a delay and a reverb. - Repeater
When you select short sounds like staccatos, colegno, and pizzicato, a module called Repeater appears. You’ll probably use it for ostinatos most often. However, every good ostinato requires accented notes to enhance the rhythm, and this library’s Repeater lets you do just that. It lets you play ostinatos with 3rd or 4th note accented, crescendos, diminuendos, etc., without writing each note in your DAW. Similarly, you can adjust the round-robin from none to six.
Compatibility:
This library is available for Kontakt 6.6.1 or Kontakt Player 6.6.1. Kontakt requires Windows 7 or higher and macOS 10.13 or higher, both 64-bit only. It comes in VST 2/3, AU, and AAX formats.
Summary:
The more you attempt to explore this library, the more you realize how vast the sonic possibilities are. I would describe this library as a comprehensive sound module for trailer or film music. You will find almost everything you’d need to compose epic hybrid cinematic scores.
Similarly, although the workflow isn’t very obvious at a glance, using each sound engine and experimenting with the buttons and knobs gets you up to speed. Also, when you’re producing, try turning up the proprietary Punisher knob if you need to hype things up a little.
Related Reading:
Top 12 Orchestral VST Plugins & Kontakt Libraries (+ FREE Plugins)
4. Sonuscore Elysion II (Synth/ Sequencer)
Dive into the world of the aggressive and driving side of film and trailer scoring with the second iteration of Elysion by Sonuscore.
Elysion II comes with the entire sound palette of the original Elysion instrument (with both the GUIs available), which was a collection of ambient synth samples or highly treated acoustic instruments. Now, Elysion II adds raw and massive-sounding samples alongside a brand-new user interface and a sequencing ensemble engine from The Orchestra library.
Combine the power of the sequencer, the wide variety of the sampled instruments, and its built-in effect processors, and you’ll find Elysion II to be a formidable scoring tool all on its own.
The electronic sounds are best suited for sci-fi and action films, games, and trailers. Although, I love using such sounds combined with acoustic instruments to add impact and space to my scores.
Key Features:
- Layers
Each patch in Elysion II features five instrument slots. You can load an instrument in each to create an ensemble of sounds. Similarly, each layer lets mute/solo, shift the octave and add an arpeggiator/envelope. Note that the latter depends on the kind of instrument you have selected. Only sustaining instruments allow you to use both, whereas hits only allow arpeggiation. - Theme Browser
Click on the preset’s name at the center to open the Theme browser with over four hundred themes. Here, you’ll find three categories: Spheres, Pulses, and Animated. Spheres feature hits and pad themes. The hits are shorter sounds, whereas the pads are longer and moving. Similarly, the Pulses feature rhythmical patterns, and the Animated patches are the most intricate ones utilizing the ensemble engine to design complex arrangements.
Similarly, you’ll notice that the names of planets categorize the patches or themes. Each planet represents a sonic character. For example, Mars represents aggressiveness, Earth is familiar and pop-like, Sagittarius is violent and dark, Antares is cinematic, Mercury is lively and vibrant, and Jupiter represents joy. There are twelve such planets. - Arpeggiator & Envelope
Each layer features an arpeggiator and an envelope editor. The arpeggiator lets you set the time signature, rate, order, steps count, transposition, swing, etc. And you can write custom sequences using the sequencer, where you can draw each note’s value with your mouse. Also, the envelope editor works very similarly.
Furthermore, you’ll also find a dedicated Pan Engine per layer that adds space and movement to your sounds. You can draw shapes in the editor with your mouse to create the path for your panning to follow. - Mixing
The Mix Page lets you control the volume, pan, and send levels to the master effects. The master effects include a compressor, delay, and reverb. The reverb is a convolution reverb with impulse responses from reputable effect processors and real-life spaces.
Compatibility:
This library is available for Kontakt 6.6.0 or Kontakt Player 6.6.0. Kontakt requires Windows 7 or higher and macOS 10.13 or higher, both 64-bit only. It comes in VST 2/3, AU, and AAX formats.
Summary:
The first Elysion was a cinematic soundscape engine dedicated to ambient sounds. So, the contrasting aggressiveness of the second version is a welcome change. The samples contain up to three round robins and five velocity layers. Furthermore, the upgraded engine and user interface make the upgrade worth it even for the fans of the previous version.
I highly recommend this instrument if you often make sci-fi or action music and are a fan of electronic sounds. Similarly, the soundscapes and rhythmic themes also come in handy for producing pop and dance music.
Related Reading:
Best Kontakt Libraries For TRANCE Music Available
5. Native Instruments Cremona Quartet (Collection of 4 String Instruments)
More Info & Price
A collection of the most valuable instruments you could ever think of, right on your screen.
How about having a Stradivarius instrument on your next production? Native Instruments has made it possible with the Cremona Quartet sample library. The name is derived from the Italian city of Cremona, where its surrounding woods provided the raw material for many iconic instruments to be built.
As a result, they feature lots of personality and character, distinct qualities that only an instrument dating back to the 1600s could provide.
Other libraries, such as Session Strings Pro 2, can be way more complex in terms of instruments present, but Cremona Quartet prevails by having a one-in-a-lifetime selection of the best violins, viola, and cello you could possibly imagine, right at your DAW.
It’s incredible to imagine that some of these instruments are valued way beyond any average person could afford, yet they’re all available for your creative use.
Key Features:
-
- The instruments
Featuring a very well-selected quartet, Cremona features four outstanding instruments: a Stradivari violin called “Vesuvius,” built around 1727; a Guarneri violin called “Prince Doria,” built around 1734; another Stradivari, but this time a cello that was built in 1700; and an Amati viola built in 1614, the oldest here. - “True Solo” strings
Every note sampled on Cremona was extensively recorded using different dynamics and microphone positions, assuring no phasing issues appear on legato transitions, from pianissimo to fortissimo. This creates a vividly organic performance, just like a real player would offer to you. - “Smart” position
With the “Smart” position algorithm, you can simulate the fingerboard position any professional player would choose in an actual performance instantly. Alternating between the “Low String” and “High String” options allows you to determine precisely how you want the instrument to sound. The lower position will sound more mellow, whereas the higher position offers a clearer and brighter sonority. - Human vibrato
Basically, you’ve got a very nice vibrato effect captured from the player’s hand and later reapplied with the proper parameters on the sample itself. This ensures that the best and most fluid effect comes out of it, while in the meantime, you can also automate and control it in real-time.
- The instruments
Compatibility:
This plugin is available for macOS 10.14, 10.15, 11, or 12 (latest update) and Windows 10 (64-bit only and latest Service Pack required). It comes in VST, VST3, AAX, and AU plugin formats and doesn’t run in standalone mode. Kontakt Player or Kontakt version 6.2.2 or higher is required.
Summary:
Aside from the usual excellent work, Native Instruments has excelled one more time by simply offering the best possible string quarter you could ever imagine. Sure, what really matters, in the end, is superb audio quality and good articulations, but the instruments featured in this library really excel any expectations.
Stradivari, Amati, and Guarneri are household names in terms of fantastic luthier work, so why not have them on your next production? The sound quality is amazing, and so was the recording process.
The articulations are nice and should fit most productions without any problem at all.
Related Reading:
Top 5 Strings VST Plugins (AND 4 Best Free Instruments)
6. Output Substance (Bass Instrument)
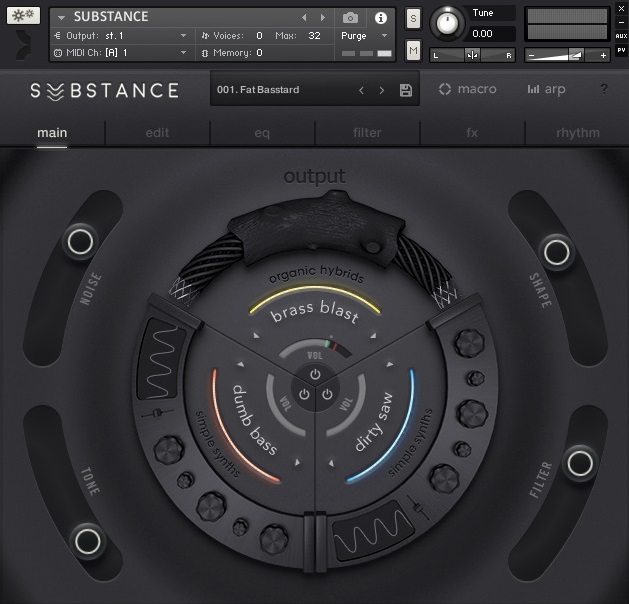
Substance by Output is a bass-focused virtual instrument that uses samples and the Kontakt engine.
The Kontakt library sounds big and impactful, with three different layers, on which you can cover different frequency ranges to make your bass sounds thicker and beefier. The tones that Output has sampled for this are unique and high-quality. Substance can be best described as grand due to its sonic capabilities, as the R&D team of Output has left nothing to complain about.
The plugin could have easily been complicated with so much functionality on a simple bass instrument. However, that’s not the case. Its interface is well-organized, intuitive, and straightforward. Anyone can learn to use it, and if not used to its full extent, one can easily browse through presets and find some great sounds. It has deep-sounding and well-sampled analog sounds, a live brass section, acoustic bass, huge polysynths, and much more for your sound design needs.
Key Features:
- Synth Engine
It has six different windows, with the main window having just four adjustable knobs to play around with, along with an on/off switch. The edit window allows you to select the sounds on each of these layers, and EQ tab allows you to go deeper into the sonic balance. Filter and fx tabs, as their name suggests, allow you to add different filters and effects to your sounds, along with a separate Rhythm window, to add more movement to your sound. - Expansive Editing
In the editing window, you can control each layer’s volume and frequency balance, ADSR envelope, pan, spread, tuning, and sample rate. This page also allows you to get into the nitty-gritty of the sounds, like each layer’s key range, glide amount, and velocity sensitivity, in advanced settings. - Sonic Flexibility
In the EQ window, you can EQ each layer separately and as a whole using the global eq, as it allows you to select the curve, q-value, and gain of the curve. Similarly, the filter page allows you to select different types of filters, the frequency on which they act, ADSR, velocity sensitivity, and more. Lastly, the effect section allows you to add a huge range of effects like distortion, pitch, motion, reverb, delay, compression, etc., as global or layer-based FX. - Rhythm Page
That is where the fun begins, as you can find a modulation editor, a modulation matrix, flux (step sequencer as a step editor), and a retrigger section. You can create some innovative movements using this, and on top of it, you also get an arpeggiator (above the rhythm window), wherein you can create ramping upwards, downwards, chords, zig-zags, and many more movements.
Compatibility:
The plugin works with the free version of Kontakt, or a Kontakt 5.8 (or higher), and is 5 GB in size. It requires a minimum of Mac OS X 10.12 or higher, Windows 7 or later operating system, and at least 4 GB of RAM.
Summary:
Substance also gives you MACRO controls, using which you can control multiple parameters at once and get hands-on with the modulations and processing of bass. There are loads of presets from different genres like hip-hop, trap, house, dubstep, bass, and more, making it the ultimate bass virtual instrument.
In addition, the sounds are massive and will give your unique music tones and allow your songs/soundtracks to stand out, especially on big stages.
Related Reading:
Top 12 Sub Bass Plugins For Producers (Best Low-End Tools)
7. Audio Imperia Constrictor (Tension Strings – Great For Horror/Thriller Scoring)
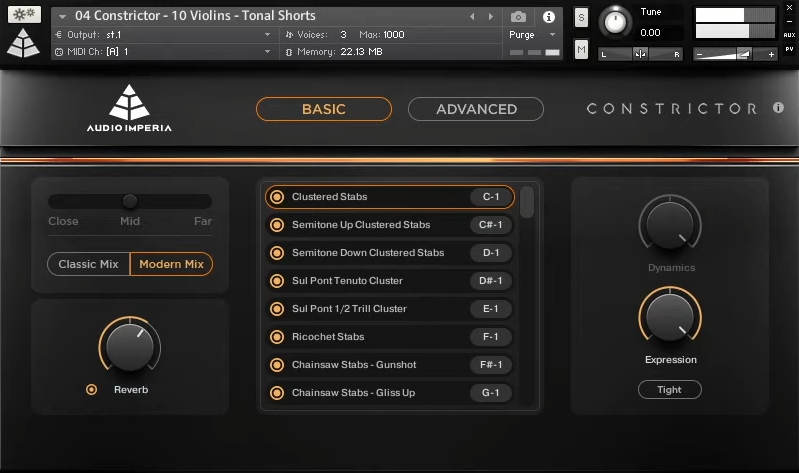
The latest library from Audio Imperia is a haunted graveyard full of weird and scary orchestral string articulations that are sure to send chills down your spine and that of your listeners.
Constrictor Cinematic Tension Strings seems well-positioned to capitalize on a desire for what the uninitiated may consider being a somewhat niche market, as the team behind Audio Imperia is comprised of a collective of professional composers and media creatives and will, I’m sure, be well aware of this.
Additionally, the need for a tension string collection may not be as unique as initially thought, given the current market popularity of suspense, thrills, and scares.
Key Features:
- Pyramid Engine
Pyramid, the moniker given to Audio Imperia’s custom Kontakt engine, is currently used by Constrictor and the vast majority of other upgraded existing Audio Imperia symphonic libraries. This is a good idea for sighted users, as having a consistent user experience across libraries streamlines finding and accessing information. - Dark Pleasures and Hidden Treasures
You will find the Basses’ “Skin Crawlers” preset particularly interesting, with its long bowed bass sustain that can transition to a scratchy tremolo when the modwheel is moved up, and it is ideal for adding some unsettling tension and malice to a score.
Notable, too, are the ‘random stabs’ presets, which, as the name implies, continuously rotate the samples via round robins of a Bernard Herrmann-style Psycho string stab—something that, of course, would have been glaringly absent from a product of this ilk if they hadn’t included it. - Presets
There are a few default settings that include musical bar lengths; however, we may need to experiment before we can reliably use these to hit a cue point, as the samples need to be tempo-synced, and the core tempo needs to be provided. A time stretch and tempo algorithm built into the engine is helpful when a library contains time and duration based presets, as it allows media composers to hit crucial onscreen cues.
Compatibility:
The library is available for Kontakt 6.2.1 or higher. Kontakt 6.2.1 is available for Windows 7 or higher 32-bit and 64-bit and macOS 10.10 or higher 64-bit. It comes in VST 2, AU, and AAX formats.
Summary:
Without a doubt, Audio Imperia Constrictor’s Cinematic Tension Strings is the most extensive and unmatched collection of tension string articulations available. Having such a terrifying creature in your composition toolkit will greatly assist in achieving the aforementioned vital textures.
Rich and dynamic, the sounds deliver all the tension, suspense, menace, and frights promised by the packaging. Especially when paired with some deep, impactful percussion, they will do an excellent job of scaring your audience.
Readings that you may like:
Other Plugin Roundups:
Genre Focused:
Top 10 EDM Plugins (And 10 Best FREE Plugins For EDM)
Top 10 Plugins For TRAP Beats (And 5 Best FREE Trap Plugins)
20 Best Plugins For Rock Musicians (+ 6 FREE Plugins)
Top 14 Trance Plugins (Uplifting, Tech, Progressive, Vocal, Dream, Hard)
Top 10 GOA & PsyTrance Plugins (Best Psychedelic Trance Tools)
Top 7 Plugins For Dubstep (With 10 Best FREE Effects & Synths)
Top 20 Synthwave Plugins (+ 11 Best FREE Plugins)
Top 15 Plugins For Techno, House, Electro, Tech House, UK Garage
Top 6 Plugins For Latin Music (And 4 FREE Tools)
Top 12 Plugins For Hip-Hop (+ Best Kontakt Libraries)
Top 7 Plugins For Game & Film Scoring (+ 6 Best Kontakt Libraries)
Top 10 R&B And Pop Music Plugins & KONTAKT Libraries
30 Best Free Plugins For DnB, EDM, IDM & Experimental Music
EQ Plugins
Top 12 Free EQ Plugins For Precise Mixing & Mastering
Top 9 Mid/Side EQ Plugins For Mixing & Mastering (+ 2 Free Tools)
Top 7 Graphic EQ Plugins (With 3 Best Free EQs)
Top 7 EQ Plugins For Mastering In | And Best FREE Mastering EQs
Top 6 Passive EQ Plugins (Klevgrand, SPL, UAD, Waves, IK Multimedia)
Top 11 Plugins For Making Metal (Best Guitars, Drums & Effects)
Metering:
Top 5 Audio Metering Plugins (LUFS, RMS, LRA, True Peak)
Top 6 Spectrum Analyzer Plugins – Spectral Analysis Tools
Top 6 Oscilloscope Plugins To See The Waveforms
Top 5 Key Detection Plugins & Software (+ Best FREE App)
Kontakt Libraries
20 Best Kontakt Libraries For All Categories (Synths, Drums, Vocals)
Top 7 Drum Libraries For KONTAKT (And 4 Freebies)
Top 7 Trap Music Kontakt Libraries (And Best Lo-Fi Kontakt Library)
Top 7 Metal & Rock Kontakt Libraries (Best Guitars & Drums)
Top 10 Guitar Libraries For Kontakt (Acoustic, Electric, Bass & Freebies)
Top 7 Trailer Scoring Plugins & Kontakt Libraries
20 Best Free KONTAKT Libraries For Various Instruments
Top 9 Piano Kontakt Sample Libraries (And 5 Best Free Pianos)
Top 10 Percussion KONTAKT Libraries (And 3 Freebies)
Top 7 Kontakt Libraries For Horror & Thriller Scoring (No VSTs)
Audio Restoration, Calibration & Utility:
Top 6 Noise Reduction Plugins (And 3 Best Free Tools)
6 Best Audio Restoration Plugins & Software
Top 7 Phase Alignment Plugins To Fix Your Bass & Drums
Top 10 Room Calibration & Headphones/Speakers Correction Plugins
Instrument Plugins:
Top 6 Vocoder Plugins (Effects & Synths + FREE Vocoder)
11 Best Rhodes VST Plugins (AND 5 Free Rhodes Plugins)
Top 12 Randomizer Plugins Including FREE Plugins
Top 6 Kick Drum Plugins (Best Kick Designer Tools)
Top 12 Woodwind Plugins (And KONTAKT Libraries)
Top 10 Double Bass Plugins (Best Upright Basses)
Top 5 Strings VST Plugins (AND 4 Best Free Instruments)
Top 6 Sampler Plugins (And 3 Best FREE Plugins)
Top 6 Classical Guitar Plugins & Kontakt Libraries (And FREE Guitars)
Top 12 Sub Plugins (Best 808 & Bass Tools For Massive Low End)
Top 10 Plugins On PluginBoutique (And 7 Best Free Plugins)
Top 11 Plugins On Plugin Alliance
Top 7 Acoustic Guitar Plugins (And 4 Best Kontakt Libraries)
9 Best Bass Guitar Plugins (And 2 Best Freebies)
Top 6 Electric Guitar Plugins (Best PAID & FREE Picks)
Top 10 Arpeggiator VST Plugins (Best Synths, MIDI Effects & Tools)
Top 10 Modular Synth Plugins (And 3 Best FREE Plugins)
Top 6 Choir Plugins & Sample Libraries (And 3 Best Free Plugins)
11 Best Percussion & Drum VST Plugins (And FREE Plugins)
Top 8 Piano Plugins (Best Sounding Pianos & 5 FREE Piano Plugins)
Top 6 Organ Plugins Ever Made (And 3 Best Free Organs)
Top 14 VST Plugins For Beginners (And 9 FREE Plugins)
Top 9 Drum Machine Plugins (And Groovebox Plugins)
4 Best Banjo Plugins (Best Banjo Instruments)
The 5 Best Ukulele Plugins & Kontakt Libraries
Top 13 Synth Plugins (And 5 Best FREE Synths Plugins)
Top 13 Sequencer Plugins (Synth, MIDI & Step Sequencers)
The 10 Best Multi-Effect Plugins (And 3 Best Free Plugins)
Top 12 Plugin Bundles For Musicians (Synths, Mixing & Mastering)
Processing & Sound Design:
8 Best Lo-Fi Plugins (PAID & FREE)
Top 11 Plugins For Mixing Vocals (For Home Studio)
Top 12 Saturation Plugins (Best Mixing & Mastering Tools)
Top 6 Pitch Shifter Plugins (And 3 Best FREE Pitch Shifters)
Top 6 Chorus VST Plugins For Musicians (And 3 FREE Plugins)
Top 6 Limiter Plugins For Precise Mastering & Mixing
The 8 Best Filter Plugins For Precise Cuts & Boosts (+ 5 Free Filters)
6 Best Autotune Plugins To Improve & Enhance Your Vocals
Top 10 Transient Shaper Plugins (VST, AU, AAX)
Top 7 Enhancer Plugins (For Bass, Drums, Vocals & Harmonics)
Top 6 Flanger Plugins (And 5 Best FREE Flanger Emulators)
Top 7 Phaser Plugins (And 3 Best FREE Phasers)
Top 10 Plugins For Mixing Drums (And 3 Best Free Plugins)
Top 7 Bitcrusher Plugins (And 4 Best FREE Bitcrushers + 3 Bonuses)
Top 6 Plugins For Voice-Over & Dialogue Cleaning (Post Production)
Top 10 Stereo Imaging Plugins (Best Old & Modern Picks)
Top 5 Multiband Limiter Plugins
Top 7 De-Esser Plugins For Better Vocals (And 4 FREE Plugins)
Top 7 Clipper Plugins (Best Limiter Alternatives)
Top 6 Chord Generator Plugins That Inspire Melodies (+ FREE Tools)
7 Best Exciter Plugins For Mixing & Mastering
Top 7 Channel Strip Plugins (And 2 Best Free Plugins)
Top 11 Distortion Plugins (And 4 Top Free Plugins)
Top 5 Comb Filter & Resonator Plugins | Melda, Kilohearts, Tritik
The 7 Best Vibrato VST Plugins | Audec, Audiority, Melda
The 7 Best Tremolo Plugins | Eventide, Melda, SoundToys, Kuassa…
The 7 Best Harmonizer Plugins | Eventide, Melda, Aegean Music
7 Best Sidechain Plugins (VST, AU, AAX) | Xfer, Cableguys..
Top 10 Noise Gate Plugins (And 6 FREE Free Gate Tools)
The 6 Best Ring Modulator VST Plugins | KiloHearts, Melda
7 Best Autopan VST Plugins | CableGuys, Melda, Waves, Soundtoys
The 6 Best Frequency Shifter VST Plugins
Top 11 Granulizer Plugins For Future Sound Design
29 Best Sound Design VST Plugins
Compressor Plugins
Top 11 Free Compressor Plugins (VCA, Vari-Mu, FET, Digital)
Top 7 Multiband Compressor Plugins (And 4 FREE Plugins)
Top 5 Diode-Bridge Compressor Plugins
Top 6 Mastering Chain Plugins: Complete VST Solutions
The 7 Best VCA Compressor Plugins (VST, AU, AAX)
Top 11 Mastering Compressor Plugins (And 2 FREE Plugins)
Top 10 Opto Compressor Plugins For Transparent Sound
The 7 Best Vari-Mu Compressor Plugins (And 2 Best FREE Tools)
Reverb & Delay Plugins:
Top 12 Reverb Plugins (And 5 FREE Reverb Plugins)
The 6 Best Spring Reverb VST Plugins | AudioThing, GSi, u-he, Eventide
Top 12 Delay Plugins For Music Production In (VST, AU, AAX)
Top 10 FREE Delay Plugins (VST, AU, AAX)
The 10 Best Convolution Reverb Plugins
Amps & Preamps:
Top 10 Guitar Amp Plugins (And 5 Best FREE Simulators)
Top 10 Bass Amp Plugins (And 5 Best Free Simulators)
Top 9 Preamp Plugins (For Vocals, Guitars & More!) + Free Preamps
Other Recommended Gear:
Top 12 NearField Studio Monitors On Any Budget
Top 10 Midfield Studio Monitors For Home Recording
Best Biggest Studio Monitors (FarField Monitors)
Top 10 Guitar Pickups for Low Tunings
Top 10 Analog Compressors For Mixing & Mastering (On Any Budget)
Top 12 USB Audio Interfaces Under 150$, 200$, 300$ 400$ (Any Budget)
Top 12 Hardware Equalizers (Analog EQs For Mixing & Mastering)
Top 6 Analog Hardware Limiters
Top 6 Solid State Bass Amps (On Any Budget)
Top 6 Ribbon Mics On Any Budget (For Vocals, Drums & Guitars)
Top 6 Cheap Dynamic Mics For Vocals Under 50$, 100$, 200$ & 300$
Top 6 Chorus Guitar Pedals (On Any Budget)
6 Best 61-Key MIDI Keyboards (On Any Budget)
9 Best 49-Key MIDI Keyboards Under 100$ & 200$
Top 5 Best 25 Key MIDI Keyboards (On Any Budget)
Top 12 Acoustic Drums (Best Kits/Sets On Any Budget)
Guitar/Amp Focused:
Can I Put Nylon Strings on a Steel-string Guitar?
Do Electric Guitars Sound Good Unplugged?
Buying Your First Guitar: 2 Things To Know
Are Tube Amps Worth It? (Tube vs Solid-State Amps)
How Often Does A Guitar Need a Setup?
Can I Play Classical Guitar On A Steel-String Guitar?
How often guitar necks need reset?
Can You Play Two Guitars Through One Amp?
Can a 6 String Bass Be Tuned Like A Guitar?
Can I leave My Guitar Tuned Down a Step? Yes, But Is It Safe?
Should I Learn 4, 5 Or 6 String Bass Guitar & Why?
How To Know If your Guitar Amp Is Broken?
How To Fix Distorted Bass Guitar Sound?
Do Fender Guitars Appreciate In Value?
Should You Put Stickers On A Bass Guitar?
How Acoustic And Electric Guitars Are Made?
Is Electric Guitar Too Loud for an Apartment?
Does a Preamp Improve Sound Quality?
If I Learn Acoustic Guitar Can I Play Electric Guitar?
How Many Hours A Day Should You Practice Bass Guitar?
Do I need an AMP/DAC To Run Bookshelf Speakers?
How to Record Electric Guitar Into Logic Pro X?
Do headphones get worse with age?
DAW Related:
Best DAWs For Musicians Available (With FREE DAWs)
What’s The Most CPU Efficient DAW? – 5 DAWs Compared
How To Make Music Without Using A DAW?
Pro Tools Guide: How To Use AutoTune & Pitch Correction?
Ableton Review: Is It Worth The Money? (Cons & Pros)
Logic Pro X Review: Is It Worth It? (Cons & Pros)
How To Use Auto-tune & Pitch Correction In Cubase?
How To Fix Ableton Crackling, Crashing & Freezing? Step By Step
Plugin Related:
What Are Audio Plugins? Different Types of Plugins Explained
What Are The Best Tools To Develop VST Plugins & How Are They Made?
Cost of Developing Audio VST Plugin: Several Factors (With Table)
VST, VST, AU and AAX – What’s The Difference? Plugin Formats Explained
Complete Guide To Noise Gate – What It Is, What It Does & How To Use It?
How To Clip My Drums? Here Is How & Audio Teasers (Before/After)
Complete Guide To Limiter: How To Use It (+ Best Plugins & Analog Limiters)
Mixing With Reverb: How To Add Life To Your Mixes
Linear Phase vs Minimum Phase EQ – Full Guide
Difference Between LUFS, RMS & True Peak Loudness Meters
How And When To Use Algorithmic And Convolution Reverb In Your Mix?
Difference Between Active EQ, Passive EQ and Dynamic EQ
Headphones & Studio Monitors:
Do headphones get worse with age?
Monitors vs Studio Headphones For Mixing & Mastering
Top 10 Room Calibration & Headphones/Speakers Correction Plugins
Are Noise-Canceling Headphones Good For Music Production?
Can Headphones Break in Cold Weather?
Why do headphones & cables get sticky?
Can Wearing Headphones Cause Hair Loss?
How Do I know If My Studio Monitor Is Blown?
Side Effects Of Sleeping With Your Headphones On
Do You Need Music Amplifier For Studio Monitors or Studio Headphones?
Do Headphones or Earphones Damage Your Brain?
Can Headphones or Earphones cause Deafness or Toothache?
FarField, MidField & NearField Monitors – Their Uses, Pros & Cons
MIDI & Synths:
Should I Buy A MIDI Keyboard Or Synth? (Are Synths Worth It Anymore?)
Why Is Audio Gear So Expensive? (Especially Synths)
Top 12 Synth Brands – Analog, Digital & Modular Synth Manufacturers
11 Tips How To Choose MIDI Keyboard
Should I Buy MIDI Controller Or Keyboard? Cons, Pros & Tips

Integration is a music website focused on audio advice, how-to, tips & tricks and best plugins (free & paid).