
Today we look at the “Top 12 Hardware Channel Strips in 2025 for Pro Mix”. Channel strips have gained significant popularity and are found in studios worldwide. Because of their versatility, they have multiple applications on the live stage and in a professional studio.
The main objective of today’s channel strips is to be able to provide a one-stop solution for all your mixing and mastering needs. It’s always interesting to see how the different strategies, innovative features and out-of-the-box execution set the leading audio equipment brands apart from each other.
Of course, there are some major similarities in most multipurpose channel units. You are sure to find a mic preamplifier of either a solid-state nature or the vacuum tube variety.
Surely, you’ll come across a compressor/limiter section next followed by a version of a multi-band equalizer. You’ll also be able to see some metering options to monitor different parameters of the unit.
Well, let’s not give everything away in the introduction. The following list talks about some very versatile, top of the line channel strips from high-end brands like SPL, SSL, Avalon, Manley, Tube-Tech, Universal Audio and many others. We have carefully selected these devices so that you can make the right decision and get good value for your hard-earned money.
Top 12 Hardware Channel Strips 2025 For Pro Mix
1. SPL Frontliner
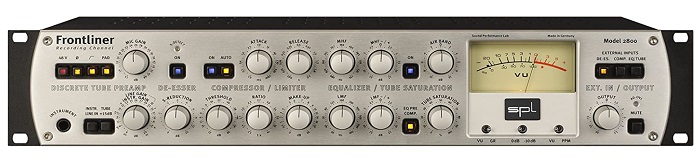
SPL has been delivering state-of-the-art audio equipment since 1983.
Having spent this much time in the industry, the company is aware of the needs of modern-day sound engineers and makes their development and design decisions accordingly. Specializing in hi-fi, broadcasting, film and music equipment, SPL is known for its out-of-the-box approach.
Whether the goal is to mix vocals or record instruments, the feature-rich Frontliner has something for every situation. The front panel is organized, and the controls are categorized under relevant sections to avoid clutter and enhance ease of use. The same organized structure also translates to the back panel, where you see separate input/output ports for each section.
Key Features:
Inputs/Outputs
SPL’s Frontliner is loaded with input/output options. The back panel includes a power supply section with a 3-pin port for the detachable power cable, a power button and a “Voltage/Fuse” set to 115V or 230V. The De-Esser, Compressor/Limiter, and Equalizer/Tube sections each have a pair of XLR input and output.
The unit also has a few Main XLR outputs and a TRS input. Finally, the Discrete Tube Preamplifier section has Line & Mic XLR inputs along with an XLR output.
- Mic Controls
The SPL Frontliner has a “Mic Gain” knob that can be used to bring your mic’s signal strength up to line level. The values on the knob range from +13dB to +68dB. The mic section also includes a button strip to control different parameters of the signal.
The unit has a “48V” phantom power button to power up condenser microphones. To overcome any phase issues caused by multiple microphones in a setup, the Frontliner provides a dedicated “Phase Reverse” button. This will invert the polarity of any mic signal by 180 degrees.
Also on board is a “High Pass Filter” that works below 85 Hz to remove any unwanted rumbling sounds in the lower frequency range. Finally, the useful “PAD” button allows further attenuation of 20dB on the mic signal.
This is especially useful for controlling the amplification of signals already too high at the lowest (+13dB) setting on the gain knob, like drums and brass etc.
- Line/Instrument Gain
The Frontliner has an instrument input on the front panel, which has an impedance of 1MΩ, while lower impedance line inputs can be connected to the back of the unit. A multi-purpose “Line Gain/Instrument Gain” knob can control the gain level of line inputs and the instrument input on the front.
The amplification of instrument signals ranges from +6dB to +43dB. For line inputs, the amplification can be set between -20dB and +10dB. Some features from the button strip, like phase reversal and high pass filtering, can also be applied to the line inputs.
The HP filter is also applicable on the instrument input. A couple of buttons in this section help you switch between the Line/Instrument input and tube preamplification. The “TUBE” switch increases the tube amplification by 15dB.
- De-Esser
The De-Esser section can be toggled on/off depending on the requirement. When on, the “S-Detect” LED will light up.
The level or intensity of De-Essing can be controlled by the “S-Reduction” knob, which ranges from 0 to -12dB. SPL tackles De-Essing on most of its devices by pinpointing sibilant frequencies, isolating them, inverting their phase, and mixing them back to the original signal. That way, the signal’s overall integrity is protected, and only sibilance is removed.
- Compressor Controls
SPL’s Frontliner has a comprehensive “Compressor/Limiter” section, which can be activated through the “On” switch. The “Threshold”’ knob here determines the level from which the compression needs to occur. The knob starts at 21dB and goes down to -58dB.
The “Ratio” knob (range: 1.2 to ∞) helps set the ratio between the original signal and the signal after compression. The knob is labeled 1:X, meaning that an increase of “X” dB on the input will cause a change in the output level by 1dB.
- Limiter Controls
The “Attack” knob can set the timing of the compression. The value on the extreme left is 0.1millisecond while the maximum value is 1,000milliseconds. With a faster attack, the transient sounds are compressed, while slowing the attack will let these transients seep through and become more audible.
A “Release” knob lets you set the time it takes for the compressed signal to return to its original level. Pressing the “Auto” button puts the Frontliner on autopilot to interact with the signal where necessary. Finally, the “Make Up” knob compensates for any loss of gain during compression.
- Equalizer/Tube Saturation
There are two toggle switches here, including one used to power the section and an “EQ Pre Comp” button allowing the user to apply EQ setting on the signal before the compressor/limiter section. The Mid-High Filter (MHF) and MHF -/+ knobs can be used in combination to set the center frequency of the parametric EQ and then cut or boost the MHF to achieve the desired tonal result.
Similarly, the Low-Mid Filter (LMF) and LMF -/+ controls can be used to set the center frequency of the bass and mids and cut/boost the LMF as required. The Frontliner also has a High-Frequency Filter controlled by the “Air Band” knob. The settings range from -10dB to 10dB. In addition, the “Tube Saturation” can be set by using the aptly labelled knob with values ranging from 0 to 100%.
- VU Meter
The SPL Frontliner has a VU Meter that ranges from -20dB to +5dB with three switches that help set its behavior. The “VU/GR” switch helps choose whether the meter will show the signal strength or the amount of gain reduction after compression.
Toggling the 0dB/-10dB switch will enhance the sensitivity of the VU meter. In addition, while the VU meter shows the average strength of the signal, a VU/PPM switch can activate the PPM (Peak Program Meter) mode to show peak levels.
- External Input Controls
The final section has a button strip that lets you choose between the De-Esser, Compressor and EQ sections. Furthermore, a master output knob with values ranging from -20dB to 5.5dB can be used to set the output level of the selected section. You’ll also find a mute button here.
Pros:
If you’re looking for an all-in-one modular channel strip, look no further. In SPL’s Frontliner, you get a compressor/limiter, de-esser, EQ/tube and a preamp section with dedicated input and output options for every scenario in a well-organized, easy-to-use unit.
Cons:
The EQ section on the SPL Frontliner is somewhat limited compared to other comprehensive channel strips on the list. Dedicated controls for low-cut filtering would’ve been a good addition to the unit. Also, having a male/female voice setting in the de-esser would’ve enhanced its capabilities further.
2. Avalon VT-737sp Tube Channel Strip
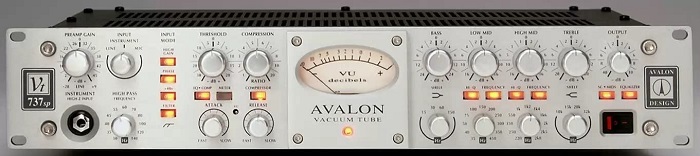
The Avalon VT-737sp uses a combination of passive and active electronics and is made by hand in the United States.
Hidden under the rugged chassis of the Avalon VT-737sp is a high-voltage vacuum tube that adds richness and warmth to directly connected instruments such as guitars, line instruments like keyboards, mixers, and DAWs alike. Also, the +48V phantom power will drive your condenser microphones for optimal performance.
Being extremely versatile, the 2-rack space VT-737sp is the ultimate direct recording solution for your mic, line, and instruments. The circuitry on board gives you access to a tube preamplifier, a detailed compression section, and a 4-band equalizer, all of which can be used separately or in combination.
Key Features:
- Rear Panel
Starting from the left, the Avalon VT-737sp’s back panel has a three-pin power port to attach the power cable. Next is the voltage selector section, where you can change the unit’s voltage depending on where you intend to use it.
Next, you’ll find an XLR input for your mic and a pair of XLR line input/output on the far right. Finally, the unit also offers a quarter-inch input which can be used to link two VT-737sps for stereo processing.
- Preamp Gain
The gain knob can be used to adjust the level of the input signal. To get more out of the tubes on board, turn the gain up, which will, in turn, drive the VT-737’s tubes harder. Considering that there is a +36dB headroom to play around with, the knob can be manipulated to get a variation of tube tones.
- Input
The VT-737sp has a quarter-inch High-Z input port on the front of the unit, which can be used to connect instruments like guitars and basses. Furthermore, you’ll find an input knob that can select from three options: Line, Mic, and Instrument.
These controls correspond to the input options on the back of the unit. In addition, you also find a “High Gain” feature here which can boost the gain of the preamp section by an additional 18dB for mics and instruments and 8dB when in line mode.
Finally, the second button in this section is the “Phase” button which can reverse the polarity of the input regardless of which mode you select.
- High Pass Filter & Phantom Power
A filter “In” button will activate the High Pass Filter (HPF). If the section is disengaged, the signal will bypass it. The High Pass Frequency knob can be an effective tool in removing rumbling and noise in the lower frequency range by setting the cut-off level from values ranging from 30Hz to 140Hz.
The +48V phantom power button can be pressed to drive the XLR mic input on the back of the Avalon VT-737sp.
- VU Meter
A VU meter sits right in the middle of the VT-737sp and ranges from -20dB to 3dB. By default, it gives an idea of the output level but can also be used to monitor the gain reduction when adjusting compressor parameters.
The sensitivity of the VU meter can be modified through the tiny VU adjustment screw on the front of the unit.
- Compressor Controls
Compression parameters can be activated or bypassed by toggling the compressor “In” button. This section includes a “Threshold” knob with values ranging from -30dB to +20dB to control the compression level. Pressing the “Meter” button will cause the VU meter to show the gain reduction level when in compressor mode.
A “Ratio” knob can be used to adjust the compression ratio compared to the original signal. The values range from 1 – 20. Keep the knob to the far left, and you would’ve set the ratio at 1:1. Move it to the far right to increase to 20:1.
Also present in this section are the “Attack” and “Release” knobs, both labeled “Fast” and “Slow”. This way, the user can set the timing of the attack on transient sounds and decide how fast or slow the compression effect eases away.
- General Controls
On the far right side of the unit is the main power switch. You can also find the master output knob here, which allows you to decrease or increase the level of the output post-processing down to -40dB or up to +10dB.
You can also power up the EQ section and decide to put the EQ before or after the Compression section by pressing the aptly labelled buttons.
- EQ Controls (Bass & Treble)
The Avalon VT-737sp offers compressive controls in the EQ section. Here you’ll find controls for a 4-band EQ, including Bass, Low-Mid, High-Mid, and Treble. The bass knob can select values between -24dB and +24d and can be used in combination with the “HZ” bass control to set the frequency shelf of the lower end.
Shelving can be done at 15Hz, 30Hz, 60Hz or 150Hz. Finally, the treble can be attenuated or enhanced between -20dB and +20dB. The shelving options for treble frequencies include 10kHz, 15kHz, 20kHz and 32kHz.
- EQ Controls (Low-Mid & High-Mid)
Next, the Low-Mid and High-Mid knobs can be rotated to cut or boost the middle band within a range of -16dB and +16dB. Both mid bands have corresponding knobs to set center frequencies ranging from 35Hz – 450Hz for Low-Mid and 200Hz – 2k8Hz for the High-Mids.
The Avalon VT-737 also allows you to change the Q value of both middle bands through dedicated “HI-Q” buttons under each knob. Another interesting feature allows you to multiply the selected center frequencies by 10 at the press of a button.
Pros:
The equalizer has 4-bands, including lows, 2 mid variations and a treble section with cutting/boosting features and frequency shelf settings to get the right sound for the situation. Switching between line, mic and instruments is a cinch. The low noise tube design delivers wonderfully warm tones.
Cons:
The Avalon VT-737sp, although feature-rich, comes with a hefty price tag. You may find the same features on other, more budget-friendly devices. However, spending much less on individual channel modules for your compression and EQ-ing needs or using a DAW for the same might be a temptation.
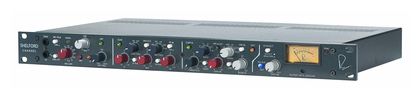
3. Manley VOXBOX Tube Channel Strip
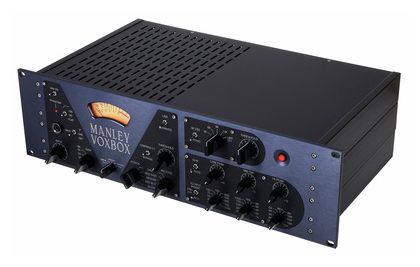
Through the VOXBOX, Manley focuses on delivering a unit primarily for vocal enhancement, among other things.
The company has an innovative approach to delivering some of its features on the VOXBOX. For instance, adding a compressor ahead of the mic preamp keeps things nice and tight so that the signal going in the preamp isn’t distorted. Also, the multi-functionality of some of the controls reduces clutter on the user interface.
The EQ section is managed well and has ample parameters for you to dig deep to get the sound you want. The de-esser not only handles sibilant vocal frequencies well but can also take care of other shrill transient sounds coming from instruments like drum cymbals.
Key Features:
- Back Panel
On the back of the Manly VOXBOX, you can find 1 XLR Mic input next to an XLR/quarter-inch Line input. The back panel also has 1 XLR/quarter-inch Insert input.
On the output side, you get an XLR out paired with a quarter inch out for the preamp and a similar pair for the equalizer. On board are two stereo RCA ports for the Compressor and De-Esser. All the inputs/outputs on the rear correspond to the relevant controls on the user interface.
- Instrument Input
The VOXBOX has a quarter-inch input on the front with an impedance of 100kΩ. The input can be activated by keeping the nearby phase switch centered. The port has a dedicated knob to set the input level. The knob is placed before the preamplifier and compressor in the overall effects chain.
- Phantom Power
The VOXBOX has a 48V phantom power switch to energize condenser mics. What is unique about the switch is its locking design which ensures that you don’t inadvertently fry a dynamic mic that may be connected.
You’ll need to pull the stick out and switch it to activate the power. The nearby LED will light up to indicate that the phantom power is on.
- Filter, Phase Switch, Gain Control
The high pass filter can be applied to line, mic or instrument sections and has a gentle slop of 6dB per octave. Dropping the switch to the “FLAT” setting will completely bypass the high pass filter.
Below the high pass filter is the phase switch labeled “0”, “LINE”, and “180”. When set to 0, there is no phase inversion. Flipping the switch down will cause a 180-degree phase inversion on the signal. The central “LINE” can either be used to activate the line/instrument port or as a mute option for the mic.
The “Gain” knob on the VOXBOX can be used as a tone control and adjusts gain, transient sounds, noise, and clipping issues. The range of gain that can be added here is 40dB – 60dB.
- VU Meter
The Manly VOXBOX has a VU meter right in the center of the unit, which depicts the loudness of the output signal. The needle moves between a range of -20dB and +3dB and a scale of 0 to 100, depending on the mode.
A control knob below the VU meter can be used to switch between “Line In”, “G-R”, “EQ OUT”, and “D-S”. The line in setting shows the level of the line instrument, while G-R is short for gain reduction, which pertains to the compressor section. The VU meter will also show the effects of your EQ-ing decisions and sibilance reduction controlled through the D-Esser section.
- Compressor
The “Compress/Bypass” switch can activate or deactivate the compressor. The circuitry is designed to activate the compressor without popping or clicking issues while the instrument/line is active.
The compressor section is placed before the preamp so that any shrill frequencies are attenuated and controlled reasonably before the signal reaches the VOXBOX’s tube circuitry.
The unlabeled “Threshold” knob is a vital part of this section and is used to set the compression level. The threshold level can be increased by moving the knob to the right. You won’t find a dedicated compression ratio knob on the unit.
Instead, the ratio is program dependent and is set to 3:1 by default. The section also has the usual “Attack” and “Release” knobs which will tell the VOXBOX how harshly or gently to manage transient sounds and how quickly or slowly to return to the original signal after compression.
The settings here include “Slow”, “Med Slow”, “Medium”, “Med Fast”, and “Fast.”
- De-Esser Section
The Manly VOXBOX has a separate De-Essing section to reduce sibilant sounds in vocal tracks. A toggle switch can be used to bypass or enable this section. There are two knob controls for sibilance reduction.
The first can be used to set the frequency band at which the reduction will occur. You can choose between 3K, 6K, 9K, 12K, and a “Limit (10:1)” setting that works as a flat limiter across the signal coming in.
The “Threshold” knob here decides how harsh, or strong a sibilant sound needs to be so that the De-Essing can occur. Rotating the knob to the right will increase the intensity of De-Essing.
- EQ Section
An “EQ IN “switch can be used to activate or deactivate the equalizer. The Manly VOXBOX has a 3-band equalizer that offers controls to cut or boost the lows, mids and highs. A pair of knobs in each band can be manipulated for the necessary adjustments.
The center frequency of the low end can be set between 20 and 1,000, after which the “Low Peak” knob can be used to cut or boost (0dB to +10dB) the set frequency. The mid-dip frequency knob allows you to set the frequency between 200 & 7K.
The recommended setting here is between a 200 to 1K range which will take care of phase issues and make the sound clear and punchy. Lastly, the “HI PEAK” section allows one to choose a value between 1K5 and 20K and then cut or boost it (0dB to +10dB), depending on the requirement.
Pros:
The VOXBOX gives you detailed features like a compressor, de-esser, preamp and a 3-band EQ. The tube technology enriches vocals significantly and adds warmth and clarity to the overall sound.
The different modes of the VU meter come in handy to check levels at a glance. The controls are laid out nicely for ease of use.
Cons:
The bulky unit takes up to 3 rack spaces, so ensure you have enough room to accommodate it. The compressor section doesn’t have a “Make-up” knob seen on some of the other channel strip units that allow adjustments to any loss of gain due to compression.
The compression section also lacks a comprehensive compression ratio control.
4. Tube-Tech MEC 1A Tube Channel Strip
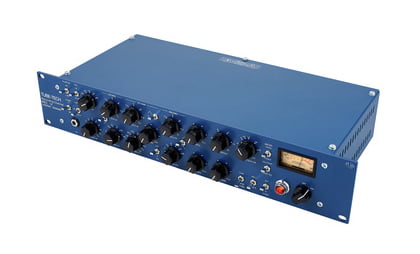
Regarding tube technology, few can match the Tube-Tech MEC 1A.
The MEC 1A has not one, not two, but seven tubes scattered throughout its internal circuitry, so you know you will get those warm and thick sounds associated with tube amplification. Furthermore, you get access to a compressor, a 3-band equalizer and impressive preamp controls on the channel strip.
The MEC 1A has a frequency response between 5Hz & 80kHz, which is quite amazing. The company also boasts start-of-the-art low-noise technology that keeps your audio signal untarnished just the way it was intended to be heard. Taking up two rack spaces, the unit has plentiful features packed in a rugged body.
Key Features:
- Inputs/Outputs
The back panel on the Tube-Tech MEC 1A is rather simple. The unit includes an XLR input and a quarter-inch input on the control panel for connecting an instrument directly.
Also, on the back, you’ll find an XLR output and a couple of quarter-inch sidechain link ports to connect external compression devices. Lastly, there is a three-pin port for the detachable power cable.
- Mic Preamp
The Mic Preamp section on the Tube-Tech MEC 1A has 4 switch controls. The first one activates the 48V phantom power for condenser mics. The switch next to it activates the -20dB “PAD” feature, which is useful in attenuating frequencies further below the lowest gain setting.
A “Phase” switch can inverse the signal’s polarity from 0 to 180 degrees. Finally, a selector switch activates and selects one of two low-cut settings, including 20Hz & 40Hz. The preamp gain can be set using the “FINE” and “COARSE” knobs.
The course knob varies the gain between 20dB and 40dB with increments of 10, while the gain can be fine-tuned between 1Hz and 10Hz by using the fine knob.
- Equalizer
The EQ section can be activated or bypassed by a dedicated switch. The Tube-Tech MEC has a built-in 3-band EQ. The bands are called “LOW SHELF”, “MID-BAND”, and “HIGH SHELF”. The concept is the same as in most channel strips.
The “FREQ. HZ” knob between 20hz and 160Hz, selects the frequency and the gain knob sets the gain between 0dB and 15dB. Also included is a switch to choose if the gain knob will boost or cut the set frequency. In the mid-band, the center frequency can be set between 40Hz and 10kHz while the gain knob adds gain up to 20dB starting from 0.
The mid controls include a separate switch to choose between boosting and cutting. Finally, in the high shelf area, the frequency can be selected between 4kHz and 26kHz and used in combination with the boost/cut switch. The gain knob offers a selection range of 0dB to 15dB.
- Compressor
The compressor section can be bypassed or activated with a flick of a switch next to the control knobs. The “THRESHOLD” knob starts on “OFF” on the extreme left and goes up to -20. The neighboring “RATIO” knob sets the compression ratio vs the original signal.
The values range from 1.5:1 to 10:1. An “ATT/REL” switch here can be used to decide between automatic and manual settings regarding the attack and release controls. While in “Fixed” mode, the attack time is set to 1 millisecond with a release time of 50 milliseconds.
The “ATTACK” knob labeled “fast” on the far left and “slow” on the extreme right decides how quickly the compressor responds to a sudden rise in the signal level. The manual settings allow the user to set the attack time between 1 millisecond and 100 milliseconds.
The “RELEASE” knob with similar markings allows the user to set the speed of the compression release. The available selection here ranges from 0.07 seconds to 2.5 seconds.
- Misc Controls
Finally, the last section of controls on the far right of the Tube-Tech MEC 1A has a “Link 1” & “Link 2” switch which connects the onboard compressor to an external compressor unit, while when the switch is in the middle position, the unit’s compressor will work independently.
Another very useful feature here is the “EQ-Comp/Comp-EQ” switch which decides the order in which the signal coming from the mic preamp will be fed to the EQ and compressor sections.
The last knob on the unit is the master Gain control which can be turned off or cranked up to +10dB. In addition, you also find a power LED and power control to switch on the unit.
- VU Meter
Like similar units, the MEC 1A has a VU meter with multiple capabilities. First, the conventional -20dB to +3dB range can be used to monitor the signal level.
Secondly, another scale ranging from 0 to 100 can monitor the gain reduction caused during compression. Switching between the two options can be done through the “Comp/Output” switch.
Pros:
The MEC 1A’s tube technology makes for some amazing tonal results. The vocals will sound warm and airy. Your stringed instruments, like electric and acoustic guitars, will shine through with great clarity and width. Furthermore, a plethora of processing options make the MEC 1A a great unit to try out.
Cons:
The Tube-Tech MEC 1A has a two-in-one input shared by line and mic. This can be a recipe for disaster, as having the phantom power on can fry the circuitry of your line instruments.
It would’ve been an added benefit if the VU had a mode for measuring different aspects of the preamp section. The channel strip is expensive and will put a sizeable dent in your savings.
5. Universal Audio 6176
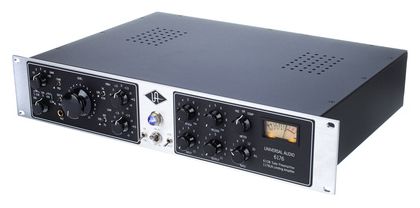
The 2U Universal Audio 6176 channel strip is packed with some interesting features.
Inside the powerful exterior of the Universal Audio 6176, you’ll find a combination of the renowned 610B tube preamp and the versatile 1176LN limiter. A tube preamp on board gives the channel strip its warm tone with a substantial presence and great body.
The symmetrically designed Universal Audio 6176 has a front panel organized into two sections with different capabilities and separate input/output ports on the back panel. The sections can be combined so that the signal leads to the other or used separately as independent units.
Key Features:
- Rear Panel
Starting on the far left, the back panel of the Universal Audio 6176 includes a balanced XLR line input which can be used to connect to a DAW, mixer, or signal processor. Next is a balance XLR output for sending forth a line-level signal.
An input loading button can be toggled to choose the input impedance of the compressor/limiter by selecting 600Ω or 15kΩ. The 600Ω setting is more suited to vintage equipment, while your signal will sound a bit brighter on the 15kΩ setting.
Finally, moving to the right, you’ll find balanced XLR line input and output. In addition, the 6176 also has a Mic input. The last thing found on the back panel is the 3-pin power port.
- Input Selector
The input knob on the front panel corresponds to the input ports on the back. By rotating the knob, you can switch between Mic, Line, and Instrument options, but that’s not all. When selecting the Mic input, you can choose between an impedance of 500Ω or 2kΩ.
The rule of thumb regarding impedance is that the input resistance of a preamp should be ten times the output resistance of a mic. However, one can experiment with both options to experience the tonal changes.
The instrument or “Hi-Z” setting corresponds to the Hi-Z port on the front panel. You can also pick one of two options here which are 47KΩ or 2.2MΩ. The 47KΩ is more suitable for instruments with active circuitry or pickups, which may be found on some electric or bass guitars with a signal level of -10dB.
The 2.2MΩ setting will be selected when an instrument with passive pickups is connected.
- Preamp Section
First and foremost, the gain section includes a gain knob with values ranging from -10dB to +10dB with increments of 5dB. Increasing the gain will result in more coloration on the input signal. The 6176 also has a switch to activate the -15dB Pad option, which can cut down the gain further below the lowest setting of the gain knob for louder, shrill instruments.
The pad option is for mic only and will not work on the other two inputs. A polarity inversion switch can correct phase issues when more than one mic is in a sound setup. A larger “Level” knob labeled 0 – 10 can be used with the gain knob to get the best results.
To get a cleaner, more precise signal out of the preamp section, the recommended position for the gain knob is -10 or -5, while the level knob can be cranked up to get the signal’s level up to where it needs to be. Finally, the unit has a 48V phantom power switch for your condenser mic. The phantom power will only be activated when the mic input is selected.
- EQ Section
The Universal Audio 6176 has a 2-band EQ that offers dedicated controls for the lows and the highs. For example, a high-frequency switch can select between 4.5kHz, 7kHz and 10kHz. Once the shelf is selected, the “High” control knob can cut or boost the frequencies.
The values on this knob range from -9dB to +9dB. Similarly, the low-frequency switch can select 70Hz, 100Hz or 200Hz as the corner frequency, while the “Low” knob can boost or cut the set frequency between +9dB and -9dB.
- Compressor Section
The compression section has its own knob controls to adjust different parameters. An “Input” knob with values ranging from 0 to 10 can be used to set the level of the input signal coming through and the threshold level of the compressor/limiter.
The neighboring “Output” knob compensates for any gain reduction that may have occurred during compression. This way, you can ensure that the signal leaving the compressor/limiter section has the required level for further processing. The “Attack” and “Release” knobs both have “slow” and “fast” settings.
Here you set the time the compressor will take to tame the transient tones and how fast or slow the signal will return to normal after compression. Compared to the original signal, the “Ratio” knob determines by what ratio the compression will occur. Moving the knob to the extreme left will bypass the compressor/limiter section from the path.
- VU Meter
The VU meter is designed to operate in different modes. For example, a “Meter” knob can select between “Pre, “GR”, and “Comp” settings.
This means that the VU meter can either show the output level of the preamp section, the gain reduction occurring during compression or the out level of the signal when it leaves the compressor/limiter section. The meter has a standard -20dB to +3dB scale and another scale ranging from 0 to 100 to manage the different modes.
- Misc Controls
The unit’s center has the main switch to power the unit with a neighboring power light, indicating that the channel strip is on. Next to the power switch is the “Join/Split” switch. When the switch is set on the split setting, both sections of the Universal Audio 6176 work independently with separate input/output connections on the back.
In the join setting, the unit will work as a channel strip, meaning that the preamp signal will be routed to the compressor/limiter for further processing.
Pros:
In the Universal Audio 6176, you get a comprehensive preamp section with EQ settings and a compressor/limiter section. Different modes can be set on the VU meter for easy monitoring.
The join/split switch is useful for separating the sections or operating the unit as a channel strip. The controls are laid out nicely in different sections for easy understanding and access.
Cons:
The 2-band EQ on the Universal Audio 6176 is somewhat limited as you don’t get any controls to adjust the mids like some other channel strips with similar capabilities. The unit also lacks high pass filtering options, which is always useful to remove rumble and noise at the low end.
6. SSL 500-Series SiX Channel
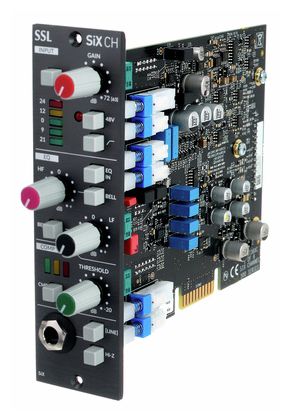
The SIX Channel is a single-sized module designed for the 500 series.
However, you would be wrong to judge the book by its cover, as this device is much more versatile than it looks. The people at SSL have packed this minuscule unit with 3 input options, a preamp with decent controls, a 2-band equalizer, and a compressor.
The Six Channel imitates the preamps sections on the renowned SSL Duality and AWS devices and adopts their Super Analogue design.
Furthermore, combining the Six Channel with a bigger console will give you additional input options if you want to enhance your current rig. No wonder this little marvel has gained significant popularity and is found in most studios worldwide.
Key Features:
- Inputs
The SSL 500-Series Six Channel has a single quarter-inch jack on the front panel, which can accommodate all three inputs. By default, the device accepts the mic input while the dedicated “Line” and “Hi-Z” buttons can be pressed to activate line in and instrument in, respectively.
- Preamp Section
The “Gain” knob adds gain to whichever input is selected. The gain range available for the mic input is +6dB to +72dB. For the line input, -3dB to +63dB of gain can be applied.
The preamp section also includes a 48V phantom power button and a phase inversion button which turns the phase of the mic from 0 to 180 degrees. In addition, the high pass filter button can attenuate all frequencies below the 75Hz level by 12dB/octave. Finally, the preamp has an LED section indicating the output level.
- EQ Section
The 2-band equalizer can be activated by pressing the “EQ In” button. Both bands have separate knobs to boost/cut selected frequencies by -/+15dB. The “Bell” button associated with each knob determines if the band will be using the bell curve or shelving mode.
Under the bell curve mode, the center frequency of the highs is set at 5kHz, while in shelving mode, the frequency range is centered at 3.5kHz. Similarly, for the low band, the shelving mode sets the center frequency at 60Hz,which is much lower than the 200Hz setting found in the second mode.
- Compressor
The single knob compressor section is activated by toggling the “Comp In” button. The “Threshold” knob here can be rotated between the values of +10dB and -20dB.
The attack on transients is set at 5 milliseconds by default with a soft knee response. Similarly, the release time is set at 300 milliseconds, and the compression ratio the channel module offers is 2:1. An LED strip in the compressor section lights up to indicate the amount of gain reduction.
Pros:
The SSL 500-Series Six Channel is a simple unit to use with no tricky button combinations. The controls are easy to navigate, and not much experience is needed to decipher what each section does.
Being a single-sized module, the SSL Six Channel doesn’t take up much space and can be added to your rig to fulfil the requirement for additional mic/line/instrument outputs.
Cons:
While the SSL 500-Series SiX Channel is relatively simple, the simplicity comes at a price. Being limited in its size, connoisseurs will not be able to fine-tune the compressor parameters or have an abundance of EQ-ing controls to work with. Also, some sections have unchangeable values that are set by default which may or may not be your cup of tea.
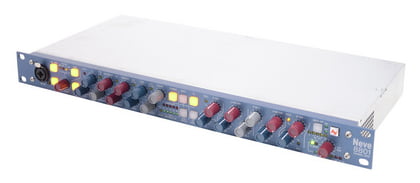
7. Rupert Neve Designs The Shelford Channel
Over the years, Rupert Neve has been delivering some classic products for the mixing studios of today.
The company’s 1073 and 1081 models have had significant success and encouraged Rupert Neve to develop the functionally superior Shelford Channel unit. So if you’re looking for a hi-performance preamp, a detailed EQ section, and a precise compressor/limiter, this could be the unit for you.
The idea behind the channel unit is to take the best features from previously acclaimed products and bring them together in a single all-in-one unit. The EQ section has been borrowed from the Shelford 5051/52 models, while years of research and development have been put in to perfect the mic preamplifier on the Shelford Channel.
Key Features:
- Input/Output Ports
The Shelford Channel offers a couple of balanced XLR line and mic inputs. The device also has 2 TS ports to connect multiple Shelford Channel strips to the unit. On the sidechain section, the device has send and return TS ports. In addition, there are two XLR outputs, a power switch, and a 3-pin power port on the rear panel.
- Input Selection
The “Mic/DI/Line” button can select the input mode. The Mic/DI mode will be active by default, meaning that the unit is ready to receive the signal from the mic input on the back and the “DI” input on the front panel. Pressing the Mic/DI/Line button will switch the unit to line mode and activate the line input on the rear panel.
- Preamp Mode
The preamp has a mic gain knob ranging from 6dB to 66dB to boost the signal from a mic. The neighboring “Trim” knob can be combined with the gain knob and gives the option of -6dB/+6dB trimming beyond the set gain value.
The nearby LED will light up in green when a signal is present and red if the signal is clipping. The Shelford Channel also has a 48V phantom button that lights up when pressed and drives condenser mics.
Next to the phantom power button is the phase/polarity inversion button which can fix phase issues arising when multiple mics are present in a sound setup. The section also has a high pass filter that can be activated by pressing the “HPF” button, which lights up consequently.
The “HPF Frequency” knob ranges from 20Hz to 250Hz and sets the frequency where the HPF will operate and start rolling off lower frequencies.
- EQ Section (Lows)
The Shelford Channel has a 3-band EQ that offers “LF”, “Mid”, and “HF” controls. The “EQ IN” button activates the EQ. If the button isn’t pressed, the preamp signal bypasses the EQ and goes straight to the compressor. The “Low Freq” knob sets the corner frequency to boost or cut.
There are 4 positions to choose from here, including 35Hz, 60Hz, 100Hz and 220Hz. The corresponding “LF” knob can then boost or cut the set frequency within a range of -15dB and +15dB. The “LF Peak” button is linked with the “LF” knob and allows you to choose between peak or shelf mode.
- EQ Section (Mids)
The mids section has a similar makeup. The “Mid Freq” knob can select between six options ranging from 22oHz to 7K5Hz to choose the center frequency. The “Mid” knob can then boost or cut the set center frequency, while a “Mid H Q” button reduces the width of mid frequencies when pressed.
- EQ Section (Highs)
The third band on the EQ doesn’t have a knob to select the corner frequencies. This is rather achieved through pressing an illuminating button. By default, the corner frequency is set to 8kHz, but when the button is pressed, the setting changes to 16kHz. The highs can be boosted or cut in a range of -15dB and +15dB.
- Compressor/Limiter
The compressor section can be activated by pressing the “Comp In” button. The “Threshold” knob can be set between -25dB & +20dB and determines the level at which the compression effect will be applied.
As with most compressors, a “Ratio” knob ranging from 1.5:1 – 8:1 determines the intensity of compression with respect to the initial signal. A button labeled “HPF to S/C” moves the high pass filtering from the main signal to the sidechain, which decreases the lower frequencies coming into the compressor.
An “S/C Insert” button activates the side chain input on the back for triggering compression on a sidechain device. In addition, the “Link” control can pair another Shelford Channel for stereo applications.
The “Timing” knob is useful in setting the speed of the attack and release function. The settings you can choose here are: fast, medium fast, medium, medium slow and auto. To speed up the compression time, pressing the fast button will multiply it by 30%.
Finally, the unique “Blend” knob determines the blending between the compressed and uncompressed signals.
- Misc Controls
The Shelford Channel allows you to change the order of the EQ and compressor by pressing the “Pre EQ” button. This essentially moves the compressor before the EQ in the effects chain.
Next on the unit is a VU meter that traditionally indicates the output level and also shows gain reduction when the nearby “VU Select” button is pressed. Next, a “Peak” LED besides the VU meter lights up red when the signal clips.
Finally, the “Silk” button has two presets of sorts called “Blue” & “Red”. Each has distinct tonal characteristics when applied to the output signal.
Pros:
Rupert Neve Designs Shelford Channel has a unique interpretation of some of the features on its front interface. The EQ section has additional buttons to toggle between peaks/shelves when boosting/cutting, and the Mid Hi Q feature narrows the middle frequencies. The Silk presets sound great, particularly on vocals.
Cons:
Although the compressor generally works well, the timing feature has 6 fixed settings and seems a bit limiting. Perhaps it would’ve been better if the effect could be fine-tuned as per user preference. Similarly, a rotary knob to select the exact corner frequency in the highs (as in the other two bands) could prove more useful than a simple toggle button.
8. AMS Neve 8801 Channel Strip
The Neve 8801 gives you a taste of the infamous 88RS console by Neve.
AMS has managed to squeeze a preamp, 4-band EQ, compressor/limiter, and expander/gate capabilities into one hand-built unit that hardly takes any space on your rack. Measuring just 1.75” x 9.5” x 19”, the 8801 is a 1U-sized strip that packs some exciting features that make the 88RS console famous.
The Marinair transformer used in constructing the AMS Neve 8801 Channel Strip is the reason behind its highly professional tones and impressive gain output. In addition, the channel strip manages the user interface’s limited real estate by using button-style knobs that can be pressed for toggling and rotated for adjusting parameters.
Key Features:
- Real Panel
The back panel has a Line input that accepts both XLR and quarter-inch connectors. A mic input comes in the form of a female XLR port, whereas the D/I input can be connected via a quarter-inch cable.
The Insert Send and Insert Receive are both on XLR (M/F) ports, while the Line output is a male XLR connector. The AMS Neve 8801 also offers a quarter-inch headphone connection. A combo jack on the front of the unit allows both instrument and mic connectivity via quarter-inch and XLR connectors, respectively.
- Input Selection & Gain
Depending on which input is selected, the corresponding LED will light up. The input options include Line, Mic, D/I and DIG. The gain knob offers variable gain depending on the selected input.
The line input’s gain can vary between -24dB and +24dB. The range of gain on mic input on the rear and the combo jack on the front panel falls between +24dB and 70dB. Both quarter-inch instrument inputs on the back and the front panel make use of a gain range between -24dB and +24dB.
Another form of input called the “Genie” input is only available through an optional daughter card connection.
- Preamp Controls
Apart from input selection and the relative gain controls, the preamp section has a 48V phantom power facility and a “Pad” button that can reduce the gain by 20dB on the instrument and mic inputs.
You’ll also find a phase revere button here, which comes in handy to flip phases of the mics in a setup.
- Filters
The AMS Neve 8801 has dedicated multi-functional knobs for the High Pass and Low Pass filters. Both filters can be activated by pressing their respective knobs. The LPF has a slope of 12dB/octave and a range of 1.5kHz to 18kHz.
The HPF has a similar 12dB/octave slope but a range of 30Hz to 300Hz. The neighboring “Filter to Sidechain” button can move both filters to the sidechain, meaning they are no longer available for use on the unit.
- Dynamics Section
This section is overloaded with knob controls for adjusting the full-fledged Compressor/Limiter and Gate/Expander module. The “Dynamics” button can access or bypass this section.
Pressing the button will activate both sections. If you wish to use them individually, setting the Ratio to 1 and Threshold to 20dBU will disable the compressor/limiter controls, while setting the Range to 0 will disable the Gate/Expander section.
- Compression/Limiter Controls (Gain & Threshold)
The compressor section starts with a multipurpose “Gain Make Up” knob, which ranges from 0 to 30dB and compensates for the gain lost during compression. Pressing the knob activates the hard knee setting.
Hard knee is when gain reduction occurs as soon as the signal goes over the threshold value, while soft knee shows a more gradual change. The “Threshold” not only sets the value between -30dBu and +20dBu at which compression will occur, but when pressed, activates the “Link” feature.
When link is activated, the compressor section is enabled and controlled through the sidechain or other connected 8801 units for stereo processing and output.
- Compression/Limiter Controls (Ratio, Attack & Release)
The “Ratio” knob ranges between 1:1 and “Limiting” to determine the ratio between the amount of compression vs the original signal. Pressing the ratio knob can switch between attack timings as a separate attack knob is absent.
The neighboring “Release” knob can be rotated to choose a time value between 30 milliseconds to 3 seconds, depending on how soon you want the compressed signal to return to its original state.
Pressing the knob can switch between manual and auto-release. An LED strip lights up to indicate the amount of gain reduction caused by the compressor.
- Gate/Expander Controls
The “Hysteresis” knob is labeled 0dB to 25dB and determines how rising, and falling signals will behave regarding the threshold. The channel will turn on if a signal rises beyond the value equal to the threshold level plus the hysteresis value.
While the “Gate” is on by default, pressing the hysteresis knob deactivates the gate and activates the “Expander” feature. The “Threshold” knob sets the gate value and is labeled -30dBu and +20dBu.
The nearby “Release” knob, when pressed, inverts the gate. As signals beyond the threshold are found in invert mode, the gain on such signals is reduced depending on the value set by the “Range” knob (0dB to 60dB).
- EQ Section: Lows
The “EQ” button can turn the equalizer on or off. AMS Neve 8801 Channel Strip has a 4-band EQ which includes low, low-mid, high-mid and high controls. The “LF Gain” knob between +20dB and -20dB decides the gain increase or reduction amount, while the “LF HZ” sets the frequency value between 33Hz and 440Hz.
Pressing the LF gain knob can toggle between the shelf and peak settings. When in peak mode, the LF HZ knob can choose between low and high Q, and the “Hi Q” led lights up.
- EQ Section: Mids
The two available mid bands have separate controls. The “LMF HZ” knob can set a frequency value between 120Hz and 2kHz, while the “Lo Mid Gain” knob can cut or boost this frequency between -20dB & +20dB. The Q value can be adjusted using the “Lo Mid Q” knob. The high-mid band has similar controls where the “Hi Mid Gain” knob will boost/cut by -/+20dB, a frequency value between 800Hz and 9kHz set by the “HMF HZ” knob. The high-mid band also has its own Q adjustment knob.
- EQ Section: Highs
The high-frequency section has a gain adjustment knob that offers a -20dB to +20dB boost/cut. The “HF HZ” knob can set the frequency between 1.5kHz and 18kHz, which can be boosted or cut by the “HF Gain” Knob.
Pressing the gain knob helps switch between peak and shelf modes, and pressing the Hz knob alternates between low and high Q when in peak mode. Lastly, pressing the “EQ to Sidechain” button removes the EQ section from the signal path and moves it to the sidechain.
Pros:
The 4-band EQ section is very elaborate. The controls give you access to every little EQ-ing detail in all 4 bands. So if you’re looking for a compressor/limiter/expander/gate combo, the AMS Neve 8801 Channel Strip gives you extraordinary control to play around with and get your sound just right.
Cons:
The channel strip does not have a VU meter. Instead, it uses LED strips to show the strength of different parameters, which may or may not be your preference. The interface seems daunting because of the clutter of knobs. Also, it’s easy to get lost in the dual functionality of some of the knobs to activate additional features.
9. Millennia STT-1 Origin Channel Strip
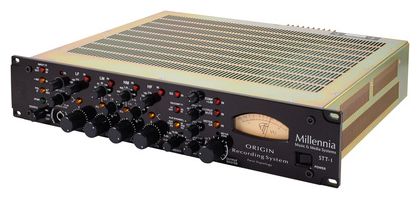
The Millennia STT-1 Original brings you the best of both worlds
The channel strip has the initials “TT” inscribed on the front panel, which stands for Twin Topology. Contrary to the other channel strips around, this means that while the unit functions as a solid-state device, it also has the circuitry to operate as a tube amplifier.
Hidden inside the metallic body is the same technology found on the famous solid-state HV-3 unit by Millennia, whereas the tube circuitry in the STT-1 mimics the acclaimed M-2B tube amplifier. Also, the audio transformers under the hood of the channel strip bring character and personality to your sound.
Key Features:
- Input/Output Options
The Millennia STT-1 has a balanced main output which shows an XLR and RCA pair. Next to it is an unbalanced main output with the same port composition. A mic can be connected through the female XLR port while the line in has a female XLR and quarter-inch connector pair.
There’s also a direct output XLR port on the back. Lastly, the front has a Hi-Z port for directly connecting an instrument to the unit via the quarter-inch port.
- Preamplifiers
The “Input TT” button helps you choose between the Solid State and Tube Amplifier. Pressing the button activates the solid-state circuitry. To manage this change effectively, the STT-1 has individual gain knobs for each mode.
The “Vacuum Tube Gain” can be varied between 20dB and 40dB, while the “Solid State Gain” knob selects a value between 10dB and 50dB. Input selection can be made by rotating the “Source” knob to choose between Mic, Line, and Instrument.
As you would expect, the preamp section has a phantom power button that lights up and activates the +48V phantom power when pressed. Also next to the phantom power button is the phase/polarity inversion button, which comes in handy to correct mic phase issues.
Finally, the XFMR switch brings the audio transformer technology to the fore, which enriches the sound of condenser mics considerably.
- Equalizer Section: Lows & Highs
The Millennia SST-1 has a built-in 4-band EQ which can be activated by pressing the “EQ In” button. The bands include Low, Low Mid, High Mid and High control sections. The general layout is similar in each band except for a few additional knobs in the mids-section. Firstly, each band must be activated by pressing the “In” button.
Next, through the LF knob, the center frequencies are selected between 20Hz and 270Hz. Then the corresponding HZ can be used to boost or cut the selected center frequency value by -15dB and +15dB. Finally, a peak/shelf switch can select the shape of the frequency curve.
The shelf options are activated when the relevant button is pressed, and the EQ shelves at 6dB per octave. When unpressed, the peak mode keeps the “Q” at 1.0. The “HF” section has the same layout with a center frequency knob ranging from 4.8kHz to 21kHz and a -/+15dB Hz knob for boosting and cutting purposes. The highs section also has its own peak/shelf switch.
- Equalizer Section: Low Mids & High Mids
The “LM” knob can sweep frequencies in the low and middle range. A center frequency between 20Hz to 220Hz can be set here, while the cut/boost knob offers a familiar range of -/+15dB. Pairing the knob with the “10X” button will enhance the selected frequency by a multiple of 10 and change the available frequency range to 200Hz – 2.2kHz.
An additional “Q” knob ranging from 4.0 to 0.4 here can help shape the low mid curve. On the high-mids side, the “HM” knob has selectable values between 250Hz and 2.5kHz with an option to boost/cut by -/+15dB. The “10X” button here gives you access to a 2.5kHz – 25kHz range.
You’ll also find a dedicated “Q” knob in this section for sweeping between the 4.0 to 0.4 range.
- Compressor/Limiter
The “Comp+Lim In” button can be used to activate compression controls. The compressor section starts with the “Threshold” knob that sets the threshold value between -20dBu to +20dBu, where the compression will occur.
Next, the “Attack” and “Release” fatures are time-based and determine how fast transients are quelled and how quickly/slowly the compression effect is released. The attack can be set between 2 milliseconds to 100 milliseconds, while the release settings fall between the 20 milliseconds and 3-second range.
Finally, the “Ratio” knob sets the relationship between the compressed signal and the original one. The range here is 1.4:1 – 30:1.
- De-Esser
The De-Esser is activated when the “Comp+Lim In” button is turned on, and the De-Esser knob is moved away from the “Off” setting on the far left. The purpose of the De-Esser is to get rid of transient sibilance sounds associated with vocals.
The De-Esser is made part of the compression section as it makes use of the 4 knobs available here. If the levels of the threshold, attack, release, and ratio controls are increased, the sibilance will show a more drastic response. The de-essing control knob can be set between 4.5kHz – 11.9kHz.
- Misc Controls
The “EQ/Comp TT” button offers the Twin Topology technology to the EQ and Compression sections. When the button is pressed, the EQ/Comp is routed through a solid-state FET amp, whereas when unpressed, the vacuum tube amplifier is made available for the EQ/Compressor.
The “Flip Dynamics” decides the order in which the signal goes through the EQ and the compressor. When the button is pressed, the compressor is placed before the EQ in the signal path, while if left unpressed, the EQ takes precedence over the dynamic/compressor section in the signal path.
The self-explanatory “Output Mute” button mutes the output signal while the “Meter GR” toggles the VU meter’s ability to either measure the gain reduction caused by the dynamic section or the output level of the signal.
Pros:
The Millennia STT-1 uses impressive “Twin Topology” wizardry to pack this single unit with solid-state and tube technology simultaneously. In addition, using audio transformers adds a new dimension to your mic, with vocals sounding detailed, loud and with great character.
Cons:
While the channel strip offers separate De-Esser controls, the sibilance reduction is moderate, so if you prefer a more detailed response regarding sibilance reduction, you’ll probably have to look elsewhere. The user interface has a clutter of controls, making quick adjustments a challenge. Furthermore, the Millennia STT-1 comes with a big price tag.
10. dbx 286s Channel Strip with De-esser

This slender single-channel strip combines simplicity with versatility.
The unit measures 19″ x 5.75″ x 1.75″ and weighs just 4.4 pounds. The dbx 286 keeps things uncomplicated and streamlined through the single-line controls on its user interface. An interesting feature of the 286 is that the preamp section can accommodate a common home studio mic and high-end mics alike, regardless of the impedance.
With insert capabilities, the dbx 286 can be linked with external devices that can use the compression and enhancer sections of the channel strip. However, perhaps some sections could benefit from more in-depth controls that allow detailed fine-tuning.
Key Features:
- Input/Output
The dbx 286s Channel Strip has an XLR mic input that accepts balanced and unbalanced inputs. The line input is a quarter-inch jack designed to receive balanced and unbalanced signals.
Also found on the back is a quarter-inch balanced/unbalanced line output and a quarter-inch insert port to add an external device to the effects chain. The line output can also send out a mic preamp signal.
- Mic Preamp
The mic preamp section has a gain knob that offers different gain values depending on the selected input. For line input, the available gain range is between -15dB and +45dB, while for mics, a slightly different range of 0 to +60dB can be applied. An LED strip shows the level of the signal post gain with a red LED lighting up to indicate clipping.
The preamp section is phantom power enabled and has a high pass filter that removes rumble/noise under an 80Hz cutoff point by 18dB per octave. Finally, the “Process Bypass” button allows the user to bypass all the modules after the mic preamp.
- Compressor
The “Compressor” has “Drive” and “Density” controls. Both knobs can be turned off by rotating them to the extreme left and have a max value of 10. The drive knob controls the amount of gain reduction on the audio signal, while the density knob can be used to set the compressor’s release time.
An LED strip here lights up to show the amount of gain reduction. The lights are labeled 3 – 30.
- De-Esser
The dbx 286s Channel Strip has a dedicated de-esser section to eliminate unwanted sibilance in vocal tracks. The “Threshold” knob ranging from “Off” to 10dB, decides the intensity of de-essing, while the “Frequency” control knob picks the frequency within a range of 800Hz – 10kHz, which will be attenuated through de-essing.
When the frequency is set between 4kHz – 8kHz, this will achieve the best results for vocals, while higher values can help attenuate shrill instrument sounds.
- Enhancer
The “Enhancer” section also has a couple of control knobs labeled “LF Detail” and “HF detail”. When turned to the far left, both effects are turned off. The LF knob is designed to boost and cut the lower range simultaneously.
The boosting occurs at 80Hz and with a 250Hz cut in the lower band to remove boominess and mud. The HF detail knob checks the unwanted higher frequencies, including sibilance and other instrument-based shrillness.
- Expander/Gate
The “Expander/Gate” section has also been kept relatively simple. A “Threshold” knob does what it’s supposed to and sets the frequency at which the gate will start to react. Everything below the set value (Off – 15dB) will be quelled. The “Ratio” knob ranging from Min – 10:1 decides the gate’s intensity as a ratio of the original signal.
- Master Gain
Finally, the “Master Gain” knob at the end of the channel strip can make up for any gain reduction by setting a gain value between -30dB and 10dB. The nearby LED will light up in red to convey any clipping that may arise, so the knob should be turned counterclockwise till the light turns off.
Pros:
The compressor’s circuitry makes for some impressive sounding vocals that are tight and crisp. The de-esser on board is an effective tool for reducing annoying sibilant sounds from your vocal tracks. The enhancer section has some interesting applications and plays its part in adding definition to the lows and the highs.
Cons:
The dbx 286 offers just one channel to work with. The compression section on the unit falls a bit short as it lacks the traditional time-based attack and release controls. Furthermore, some users may prefer the inclusion of a ratio knob to dial down the compression more accurately. An additional band in the EQ section would’ve been nice to have.
11. Manley CORE Reference Channel Strip
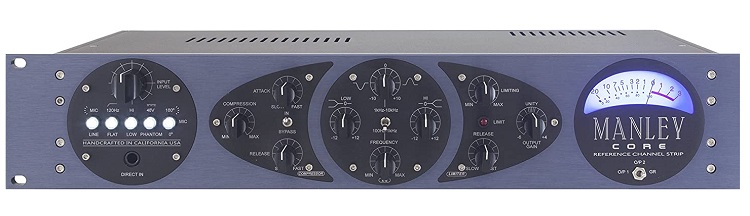
The handcrafted Manley Core is built to impress.
Introduced in 2014, the channel unit is designed to house several components essential in the recording and mixing process. The Manly Core includes a tube amplifier, an EQ section, an ELOP compressor and a FET limiter, all in one not-so-expensive unit.
The 2U-sized device measures 3.5” x 7” x 19” and weighs 3.6kg. The front interface seems user-friendly and has all the controls categorized into easy-to-navigate sections. In the Manley Core, the company brings forth all the most sought out features from its product catalogue into a channel strip that any sound engineer would be proud to own.
Key Features:
- Input/Output
The rear panel of the Manley Core has a balanced transformer-powered XLR input for the preamp section. Next, the mic input is an electronically balanced XLR port for line input. The direct output female XLR port can connect to an external device like a mixer.
External devices can be brought into the signal path through the quarter-inch TRS insert port. This bypasses the preamp and routes the device through the Manley Core’s EQ input. Finally, the main out female XLR port can be used to connect with a digital to analogue converter.
- Preamp Section
The section on the extreme left of the unit has the preamp controls. The first control knob here controls the level of the selected input. The input can be selected by pressing the “Mic/Line” button in the button strip below the level knob.
The unlabeled “Input Level” knob switches the gain off when turned to the far left and adds gain up to 40dB when moved to the extreme right. The input levels of the line, mic and direct input can be controlled here.
Through the input level controls, 20dB of gain can be added to the line input, while the mic input can receive 40dB of gain. A button labeled “120Hz/Flat” offers 120Hz high pass filtering to reduce popping noises, rumble and breath sounds you may encounter in vocal tracks.
When pressed, the “Hi/Low” switch adds 10dB of gain, which can be useful to liven up quieter sounds. Next in line is a 48V phantom power button to bring condenser mics to life and a phase inversion switch to eliminate mic phase.
- Compressor
The section can be activated or bypassed by toggling the “In/Bypass” switch. The “Compression” knob sets the threshold of the compressor. The threshold is raised by moving the control to the right.
The timing of the compressor’s action against transients can be set by adjusting the “Attack” control while determining how long it will take for the compression to ease away is done through the “Release” control.
- Limiter
The limiter section works in conjunction with the compression section. The limiter knob can be rotated to set an output ceiling or limiting peaks. The nearby LED lights up if a signal goes beyond the threshold and stays off if the signal stays below it.
The limiter section has its own “Release” knob, which determines the time it takes for the limiter to return to maximum volume. The release controls on the Manley Core have a very wide range for different applications. Maxing out the release time causes a distortion effect.
- EQ Section
The center frequency of the lower end is set at 90Hz, while the higher end is centered at 12kHz. The “Hi” and “Low” knobs range from -12dB to +12dB and are designed to cut or boost the frequencies per user preference.
Two mid-frequency ranges are available, i.e., 100Hz to 1kHz and 1kHz to 10kHz, which can be selected through the toggle switch. The nearby knob can boost/cut the selected frequency level by -/+10dB. The “Frequency” knob allows the user to sweep frequencies of the selected range.
- Misc Controls
Finally, the Manley Core has an “Output Gain” knob which ranges from -6 to 4dB with a “Unity” setting in the middle. You can enhance the level of the signal and make up for any loss of gain.
The channel strip also has a VU meter which can be set to show the output level of the direct output, the main output, and the gain reduction due to the processing occurring in the compression section.
Pros:
Manley’s Core channel strip includes the best components and features from the company’s product line. The tube technology offers some warm tones and great clarity. In addition, the user interface is organized and easy to follow. The channel strip offers good value for money based on the features that Manley Core provides.
Cons:
While the preamp section has a high pass filter which is claimed to take care of breathy vocal sounds, a dedicated de-essing section is missing. The Manley Core has no EQ bypass switch. Furthermore, you don’t get the necessary setting to change the order of different processors, like moving the compression after the EQ or vice versa.
12. Drawmer MXPro-60

Drawmer’s MXPro-60 is a powerful and feature rich channel strip with detailed controls for enhanced adjustments.
The MXPro-60 uses the same preamp circuitry as Drawmer’s acclaimed 1960-mic preamp and tube compressor unit. Because of this, the channel strip can cut down the noise significantly and keep distortion to a minimum.
Some of the other capabilities of the MXPro-60 include a 3-band equalizer, a compressor/limiter and an impressive de-essing section.
Surprisingly, with all the features packed in this unit, Drawmer have succeeded in restricting it to a single rack unit measuring just 1.75” x 7.87” x 19”. While the Drawmer MXPro-60 is a solid-state device, it has separate “Tubesound” circuitry which can be applied to all three frequency bands.
Key Features:
- Input/Output Ports
The MXPro-60 has a balanced XLR input for the mic. The line input includes balanced and unbalanced quarter-inch ports. There is also a quarter-inch insert port on the back for adding an external device to the signal path of the channel strip.
In addition, the balanced output section has an XLR port and a quarter-inch output. The unit also offers a -10dBu unbalanced output port. Finally, the preamp section has an input port for connecting an instrument directly to the front panel.
- Preamp
The preamp has a gain knob with values ranging from 0 to 60dB. The gain can be set on any of the three available mic, line, and instrument inputs. The dedicated instrument and mic buttons can select the corresponding input while leaving both buttons unpressed will activate the line input.
The “+20dB” button adds additional gain to the instrument input on the front panel of the Drawmer MXPro-60. The “Bright” button adds an HF boost to the instrument input to simulate the characteristics of an instrument amp.
The unit also offers 48V phantom power, much like other channel strips. Next to the phantom power button is the phase reverse button to correct mic phase issues. When activated, the “100Hz H.P” button rolls off the low-end frequencies at 100Hz.
Due to the absence of a VU meter, the preamp section has a light strip to indicate the signal strength and clipping issues.
- Dynamic Section: Gate
The dynamic section includes gate controls, a de-esser and finally, a compressor. The “Gate” section has a Threshold knob with values between +20dB & “Off”. Signals below the threshold level will be considered unwanted and will be removed.
The red and green LEDs below the control knob signify the gate’s status (open or close). The neighboring “Rel” knob can help select the release time of the gate. Transients like drum sounds require a quick release, so the controls should be set accordingly.
- Dynamic Section: De-Esser
The MXPro-60 offers an automated de-esser to attenuate sibilance in vocal tracks. The main knob, when turned to the far left, switches off the de-essing. The knob has a de-essing range between 1 and 10.
The De-essing section also has a button to toggle between male and female voices so that the channel strip can take appropriate measures accordingly.
- Dynamic Section: Compressor
The “Threshold” knob in the “Compressor” section presents a range of +20dB and -40dB. A signal beyond the threshold value will face automatic gain reduction. The “Ratio” knob decides the relationship between the main signal and the signal after compression.
Selecting 1:1 will bypass the compressor if required. The ratio can be set between 1:1 and 1:∞. An LED strip below the controls shows the amount of gain reduction. The gain loss in this section can be compensated using the gain knob that offers -30dB to +20dB gain correction. The “Dyn In” button will activate or bypass the compressor controls.
- EQ Section
The “LF Cut/Boost” control can use the high-pass shelving mode. Through the control knob, a boost/cut of -18dB to +18dB can be set below 100Hz. The “HF Cut/Boost” control works similarly and offers low pass shelving with the ability to cut frequencies above 4.25kHz by -18dB/+18dB.
The “Mid Parametric” section has “Frequency”, “Bandwidth”, and “Cut/Boost” knobs. The center frequency can be set between 150Hz and 16kHz, while the bandwidth can be chosen from a range of 0.3 and 3 octaves. The set center frequency can be cut or boosted by -/+18dB.
- Tube Sound Section
The “Tubesound” section can be activated by toggling the “Ts In” button. This section truly brings the Drawmer MXPro-60’s tube technology to the fore by allowing the user to apply it on all three bands according to preference.
You’ll find a separate knob labeled 0 – 11 here that can set the overdrive for each band. The amount of “Tubesound” can be set here individually on lower frequency up to 350Hz, on mids up to 350Hz to 2kHz and at the high end up to 2kHz and onwards.
- Output Section
Finally, in the output section, you’ll find a customary “Master Fader” that sets the level of the output signal between -20dB and +15dB. The section has a separate limiter which has a default setting of +16dB.
When hard limiting is taking place, a red LED will light up, while during soft limiting, while the signal is about to enter the hard limiting region, a yellow LED will light up.
Pros:
Drawmer’s MXPro-60 has a built-in de-esser that offers different settings and parameters for male and female voices. The “Tubesound” feature could have some interesting applications as it claims to imitate the tonal features of an actual vacuum tube unit.
Having so many features at such a low price point on a strip that requires just a single rack space is a feat in itself.
Cons:
Regardless of how close a solid state device may get to what a tube unit can sound like, it can still fall just a little short in terms of the warmth and fat sounds those military-grade vacuum tubes dish out.
Furthermore, although the Drawmer MXPro-60 can be called a jack of all trades, it lacks the depth in some of the sections that specialist devices succeed in providing.
Bonus
Presonus Studio Channel
This sleek channel strip by Presonus will tickle the fancy of many a sound engineer.
The Presonus Studio Channel may be one of the most economical channel strips on the list but don’t be fooled by the low price tag. The device is every bit as good as some of the more expensive units around and delivers a tube preamplifier, a 3-band EQ and compression module packed in an ergonomically designed 1U channel strip.
Although named the “Studio” channel, Presonus’ channel strip also works exceptionally well in live performance situations.
The tube preamplifier uses the 12AX7 tube, which is driven by double the voltage, unlike other channel strips in the price range. This makes for a wider sound stage and more headroom.
Key Features:
- Input/Output
The Presonus Studio Channel strip has a simple back panel divided into input and output sections. The input section includes a female XLR mic port and a quarter-inch jack for line-in, while the output controls include a male XLR port and a TRS connector.
In addition, the channel strip has a power button and power port on the rear panel. Finally, like most channel strips, the Presonus Studio has a quarter-inch port on the front for direct instrument connectivity.
- Preamp Section
The “Gain” knob provides a range of 10dB to 54dB for the selected input. Since the Presonus Studio offers a vacuum tube-driven preamplifier, the “Tube Drive” knob can add tube-based sound characteristics to the selected input.
The drive can be set in percentage values, and the recommended percentage for enriched vocals and punchy bass guitars is 30%, while a more overdriven sound will suit the likes of electric guitars and blues harps.
The button strip above the knobs includes 48 volts of phantom power and phase inversion buttons which are self-explanatory. Next to these is a -20dB pad button in case there is a requirement to attenuate shrill sounds even further.
Finally, the preamp section has an 80Hz Roll-Off button which ensures that all frequencies under 80Hz are rolled off by 12dB per octave. This feature will clean your vocal sounds in a live setup and add clarity.
- Compression Section
This section has all the necessary controls that need to be present in a comprehensive compression unit. You can set a “Threshold” between -40dB and 20dB. You’ll get a dedicated knob that can set the “Ratio” value between 1:1 and 10:1.
The higher you turn the knob, the greater the difference between the compressed and untouched signal will be. The “Attack” and “Release” controls offer a range of values between “Fast” and “Slow” settings.
Both time-based parameters can decide the speed at which the compressor will compress certain frequencies and the speed at which the effect will wear off. A very useful “Gain” control can compensate for any gain loss during compression. Pressing the “Comp Bypass” button will bypass the compressor.
- Equalizer Section
The Presonus Studio has a 3-band equalizer on board which can be bypassed by toggling the “EQ Bypass” button. The three bands include “Low”, “Mid”, and “High”. The low band has a “Freq” knob which sets the center frequency between 20Hz and 300Hz. The band’s “Gain” controls can then boost/cut the set frequency by -/+10dB.
By default, the low band is set as a shelving EQ but pressing the “Peak” button enables peak equalizing, which sets the Q at 0.7. The frequency range can be set in the mid-band by adjusting the Q knob. Then the center frequency can be set between 300Hz and 3kHz with a possible boost/cut range between -10dB and +10dB.
Finally, the high band offers a range between 2kHz to 20kHz for setting the corner frequency with a boost/cut range of -/+10dB. Like the low band, pressing the “Peak” button here toggles between peak and shelving options. The peak mode sets the Q at 7.0.
- Misc Controls
Through the master control knob, the output level can be set between -80dB and 10dB. The Presonus Studio also allows the user to change the order of the compressor and EQ modules. For example, pressing the “EQ>Comp” button moves the EQ before the compressor in the signal path.
The VU meter on the unit’s center measures the output level by default and can measure gain reduction resulting from compression when the “GR>Meter” button is pressed.
Pros:
Getting a channel strip with a tube preamplifier, a 3-band equalizer, and a compression section at this price point is unfathomable. The equalizer has detailed controls with peak and shelving options.
The VU meter’s behavior can be set to suit your needs, and the compression section is precise and detailed. In addition, you can also change the order of the EQ and compressor depending on preference.
Cons:
The gain and tube drive on the tube preamplifier section tends to get noise as they’re cranked up. The unit lacks dedicated controls for a de-essing section. In addition, the EQ tends to treat the higher frequency quite harshly. Also, it always increases convenience if the power switch is found on the user interface rather than on the back.
Conclusion
So now you have 13 different devices to choose from.
The features on most of these channel strips are similar in many ways, but the execution may be very different. It depends on what you’re looking for and what tickles your fancy the most.
If you prefer buying specialist devices built for a single purpose and giving you the maximum controls for that purpose, you may drop the idea of a channel strip entirely.
However, If you want to go in a different direction and get a multi-functional device that gives you a taste of everything in a single package, you have your work cut out after going through the list. See what suits you the most.

The Integraudio Editorial Team consists of experienced music producers, audio engineers, and plugin enthusiasts dedicated to providing in-depth reviews and guides for music production software.