
If you hear a crackling sound while composing music in Cubase, we’ll talk about why it happens and how to fix it today.
Cubase cracklings because your computer may not be up to handling a lengthy session, but outdated drivers or faulty software could also be to blame. If you hear crackling or have audio dropouts while working in Cubase, your computer is likely having problems processing audio and managing your session.
Cubase’s cracking can be remedied by opening the preferences panel and inspecting the audio driver. Changing the buffer size and sample rate in the audio options menu usually helps resolve these problems. After that, you may optimize your CPU utilization and speed things up.
How To Fix Crackling In Cubase?
These unwanted sounds happen because of two sources, hardware and software. So to solve this problem, we need to understand why this happens. The hardware refers to weak components like a weak PC or an old interface, and the software problems can be influenced by drivers, incorrect Cubase settings, and so on.
Hardware:
While it’s easy to point fingers at your computer or audio interface when things don’t go as planned during a recording session, remember that those aren’t the real issues holding you back.
To record music to the greatest levels and with good efficiency, a high-quality computer and interface like UAD are essential. However, even with a low-quality computer and a poor interface, you can still achieve quite a bit; you need to know how to work around their restrictions.
Audio Interface
No matter how expensive an interface is, if you don’t take care to use it within the parameters in which it was created, it can cause problems. Therefore, checking the driver and how it communicates with your PC is vital because the more imperfections in this communication, the more bugs Cubase will give you.
- Driver
Verify that the driver for your interface is up-to-date and functioning correctly; this is especially important if your interface does not use Asio4All. Some audio interfaces come with subpar drivers, but if your DAW of choice doesn’t support the manufacturer’s proprietary software, you can download the free and universally compatible Asio4ALL.

- Check The Ports
It’s always good to check the interface connectors; for example, you can take any input it has, from XLR, Jack, Headphones, Power, and even USB. Very often, a broken USB port or a cable not well plugged into the interface can cause a crackling sound.
- Buy An Power Inverter
Let’s imagine you’re performing at a concert hall or rehearsal area that you have no influence over and no idea where your equipment’s electricity is coming from. When you connect in the interface jacks or XLRs, a strong voltage current flows through the entire system, which can cause a weaker interface to fail.
Indeed, most interfaces obtain their power through USB, but if you invest in a current converter, the power supplied to the interface is stable and does not create system faults. If a separate source of electricity powers your interface, you’ll run into the same issue.
Weak PC
The problem may be as simple as that your computer isn’t powerful enough to process audio at the required quality. If you’re in the market for a new computer with the sole purpose of producing music, or if you want to update your current computer as an investment, the advice below is required reading.
- Use Your PC Strictly For Cubase
When you train your computer to function solely for Cubase, it will devote all of its resources to the DAW. This includes limiting it to a basic theme, eliminating all unnecessary programs running in the background, and disconnecting from the internet.
This is an excellent option for those with a less-than-stellar computer, and the resources Cubase needs won’t negatively affect them in the long run.
- SSD
Rather than using magnetic discs to store information, an SSD drive uses flash memory. They don’t need to physically move a drive head to different locations on the disk to read or write data, as there are no moving parts. As a result, compared to HDDs, they provide significantly quicker data access.
Cubase, together with the User Library and VST folder, should be installed on an SSD if you have one, as this will allow sessions to load and samples to be processed much more quickly.
From booting up to loading a big game, you’ll notice a marked improvement in performance with a solid-state drive. Although they may be costly, they will serve you well as a manufacturer in the long run.
- RAM
RAM is used for tasks such as launching applications, installing new software, and backing up data to the cloud, all of which require access to information that is only needed temporarily. As a result, memory usage is high for both live and other DAWs.
Furthermore, more and more memory is needed as your session expands to accommodate additional MIDI channels, audio effects, and plugins, all of which reside in RAM. As a result, if you’re serious about a career in music production, consider updating your RAM.
To put it plainly, 8 GB of RAM is required, but not ideal, for a bare-bones recording experience in Cubase. The optimal compromise is 16GB of RAM, although even that could have restrictions. But we’ll go through some solutions if you’re planning on installing 16GB RAM and still experiencing this problem.
Software:
After ensuring that the hardware is in good working order and we’re using our equipment properly, we can discuss software-related issues. Here, crackling can be caused by anything that puts a strain on the CPU, using many plugins, or playing back 100 tracks simultaneously with a short latency.
CPU Overload
Overusing the central processing unit is the primary cause of audio glitches, including pausing and crackling. As your Cubase session grows, your computer’s central processing unit (CPU) demands increase.
- Buffer Size
Try increasing your buffer size if you hear crackling when listening to input signals or playing virtual instruments in your DAW. Your computer’s processor requires time to do all the necessary computations when producing music in real time; raising the buffer size provides the CPU additional time to do its work.
As a result, as the buffer size grows, you will experience greater and more crackling sounds when monitoring input or playing virtual instruments in your DAW. The standard practice among musicians who use software instruments is, to begin with, a small buffer (32 samples is the bare minimum) and raise it as the session progresses.
Any audible clicks, pops or stutters indicate that your buffer is too empty. Go to File > Settings > Studio> Select your audio device in the Devices list, then go to the Control Panel by clicking on it.
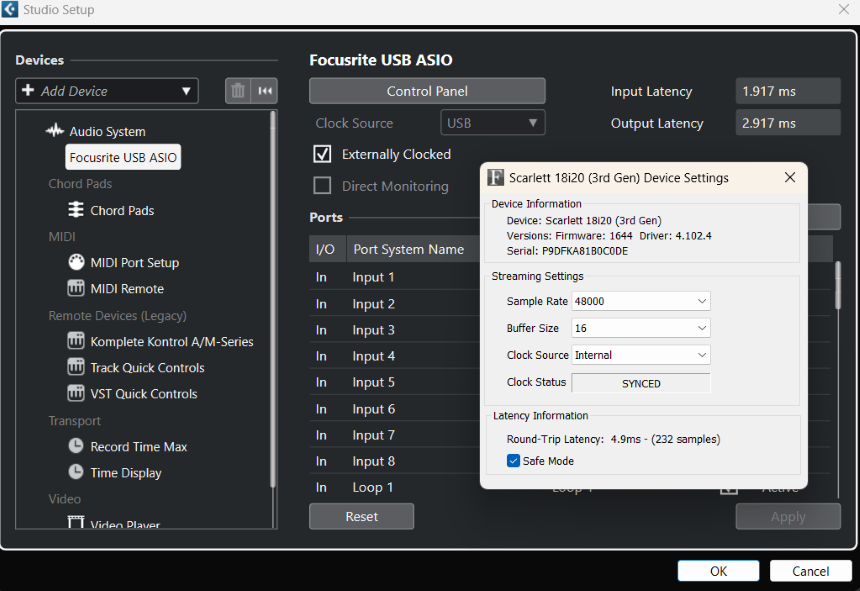
- Sample Rate
The number of audio samples sent per second is known as the sample rate. For Cubase, the less work required to create an audio file, the lower the sampling rate. Cubase uses a sampling rate of 44KHz by default. However, some producers choose higher sample rates to get the best sound quality.
This is especially useful when stretching audio, as doing so slows the sample rate and spreads the samples out over a more extended period. Thus, increasing the sampling rate yields superior audio quality.
Multiple Programs Running In Background
The more programs and windows you have open, the more work your computer has to accomplish across its various cores, and the more likely it is that you will run out of RAM before everything is finished. If you’re using Cubase for production, close all other programs.
Be wary of “background apps,” or those that continue to process data even when you have stopped actively using them. A few will become visible if you hit the arrow labelled “display hidden icons” on your toolbar. Next, choose the app running in the background and select the option to terminate it by clicking the corresponding menu item.
In most cases, even if you minimize an app’s window, it will continue running in the background. Start, then navigate to Settings > Privacy > Background programs for an in-depth look at your computer’s hidden processes.
You may view a complete list of all programs that have permission to run in the background by clicking on Background apps. Turn off anything that isn’t necessary.
Complex Cubase Session
Even if you follow the steps above, you may still need help throughout your session, such as cracking or freezing.
This error may occur when your session becomes too large for your CPU. There could be many time-stretched lengthy audio samples, multiple instances of Fab Filter ProQ running at x32 sampling, or other unneeded processes running in the background.
- Rendering The Tracks
Your CPU will thank you for rendering your music. When a track is frozen, it is treated the same way as a recorded audio track, and all processing power is dedicated to that task. Instead of constantly calculating the effects and plugins added to an audio track, a rendered track plays back a “frozen” audio file, reducing the strain on the CPU.
When a frozen track is flattened, the original audio clip, its effects, and plugins are removed and replaced with a new audio clip. You should only render your songs if you’re delighted with the sound you’ve achieved in every track, as beyond that point, additional adjustments to the sound quality will no longer be possible.

- Mix In Groups
So, set up a slapback delay send channel, a long delay send channel, and two or three reverb send channels. Having only three reverb instances running instead of one for each session’s 30 tracks is an excellent way to alleviate CPU overload problems.
You may occasionally utilize reverb or delay on a track, but only for sonic or creative purposes and never while mixing. Because you aim to create a natural habitat for all your instruments to inhabit when using spatial effects, this also results in a cleaner and more cohesive mixes.
When all instruments are routed through the appropriate reverbs, it becomes much simpler to create the desired ambience.
- Less Oversampling In Plugins
Indeed, an oversampling in Fab Pro Q3 or a reverb will give you a richer sound, but if the latency is low and you have at most three tracks simultaneously, you won’t understand anything you recorded.
To solve this problem, it is preferable to remember that oversampling is unnecessary to minimize when you record. However, when you mix and give yourself high latency, you can increase it.
- Delete Everything Unused
The best way to free up your Cubase session is to eliminate any unnecessary tracks, clips, or plugins that are still active. Streamlining your session this way can reduce the likelihood of audio dropouts and improve Cubase’s performance.
- Delay Compensation
Another important cause of cracking in a digital audio workstation is the usage of latency-inducing plugins. Any plugin built into the DAW will add latency to the signal flow. The signal will be delayed by the time it takes to load each plugin or chain.
All the DAWs we support feature a “Delay Compensation,” which delays tracks by the same amount as the track with the most latency to keep them in perfect time alignment.
Plugins in a session will cause more delay than the host buffer size alone, making this a must-have for modern workflows but at a cost.
This effect is only noticeable while monitoring input signals through the DAW or while playing virtual instruments within the DAW.

Conclusion
We’ve all experienced crackling and latency problems at some point or another in our music-producing careers. So many factors contribute to these problems, so you’ll have to devise your strategy.
Your computer and Cubase are the major tools we use to produce our art, so it is important to take care of them and follow the steps in this post if you ever suffer any audio performance concerns.

The Integraudio Editorial Team consists of experienced music producers, audio engineers, and plugin enthusiasts dedicated to providing in-depth reviews and guides for music production software.