
This article will show you how to move logic pro to a new computer. We will look at moving the logic application itself, project files, samples, and plugins.
Moving the Logic Pro application
- On your new Mac, open the App store and log into the same Apple ID you used to purchase Logic on your original device.

- Once you’ve signed in, on the bottom left of the window, you will see your name (Or the name associated with the Apple ID); click on the name to open the account tab.
- In the account tab, you will see the purchase subheading; navigate through the list until you find Logic and click install.

- Once it is downloaded, you now have logic pro moved onto a new computer.
Moving Project files
- Finding the Files on your old Mac
First, you will need to find the projects. You can save your projects in many different locations, the most common being the default save location, the desktop window, and an external hard drive/memory stick. We will also look at how you can find projects if they have been saved elsewhere.
- The default saves location
When you first go to save a project in Logic, you’ll be given the option to save your project in the default logic folder. If you have never changed the save location, this will be where your projects are stored.
- Make sure the Finder app is selected and press ‘Go’ in the menu bar.
![]()
- Once the drop-down menu opens, navigate to the Computer option and select it.
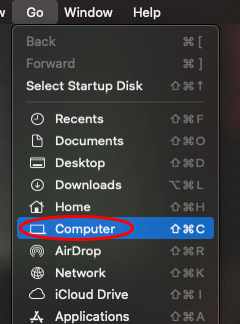
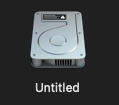
- You’ll then have a finder window with different locations to select. Select the location named ‘untitled’ (Sometimes it may be different if you have changed it).
- Once the ‘untitled’ folder opens, you will see Applications, Library, Systems, and Users. Select Users and then select your username. (You should see a home symbol indicating your device’s main/only user).


- Navigate to music and open the folder.

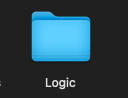
- Select the Logic folder and find all your logic pro project files.
- Desktop
If you have stored your file on the desktop, then it’s very fast and easy to locate them. They will be on the desktop as project files/folders or within a separate folder/folder on the desktop.
- If your files are on the desktop and not sorted in separate folders, you have successfully located your files.
- If your files are stored in separate folders, you need to open the folders on your desktop until you find the logic pro project files.
- External Hard Drive/ Memory Stick
Similar to the desktop, finding your files in your external hard drive or memory stick is a very simple process.
- If your files are not sorted into any separate folders, then you need to open the hard drive or memory stick, either by the finder or the icon on the desktop, and you have successfully located the files.
- If the files are sorted into separate folders, you need to open that folder to locate all your projects.
If you still can’t find your projects, you can use the search tool in the finder to search for the files individually. If you use the default logic naming system, search for ‘logicx,’ and all the project files with that in the name will appear. If you use a separate naming system, you can find the location of the files by following these steps.
- With Logic Pro Open, on the menu bar select File and then ‘open recent’.

- Don’t select a file. Find the name of a project and remember it.
- Then head to the finder and search for the name of that specific project.
- Once that project appears in the finder window, single-click the file to highlight it yet not open it, and at the bottom of the finder window, you will see the file location.

- Once you’ve found that location, navigate to it, and all your files should be saved there.
- Moving the files, the files to your new Mac
Now that you have found your files on your old Mac, you will want to move them to your new Mac. There are a few processes in which you can do this, such as airdrop, email, and using a hard drive or memory stick. I always recommend using an external hard drive or memory stick to transfer files if you have any.
- Using an external hard drive or memory stick
- If your files are already on an external hard drive or memory stick, you need to eject the device, plug it into your new Mac, and read step 5.
- If your files are stored elsewhere, you will want to move them into a new folder.
- To make a new folder right-click/command-click on a space in your external hard drive/memory stick and select the new folder.
- Then go back to your project files, select them all, and drag and drop them into your new folder, then once they have all transferred, eject the device and plug it into your new Mac.
- Once the external hard drive/ memory stick is plugged into your new Mac, you can either leave it as the designated place to store files or drag and drop the folder containing your project files onto the desktop to transfer them to your new Mac. Once on the desktop, you can quickly move them anywhere you’d like on your Mac.
- Using AirDrop
Using AirDrop is simple; however, it can take a while to transfer, depending on network speeds. (You must be signed into an apple ID to use AirDrop.)
- On your old Mac, navigate to your logic projects, right-click/command, click on the file to open the drop-down menu, select share, then AirDrop.

- Then, on your new Mac, ensure AirDrop is activated by opening the finder and selecting AirDrop under the favorites Tab. You will see the section called ‘Allow me to be discovered by:‘ click the drop-down arrow to ensure this says, Everyone.

- Then the files you’re trying to AirDrop from your old Mac should appear (It can take some time to appear).
- Once they appear, accept the AirDrop, and the files should be sent to your new Mac and appear in the Downloads section in the finder window. From there, you can move them wherever you’d like.
- Using email
I don’t recommend this option as it can be very time-consuming; however, it is still a useful tool if you can’t use any other options.
- On your old Mac, navigate to your logic profiles, right-click/command-click on the file to open the drop-down menu, select share, then mail.

- If you need to sign in, you’ll be prompted to sign into an email account.

- Once signed in, select the email you want to share the folder and press send.
- Then, on your new Mac, sign into the email you sent the folder and download the project file.
Moving Samples.
Moving Samples is very similar to project files; however, you most likely know exactly where you’ve stored your samples, so we won’t need to cover how to find them. If you need to know where they are stored, use the same methods we covered for finding project files.
- Using an external hard drive or memory stick
- If your samples are already on an external hard drive or memory stick, you need to eject the device, plug it into your new Mac, and read step 5.
- If your samples are stored elsewhere, you will want to move them into a new folder.
- To make a new folder right-click/command-click on a space in your external hard drive/memory stick and select the new folder.
- Go back to your samples, select them, and drag and drop them into your new folder. Then once they have all transferred, eject the device, and plug it into your new Mac.
- Once the external hard drive/ memory stick is plugged into your new Mac, you can either leave it as the designated place to store your samples or drag and drop the folder containing your samples onto the desktop to transfer them to your new Mac. Once on the desktop, you can quickly move them anywhere you’d like on your Mac.
- Using AirDrop
Using AirDrop is simple; however, it can take a while to transfer, depending on network speeds. (You must be signed into an apple ID to use AirDrop.)
- On your old Mac, navigate to your samples, right-click/command-click on the file to open the drop-down menu, select share, then AirDrop.
- Then, on your new Mac, ensure AirDrop is activated by opening the finder and selecting AirDrop under the favorites Tab. You will see the section called ‘Allow me to be discovered by:’ click the drop-down arrow to ensure this says, Everyone.
- Then the files you’re trying to AirDrop from your old Mac should appear (It can take some time to appear).
- Once they appear, accept the airdrop, and the files should be sent to your new Mac and appear in the Downloads section in the finder window. From there, you can move them wherever you’d like.
- Using email
I don’t recommend this option as it can be very time-consuming; however, it is still a useful tool if you can’t use any other options.
- On your old Mac, navigate to your samples right-click/command-click on the file to open the drop-down menu, select share, then mail.
- If you still need to sign in, you’ll be prompted to sign into an email account.
- Once signed in, select the email you want to share the folder and press send.
- Then, sign into the email you sent the folder to and download the sample files on your new Mac.
Moving Plugins
The hardest thing to move is plugins. Plugins can be tricky as most VSTs will have their own sample libraries stored somewhere on your Mac/External Hard Drive .
The best way to transfer plugins is to redownload them from the manufacturer’s website, especially if your new Mac is on a different OS system from your old Mac.
If you can’t redownload them from the manufactures website, there is another option. However, it is not guaranteed to work.
- Make sure the Finder app is selected and press ‘Go’ in the menu bar.
![]()
- Once the drop-down menu opens, navigate to the computer option and select it.
- Select Untitled
- You’ll then have a finder window with different locations to select. Select the location named ‘Library.’

- Once the ‘Library’ folder opens, navigate to the ‘Audio’ folder and open it.

- Then navigate to the ‘Plugins’ folder and open it.

- You will need to transfer all the files from the components folder, VST folder, and VST3 folder to the corresponding folders on your new Mac. Follow steps 1-5 to find these folders on your new Mac.

- To transfer these folders, you can use an External Hard drive/ memory stick, AirDrop, or Email.
- Once the files are downloaded onto your new Mac, drag and drop only the files from the components folder (Not the folder itself) from your old Mac into the components folder on your new Mac.
- Then do the same for VST and VST3 (Always moving just the files, not the folder itself)
As I mentioned, it’s always best to redownload the plugins from the manufacturer’s website to avoid glitches and get the most up-to-date versions.
If your plugins require a license/activation key, they can be found on the manufactures website.
Conclusion
Mac Migration can be difficult, but the process becomes simple once you’ve found your files. It’s important to remember that plugins should always be re-downloaded from the manufactures site if possible.
I’d always recommend that you store your files on an External Hard Drive; not only does it free up space and keep your files safe in the event of a virus or damage to your computer, but it also means that you can move them between computers with ease. If you already had all files on an External Drive, this process would have been very fast and simple.

The Integraudio Editorial Team consists of experienced music producers, audio engineers, and plugin enthusiasts dedicated to providing in-depth reviews and guides for music production software.