Whether you wish to record a live band with hardware gadgets or produce a rock song using virtual instruments, REAPER has you covered with outstanding recording capabilities, straightforward audio/MIDI editing, and a thriving community to boot.
Making metal and rock music typically involves recording a lot of live performances. Many artists and bands prefer recording practically everything from guitars and keyboards to drums and bass guitars. Consequently, we need to edit the recorded audio, sometimes even by correcting the timing or pitch.
Beyond audio is a world of MIDI recording, writing, and editing. Complementing a live instrument, like the bass drum, with a virtual MIDI instrument is a common technique. Similarly, mixing is a huge part of producing any music. Built-in effect plugins, compatibility with third-party or hardware plugins, automation, etc., play vital roles in mixing.
Is REAPER Good For Making Metal & Rock Music?
Yes, REAPER is excellent for making metal & rock music. Despite being inexpensive, it offers in-depth audio/MIDI editing, timing and pitch correction, a huge collection of effect plugins, drum replacement, and easy multi-track recording. Likewise, you can add and remove features to better suit your workflow.
The best way to evaluate whether a DAW is useful for you is by understanding its features. In this article, I will discuss various REAPER features and make some comparisons with other DAWs to help you understand the difference.
Since customizability is one of the most loved features among REAPER users, we’ll explore the built-in features and the free customization scripts created by fellow users. These scripts include many excellent effect plugins programmed inside REAPER.
Introducing REAPER
REAPER stands for Rapid Environment for Audio Production, Engineering, and Recording. It’s a well-programmed digital audio workstation at a surprisingly low cost for personal use, allowing you to spend your budget on your preferred effect and instrument plugins.
Discover five reasons why REAPER is the ultimate choice for musicians of any genre:
- Lightweight
REAPER is arguably the lightest DAW available today, with an installer size of merely 15 MB on Windows and 25 MB on macOS! It’s highly efficient at utilizing your computer resources, ensuring that even the most primitive computer can record, edit, and mix audio. However, despite its small size, the DAW is no less feature-rich than the most expensive available today. Frankly, it outdoes most DAWs easily thanks to its features like surround mixing, subprojects, powerful routing, audio editing, etc. - Compatible
REAPER is among the few DAWs available on Windows, macOS, and Linux. It’s compatible with all the major plugin formats, including VST, VST3, AU, CLAP, and LV2. Likewise, it supports most hardware gadgets like control surfaces, synths, effects, and old SysEx hardware. - Customizable
You can alter virtually everything in REAPER to your preference. Hundreds of customizable themes made by users let you make your REAPER look like another DAW or something entirely new. Furthermore, you can change the keyboard shortcuts, menu items, toolbars, and even features. REAPER can run scripts written in LUA format to add all kinds of features. If you’d like a certain function, it’s probably available in REAPER either by default or user-programmed scripts, thousands of which are free. - Rock Solid
REAPER is one of the most stable DAWs available today. It can optionally keep any plugin in a separate thread to prevent crashes if it malfunctions. Also, it provides live visual feedback in gain automation and stretching, giving you a true “what you see is what you get” and vice-versa experience. - Portable
You can install REAPER to any location, like a flash drive, to run the DAW portably on any computer. The drive could also hold many of your plugins that don’t require computer authentication.
REAPER Features
The list of features I’ll enlist and describe below isn’t exhaustive. It only includes those that are relevant to making metal and rock music. Hence, I’ll describe each feature to show how it can help your particular workflow. Let’s get started!
Recording & Takes
REAPER allows you to record as many inputs as your audio interface supports in a project. This feature is essential for recording a band or performing live. Furthermore, each take of your recording is stored separately, letting you select the best performance of each player while editing. You can even chop up an audio recording, select the best segments from multiple takes, and group them as a “comp.” A comp saves the set of takes you’ve selected for each item, allowing you to recall different comp sets when needed. Additionally, once you’ve decided which comp to use, you can render the set of takes into a single audio item.
Take FX
REAPER supports various types of items: audio, MIDI, video, timecode, empty (for notes), etc. We primarily work with audio and MIDI items for music production. However, all of them can host effect plugins and instruments, positioning them before the chain of effects/instruments on the track.

Suppose I had a track with a reverb plugin. And I placed an audio item with an EQ on that track. Then, the EQ would process the audio item before sending it into the reverb on the track. It’s handy to change a particular audio item without modifying other items on the same track. I’ve often used it to adjust the proximity effect of a recording, EQ out a peaking frequency, etc.
Similarly, if I placed an instrument on a MIDI item, the instrument would play alongside the instrument on the track. The feature is useful for creating a short, temporary layering with multiple instruments without creating another track.
You’ll recall that I mentioned you can record multiple takes in one item in the previous feature. So, beyond merely placing effects and instruments on the item, you can even place them on each take, hence the name of this feature, “Take FX.”
Stretch Markers
REAPER allows you to warp or stretch the time of an audio/MIDI item to correct the timing of the performance or change the playback speed. Stretch markers are the markers you place within an audio or MIDI item to individually stretch each segment of the content. For example, you could use stretch markers to lengthen a certain word in your vocal recording or to correct the timing of an instrument performance.

Moreover, this feature offers a “snap to grid” option in the item right-click menu. Once you’ve placed stretch markers at the transients of your recording, you can press “snap to grid” to automatically move the transients to the grid of your arrangement page. I’ll describe how to automatically add transient guides and stretch markers later in this article.

You can also stretch an item as a whole without placing stretch markers. It essentially changes the playback rate to lengthen it or shorten it. Furthermore, you can assign each item to preserve the pitch when stretching or change the pitch like a cassette.
ReaTune
ReaTune is a pitch-tuning and correcting plugin available in REAPER. It features three seemingly independent pages: tuner, correction, and manual correction. However, they are all somewhat interconnected. Let’s go through each in brief:
Tuner
It should come as no surprise that this page features a digital tuner that analyzes audio input. You could use it to tune your guitar, bass, violin, etc. However, there are a couple of other features worth talking about here.

First, the Window Size drop-down at the top right lets you adjust the pitch analysis window. A short window like 20ms is much quicker than 200ms. Hence, you should use a longer window size to tune a guitar, for example. Otherwise, the meter will keep jumping around, confusing you. The window size also affects the pitch correction features of this plugin. So, I like to use 20 to 100ms when using automatic pitch correction, a higher value for good performances and a lower value for flawed singing.
Remember that the window size adjusts how many segments ReaTune divides your audio into. To the right of the Window Size menu, the Overlap drop-down adjusts how much one segment/window overlaps the next, from 1x (none) to 8x. So, increase the overlap if you notice strange artifacts in the pitch correction.
Finally, this page lets you assign the reference pitch and convert the pitch analysis into MIDI notes. I like to create a new track, send MIDI data from the main track into this new track, and record the MIDI output to notate a recording.
Correction
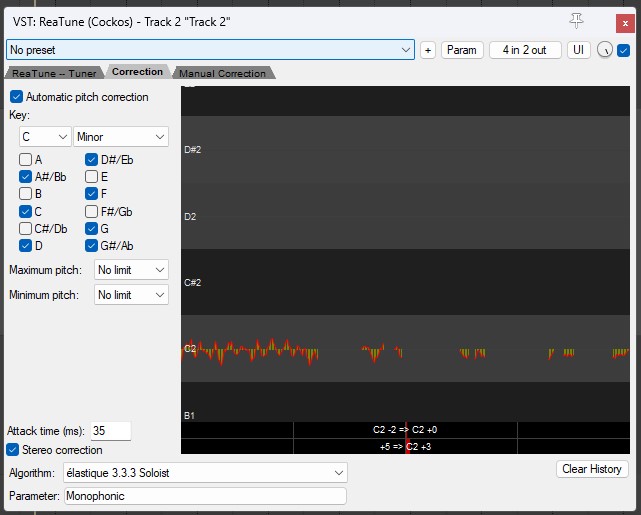
The star of this page is the auto pitch correction feature or auto-tune. You can either select a preset scale or assign the notes of your composition manually for the pitch correction. Likewise, you can change Attack Time, which is the time ReaTune takes to process detected pitch fluctuations. Like Window Size in the previous section, use a smaller value, like 2-25ms, for subpar vocals. Good singing, especially with vibrato, should have a longer attack, like 50-250ms.
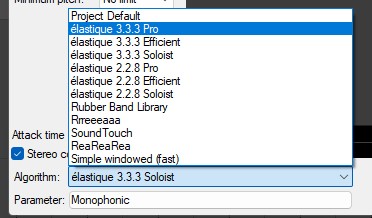
At the bottom of the screen, you can change the algorithm for pitch processing. I recommend “élastique 3 Soloist” for vocals and most lead instruments, and “élastique 3 Pro” can be good for some instruments. Likewise, the parameter drop-down menu has various options that could minimize artifacts, depending on the audio source and style.
Manual Correction

The manual correction tab lets you draw pitch editing curves manually. This mode often gives the best results since you fully control the correction process. However, note that the options we’ve previously covered also affect manual correction. These options include Window Size, Overlap, Attack Time, Algorithm, and Parameter.
Effect Plugins
REAPER ships with over thirty primary effect plugins and over two hundred Jeusonics (JS) effect plugins. The latter are plugins programmed and editable in REAPER, which makes them extremely CPU efficient. Although, it doesn’t mean the primary effect plugins aren’t!
These plugins include unlimited multi-tap delay, unlimited band EQ, unlimited multi-band compressor, convolution reverb, shimmer reverb, harmonizer, filters, hardware effect emulations, multi-effect sequencers, and more. ReaFir is a multi-effect plugin capable of linear EQ, noise reduction, FFT compression, etc. Furthermore, REAPER even features a Video Processor plugin that lets you perform different video editing tasks like chroma keying, adjusting brightness/contrast, cropping, color correction, etc.

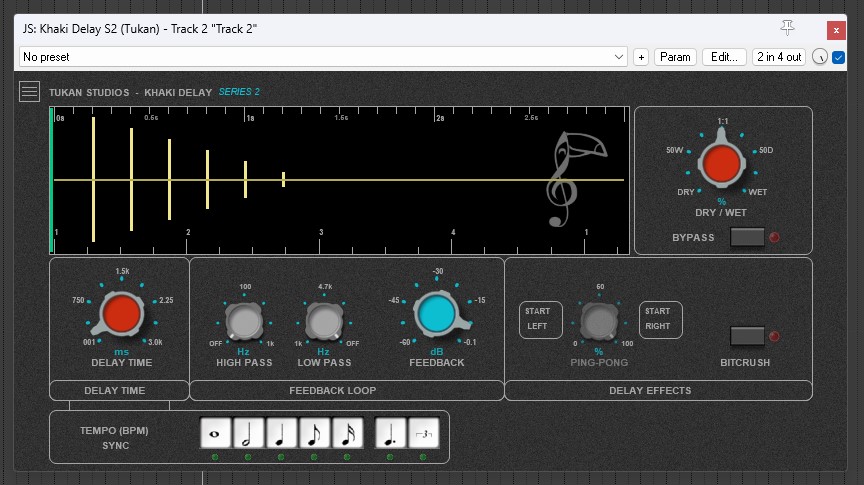
Hundreds of excellent JS effect plugins made by fellow users and enthusiasts are available for free via the ReaPack extension and other online sources. Two of my favorite developers are Tukan and Geraint, who have contributed outstanding plugins and instruments that I frequently use in my projects. They include guitar amps, channel strips, synths, reverb effects, etc.

Dynamic Split
The dynamic split feature splits an audio item based on its volume fluctuations or dynamism, often also called transients. A common use of this function is to delete the silent segments of an audio recording. Likewise, you can use dynamic split to detect the transients in the audio item and add stretch markers. It’s particularly handy for correcting rhythmic recordings like drums and bass guitars.

Dynamic split can also create MIDI notes based on the transients. In metal and rock music recordings, you can use it for drum replacement. For instance, if you dislike your kick in a live recording, use dynamic split on the close mic and generate MIDI notes to play a drums plugin. Alternatively, you can also use ReaGate, a gating plugin that generates a real-time note for drum replacement.
If you’d like to learn more about the dynamic split feature, have a look at my article on removing breath noise. I’ve described every parameter in the feature and how to apply them there.
Routing & Folders
REAPER allows you to create complex audio routings on the fly. You can use any track as a MIDI or audio track and send its audio to any other track(s). Further, every track supports up to 64-channel audio (2-channel is stereo), allowing you to have multi-timbral instruments, advanced routing within a track, surround mixes, etc.
Every track can also function as a folder for managing tracks. And contrasting many other DAWs, a REAPER’s folder track acts like a sub-mix, allowing you to process the “children” tracks together. You can even add instruments in the “parent” track, which plays the MIDI data from its “children” tracks.

If you’re used to working with VCA groups, a way to link the volume, pan, and other parameters of multiple tracks to each other, you can do so in REAPER as well. You can create up to 64 groups and rename and assign each a color. Furthermore, you can set up inverse relationships between the volume, pan, and width of any two groups.
Automation & CC
From creating a fade-out as an outro to adding reverb during the chorus vocals, automation is an important part of mixing rock, metal, or virtually any kind of music nowadays. REAPER provides an ingenious automation system with user-modifiable curves and preset shapes. Moreover, you can adjust the level of an entire automation envelope with a single knob:

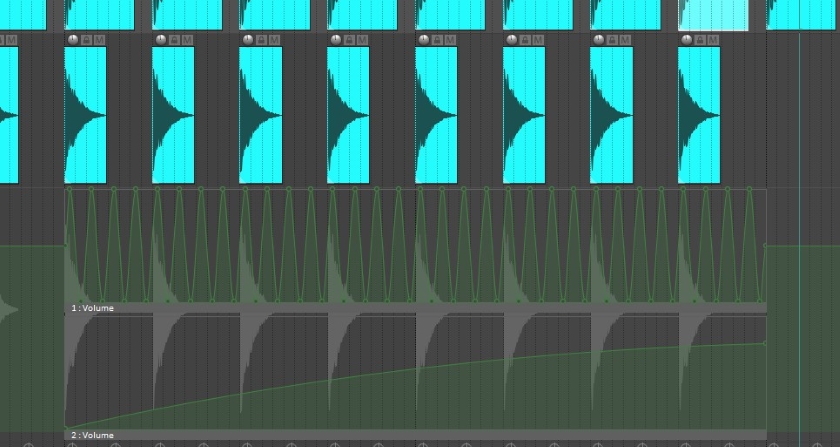
REAPER also allows you to create automation items, which makes it much easier to copy and move groups of envelope points. Automation items can generate LFO curve shapes like sine, triangle, square, saw, etc. Further, you can combine two automation items by placing them over one another. I often use this feature to create ramped LFO automation:
Beyond track automation, you can also automate a take and its plugins’ parameters. The take envelopes include volume, pan, mute, and pitch alongside any automatable parameter in a Take FX.
Like automation envelopes, Control Changes (CC) send data to various MIDI parameters like pitch bend, modulation, expression, sustain pedal, etc. However, the difference between automation and CC is that CC is typically written and recorded in a MIDI item, accessible from the piano roll. And while it’s a common enough feature in DAWs, REAPER allows you to write CC data with curves. Many DAWs use vertical bars or freeform drawings instead, making it tedious to write and edit precisely.

CCs are crucial to program virtual instruments and get realistic results. So, if you’re considering making metal or rock music using virtual guitar or bass guitar, REAPER would be an excellent choice for its CC editing features alone.
Timebase
The timebase decides whether an item should use the real-world time or the internal beats set by the tempo. If you set up a project to use real-world time, changing the tempo would have no effect on the audio items – an audio recording playing at 10 seconds in would still play at the 10th second by automatically changing the measure it falls on.

Contrariwise, if you switch to a beat timebase, an audio item in the 10th measure will play at the 10th measure regardless of your tempo. In this timebase, if you increased the tempo, an audio item at the 10th second would now play 5 seconds in, for example. It’s the most common behavior in DAWs.

Using the beat timebase can not only adjust the position of your audio items but also the length and playback rate according to the tempo. A slower tempo would result in slower singing, and a higher tempo would speed up the recording to match. Furthermore, while most DAWs can only set up a timebase for audio items, REAPER can assign an internal tempo for MIDI items and ignore the project tempo, resulting in real-world timebase behavior.
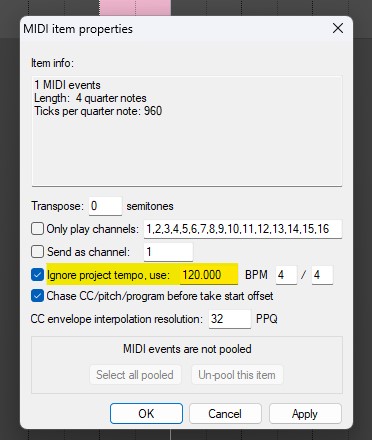
Sometimes, I’ll record a piano piece or melody without considering the tempo. By making the MIDI item ignore the project tempo, I can change the project tempo until the grids match up with my performance. Then, I can continue adding more instruments to the song.
REAPER allows you to assign a timebase to the project, track, or individual item. The item timebase holds the most priority and overrides the prior two, while the track timebase overrides the project timebase. However, the project timebase applies if you don’t set an item or track timebase.
Before we end this section, discover the timebases available in REAPER:
- Time
This timebase ignores the tempo entirely. You can use it to record a live band without the constraints of a fixed tempo. However, I mostly use it for sound design in movies and other videos. - Beats (position, length, rate)
As the name suggests, this timebase uses your tempo to change your audio items’ position, length, and playback speed. It’s what you find on many other DAWs as well. - Beats (position only)
This timebase adjusts the position of your audio items in relation to the tempo. So, an audio item starting at the 10th measure would still play at the 10th measure regardless of the tempo, but it wouldn’t speed up or slow down. You should use it as an item timebase to place a sample like a crash cymbal or guitar slide to the arrangement without worrying about tempo changes. - Beats (auto-stretch at tempo changes)
This timebase is only available for items. It adds stretch markers on the item to account for tempo automation. Conversely, the previous two timebases use the average of any tempo changes in the length of the item.
Floating Tempo
Some artists and bands prefer recording their songs without a metronome to humanize their performance. A slight increase in the tempo during the chorus can make a song more enjoyable and dynamic. So, it’s crucial to understand how to record and time such recordings to add tempo-synced MIDI instruments and effect plugins like a delay.
REAPER offers tempo markers to change the tempo mid-project and add tempo ramps between two markers for more flexibility. You can also assign a time signature to each marker. However, calculating the tempo manually can be a tedious process.
Therefore, here’s my preferred method to work with a floating or fluctuating tempo:
- Change the timebase of your tracks or items to “Beats (position only).”
- Align the first measure’s start of your recording to one of the measures of your grid.
- Trim the start of the items, snapping them to the grid. You’ll un-trim it after you’re done.
Trim. - Add a tempo marker at your recording’s first measure and one where the tempo falls out of sync by pressing Shift + C.

Adding the first marker. - Hold Control + Alt or Command + Option and drag the second tempo marker into position. Holding the keyboard command while moving the second marker warps the grid by changing the first marker’s tempo.

Adding and dragging the second marker. - Add as many tempo markers as you need and move the grid into position using the keyboard shortcut mentioned above.
- If the recording gradually changes speed, you can set the markers to “gradually transition tempo to next marker” in the properties window. Double-click a tempo marker to open its properties.
MIDI Control
Working with hardware effect plugins, synths, or sequencers in REAPER is easy. Once you’ve connected your hardware, add a new track in REAPER and insert the ReaInsert plugin. Then, right-click the track, and find “Show MIDI track control panel.”
We use the ReaInsert plugin to connect a hardware gadget with REAPER. It can send audio from the track to any audio output in your audio interface and MIDI to the selected device. Similarly, it can receive the audio from your outboard plugin as hardware returns.

ReaInsert allows you to select the MIDI channels of your input/track and the external instrument. Furthermore, it has automatic device latency adjustment and manual compensation, ensuring your hardware devices remain in sync with your project.
Once you’re done with ReaInsert, it’s time to check out the MIDI track control panel I mentioned earlier. At the top of the track’s FX chain, you’ll find the ReaControlMIDI plugin, which lets you select program patches on your hardware and transpose the MIDI. Likewise, you can send up to five control change (CC) data like volume, pan, modulation, sustain, etc. Of course, if you need more than five CC, you can add as many ReaControlMIDI as you want. Alternatively, you can use the piano roll to send CC data to your hardware.

ReaControlMIDI can also send SysEx messages to your hardware. This feature is crucial to using older hardware as it allows you to load and backup presets or control parameters using your computer.
Monitor FX
REAPER allows you to add effect plugins after the master channel. This effect chain, called the Monitor FX, affects what you hear but not what REAPER will render. So, it’s ideal for room correction, headphone correction, and an emergency limiter.
Many other DAWs do not offer this feature; you’ll have to place monitoring effect plugins on the master channel. And you have to remember to add them to each song and bypass them before you render. Hence, people who use such plugins benefit greatly from using REAPER.
Conclusion
We’ve covered twelve features that ensure a smooth workflow while producing metal and rock music. While many of them are related to live recording, a workflow involving virtual instruments and MIDI recording will also benefit from most of them. For example, having a flexible routing system allows you to use multi-timbral instruments, send effects, layer instruments easily by sending MIDI to multiple tracks, etc.
Note that REAPER doesn’t ship with instruments except for a few primitive synths. Instead of considering it a disadvantage, I implore you to view it as an opportunity to build a unique, custom library with the same budget that would cost you to buy an alternative DAW. So, here are my favorite plugins for producing metal or rock music in REAPER: MODO Max (bass & drums), Amplitube 5 (guitar amp), Ample Guitar LP, and MixBox.
If you aren’t after a detailed setup, you can purchase Kontakt 7, SampleTank 4, or HaLion 7 instead. Each offers an outstanding range of instruments and built-in effect plugins fit for any genre, including metal and rock.
And if you seek inspiration, REAPER features multiple chord and scale assistants in the ReaPack extension. You can quickly look up scales and chords, write the chord notes automatically, and lock your keyboard to a certain scale. However, I must mention that they’re not the equivalent of the chord track or chord pads in Cubase or Studio One. REAPER’s tools are more like chord and scale references.
To summarize, REAPER is a fast and powerful DAW with all the features necessary to produce metal and rock music. It can grow alongside your needs and experience thanks to its customizability, responsive developers, and active user community, constantly adding scripts to the DAW. Furthermore, even non-exclusive features in REAPER surpass many DAWs by their speed, flexibility, and logic.
I hope this article has helped introduce you to REAPER and how it can be useful to your workflow. If you’d like to learn how to use the DAW, download the free 60-day trial and watch these instructional videos. And with that, we reach the end of this article. Happy music-making!

The Integraudio Editorial Team consists of experienced music producers, audio engineers, and plugin enthusiasts dedicated to providing in-depth reviews and guides for music production software.