

This article is for you if you’ve noticed that your instrument is giving you latency when recording. Today we will talk about how you can Fix/Reduce Latency in Cubase and the causes of this problem.
A DAW that hasn’t learned the best settings you need will give you significant latency, whether you’re trying to record raw vocals without any plugins applied to the daw track or a guitar with a plugin that resembles a real amp to obtain the tone you desire.
All these issues, of course, have simple solutions if you have a powerful personal computer. However, even if you don’t, you may still find workarounds if you understand your system’s limitations.
How To Fix/Reduce Latency in Cubase
To begin, check that you have completed all the procedures to record your instrument or voice by reading the article we produced for that purpose, which you can find HERE.
Cubase’s latency can be decreased by following steps to ensure your computer is set up for peak performance:
- Verify your hardware specifications.
- Put out-of-date drivers for your audio and MIDI devices
Now that the computer is prepped, we can concentrate on the digital audio workstation. Here, we’ll look closely at the potential causes of latency in the DAW and some potential solutions.
Buffer Size
The size of your host I/O buffer is the primary cause of latency while listening to input signals or playing virtual instruments in a digital audio workstation.
When rendering music in real-time, your computer’s processor needs time to perform all the necessary computations; increasing the buffer size gives the CPU more time to do its work. Therefore, when monitoring input signals or playing virtual instruments in your DAW, you will notice more and more latency as the buffer size increases.
Most musicians who play software-based instruments start with a tiny buffer (32 samples is the minimum) and gradually increase it as their session becomes more involved. Your buffer is too low if you hear clicks, pops, or stutters.
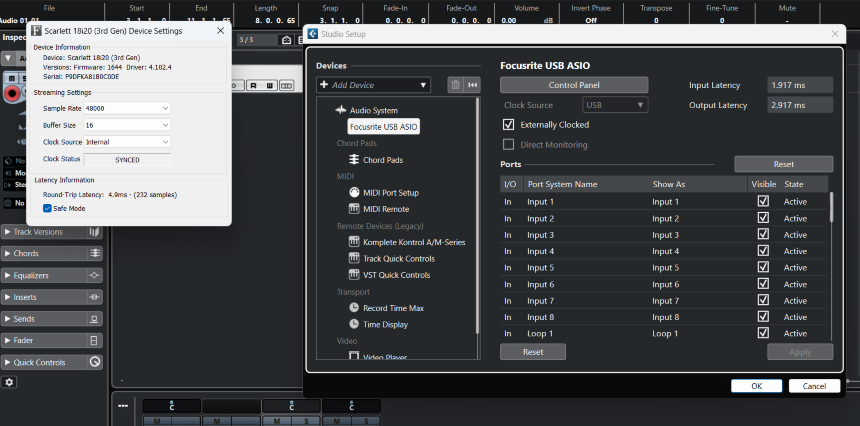
- Select Studio > Studio Setup.
- In the Devices list, select your audio hardware.
- Click Control Panel.
- Lower the size of the buffers.
Plug-ins and Delay Compensation
The use of latency-inducing plugins is another major contributor to delay in a digital audio workstation. It will always introduce some delay into the signal path by any plugin used in your DAW, whether it be a native or third-party one. Each plugin or plugin chain will add its latency to the signal.
Delay Compensation is a function present in all of the DAWs we support, and it ensures that your tracks remain in perfect time alignment by delaying them by the same amount as the track with the most latency. This is a must-have for current workflows, but it comes with a price: the delay introduced by plugins in a session will exceed that introduced by the host buffer size alone.
Only when monitoring input signals through the DAW or playing virtual instruments in the DAW will this impact be an issue, and we will cover how to get around this problem later in this article. This crucial function will maintain your tracks time-aligned and should always be enabled, provided you only push the delay compensation engine within its limits.

Tips to Save Your CPU
Sample Rate
How many times per second sound is recorded known as its sample rate. It’s the equivalent of the video term “frames per second,” or FPS. First, verify that the sampling rate of your computer and your audio interface are identical. It would help if you used a sample rate of 44.1 kHz because that’s what most digital music services (like Spotify, YouTube, etc.) use. However, sample rates can go as high as 192 kHz.
Maximum Use Of CPU
Nowadays, computers often come with power-saving features activated by default to conserve energy and improve performance. In Windows, select High performance from the power menu: You should turn off any options that seem to be designed to conserve power. Instead, keep your laptop up and connected at all times for optimal performance.
Close Unwanted Programs and Functions
The central processing unit (CPU) serves as the “brain” of your computer. In a constant state of multitasking, it does many things at once. Shutting down all other programs before beginning music production is a good idea.
Because of this, your computer’s central processing unit will be available just by your digital audio workstation. Make sure no extraneous programs were launched in the background during boot-up by checking the Task Manager/Activity Monitor. Turning off Wi-Fi has the additional benefit of helping concentrate on the task.
Render To Audio
Many people have found that rendering to audio is a game-changer. However, two important insights have emerged due to this process of translating to sound.
First, it releases a lot of computer resources. It’s taxing to run five instances of Kontakt and a dozen FabFilter plugins simultaneously. Therefore, it’s much easier on the laptop’s hardware to shut down all those plugins and still operate with sound.
The second benefit is that it will significantly reduce your work time. Once you’ve committed to an audio track, you can’t go back and change any of the parameters; you have to work with what you’ve got.
Avoid Bridged Plugins
When 32 Bit plugins are used with a 64 Bit OS, a “bridged plugin” is the result. When Cubase cannot locate a 64 Bit plugin, it “bridges” the 32 Bit one. More processing power is needed here compared to just using the 64-bit version of the plugin on a 64-bit operating system.
Conclusion
We’ll wrap up this discussion on latency with a few final points to think about. Generally speaking, a higher sample rate will result in less latency. Of course, running at more significant sample rates will put more demand on your resources, but if you’re focused on achieving the lowest possible latency, it’s worth testing it out.
Keep in mind that using the Aux Channels in Console will cause your signal to be delayed by 32 samples. Though the added delay won’t be audible for most applications, innovative routing techniques (like parallel processing) might be affected.
If you are recording a single sound source with several microphones (like a multi-mic drum session), and some of the channels are going through up-sampled plugins while the others aren’t, you must leave Input Delay Compensation (under Console>Settings>Hardware) enabled.
If that’s not the case with your recording circumstances, you can turn this option off to achieve the lowest possible delay. Of course, you must close and reopen your DAW whenever you alter this parameter.

The Integraudio Editorial Team consists of experienced music producers, audio engineers, and plugin enthusiasts dedicated to providing in-depth reviews and guides for music production software.