
We have a fine selection of monitor controllers from leading brands, including SPL, Mackie, Dynasty, Presonus, and Behringer, for you to feast your eyes on. Surely, as you read through the post, you’ll start to get an idea of the importance of these controllers in a studio setup.
When delving into the wonderful world of sound engineering and music production, many of you may have started with a small cozy studio setup including your trustee laptop, a decent audio interface, and a pair of studio monitors.
While your audio interface may seem sufficient at first, providing you with headphone and speaker connectivity at a basic level with a knob or two to control the output volume, what if you need to expand?
This is where studio monitor controllers shine. These devices come in different shapes, sizes, and features depending on the requirements of your setup; however, they all have a common mission.
Monitor controllers allow you to expand the capabilities of your mixing environment by allowing more connectivity options, different modes, metering options, and button/knob controls to change several parameters with ease.
As you progress in your journey as a music producer, your equipment needs to evolve with you. A state-of-the-art studio monitor controller is essential to streamline your workflow so that your mixing needs can be handled efficiently and effortlessly. Now let’s dive right in to see which controller with be the perfect fit for you.
Top 7 Studio Monitor Controllers (Best Rated)
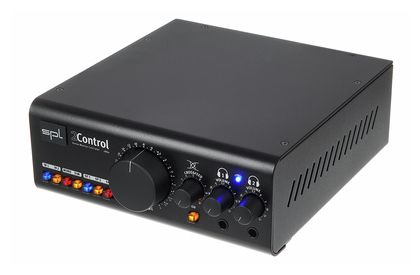
1. SPL 2Control 2860
Sound Performance Lab (SPL) have been delivering high-end audio equipment since 1983.
Specializing in a wide array of technologies, SPL prides itself on delivering hi-fi solutions to media broadcasters, filming enthusiasts, and musicians alike. The company is known for its innovative approach and out-of-the-box implementation of some unique features. The 2Control 2860 is a great example of this.
In the 2860 from SPL, you not only get a solid studio monitor controller with several input/output options and dedicated controls for each, but you also get a taste of a feature called “Crossfeed.” Additionally, the 2 control offers 2 of everything. 2 headphone amps, 2 channels, 2 speaker sets packed in one impressive monitor controller.
Key Features:
- Rear Panel
The rear panel starts with a power section. This section includes a 3-pin power port for the detachable power cable. All volume levels should be fully turned down when powering the unit to avoid damaging the equipment and the user’s ears. Next, the unit also has a power button and a voltage selector to change the voltage from 110V to 230V and vice versa.
The unit has a “GND Lift” section to eliminate hum noises. Next, the rear panel has a pair of stereo inputs labeled “IN 1” and “IN 2”. The input ports can connect your DAW or a stereo audio device to your SPL 2Control. These inputs have an input sensitivity of +4dBu by default.
However, the sensitivity of the stereo inputs in the “IN 2” section can be switched between +4dBu and -10dBv by pressing the nearby button. Finally, the unit has two stereo outputs labeled “SP 1” & “SP 2” for connecting speakers and a single “SP 3” XLR output for a sub-woofer or mono speaker.
- Button Controls
The front panel of the SPL 2Control has a button strip with 7 buttons to control various aspects of the unit. The first two “IN 1” and “IN 2” buttons correspond to the ports on the back and can select and activate the desired input. You can also press both buttons simultaneously to send forth a sum of the input signals.
The “Mono” button has some useful applications as it allows the user to convert a stereo signal to mono by combining the left and right channels. This can be especially useful for pinpointing different issues in your mix, like phase correction.
The “Dim” button reduces the volume by 15dB and comes in handy if you’re working with two different volume levels and don’t want to adjust the main volume control again and again. Finally, each SP output on the back has relevant buttons in the button strip on the front panel.
- Volume Control
The large master volume control is right in the front panel’s center. This knob is designed to reference the input level. When the knob is set to 0dB, it is at the unity level, and input and output are equal. The knob rotates from -80dB to 7dB and controls the output level of SP 1, SP 2, and SP 3 outputs.
- Crossfeed Knob
One of the most unique features of the SPL 2Control 2860 is its “Crossfeed” control. When listening to a speaker on one side of the room, your ears can tell where the sound is coming from because of the noticeable time difference between the sound reaching both ears.
SPL has designed the 2Control to create an impression of the sound source being 30 degrees from the listener with significant signal leakage in both channels to simulate crossfeed. The basic concept is to offer, on your headphones, the same feeling you get when listening to large loudspeakers.
- Headphone Amplifiers
The SPL 2Control features 2 separate headphone amps on board. These amps are designed after the technology used in SPL’s renowned Phonitor X amplifier, which assists in recreating the acoustic characteristics of speakers on your headphones.
With dedicated volume knobs, the headphone amps are very useful in a mixing situation when you’re in the studio with a fellow musician/someone you’re collaborating with and want more than one headphone access.
Pros:
The SPL 2Control’s impressive crossfeed feature provides an audio image of loudspeakers to the headphone users. The unit also offers dual headphone jacks with dedicated volume control to accommodate multiple listeners at a time. In addition, the stereo-to-mono conversion in terms of outputs helps to single out mix flaws so you can identify and fix them.
Cons:
Looking at the big price tag, you would expect the device to deliver impeccable quality, however, some users have experienced noise coming through the headphone amplifier even when all the levels are turned down. Also, as seen on more basic devices, a mute button would’ve been a good addition to the interface.
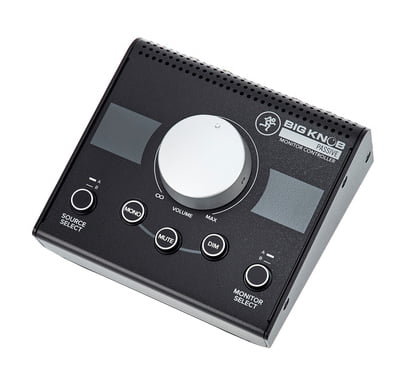
2. Mackie Big Knob Passive
The Big Knob series from Mackie has gained significant popularity since its release.
The series includes 3 variations of the instantly recognized big knob design. The Big Knob Studio + is the most advanced of the lot and has a ton of I/O ports, a built-in headphone preamp, a talk-back mic feature, and much more. But, as you would imagine, the unit also comes with a hefty price tag.
The more modest versions of the Big Knob line include the Big Knob Studio and Big Knob Passive. While the Studio version is a close second compared to the Studio +, the Passive edition does lack in some areas. However, the device does what it claims and is ideally suited to the needs of sound engineers that work in smaller setups.
Key Features:
- Inputs/Outputs
On the back of the Mackie Big Knob Passive, you’ll find the “Source Inputs” and “Mon Output” sections. The monitor controller offers 2-quarter-inch stereo input pairs capable of accommodating balanced and unbalanced signals. Also, in the inputs section, you get a 3.5mm jack for connecting any aux-enabled audio device.
The output section has a similar setup and includes a pair of quarter-inch stereo outputs designed to take balanced/unbalanced signals.
- Source/Monitor Selection
Selecting the inputs plugged into the back of the Mackie Big Knob is a cinch. By default, Input A is selected, but you can select the other inputs by pressing the “Source Select” button. Similarly, the “Monitor Select” button can be used to select the output. Again, by default, Output A is selected.
- Big Knob Controls
The “Big Knob” placed at the center of the unit is where the Mackie monitor controller gets its name. The knob ranging from “OFF” – “MAX” helps set the volume level of the selected input. The level must be off when plugging or unplugging any input/output ports.
The supporting buttons below the knob include a “Mute” button to silence everything and is a good alternative to muting everything by turning the big knob to the far left. The “Dim” button attenuates the selected monitor’s output by 20dB.
Finally, if you want to get details about the various flaws and imperfections in your mix, you can switch to the mono mode by pressing the aptly named “Mono” button.
Pros:
If you’re looking for a small but technically sound unit that takes care of your limited studio requirements, the Mackie Big Knob Passive is worth checking out. Coming at a very affordable price, the unit can accommodate three inputs and two outputs and doesn’t need a power source to function.
Cons:
Unfortunately, the Big Knob Passive cannot be used as an audio interface, so you might want to check out the Big Knob Studio, which has built-in recording capabilities and much more control in terms of input/outputs and overall features.
The Passive unit also lacks a headphone jack, so you’ll need an amp on hand for headphone monitoring. Finally, the device doesn’t offer enough volume range.
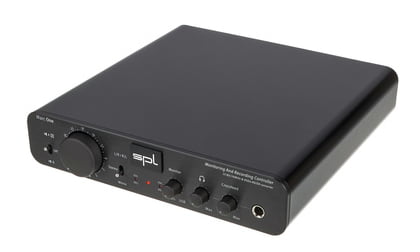
3. SPL Marc One
Compared to the 2Control by SPL, the SPL Marc One takes things a step further.
The Marc One comes in a slightly smaller size but has much more to offer in the input/output department and the execution of its features. The people at SPL have always made sure that they makes no compromises regarding the build quality of their products, and the Marc One is no exception. The exterior is made of metal, and the controls seem solid.
The monitor controller uses SPL’s Phonitor matrix, which ensures that when you adjust your mix on headphones, it will sound great on any speaker system. In addition, the circuitry under the Marc One’s hood offers exceptional recording and monitoring quality at a pristine 768 kHz and 32-bit, so you know that the resolution of the sound will be extraordinary and detailed.
Key Features:
- Inputs/Outputs
Starting from the far right, the SPL Marc One’s rear panel has a USB type B port for computer connectivity. The USB port can also route a digital input to the line output section. Next, the monitor controller has a couple of stereo line inputs with quarter-inch jacks. In the speaker output section, the device offers 2 options.
The first output has three quarter-inch ports that allow connectivity with studio monitors and a subwoofer, while the other has two ports without the possibility of connecting a subwoofer speaker. In addition, the line out comes in the form of stereo quarter-inch jacks.
The power section included a power button and a power port for the included power supply. Finally, the settings section has two dip switches. Here you can select while recording through the USB port whether the port will accept data from just Line 1 or a sum of Line 1 and Line 2. You can also lessen the outputs of the speaker by 10dB here.
- Speaker Selection & Level Control
The SPL Marc One has a simple interface with button controls that correspond to the input/output section on the back of the unit. Starting from the far right, the unit has a three-way selector switch to choose the speaker output.
Having the switch in the central setting will turn both speaker outputs off. The large volume control knob controls the level of all speaker outputs and the headphone output.
- Three Operating Modes
Another three-way switch helps select the mode in which the SPL Marc One will operate. The options here are “Stereo,” “Mono,” and “L/R > R/L.” Switching to mono mode is always useful as it helps to single out mixing errors that need correction.
The L/R > R/L feature switches the two channels so that the right channel becomes the left one, and you hear the left channel on the right side. This feature comes in handy if you’re dubbing a video where the direction of the audio matters.
You can easily switch between the channels as required. Considerable work would have to be done in your digital workstation to achieve the same result if this feature did not exist.
- Monitoring, Headphone Amp & Crossfeed
The SPL Marc One has a separate knob for controlling the input signal level. Marked “Inputs” at one end and “USB” on the other, you can rotate the knob to the right to increase the level of the USB input and move to the left to enhance the line input level. Keeping the knob in a centered position will cause both inputs to be equally loud.
The monitor controller has a built-in headphone amp meaning that you get a headphone output and a dedicated level knob to control its volume. Finally, the “Crossfeed” feature adds the audio image of external monitors directly to your headphones without any acoustic artifacts or environmental disturbance so that you can get a true picture and mix accordingly.
Turning the knob to the right increases the intensity, while moving it to the far left turns the feature off completely. The SPL Marc One uses LEDs to show clipping in the left and right channels. These LEDs are positioned in the unit’s center under the SPL branding.
Pros:
The SPL Marc One is built like a tank. All the control knobs and selector switches are made with quality material and provide a premium feel. The crossfeed feature is great for delivering a vivid speaker image on your mixing headphones, and the headphone amp works well. In addition, the controller offers a decent amount of input/output options.
Cons:
The metering options on the unit are a bit limited, with just a couple of LEDs that identify signal clipping on the left and right channels. Also, the SPL Marc One offers only one headphone output, which can be a problem if you have multiple listeners in your studio. In addition, the monitor controller lacks dim controls, and the channel switch mode may not be useful for everyone.
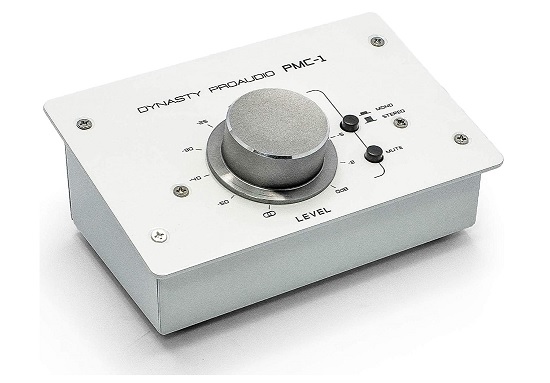
4. Dynasty ProAudio PMC-1
The Dynasty ProAudio PMC-1 is an extremely simple monitor controller.
The PMC-1 is more suited for smaller studio setups as it has limited input/outputs and adjustable controls on the user interface. Being a passive controller, the PMC-1 has been designed so that it doesn’t require a power source to power it. Measuring 5.1” x 3.75” x 2”, the device hardly takes up any space on your work desk.
Since the ProAudio PMC-1 lacks a comprehensive control panel, not much is happening to your sound, and the input signal is forwarded to the output speakers without coloration or changes. In addition, the device is durable, and the hard metal chassis protects the unit from the occasional fall.
Key Features:
- Inputs/Outputs
On the back panel of the Dynasty ProAudio PMC-1, you’ll find an input section and an output section. The unit offers a pair of balanced left/right combo ports that allow connectivity with male XLR and quarter-inch/TRS cables. The output area has a pair of quarter-inch output jacks. In addition, you’ll also be able to find a 3.5mm stereo port in the input and output sections.
- Volume Control
As a bridge between your input source and monitoring speakers, the Dynasty ProAudio PMC-1 has a large volume knob in the center of the interface. The markings on the volume knob show a range between -50dB and 0dB.
Next to the knob is the mute button which comes in handy to silence the setup at the touch of a button.
- Mono/Stereo
The final control on the Dynasty ProAudio PMC-1’s interface is the Mono/Stereo button that toggles between both modes. Having the mono mode at your disposal has its advantages, as it opens doors to effective mixing.
For example, you can efficiently equalize the different frequency ranges in mono mode before switching to stereo for fine-tuning. Also, mixing in mono can eliminate phase issues and improve panning results. The Dynasty ProAudio PMC-1 works in stereo by default and is switched to mono when the relevant button is pressed.
Pros:
The Dynasty ProAudio PMC-1 is ideal for smaller setups where you have only a pair of monitors to work with. If you need a monitor controller that covers all the basics, is strongly built, and doesn’t take much room or come with a heavy price tag, opting for the ProAudio PMC-1 is a no-brainer.
Cons:
The unit’s simplicity is also its downfall. If you’re looking for a controller that can manage multiple inputs and simultaneously give you several monitor options, the ProAudio PMC-1 just doesn’t cut it. In addition, the unit lacks a headphone output, so you’re stuck mixing through a single pair of monitors.
5. PreSonus Monitor Station V2
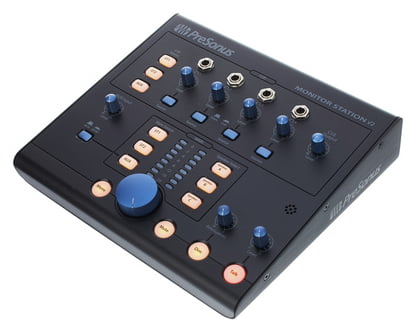
The V2 is the next iteration of its predecessor, the PreSonus Monitor Station.
The monitor controller has a solid metal body measuring 2.5” x 9” x 8.5”. The design is simple and looks very similar to the older model but with a new color scheme that gives the V2 an aesthetically pleasing look. While the PreSonus Monitor Station V2 is similar in most aspects to its older brother, a few surprises are hidden inside its rugged exterior.
If you’re using a simple pair of studio monitors, your headphones, or a combination of both, you can probably get by with just your audio interface. However, if you’re looking to improve your setup and need multiple input and output options without spending too much, the PreSonus Monitor Station V2 could be a handy addition to your studio.
Key Features:
- Rear Input
The PreSonus Monitor Station V2 has a very organized back panel. All the ports are organized into sections corresponding to the user interface controls. Starting from the far right, the rear panel has 2 pairs of stereo inputs labeled “ST 1” and “ST 2”. Next to the stereo inputs is a S/PDIF input to connect to a digital audio device with S/PDIF output.
The Aux input section has a couple of color-coded ports for RCA connectivity and a 3.5mm jack. On the output side of things, there are 3 pairs of RCA connectors labeled “A,” “B,” and “C” for your speakers.
Each pair has a dedicated output knob labeled -80 to 0 next to the ports. This could be very useful if you’re working with passive monitors that need the extra juice. Finally, the unit has a pair of “Cue” and “Main” stereo line outputs. The power section has the main power switch and an 18V power jack.
- Cue Section
The user interface is divided into two sections. The “Cue” section and the “Main” section. The Cue section has a button strip to select ST 1, ST 2, or Aux inputs. Here you’ll find four quarter-inch headphone jacks with dedicated volume knobs ranging from 1 to 11.
Also, with each volume knob, a source button can toggle between the Main sources set by default and Cue sources when pressed. Here you also get a separate “Cue Output” knob to control the main output level of the section.
- Main Section
Instead of a conventional VU meter, the V2’s main section employs two parallel LED strips to serve the same purpose. The strips are labeled from 0 down to -24 and respond depending on the different calibration settings that can be selected. The metering strips are flanked by ST 1, ST2, and Aux buttons on the left and three speakers (A, B, C) buttons on the right.
This means that the left strip shows the V2’s input levels while the other one is linked to the unit’s output speakers. The 0 VU LED will light up as a default setting if an input signal reaches +10dBu.
There are three settings in total that the 0 VU LED can reference depending on the sound source. These options include +4dBu, +10dBu, and +18dBu and can be selected by long pressing the ST 1, ST 2, and Aux buttons, respectively, when powering on the unit.
An easy guideline here is to choose the setting equal to or greater than the maximum input of the monitoring device and the maximum output of your input device. If you want to enable your main speakers and sub speakers together, the main section allows activating speaker outputs simultaneously.
- Other Controls
Apart from the controls found in the cue and main sections, there are a few important features on the PreSonus Monitor Station V2’s interface. The Aux input has a separate volume control marked with a range between -60 and +20. An “Aux/SPDIF button can toggle between the two input options on the back panel.
Selecting the Aux setting will enable both the RCA and 3.5mm jack. Finally, the bottom row of controls features a mono button that allows you to hear your mix in mono to home in on errors for correction. Next to the mono button is the volume knob that controls the output level.
The neighboring mute button silences the speakers, while a dim button can significantly subdue the signal according to the “Attenuation” knob with adjustment values between -30 and -6.
The last thing on the PreSonus Monitor Station V2 is a built-in talkback mic which can be used by long pressing the “Talk” button. Here you also get a dedicated knob to set the mic’s level between 0 and 10.
Pros:
The PreSonus Monitor Station V2 can accommodate a whopping 4 headphones, also providing dedicated controls for selecting the source and level of each source. The control layout is easy, and the rear panel is nicely organized under corresponding sections.
In addition, the built-in mic/talkback function is a very handy feature when working with multiple recording artists.
Cons:
Since the unit has a built-in talkback mic, you don’t get a separate port for an external mic for the same purpose as was found on the older PreSonus Monitor Station version.
In addition, the PreSonus Monitor Station V2 is known to have some power supply issues. Also, some buttons or knobs may malfunction after extended use due to poor built quality.
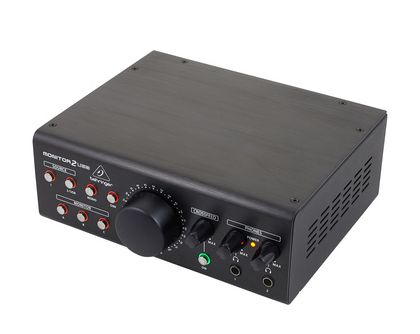
6. Behringer MONITOR2USB
Behring has been exciting sound engineers with their top-of-the-line audio equipment and studio products for years.
The technically gifted Swiss company has been around since 1989 and has been delivering many acclaimed products like guitar effects processors, pedals, synthesizers, drum machines, and studio equipment, including audio interfaces, monitors, mixers, monitor controllers, and much more.
Regarding monitor controllers, Behringer’s Monitor series includes the Monitor1 and the Monitor2USB. The earlier version is a simple unit with limited input/output options and just a volume control and a couple of buttons on its interface. The Monitor2USB, however, is a significant upgrade and gives you all the bells and whistles at an affordable price.
Key Features:
- Rear Panel
The rear panel of the Behringer Monitor2USB has a decent number of input/output options for small to medium-sized studio setups. Firstly, the unit has a USB type B port so that you can connect it to a computer and use it as an audio interface for the DAW.
Below the USB port is a large power button to turn on the unit and an AC port that can accommodate an input ranging from 100V to 240V, so you can use it anywhere in the world without using a power converter. In addition, the unit offers 2 pairs of balanced stereo XLR inputs.
Input one has a default sensitivity setting of +4dBu, while input 2 has a toggle button to switch between +4dBu and -10dBv options. Furthermore, the output section has 3 sets of outputs, including 2 pairs of stereo XLR outputs for your near-field and hi-fi studio monitors and a single XLR output for connecting to a full-range speaker or subwoofer.
- Source Controls
The features on the Behringer MONITOR2USB can be activated by rounded metallic one-touch buttons that are surrounded by ring LEDs which light up to indicate that the relevant function is activated. The user interface has a couple of input selection buttons highlighted by the “Source” heading.
Button “1” selects the first pair of stereo inputs on the back, while the second button marked “2/USB” can be selected for either the USB or the second pair of inputs. Next to the source buttons is the “Mono” button which, like other monitor controllers, allows you to hear your mix in mono.
This can be very useful for checking if your mix is even or for identifying phase issues in your mix, as sounds that are out of phase should disappear completely in a mono setting. You also get a “Dim” button which works like the “Mute” button on your car stereo.
Although the feature doesn’t completely mute the sound, it attenuates it by 15dB, so you can pause and have a conversation with a person in your studio and then instantly revert to your previous volume setting.
- Monitoring
The Behringer MONITOR2USB has a separate button strip under the “Monitor” section. Here you get three buttons corresponding to the XLR outputs on the back of the unit. The good thing about these buttons is that you can select more than one output at a time.
In addition, the large “Volume” knob that sits in the middle of the user interface can be used to adjust the overall volume level of all monitors in one go. The knob is voltage controlled and is quite sensitive, offering a smooth transition.
- Crossfeed Feature
If you are used to mixing on monitoring headphones, the Behringer MONITOR2USB offers a “Crossfeed” or panorama feature, which will give you the audio image of studio monitors inside your headphones.
This eliminates room acoustics and disturbances that may come into play when hearing a mix on your main speakers. Crossfeed can be activated by pressing the dedicated “On” button present in the section and rotating the knob to achieve the desired sound image.
- Headphone Controls
Under the “Phones” section, you get the option to connect two headphones simultaneously to the Behringer MONITOR2USB. This allows two listeners to listen to a mix at the same time. The section also offers a dedicated volume knob for each headphone jack, so the level of both can be adjusted separately.
Pros:
The Behringer MONITOR2USB eliminates the need for an audio interface, as you can directly connect to your DAW. The two separate headphone outputs come in handy when there is more than one listener in the studio. Working in the mono setting and playing with the crossfeed features exposes the flaws in your mix so that they can be corrected timely.
Cons:
The build quality of the Behringer MONITOR2USB can be improved. The knob’s construction isn’t flawless, as some users have experienced momentary volume dips/jumps when the knob is rotated in a certain direction which can pose a problem and even damage your equipment.
Also, some sound signals may bleed through the third output even when unselected, which is a deal breaker.
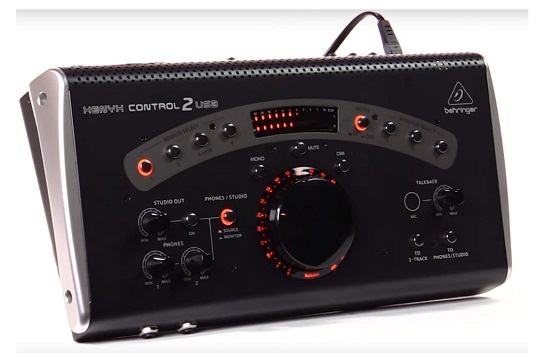
7. Behringer CONTROL2USB (Great For Multiple Monitors)
The Behringer CONTROL2USB is by far the most gifted of all the units discussed so far.
Seeing as this is the second monitor controller by Behringer on today’s list, you can be sure that the company does things right regarding studio equipment. The futuristic-looking CONTROL2USB is an all-in-one solution for your sound monitoring needs.
Designed for larger setups, the controller has all the input and output options you’ll need.
With the CONTROL2USB, you can switch between several inputs, choose from different outputs, have multiple outputs activated at once, and control their levels through a master volume control. Although slightly bigger than some of the other units, considering all the features, the CONTROL2USB is worth checking out, thanks to the good value it delivers.
Key Features:
- Power Control & USB
The rear panel of the CONTROL2USB is loaded with ports and knob controls. Starting at the far left, the controller has a USB B port for computer connectivity.
Below the USB port, you’ll find the power button and the power port capable of managing 100V to 240V, so you can take it along wherever you go worldwide, and it’ll work just fine.
- Inputs
The unit offers 4 inputs. Inputs one through three are all designed the same way and include a pair of quarter-inch jacks for stereo connectivity with a sensitivity button that can switch between +4dBu and -10dBv. Each of these inputs has a sensitivity control knob that offers adjustment between +10dB and -10dB.
The fourth input has a pair of RCA ports for connectivity with a line instrument or a turntable which can be selected by pressing the line/phono button. That’s right, the CONTROL2USB has a built-in phono preamp, which is why you’ll also find a ground terminal to connect the ground wire from your turntable.
Also, in this section, you get the standard +10dB/-10dB sensitivity knob. A “Monitor Mix Input” can also be found here with a +4dBu and -10dBv button and a pair of quarter-inch jacks. You can send a stereo mix from your digital workstation to the controller through the ports.
- Outputs
In terms of output options, the “Phones/Studio Out” section is subdivided into a studio section and a phones section. The studio output can be seen as a pair of quarter-inch jacks. You can connect your speakers here and control their sensitivity through the -10dB to +4dB trim knob for monitoring and talkback.
The CONTROL2USB offers two headphone jacks on the front of the unit; however, if more outs are required, you can connect a multiple-output headphone amplifier to enhance the controller’s capabilities.
The “Recording Out” section has three -10dB to +4dB enabled quarter-inch stereo outputs for recording tracks if required. Finally, the “Monitor Out” section has three stereo outputs with corresponding trim knobs.
- The Boomerang
A prominent feature of the user interface is the boomerang-shaped control strip. Starting from the far left, the strip allows you to choose between the four input ports at the back of the unit. On the far right, you find three buttons marked A, B, and C, which allow you to choose between the monitor outputs.
More than one can be selected here simultaneously. The center of the strip has two parallel rows of multicolored LEDs, which can be programmed to show input or output levels by the nearby “Meter” button.
- Talkback Feature
The Behringer CONTROL2USB has a built-in mic, so you can easily talk to your vocalist while he’s in the soundproof booth. Of course, there are many other uses for this feature.
The nearby knob acts as a gain control for the talkback mic, and the “Phones/Studio” button decides if the mic’s signal will be routed to the phones or the studio monitors connected to the corresponding outputs. Selecting the “2 Track” button will send the mic signal to the outputs under the recording out section.
- Volume Controls
The CONTROL2USB has an enormous, highly sensitive voltage control knob that can adjust the levels of the three monitoring outputs. Supporting the knob is the “Mute” button that silences all three monitors.
Also present is a “Dim” button which attenuates the signal going to the A, B, and C outputs by 20dB. Finally, the “Mono” button in this section converts the mix to mono to unveil any mismatches or flaws.
- Studio/Phone Out Controls
The “Phones/Studio” button here decides which controls to activate. When in phones mode, the two control knobs corresponding with the phone outputs on the front of the unit come into play for the necessary level adjustment. When in studio mode, pressing the “On” button activates the studio outs, and now the neighboring knob can be used to adjust the studio output level.
Pros:
The Behringer CONTROL2USB is a versatile controller loaded with features. At a relatively low price point, it’ll be difficult to find a device that offers so many input/output options, a built-in talkback feature, multiple headphone connectivity, and a phono preamp. All this while staying within the realms of simplicity is a feat that few have succeeded in achieving.
Cons:
Perhaps to make the CONTROL2USB so economical, Behringer has had to cut corners. Sadly, the material used in the controller’s circuitry is subpar, due to which the transistors emit a lot of noise. Many users have complained of hearing a monotonous hum coming from the controller. In addition, the level knob tends to become scratchy and has a similar volume jump/dip issue to the MONITOR2USB.
Conclusion
If you’re looking for a slight upgrade from your audio interface and don’t want to spend too much, the Dynasty Proaudio PMC-1 can be a good start.
The Mackie Big Knob also falls in the smaller studio category and gives decent controls and a couple of input/output options if that is all you need. Another good thing about these controllers is that they’re both passive and don’t need a power source to function.
If you have a bigger setup and are unsatisfied with just a pair of inputs and outputs, both monitor controls from SPL and the Behringer Monitor2USB can be worthy choices. You get more I/O freedom, an enhanced control over these I/O options and access to the “Crossfeed” feature that will greatly enrich your headphone mixing experience.
The Presonus V2 and Behring’s Control2USB devices offer built-in talkback features and a plethora of input/output ports with adjoining buttons and knob controls that set their sensitivity and trim level. These two can be great choices if you have a mid-level studio. Furthermore, the Presonus V2 offers a headphone preamp with 4 outputs, more than any controller on the list.

The Integraudio Editorial Team consists of experienced music producers, audio engineers, and plugin enthusiasts dedicated to providing in-depth reviews and guides for music production software.