
In the realm of production, Audio Damage is a firm making waves, and their products appear to be getting more and more helpful. A list of the Top 10 Best Audio Damage VST Plugins 2024 has been developed for you.
There is a plugin effect for every step of the production process and for many uses outside of traditional music production. For every step of music production, there are hundreds of plugin effects, like virtual instruments before them, were created to replace expensive hardware.
On the other side, mixing involves the processing of sounds or music that you have previously made using effects plugins. These kinds of plugins are used for EQing, compression, filtering, reverb, delay, and other things. For many newbies, the interface of these sorts of plugins might be intimidating because it frequently imitates the gear you’d see in a studio rack.
Since 2002, Audio Damage, a company located in Boulder, Colorado, has been producing dependable music software for artists. They have also contributed to some of the most well-known music software available.
So let’s examine their top selections for audio effects and more.
Top 10 Best Audio Damage VST Plugins
1. Audio Damage Quanta 2
More Info & Price (Trial Available)

Audio Damage Quanta 2 is a granular synthesizer plugin.
It allows you to manipulate audio samples in various ways, including time stretching, pitch shifting, and granular synthesis. Quanta 2 features a powerful modulation system, a granular engine allowing real-time manipulation of samples, and a user-friendly interface with various presets and sound-design tools.
Key Features:
- Granular engine
The granular engine in the plugin allows you to manipulate audio samples in real time by slicing them into small grains and playing them back at different speeds, pitches, and positions. This allows for a wide range of sound design possibilities, from traditional granular techniques to more experimental and creative effects.
- Advanced modulation system
Quanta 2’s modulation system allows for up to 16 modulators per patch, which can control various parameters such as pitch, grain size, and position. This allows for a high level of control and flexibility in shaping the sound of the granular engine.
- Time stretching and pitch shifting
The plugin allows you to manipulate audio samples’ time and pitch independently. This allows for many creative possibilities, such as creating harmonies and chord progressions from a single sample or stretching a sound out to create a drone.
- User-friendly interface
Quanta 2 features a user-friendly interface with various presets and sound-design tools. This makes it easy for you to get started and explore the plugin’s capabilities and allows more experienced users to create their own patches and sounds quickly.
- Multiple granular modes
The synth offers multiple granular modes, including classic granular, harmonic, and harmonic+. In addition, it includes a variety of built-in effects, such as reverb, delay, and distortion. These effects can be used to add depth and texture to the sound of the granular engine.
Compatibility:
Audio Damage Quanta 2 is compatible with most Digital Audio Workstations (DAWs) that support VST, AU, or AAX plugin formats.
Summary:
The multiple granular modes offered by the plugin allow for a wide range of sound design possibilities and make it easy to create complex and interesting sounds. Secondly, the built-in effects can add depth and texture to the sound of the granular engine. Overall, it’s one of the best granular synthesis plugins, given its advanced features and easy user interface.
2. Other Desert Cities
More Info & Price (Trial Available)
Or Buy Here (Support Integraudio)
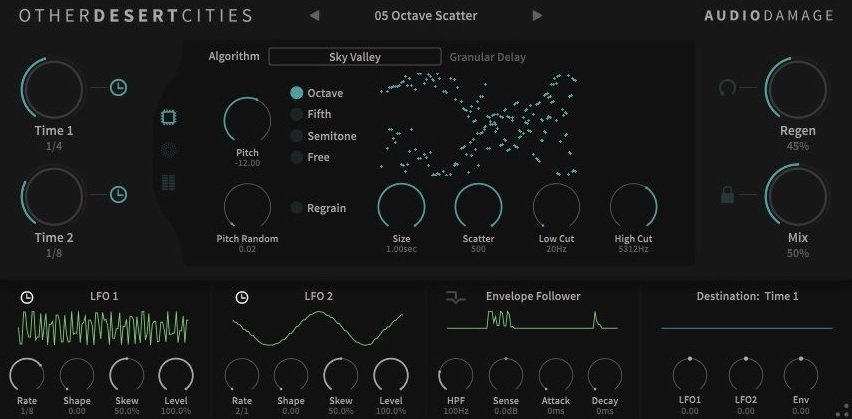
Other Desert Cities of Audio Damage can make you rethink your assumptions if you had previously believed that the world of delay plugins has seen it all.
In case you were wondering, it is named after a sign on a Los Angeles motorway. This takes the idea of a delay plugin and explores various different avenues with it and there are six algorithms that span a range of delay types, including granular, tape, inverted, and normal double delays. In contrast, there are two tempo-synchronized variable waveform LFOs and an envelope tracker that may be used to modulate practically every interface function.
Key Features:
- User Interface
The ODC user interface is thoughtfully divided into three independent panels for the core part due to its intricacy. Algorithm-specific controls are found in the Algorithm panel and the broadcast processor is located in the Speaker panel, and you may balance signal levels using the Levels panel.
Regen is one of the most fascinating delay controls among the key ones. It is a feedback mechanism that produces a clearly aberrant effect by feeding delayed signals back into their inputs.
- Modulation
ODC’s Modulation section adds a finishing touch by combining two LFOs and an envelope follower. With two-way controls that let you change the value of the modulated parameter, they can modulate practically all global parameters, algorithms, and speakers.
Along with side-chaining, the Envelope Follower also implements a high-pass filter, sensitivity, attack, and decay parameters. If you want to tune it exactly, the result of the envelope tracker is shown on a moving graph, which is quite helpful.
- Levels
Comparatively speaking, the Levels panel is more utilitarian, but the ODC performs best when the input and output levels, panning, and different gain adjustments are correct. You’ve undoubtedly realized at this point that there is still a lot to accomplish, and we haven’t even discussed the six delay algorithms. Since these algorithms are strong on their own, it seems to sense that you can’t combine and match them.
- Mirage
The Mirage shares the same fundamental controls and mechanical design as the Cactus. The input signal is swept by a drum of playback heads that simulate a moving tape; both the answer window and the head count are programmable. In comparison to Cactus, I found Mirage to be a more fluid, organic, and adaptive process.
While a number of playheads may simulate a multi-tap delay, enabling Respeed makes it feasible to produce exquisite glissandos reminiscent of Eventide.
- Cactus
The Cactus operates two delays that resemble tape loops, enabling two-way playback with modulating variable speed. The delay buffers’ portions can be sampled randomly. We’re now beginning to stray from the comfort zone of familiar chords and echoes, but at least Cactus permits playback speeds to be measured in semitones, fifths, or octaves.
The “regenerated” sound that is routed back into the effect for feedback is either taken from the offset output tone or from the buffered source signal, depending on the setting of the Respeed switch.
Compatibility:
It’s available as a VST, VST 3, AU, and AAX for Windows 8.1 or higher (64-bit only) and macOS 10.12 or newer, as VST and VST 3 for Unbutu 18 or later, and AUv3 for iOS or newer.
Summary:
All the basics are covered, from dub and reverse delays to procedures that seem like they require numerous pitch-shifters and open tape meters, by a modest selection of factory presets and a set of clean presets. As a result, Other Desert Cities approaches the field of audio delay with vigour and creativity and successfully balances complex and alien effects with a simple and intuitive user interface. It should be a part of your toolbox for sound design, in my opinion.
3. Panstation 2
More Info & Price (Trial Available)

New Panstation plugin capabilities have been added in the latest version, which was published by Audio Damage.
Due to the limited amount of pieces, dynamic breading required someone to spin the pots on the mixing station, generally while mixing. Panning effects were uncommon, and contemporary effects like tempo-synchronized panning have been eliminated since the mixing engineer was often preoccupied with the level faders.
Auto-panners, which are pricy signal processors, were developed to achieve dramatic automaton effects. The Drawmer dynamics unit and the Audio & Design PanScan were two of the most well-known automated panels. In the world of professional recording, these instruments are still highly regarded and can fetch up to twenty times the cost of the plugin you just purchased.
Key Features:
- Depth
The low-frequency oscillators vary the strength of the two audio channels in accordance with the depth control, which also controls the overall impact of the boarding station. When set at zero, the Panstation has no impact on the sound travelling through it unless the switch is turned on.
The sound will start to move back and forth and/or grow and decrease in volume as you adjust the control setting, which also causes the gain shift. When the volume is at its highest, the sound will either switch from one side of the stereo field to the other or go completely silent.
- Bias
The Panstation effect is strengthened on one channel more than another by the Bias setting. The levels of the two channels are regulated equally when the implicit center setting is set to zero, and the control has no impact.
Reduced modulation on the right channel results in a stronger panning effect on the left side canal when the dial is turned to the left of center and displays negative numbers. The panning effect is stronger on the right channel when settings are more to the right of center since they operate in reverse.
- Panning
The pop-up menu lets you choose from a number of panning rules and takes its name from terms used in mixer design. The signal’s amplitude shift as it passes from one side of the stereo field to the other is precisely controlled by a panning law. He gave specific panoramic laws substantial care while constructing them to account for various circumstances and outcomes.
However, all you need to know in the context of Panstation is that using a different panning law changes how the sound’s perceived loudness and distance change as it pans back and forth. None of Panstation’s panel rules is inherently superior to those of the others because it is designed to provide special effects.
Compatibility:
It’s available as a VST, VST 3, AU, and AAX for Windows 8.1 or higher (64-bit only) and macOS 10.12 or newer, as VST and VST 3 for Unbutu 18 or later, and AUv3 for iOS or newer.
Summary:
PanMan is unquestionably the most intricate of the two, but it also costs more money. Due in part to the PanStation’s substantially higher and crisper signal display window, we notice that it boots up more quickly. In a perfect world, we’d advise both.
You might as well choose the PanStation as many of PanMan’s functions won’t be used if you’re not the biggest item. A fantastic plugin that generates a lot of pan for your money. More information about the options is provided in the handbook than we can fit here. It’s really helpful for digesting creative ideas and fixing mixing issues.
4. Eos 2
More Info & Price (Trial Available)
Or Buy Here (Support Integraudio)
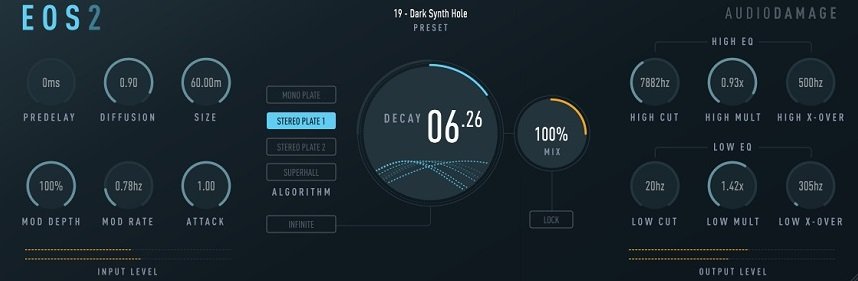
Since Eos Algorithmic Reverb is the most popular Audio Damage plugin of all time, the business is excited to release version 2.
Eos is a wonderful and straightforward reverb plugin. It comprises two plates reverbs, a hall reverb, and three reverb algorithms. The plate reverbs were created to look and sound like vintage digital ones from the 1970s, Plate One has a mono input and stereo output, while Plate Two has a stereo reverb input and output plate, but Superhall, which mimics the digital hall reverbs popular in the 1980s, is my favourite.
For ambient tunes or to give a touch of the abstract, the Superhall algorithm may produce sumptuous lengthy reverbs. I’ll demonstrate how you may highlight fascinating layers and powerful hall reverb washes in your sound sources by utilizing it as an insert or bus effect, along with some automation.
Key Features:
- User Interface
Pre-Delay, Size, and Decay parameters are available on the Eos to customize the reverb sound. These are followed by settings for the reverb sound’s Attack, Rate, Diffusion, and Depth. Attack and diffusion both have the potential to lessen the reverb’s tail or reflections while introducing a fade-in affect to the reverb.
If desired, the Rate and Depth parameters provide modulation effects to the reverb in order to create crazy custom reverb effects. This is followed by a filter component, which is useful for removing frequency ranges from the reverb sound, for instance, cutting off the low end, which might occupy extra space in the mix.
- Modulation
The delay lines in the reverbs get time-varying adjustments through the MOD DEPTH and RATE knobs. In a reverb, modulation has two functions: Because of its subtle timbre changes over time, when used sparingly, it creates the reverb effect that sounds more authentic and less fake. A high resonance in the reverb network is also broken by the modulation, which lessens the likelihood of an overt metallic sound.
Second, modulation transforms reverberation from a spatial improvement to a distinctive effect when used heavily. Tonal alterations are produced in the reverb when modulationis used heavily. When paired with the original signal, just the proper amount of modulation produces a rich chorus sound, but too much might result in unpleasant pitch bends.
- Decay
How long the echoed sound reverberates is controlled by the DECAY parameter. The overall sound of the effect is most significantly impacted by this parameter. The control’s range roughly corresponds to the amount of time needed for a full-volume signal to fade into quiet while producing the reverb sound.
The reverb type, SIZE control, and frequency multiplier control all have an impact on how quickly the audio fades, therefore the numerical amount of decay should be viewed as a relative value.
- Infinite Button
When the INFINITE button is selected, the decay duration of the reverbs is basically set to infinity. When you turn on the infinity knob, any signal that is present in the plugin will be frozen, acting somewhat like a looped sample.
The regular decay time is restored and the reverb generally vanishes when the infinity knob is turned off. Infinite control is obviously useful for producing unexpected effects and is not likely to be something you use frequently. When the infinite is switched on, the Eos will process any signal that enters one of its inputs. This means that the ideal source material for endless mode is quite limited.
Compatibility:
It’s available as a VST, VST 3, AU, and AAX for Windows 8.1 or higher (64-bit only) and macOS 10.12 or newer, as VST and VST 3 for Unbutu 18 or later, and AUv3 for iOS or newer.
Summary:
With this improved edition, Eos 2 undoubtedly received what it deserved. I adore how it allowed for the creation of many modes in terms of potential reverb varieties. It undoubtedly matches the calibre of its rivals, and the cost is reasonable.
5. Audio Damage Continua
More Info & Price (Trial Available)

Continua, by Audio Damage, lets you bend the wave shapes any way you want.
The plugin offers three independent oscillators, two filters, four envelope modulators, and four LFOs. You can use oscillators two and three to modulate the first oscillator and assign noise and drive to the filters. In addition, you can use the filters in parallel or series for different effects and pan them to taste. In the FX/Output menu, you’ll find a chorus, a delay, and a reverb – all of which are stereo effects. You’ll also get eight macros you can assign parameters to.
Key Features:
- Fifteen Voices
This polyphonic synth lets you play up to fifteen notes simultaneously, which can help you create beautifully layered arrangements.
- Filters
Filtering in Continua is not restricted to the usual HP, LP, BP, and Notch shapes. Instead, thanks to the fantastic Morph knob, you can slightly shape your filter to make it unique. That ensures that not only do you get all the regular filters, but you can also unlock what’s between them.
- Envelope Generators
The plugin gives you two ADSR and two FEG envelopes, which can be routed anywhere in the plugin. The ADSRs operate simultaneously, while the FEGs can be set independently. The ADSR control panel gives you a knob for each parameter, in addition to the Curve knobs for the attack, decay, and release.
That helps you shape the envelope to taste, but things get truly interesting with the FEGs. Its flexibility allows the user to add unlimited breakpoints to the envelope, shape them to taste, and even sync them to the host tempo.
- Unisons Mode
You can create a thicker sound by using Continua’s unison mode. That will make all fifteen voices, or fewer if you prefer, play the same notes simultaneously. Additionally, you can adjust the number of agents by using the knob under the Voice Activity graph.
- Sample & Hold
You can use this cool feature to generate random notes. The source can be either random numbers or the outputs of an envelope or LFO. You can mix the signal using the Smooth, Limit, and Level controls and choose the pace through the Rate knob.
Sound & Usability:
You can create mind-bending leads or entire soundscapes with the plugin’s broad set of controls. The extensive modulations, beautiful effects, and nuanced filters make it a unique-sounding tool. But obviously, a great deal of Continua’s magic comes from its three oscillators. Not only can you create the three most common waveforms, but the plugin also lets you distort the shapes to taste to design different sounds.
When it comes to usability, Continua offers one of the most user-friendly interfaces on this list. If you’re acquainted with synthesizers and have experience building sounds from scratch, you’ll find this plugin an effortless device.
Compatibility:
This plugin is available for Windows 8.1 and higher and macOS 10.12 and newer in VST, AU, and AAX formats.
Summary:
Continua is the perfect plugin for sound designers and producers who want to generate exciting sounds without wasting time. The interface is straightforward, and the parameters all have understandable names rather than confusing acronyms.
You can’t go wrong with this Audio Damage synth plugin. Its highly configurable nature gives you all the control you need over your patches, which results in an excellent workflow.
6. Audio Damage Discord 4
More Info & Price (Trial Available)

Audio Damage’s Discord 4 is a pitch-shifter, delay, and reverb plugin based on early 1980s pitch-shifting hardware.
First, the input signal crosses the pitch shifters. Then, it passes through the delays and the adjustable width filters. After that, the signal goes into the reverb algorithm. From the reverb, the signal is fed back into the pitch shifters for glorious effects.
With options like Reverb Freeze and Low-Frequency Oscillators, this plugin goes from soft to chaotic pitch-shifting. I recommend it for experimental music and general pop music.
Key Features:
- Algorithmic variety
There are three pitch-shifting algorithms available: Vintage, Clean, and Granular. Audio Damage modeled the Vintage style after the legendary Eventide H910 and H949 hardware pitch shifters. The Clean mode allows you to create very modern-sounding shifting soundscapes.
Finally, the Granular style provides you with a vast amount of experimental options to explore, with very smooth pitch-shifting. It subdivides audio into numerous tiny samples and stretches them for pitch shifting.
- Effects
The plugin employs two delays and a reverb effect in that order. Of the two delays, one is tempo-synced, and the other is free-running. However, both delays support feedback, cross-feedback, and a sophisticated bandpass filter.
Similarly, the reverb provides standard size, color, and mix parameters alongside a freeze button. This button forces an infinite length of the reverb, which sounds super cool as the endings of a song.
Furthermore, the plugin features a soft saturation and limiter at the end of the signal path. These let you add some vintage-style warmth and loud feedback without worrying about real-world output.
- LFOs
The two low-frequency oscillators present in this plugin modulate pitch-shifting intensity, delay times, and the filters’ frequencies. The Rate knob controls the variation of the LFO over time.
Similarly, the Shape knob lets you choose if the wave will be a sine, triangle, or square. The Skew knob controls the horizontal symmetry. And finally, the Warp knob adds a controllable curvature to the wave, changing the vertical balance.
Compatibility:
Discord 4 is available for Windows 8.1 or higher and macOS 10.9 or higher, both 64-bit only. It comes in VST 2/3, AU, and AAX formats.
Summary:
This plugin’s main strength is the highly adjustable parameters, which ensure advanced precise control over the end output. The tempo-synced and free-running variants of the individual effects offer a plethora of different sonic options.
Likewise, the feedback system creates unexpected, creative effects that would require otherwise require complicated track routing.
Furthermore, the resizable user interface makes for a very sleek and enjoyable experience when using the plugin.
7. Audio Damage Kombinat Tri
More Info & Price (Trial Available)

Audio Damage’s Kombinat Tri has three distortion engines with thirteen different algorithm options for each.
Each algorithm offers a different tone-shaping characteristic which improves this plugin’s versatility. Since you can apply them individually to each band, you can use the same or different ones for various sound combinations.
Key Features:
- Multiband Mode
The practical difference between the two is that in Series mode, sonic changes made to one band are carried over to the next, but in Multiband mode, modifying the settings of a specific distortion engine influences the sound of that band.
In summary, Series mode adds distortion to whatever signal is left after each step, but Multiband mode allows you to regulate distortion in the frequency spectrum precisely.
- Kompressor
The plugin’s built-in compressor is a one-knob wonder that can add clean distortion or smash everything. Since there is only one control on the Kombinat compressor, operating it is fairly simple.
Crank the knob up if you want a stronger compression effect. This will smooth out the filter’s output signal, making the low-volume portions of the signal much more noticeable and almost as loud as the loudest ones. The compressor starts to behave erratically and adds distortion to the sound when you send it high-level signals.
- Feedback
The plugin lets you control an envelope follower through the feedback section, which expands its modulation abilities.
The combiner includes an inbuilt feedback route that may mix its output signal with the periodic input signal and send it back into the input, amplifying the distortion of the Kombinat and producing ringing oscillations and other unforeseen effects. It’s an experimental feature, so while you might not always find it beneficial, it’s worth giving it a go sometimes to see what happens.
- Presets
Including designer presets and user favorites from other versions, the presets on this plugin give you great starting points for your timbres.
- Distorsion Mode
The mode switch in the upper right corner of the Kombinat window controls how the signals are routed through the motors. When operating in multiband mode, the motors run concurrently on the corresponding frequency band.
This is because the outputs of the three engines—a HIGH engine for high frequencies, a LOW engine for low frequencies, and a MID engine for mid frequencies—combine before being transmitted to the output filter.
Character & Sound:
However you want your distortion, Kombinat Tri can help you achieve it. Underneath the simple interface, the plugin offers a vast sonic landscape. All you have to do is mix and match the algorithms and tackle the parameters. Additionally, the crossover points are precise to the point of fully isolating bands.
Compatibility:
This plugin is available for Windows 8 or higher and macOS 10.12 and is newer in VST, VST3, AAX, and AU formats.
Summary:
At first glance, the Kombinat Tri doesn’t look special. Even so, once you get a feel for its sound and start tweaking its parameters, it’ll convert you. There’s no doubt it’s a great addition to your toolkit.
8. Audio Damage Replicant 2
More Info & Price (Trial Available)

Replicant 2 is a beat slicer and repeater plugin by Audio Damage. It’s the new version of the Replicant plugin and has many new features that can generate insanely creative glitches.
Replicant 2 aims to add interest and complexity to your musical phrases with various tempo-based effects. In addition, you can split the incoming audio into buffer chunks and loop it and some other nifty tricks to add stereo width and interest to your sounds.
Key Features:
- Repeater
The main effect of the original Replicant plugin was the repeater. In version 2, it’s even more evolved. The repeater is tempo-based and can go as fast as 1/128th note. You can set the random loop amount for more unpredictability and even engage triplet notes. Finally, you can control the number of repetitions, the randomness of the repetitions, and their direction.
- Stutter
The new effect in Replicant 2 is the stutter effect. It adds more subdivisions for even glitchier sounds and can go as fast as 1/16384th note. You can control the pitch of the subdivisions and their randomness. The scatter control makes the stutter effect even more fun.
- Creative effects
You can push the boundaries of what Replicant 2 can be by using it in even more creative ways. It can serve as a simple delay plugin and an advanced planning tool. For example, you can set the stereo width of the incoming signal, the panning position, and the speed by which it’ll be modulated to create surround effects. A built-in filter also helps you shape the sound and add even more sonic sculpting opportunities.
Compatibility:
Replicant 2 is available on Windows 8 or higher and macOS 10.8 or higher in VST, VST3, AAX, and AU formats.
Summary:
Replicant 2 is a straightforward beat repeater and slicer effect plugin capable of some cool creative effects. It can add interest to simple melodic or rhythmic phrases, and it generates glitch sounds that can fit any genre. The fast subdivisions that its capable of can turn any sound into glitch heaven.
9. Audio Damage Dubstation 2 (Delay)
More Info & Price (Trial Available)

Dubstation 2 is a stereo delay plugin.
It focuses on remaining simple and providing results similar to hardware delays, thanks to its unique filters and saturation. So, if you have used hardware delays, you’ll have no trouble using Dubstation 2. Let’s talk a little more about some of its features.
Key Features:
- Filters
There is a high-pass and a low-pass filter in Dubstation 2. The high-pass ranges between 100 Hz to 1.5 kHz. Similarly, the low-pass ranges between 4 kHz to 8 kHz, hence why it sounds like hardware. Furthermore, Dubstation 2 also decreases the low-pass frequency as the delay time increases to simulate the analog sound.
- LFO
The LFO modulates the time between delayed signals and their pitch. It helps make the old delay hardware sound convincing. Furthermore, it is useful for doubling and creating chorus effects.
- Saturation
There are two ways to add some distortion to your sound in Dubstation 2. The first is to increase the Input level, which you also automate to add delay only on certain words/phrases. And the second method is using the Saturation knob. Both of these methods affect the delayed signals only.
Compatibility:
The plugin is available for Windows 8.1 or higher 32-bit and 64-bit and macOS 10.9 or higher 64-bit only. It comes in VST 2/3, AU, and AAX formats.
Summary:
Dubstation 2 is an excellent value for money in terms of efficiency. Other than what I’ve mentioned, other features in this plugin include the Loop, Reverse, and Mode switches. Loop makes the plugin repeat the audio endlessly, while Reverse plays each delay return backward. And the Mode switches include Single, Dual, and Ping-Pong modes. The Dual mode allows you to add delay to each channel of your signal independently.
10. Audio Damage Enso
More Info & Price (Trial Available)

Enso is a virtual audio looper that lets you record and loop audio with several real-time effects in your DAW.
It allows you to record and playback up to 10 minutes of stereo audio multi-directionally at different speeds. The single-button loop engine is fully automatic and lets you add effects in a very tape-style fashion. Hence, even if it works as a modern looper, its sonic behavior is modeled after vintage tape machines.
Key Features:
- Intuitive Interface
The resizable GUI is stunning and uncomplicated, with the signal chain being straightforward and streamlined, making Enso easy to use and operate with, both in the studio and live settings.
- Tradition signal flow
Like old-school loopers, the plugin can have the input mixed with buffer content, after which it can be sent to effects, or like a tape looper, the feedback path contains the effects and speed changes using the Dub in Place button. One can also have four different start and end points, in which sector crossfades can happen.
Compatibility:
It’s available as a VST, VST 3, AU, and AAX for Windows 8.1 or higher (64-bit only) and macOS 10.12 or newer, as VST and VST 3 for Unbutu 18 or later, and AUv3 for iOS or newer.
Summary:
Enso is a fun tool and is great in emulating the warped sonics of vintage tape manipulators, which makes it a great tool, especially for guitarist producers. In addition, its workflow is creative and can inspire your sound design process. Lastly, the onboard effects sound analog and are of good quality.
Conclusion
Finally, we can conclude that this choice excellently exemplifies how we may modify the sounds we use in our songs. Audio Damage created a solution that was especially suitable for the possibilities of the present age. They were able to create plugins that are typically hard to create in the physical edition, and this contemporary note pleasantly pleased us.
They released a bundle collection of 33 totally free plugins, and I can attest that they are really useful. I’ve used them before, and I can say that I was happy with them. The Audio Damage Quanta, a granular hybrid synthesizer that creates synth in a creative way, is, nonetheless, my favorite from this list. The plugin is incredibly user-friendly and adaptable, and it also has the ability to produce noise that may be routed in the granulator. The sound is superb, and you may adjust whatever element you wish to utilize.
Your connection with the plugin is crucial, thus we urge you to use their trial choices before making a decision. Each of these plugins includes a link leading to a page where you can buy it, and some of them allow you to support our Integraudio page if you use the link provided on this platform.

The Integraudio Editorial Team consists of experienced music producers, audio engineers, and plugin enthusiasts dedicated to providing in-depth reviews and guides for music production software.