
What Is Drum And Bass?
Drum And Bass is a type of electronic dance music that has given birth to many sub-genres, such as Liquid Drum And Bass, and Neurofunk. From its very core elements, Drum And Bass is built around breakbeats and heavy bass (surprising given the name right?).
For those who are unaware, a breakbeat is originally a break in old Funk, Soul, or Jazz records where the drums are the only thing playing. This allowed producers to chop it out from the song and use it as the basis for their own song. The most famous of these breaks is called the “Amen Break” from a 1969 song “Color Him Father” by The Winstons. This has been sampled by everyone from Salt-N-Pepa to Mantronix to even Heavy Metal band Slipknot.
It’s quite fast, ranging between 160 BPM and 180 BPM, with the most common tempos being between 170 BPM and 175BPM.
It really became what it is today in the 1990s, taking inspiration from UK Rave, Breakbeat Hardcore and Jungle. Though Jungle and Drum And Bass have somewhat been categorized as the same genre for some people, they are in fact different genres and Jungle is what came before Drum And Bass.
The pioneers of Drum And Bass include:
Recently there has been a resurgence of Drum And Bass, with more artists leaning towards a more Pop sound, such as:
Producing A Drum And Bass Song
Like I mentioned, the main characteristics of Drum And Bass are the breakbeat drums and the heavy bass sound. Of course there are other sounds in the production, but let’s start with the foundation of the production. For this article I will be focusing on the drop of the song, which is the main part of any Drum And Bass production.
The tempo I’ve chosen is 174 BPM as it’s a standard for this genre. I’ll be using Ableton Live 12 but you can use whatever DAW you prefer.
Drums
First things first, I am going to find a breakbeat on Splice, but you can use whatever sample libraries you have access to. The sample I chose is this:
I then took the first bar of the sample and just used this section. I looped this over the drop. I liked the way this part hit and it allowed me to build a full drop over the top of it.
I then wanted to beef up the drums, as on their own they won’t be enough to cut through the mix, especially when we add the heavy bass, and give that heavy impact I am looking for. So first let’s layer a kick over this. Once again using a sample from Splice.
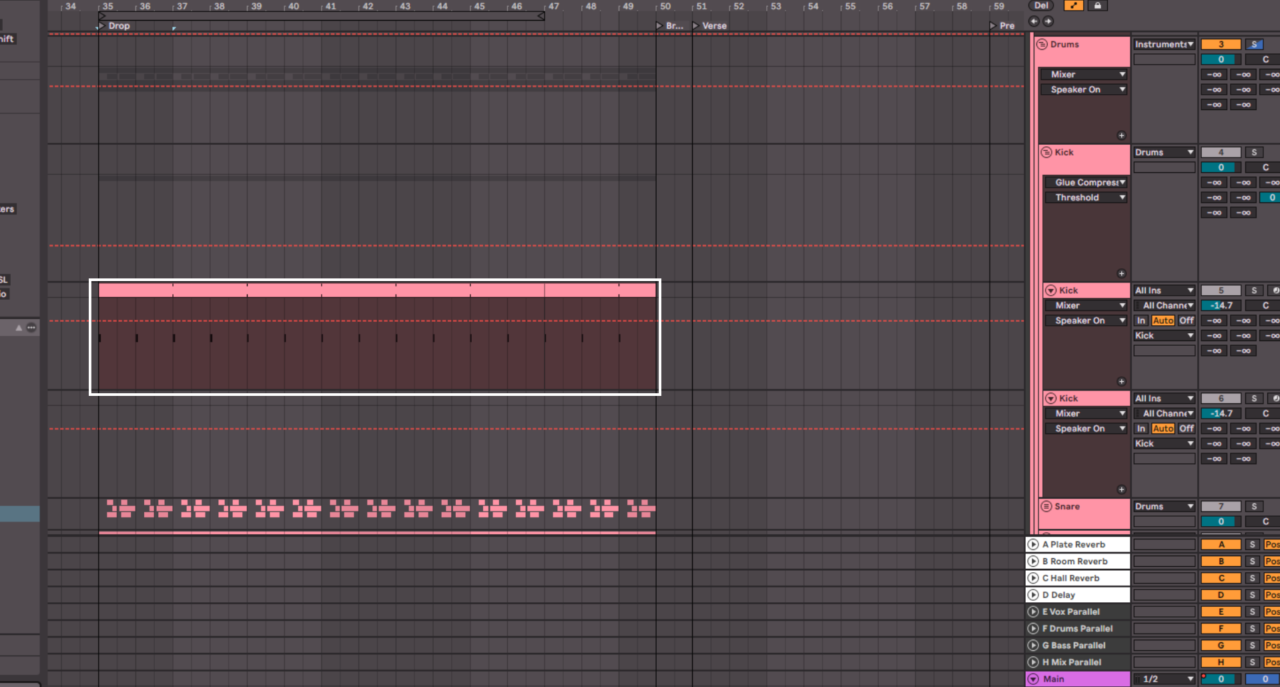
I am just placing the kicks on the same beats as the breakbeat, which in this case is the first beat of each bar. So now we have:
Then, of course, we need to do the same with the snare. I like to use a few samples when it comes to snares. I find that this way I can get the crack and the body exactly how I want by choosing specific samples for each part of the snare. Sometimes you may need to EQ your samples to make them fit together without having a build up of unwanted frequencies, but if you choose your samples well, then you won’t have to. So in this case I didn’t need to use any EQ to get them to sit well together.
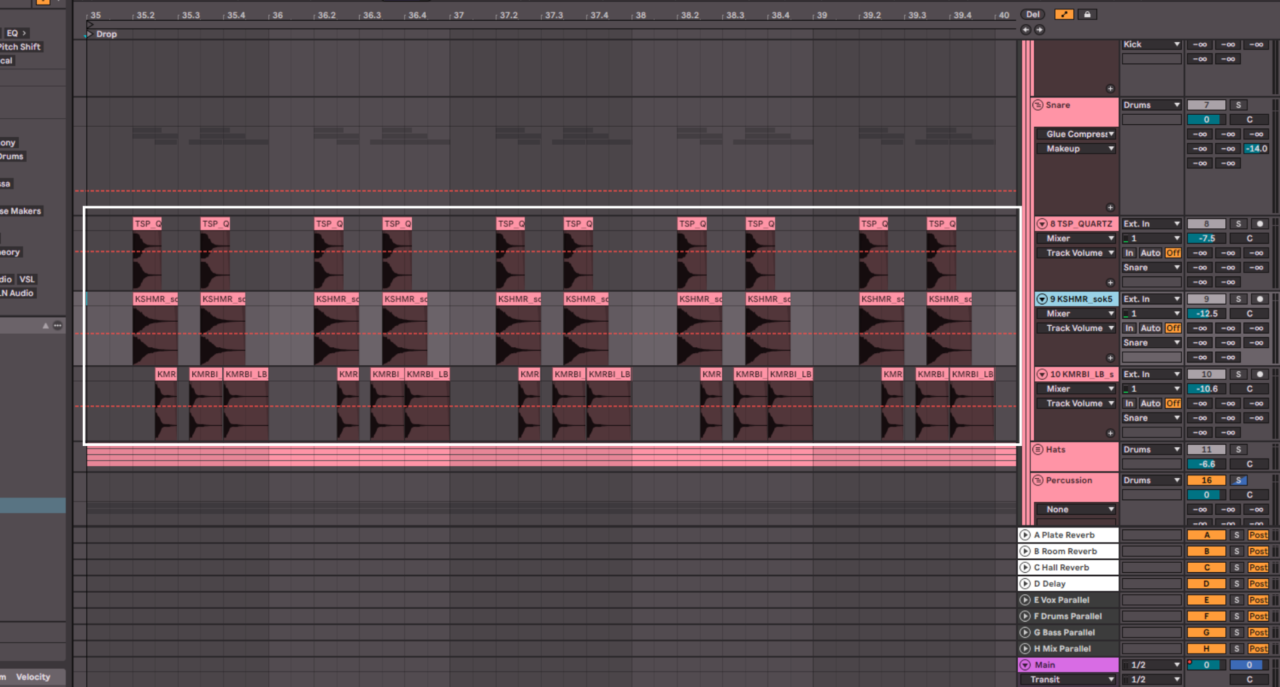
Once again I am following the beats where the snare hits in the breakbeat, which here is the second beat and halfway between the third and fourth beat. The two top tracks are for the main snare hit, but if you look there is a third track where the snare is being hit on different beats. In the breakbeat you can clearly hear the main snare, but there is also some extra snare notes played as ghost notes, which is just a really quiet hit. I like how these ghost note snares add to the overall groove, so I wanted to bring them out a bit more by using a shorter and higher pitched snare sample to double them. With the breakbeat, kick, and snare we now have a much beefier beat:
The next step is to add top loops. This is a sample loop where there is no kick, and it mostly consists of hi-hats, other cymbals, snare, and some percussion. This really helps to give more life to the beat. I tend to use a fair few of these samples too, as I find just one never has exactly what I need. These are really supporting the overall feel of the grove, so they aren’t extremely in your face, but they do have a significant impact to the feel and almost humanizes it a bit.
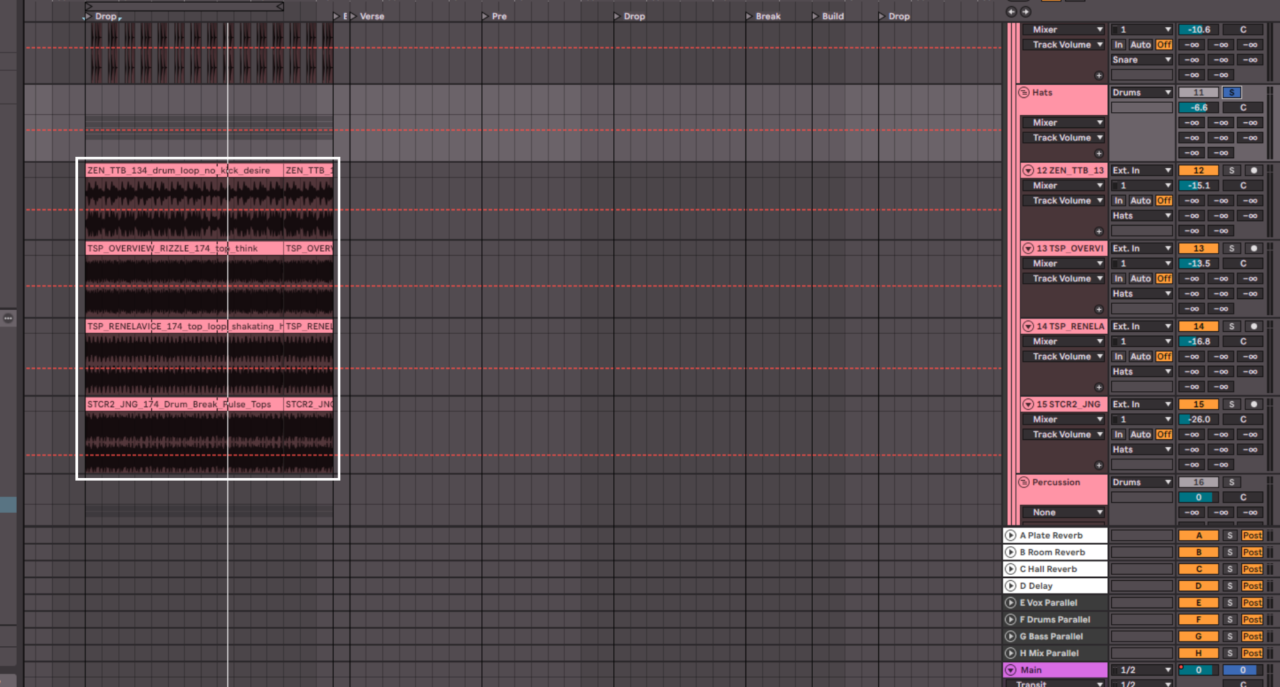
By having top loops, you can really control how much of each element is present in the final mix too. With these added, we have:
Finally, for the drums, I love using percussion loops. It does a similar thing to the top loops, but in a different frequency range. These are even more tucked in the mix, but they do make a significant difference to the feel of the drums. It adds a live feel that I find hard to replicate in any other way. You can even record your own percussion with whatever you have around. I’ve used all sorts, even rice in a tub.
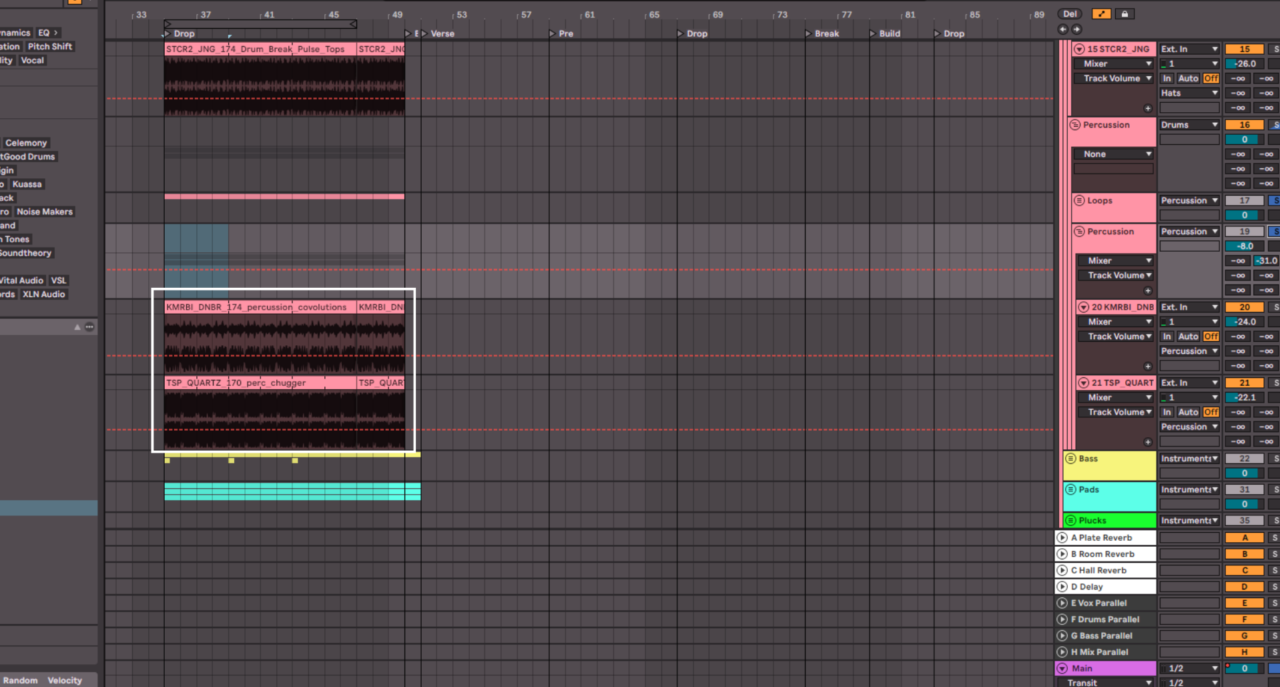
The two sample loops I chose were completely based on areas of the frequency range I felt were missing in the beat, which here was the mids to high mids. All together our beat now sounds like this:
Bass
Now for the other main aspect of Drum And Bass, the bass. I always like to start of my bass production for this genre with a sub bass. This is the lowest part of your production, and once this is right, layering the other bass sounds on top becomes so much easier. Sort out the body of the bass first and then add all the flavors.
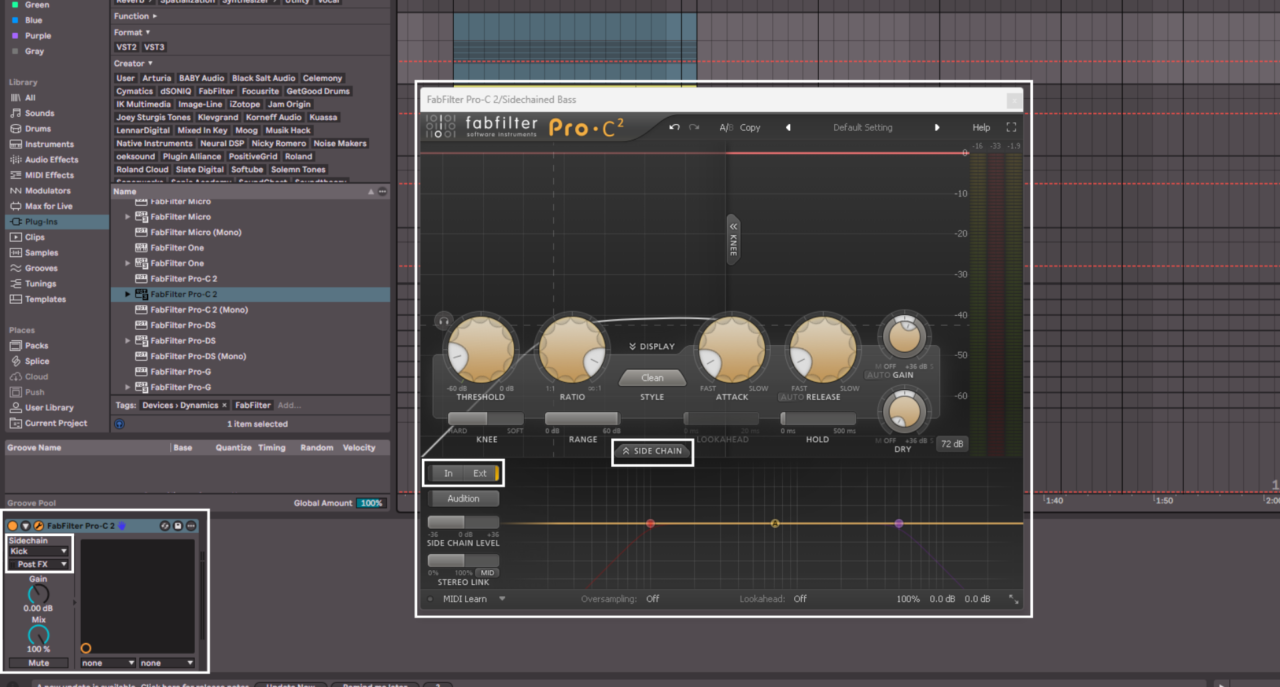
Before going into this sub bass sound, it’s important to note that a classic technique in Drum and Bass is to sidechain the bass to the kick. This means that when the kick plays the bass lowers in volume. The easiest and most typical way of doing this is using a compressor. For this I am Pro C by Fabfilter, as it’s my favorite all-round compressor. I have this on a group/bus in Ableton Live so that it is affecting all of the main bass sounds. In Pro C if you click on the “side chain” button at the bottom then select “Ext”, it will use whatever you’ve set the sidechain up as in your DAW, which here is “Kick”.
For the part that the sub bass is playing, and consequently all of the bass elements will be playing, I wrote this:
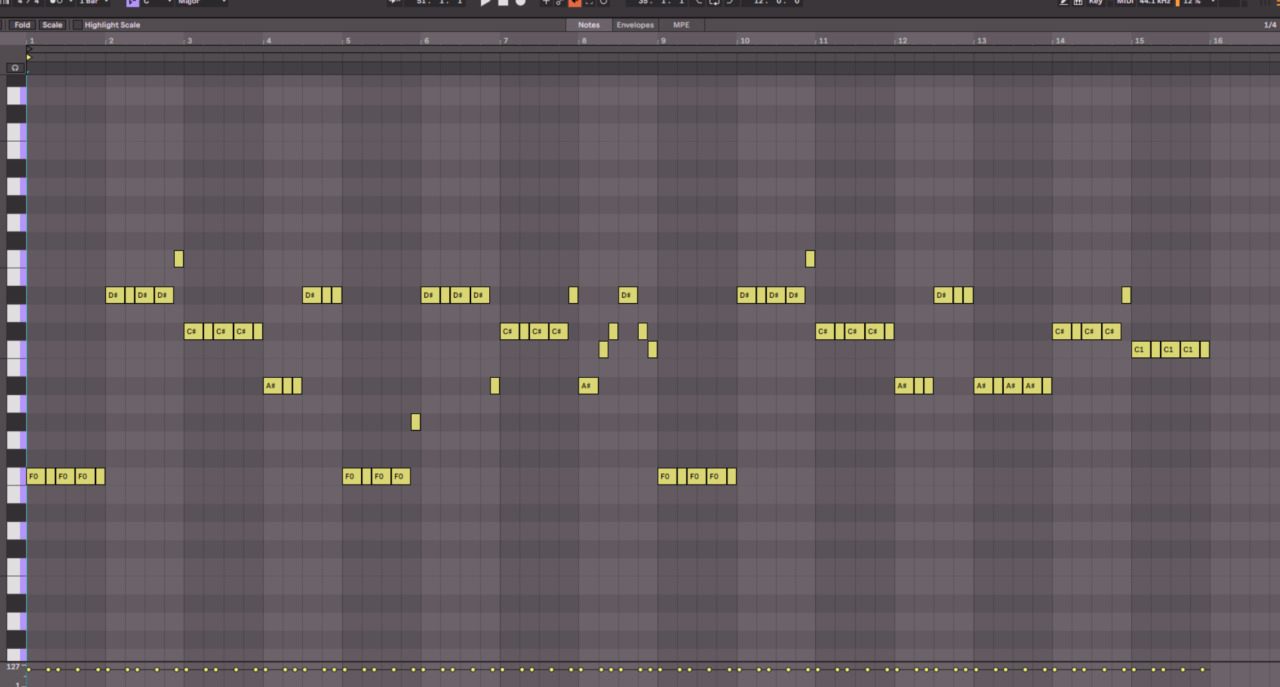
It’s a very simple part, consisting of five main notes in a rhythm that I felt suited the beat, and some fill parts at the end of the first section. For the sound I am using a preset from Splice on Serum 2:
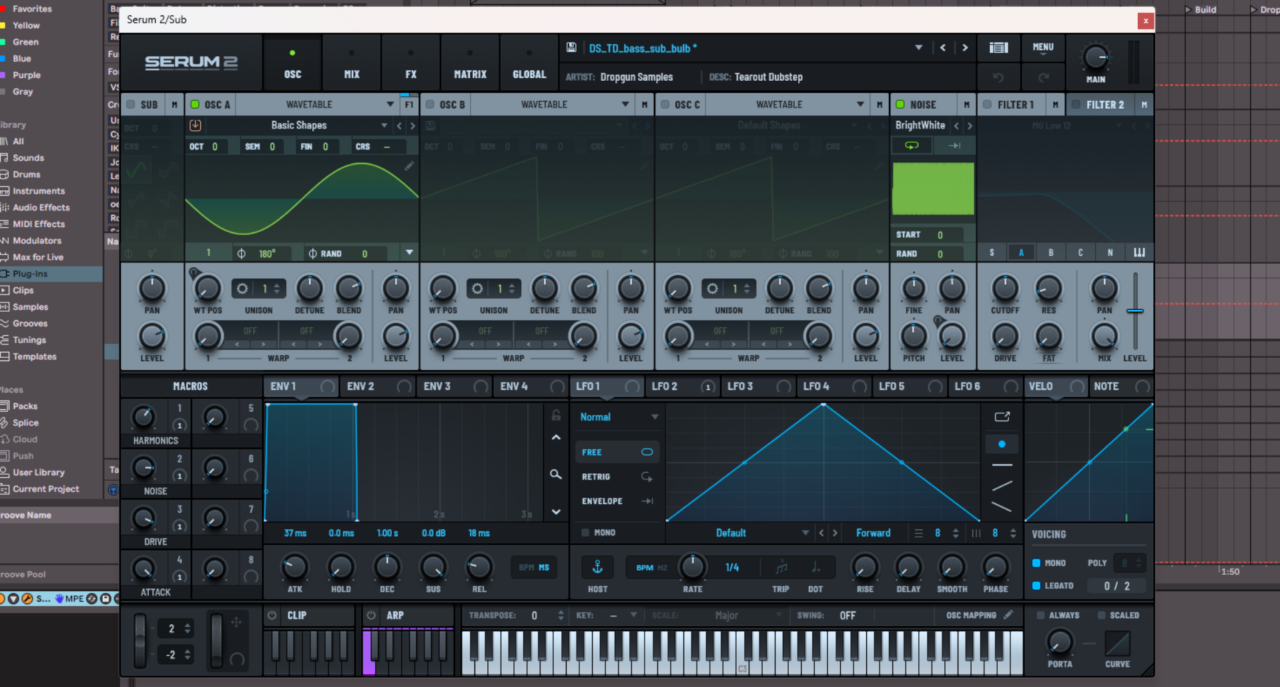
With the sidechain, we have the foundation of our bass sound:
For the next layer I wanted something way more obnoxious and in your face. So I found a one-shot sample on Splice of a tuba bass synth. I then used Simpler (Ableton Live’s sampling instrument, which pretty much all DAWs have a variation of) and transposed the sample so that it was a C.
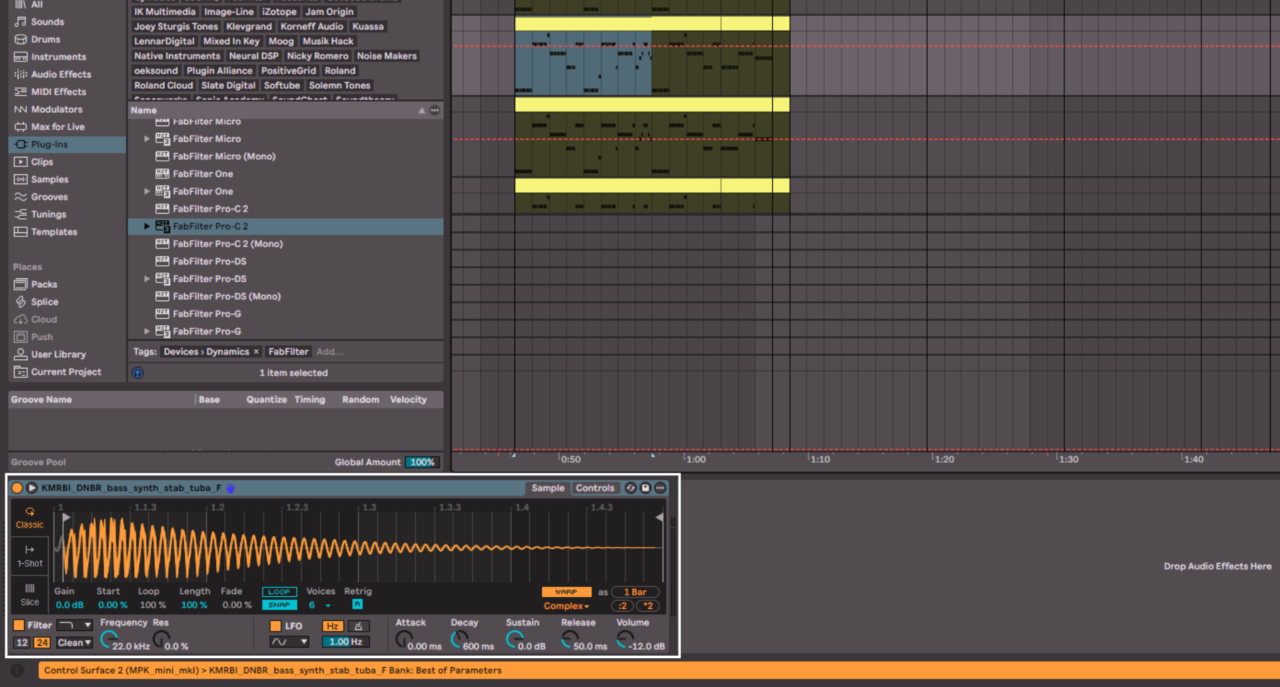
Then I copied the MIDI from the sub bass track and changed the octave of the MIDI until it sounded right. Along with the sub bass, we have:
After hearing this I thought, why not go even more brass with the bass. So I added Kontakt by Native Instruments to a MIDI track and loaded up my favourite brass library, which for me is Studio Brass by Spitfire. I am using the “Bass Trombones a2” for this. I wanted to make this sound much more aggressive, so I have used a couple plugins to bring out the aggression.
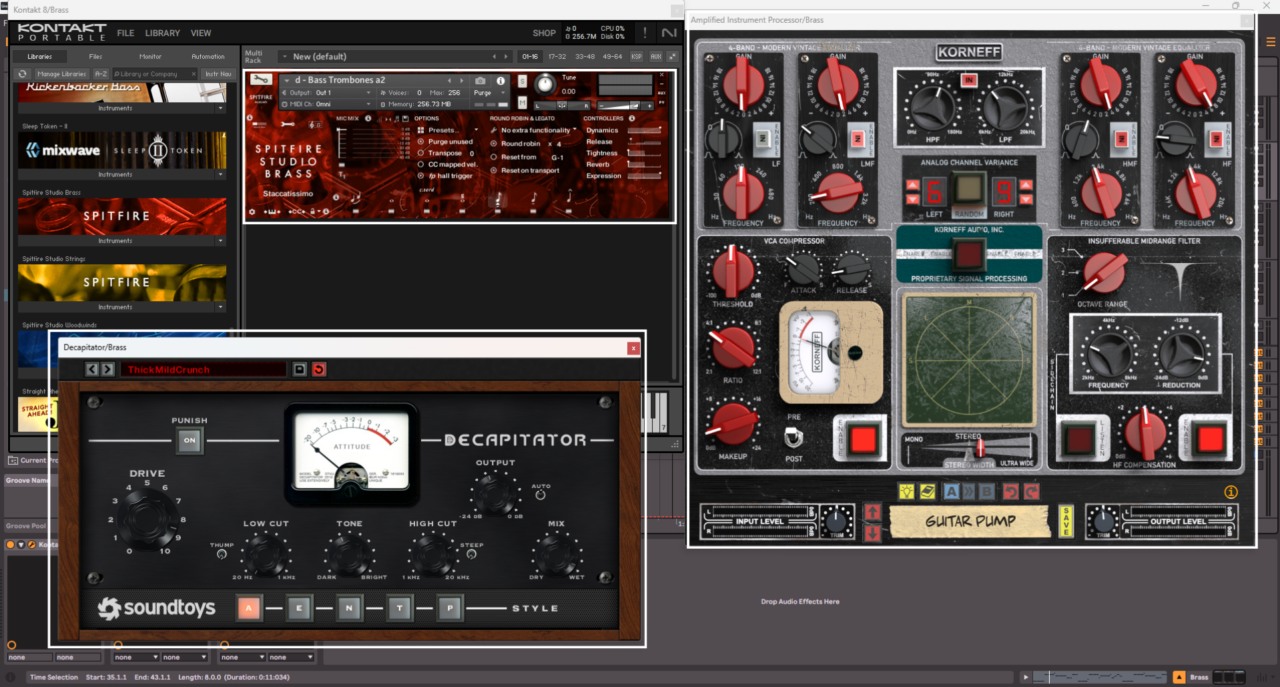
First I am using the Amplified Instrument Processor by Korneff Audio. This is typically used for guitars, but I love using it on synths too. I’ve boosted around 200Hz for some more body, used a high-pass filter to remove some sub bass frequencies (as the sub bass is taking care of that) and a low-pass filter to remove some of the top end. I am also compressing the trombone, adding some width and removing some of the annoying mid-range frequencies.
This then goes into Decapitator by Sound Toys which is my go to distortion plugin and really enhances the bite of the brass.
So this with the other bass sounds results in this:
You could just leave it here, but I felt that the bass lacked attack, so I added another synth using Serum 2. This is a bass pluck which is just full on attack. It’s also got a healthy amount of distortion within Serum 2.
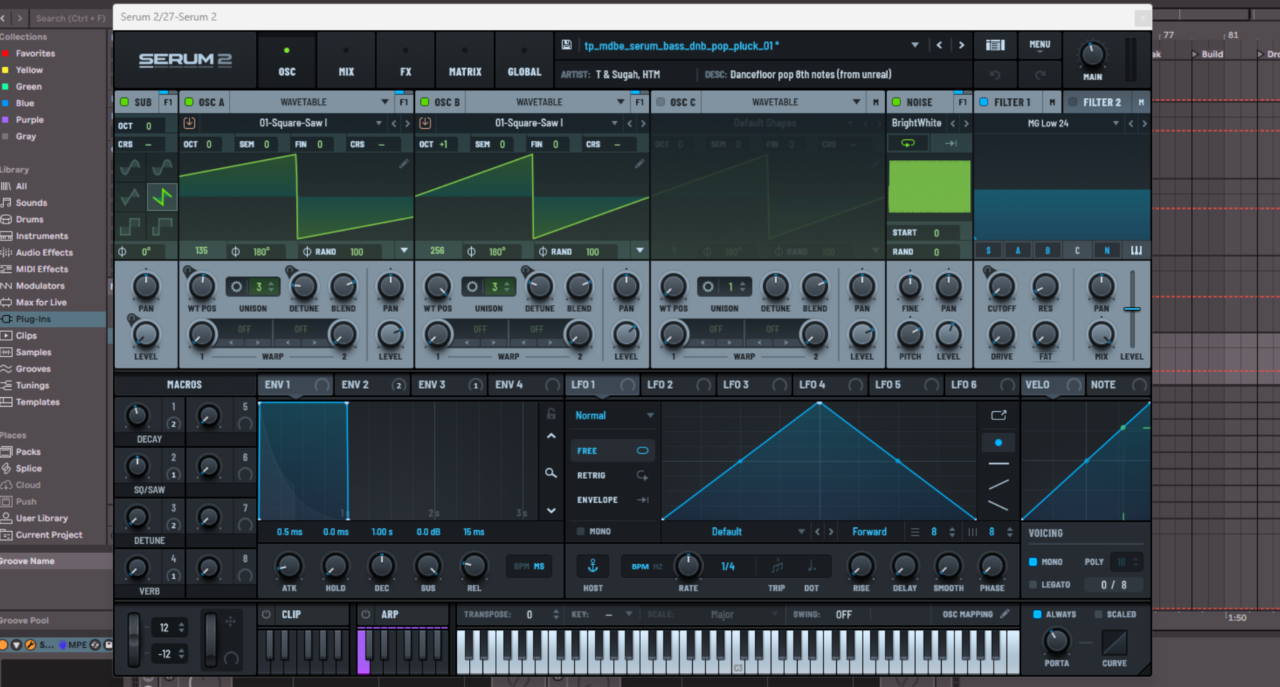
So all together the bass sounds like this:
The last aspect of the bass is just a one shot “wub” sample that happens at the start of each 4 bars. This just adds a bit of an accent to the start of each round. So the final bass sound is:
Chords
As the track progressed, the brass sound of the bass really became a key feature so I wanted to run with that. That’s typical of making music in general. Just go with where it takes you. It’s more philosophical than technical but it’s always great to trust your gut, that’s what makes your music yours.
So for the chords in the track, I’ve used brass sounds. Namely I’ve used Augmented Brass by Arturia and Swing! by Project Sam. These are all playing the same MIDI chords, shown below, but at different octaves.
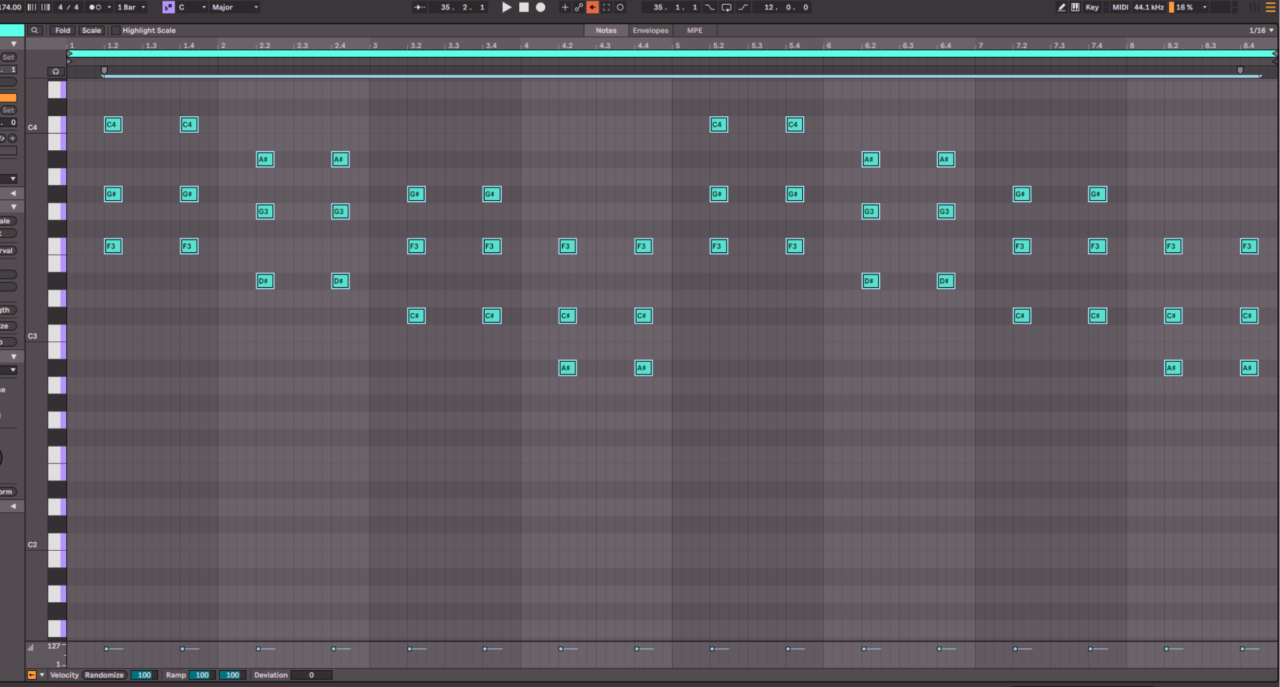
The rhythm for this is just on the offbeats, i.e. beats 2 and 4. I used 2 different VST instruments for this to get a fuller sound, and I’ve doubled the Augmented Brass track with the chords played an octave above.
Melody
The final instrument in the track is another brass element playing the bassline but in a higher octave. I am using the “Lead Trumpet” in Straight Ahead! Jazz by Impact Soundworks.
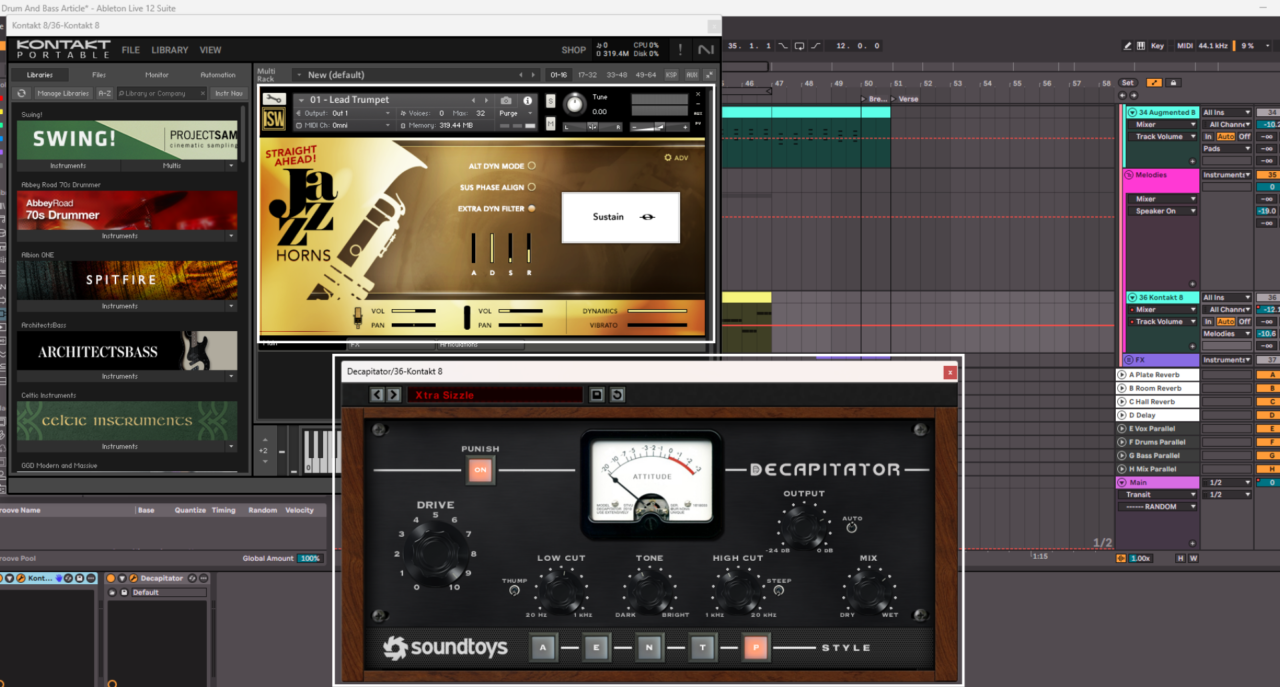
This is going through Decapitator by Sound Toys as well to help it blend with the bassline and bring out some sizzle. Having this there really helps to bring out the bassline part as it’s covering more of the frequency range.
FX
The very last element in this production is to add impacts to the start of the drop. This is a classic move in most electronic music. I’ve used a collection of 5 different impacts to really let you know that this is the drop. It’s a mixture of bass drops, metallic impacts, and white noise impacts. All together the impacts sound like this:
Conclusion
All together, we have the final production of the drop:
So now we have a solid Drum and Bass drop. Where can we go from here? The obvious choice is to build this out into a full song, with builds, hooks, drops, etc. Of course we can also take this into a different sub-genre.
For Liquid Drum And Bass you can lean more heavily into using more melodies, having more emphasis on the chords, and add more atmospheric and spacious sounds. It’s a much softer sub-genre so you can take some of the aggression out of the bass and drums too.
For Neurofunk, we can take it heavier. Really messing up the bass sounds with more distortion, fuzz, or even bit crushing it to completely mash it up. You can tighten up the drums too, using more aggressive one-shot samples and less percussion. You want the drums to be much tighter and harder.
You really can take what you’ve learnt here and apply it to all the sub-genres or even just make a full version in this style. Have fun!

I am a music producer, songwriter, mixing and mastering engineer, sound designer, composer, multi-instrumentalist, vocalist, and musical artist. Yeah, I know, it’s a mouthful. Basically, if it involves music, I am super into it. I recently became a full-time freelancer in the music space, having dabbled in it for around 10 years. I started playing guitar at 7 years old, and I am now almost 30 (almost!). Music has been a main part of my life since I formed memories. I literally cannot remember a time before music. I adore every aspect of creating and working on music, from starting a song to mastering and polishing the final piece. It’s all incredible.
I’ve worked on many projects over the years, including my own. I release pop/indie music where I do everything, from writing to recording to mixing to mastering, and I even create all the content around it. I do this under the name Mauve Shores. A big passion of mine is metal/alternative music, so I release music with my band Midnight Paradise. The band is literally me and my best mates, so it’s super fun. I do everything except for play drums and bass in that. The final project I release under is called Heavy Blink, and I put out LoFi Beats. I’ve even had tracks reach over 250k streams on Spotify.
Outside of my own projects, I have worked in a variety of genres. I’ve written, produced, mixed, and mastered pop songs for the artist No False Feelin’, one of which got in the UK Top 40 Spotify playlist and has almost 1 million streams. I currently create drum and bass remixes for a client, some of which have over 2 million streams. I’ve done mixes for events such as a dance recital and a business event. I’ve also done some audio cleanup and sound design for a live voice over group that do their anime in person. Right now I am working on a mixture of my own stuff, and with clients. For example, I am beginning to produce, mix, and master a death metal album, and also at the same time a teen pop style song. I love the variety that comes with this line of work.
I am also super nerdy about the gear and technology revolving around music. I could talk for days about my favorite plugins for specific things. Don’t even get me started on EQs. I began as just a guitar player, so my gear obsession has definitely been more towards pedals, but the more I got into production, the more this expanded to everything.
Outside of music, I am into a lot of different things. I love to connect with nature, whether this is through hikes or even making terrariums. I really enjoy skateboarding, playing rugby, and running. I’m also into creating things in general, I always have some DIY projects going, whether that is woodwork, or electronics. Before going full-time as a freelancer, I was a software developer for 6 years, so programming is something I still enjoy and do in my free time. Of course, we can’t forget about how much I enjoy spending time with my wife and my friends.