
In this article, we will give you detailed instructions on recording an electric guitar in one of the most versatile DAW’s out there – Logic Pro X.
Just plug your guitar with an instrument cable to an audio interface connected to your computer. Then make sure you can hear the signal in Logic, set up the metronome, press “Rec,” and start playing. After recording, you will see a blue box with a waveform – this will be your recorded track.
We’ll take a closer look at the different ways you can record guitar in Logic Pro X. Even though it is professional software, it has a pretty simple and user-friendly interface.
Besides that, the main advantages of this DAW are the advanced audio editing functions, lots of loops, virtual instruments, and built-in plug-ins for any needs and tastes. Therefore, you can safely learn how to produce music at a high level. But let’s first understand how to set up the visibility of your audio interface.
How to configure the audio interface in Logic Pro X?
The main task here is to make sure that your DAW is synchronized with the audio interface. You can check this in the settings by pressing the key combination “⌘,” and then go to the Audio tab.
- Step 1
Make sure that your Input Device matches the name of your audio interface. In this case, you will let Logic know from which device to read audio.
Input Device must match the name of the audio interface.
- Step 2
You will need to hear your audio single to control it. If you use headphones or monitors connected to your audio interface, ensure that the Output Device matches its name. Select the “built-in” option from the list if you want to hear the signal from another source, like your mac’s speakers.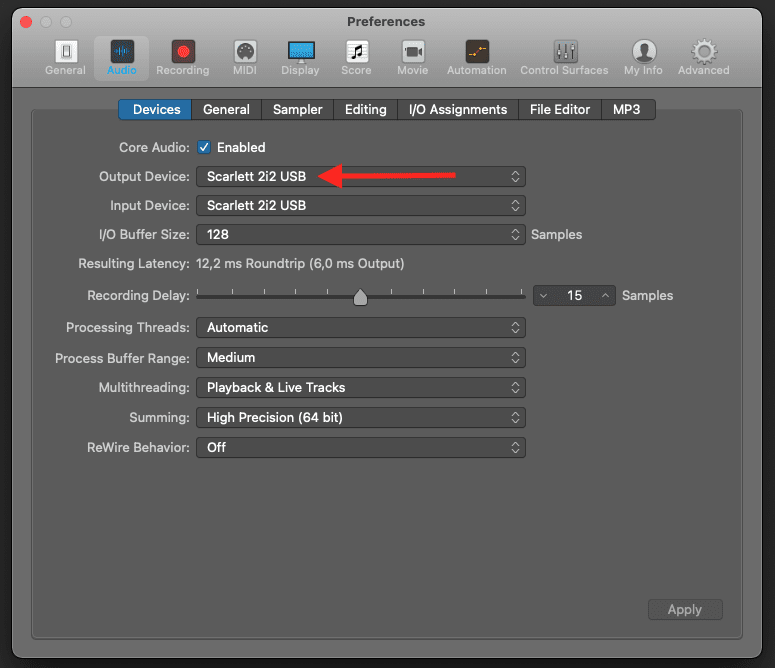
Set up the Output Device to monitor the signal.
- Step 3
To comfortably hear and control your guitar signal, you need a minimum of latency. You can affect this by reducing the number of Buffer Size samples. The fewer there are, the less latency there will be. But keep in mind that this will be somewhat wasteful on your mac’s RAM.
Adjust the number of Buffer Size samples to reduce latency.
Different methods of recording an electric guitar in Logic Pro X
Let’s now break down exactly how you can record a guitar. It will depend more on the goal you need to achieve. For example, do you want to get a clean DI track and process it with your plugins? Or do you have a good-sounding amp and cabinet and want to capture just that sound? Let’s go into more detail.
How to record electric guitar via “Audio” function?
As soon as you open a new project, Logic will immediately give you the choice of what you want to record, whether it’s an external or a software midi instrument.
The Audio function allows you to capture the clean signal from your electric, electroacoustic, or bass guitar. It means you’ll get what’s called a DI signal – just the sound of the strings from the pickups. Let’s now look at what you need to pay attention to with this method.
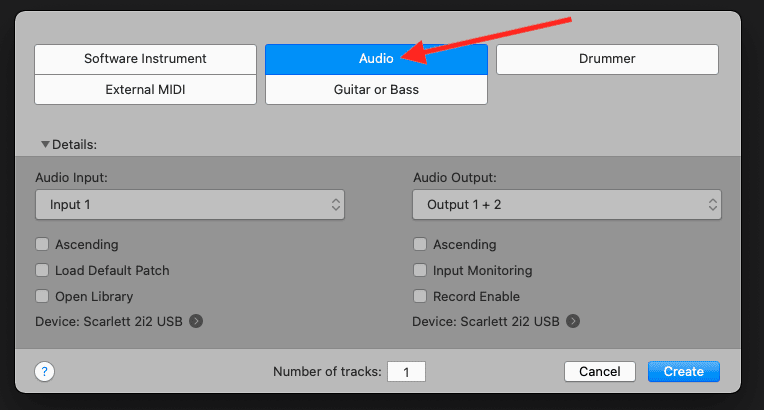
Press Audio to record an electric guitar as a clean DI.
- Step 1
You have to make sure that your Input number matches the one that your guitar is plugged into in the audio interface. Otherwise, you won’t get any signal from it.

Input number has to match the one that your guitar is plugged into in the audio interface.
- Step 2
Check the I button, which stands for Input Monitoring, to hear the sound of the incoming signal. Also, adjust the gain level on the audio interface. The most important thing is that it should not be too quiet or too loud, as the latter will cause clipping.

Check the I button and adjust the gain
- Step 3
Once you have everything you need set up, all left is to select the appropriate Metronome BPM and press the “Rec” button. You can also start recording with the hotkey “R”. With the “1234” button on, Logic will give you four beats of the metronome each time before you start recording, which will help you to get into the action. Set the metronome and press the “Rec”.
And there you have it. After you’ve played the take you want, press the spacebar and stop recording. You will see a blue box with a waveform on it. It will be your recorded electric guitar audio.

The waveform in a blue box is a recorded electric guitar.
It is important to note that having a DI signal for your guitar will always be advantageous because it is easy to edit. In addition, it gives you a lot of options for further manipulation of your guitar tone. For example, you can run it through your favorite amp sim plugin and achieve your desired sound.
How to record electric guitar via “Guitar or Bass” function
You can also create a new track thanks to the Guitar or Bass function. If you do, you will have plenty of opportunities to use Logic Pro X’s library of ready-to-use guitar tone presets for all tastes. Here you can experiment with virtual guitar amps, cabinets, and mic distances. Also at our disposal is a pedalboard with just a massive selection of guitar effects pedals. Let’s take a closer look at how to record via the “Guitar or Bass” function.
- Step 1
Go to the Track tab and click New Tracks. You’ll see the familiar window, only this time we’re not clicking Audio, but Guitar or Bass. A brand new track and an open library will appear in front of us on the left side of the screen.
Select the “Guitar or Bass” function to create a new track.
- Step 2
In the Electric Guitar and Bass section of the Library, select the type of guitar you want. Here you can choose between Clean Guitar, Crunch Guitar, Distorted, and Experimental. Each subsection has many options.
Choose what type of guitar you want to work with.
- Step 3
Once you have selected the desired preset, you will see that your signal already has a ready-made effect chain. But that doesn’t mean that your options are over. You can influence the settings yourself and get the guitar tone you think you want.

A ready-to-use guitar effects chain in Logic Pro X.
Overall, the Logic Pro X’s built-in capabilities in achieving your guitar tone are pretty great. You have to listen and experiment. The key factors that will affect your sound are the Pedalboard and Amp Designer plugins.
The pedalboard, as in reality, should be placed at the beginning of your guitar chain. Logic provides virtual effects of many types, from distortion to compressors. Just build your sequence with what works best for you.

The Pedalboard plugin has a lot of virtual pedals.
The Amp Designer plugin should go after Pedalboard. Here, you will choose between different types of virtual amps based on their legendary physical copies. You can combine the amp with various cabinets and microphones, which will also affect the character of the sound.
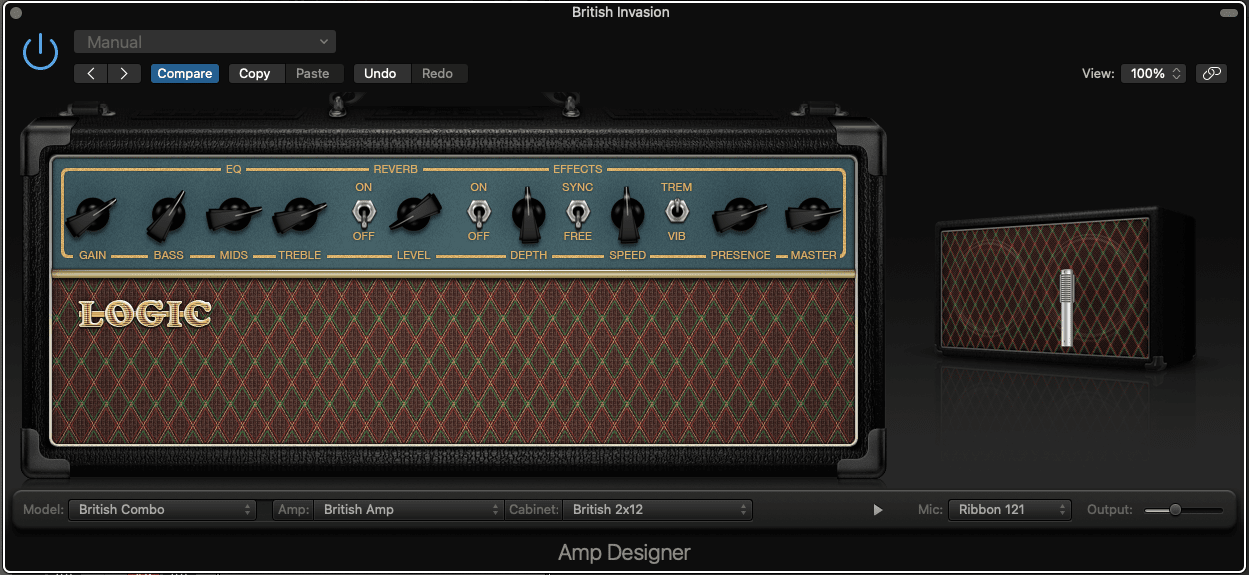
Select desired guitar amp, cabinet, and mic in the Amp Designer plugin.
The ability to record a guitar through Guitar or Bass is a great way to immerse yourself in the sound experimentation that Logic Pro X offers with its built-in plugins. You can switch between presets, change their settings and achieve what you want.
It’s worth noting that the basics of the recording process here remain the same as in the “Audio” method. That is, you also need to adjust the gain, adjust the metronome, and press Rec. The main difference is the presence of a guitar tone library.
If you record a guitar part with the preset, its base is still a clean DI signal. So if you remove all effects, you get the same audio track as in the first option.
How to record electric guitar with the amp in Logic Pro X?
If you have a physical amp that you love the sound of, you can also record an electric guitar in Logic Pro X. But this method is more complicated and requires additional physical equipment.
In addition to the audio interface, you’ll also need a load box or an attenuator with a dummy-load function. The point is that in this case, you can record the guitar directly, without a cabinet. But, as you know, a guitar amplifier without a cabinet can’t work because the speakers act as resistance. So be careful; turning on a guitar head without a cabinet can damage your amplifier!
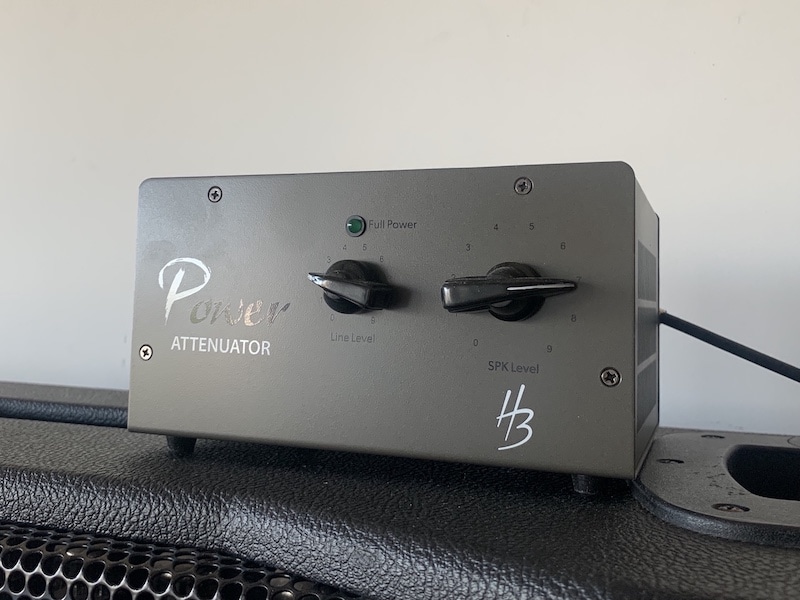
An example of load box/attenuator.
The load box can replace the guitar cabinet on the way to your audio interface and provide the ability to get a guitar amp signal. But remember, you’ll still have to use virtual cabinet emulations, called IRs, to get the guitar tone ready. Let’s take a closer look at your plan of action.
- Step 1
Сreate a blank Audio track in Logic Pro X. Build the guitar circuit in such a way that you hear a more or less finished guitar sound. Use the Noise Gate plugin and any IR loader with the cab impulses you want.
An example of Guitar chain with noise gate and IR loader.
- Step 2
Adjust the levels on your load box, guitar head, and audio interface. Make sure you get a good gain that is not too low or too high.
Check the signal level.
- Step 3
Once you are sure, everything is working well, press “Rec” and record your guitar parts directly from your guitar amp.
In this method, it’s best to record those guitar parts that you’re sure you’ll play smoothly and clearly. The thing is, if your guitar amp is overdriven, your waveform will look almost like one solid straight line. In this case, it will be difficult for you to find the correct transients to edit the parts during the production.

An example of waveform recorded directly from a guitar amp.
Otherwise, you need another piece of physical equipment called a DI box. With it, you can get two signals simultaneously: from a guitar amp and a clean DI. It will help you later navigate where the transients are and edit the overdriven signal.
How to record the electric guitar with cab in Logic Pro X?
This method is the most advanced and is still used in professional recording studios. In this case, you can capture not only the sound of your favorite guitar head but also the speakers of the cabinet. But like the previous one, you will need additional physical equipment.
The most important thing here is the microphone. It can be either a dynamic or a condenser microphone. It all depends on what you have. Note that the industry standard, in this case, is considered a dynamic mic Shure SM57. Many believe that it can give you the most transparent and most rich guitar sound from the speaker. But how do you set it up right?
- Step 1
Connect your microphone to the cable and then to the audio interface. Make sure that the input in Logic matches the number on your audio interface.
- Step 2
Place the microphone in front of the center of your speaker as a starting point. You can move it around, listen to it, and get the character of the sound you want – more low-end or fewer highs – all depending on mic placement.

An example of microphone placement on a cab’s speaker.
- Step 3
Adjust the gain on your audio interface to get the most appropriate signal. Then press Rec to start recording audio.
This method of recording will give you plenty of possibilities. For example, use a second mic for room ambiance. You can even capture the sound of a guitar with more than three microphones. It’s all up to you.
But remember that just like in the previous method, you will also get a straight waveform signal, which will be challenging to edit. Therefore, the DI box can serve as a good tool for you here as well.
Conclusion
Logic Pro X is a professional and versatile audio workstation where you can easily record an electric guitar in several ways. It is suitable both for professionals and beginners.
It all depends on what kind of equipment you have. If you want to try all the features of the built-in Logic plugins, record your guitar with the available presets. If you want a clean signal, record with Audio and then reamp with your favorite plugin. Or, of course, you can record guitar directly into your 3-rd party amp sim.
This DAW is also ideal for more experienced musicians and producers who want to capture the sound of a particular guitar amp and cabinet. Get some extra equipment like a load box, a microphone, and you’re good to go.

The Integraudio Editorial Team consists of experienced music producers, audio engineers, and plugin enthusiasts dedicated to providing in-depth reviews and guides for music production software.