

This article will discuss the best tips for using a Spectrum Analyzer when mixing-mastering music using the plugin SPAN.
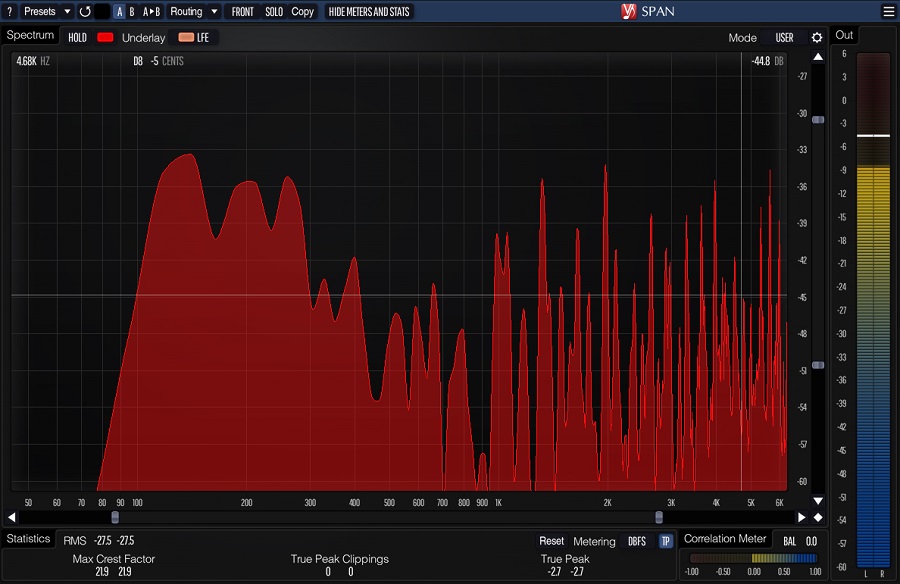
A spectrum analyzer is a specialized device used to measure the frequency spectrum of a signal. It works by receiving an input signal, typically an electrical signal, and then separating it into component frequencies.
The spectrum analyzer then displays this information on a graph, with the x-axis representing the frequency and the y-axis representing the amplitude or power of each frequency component. That allows you to see the energy distribution across the different frequencies present in the signal.
Modern spectrum analyzers can be hardware- or software-based. They can cover a wide range of frequency bands, from audio frequencies to microwave and millimeter-wave frequencies used in wireless communications. In the context of mixing and mastering music, a spectrum analyzer can be useful for analyzing the frequency content of a mix or individual tracks.
By visualizing the frequency spectrum of a track or mix, you can identify any imbalances or problem areas in the frequency response, such as excessive bass or harsh high frequencies. Using a spectrum analyzer, you can also identify the frequency range occupied by different instruments and sounds in the mix, which can help you to adjust the EQ settings to create a more balanced and coherent sound.
In addition to analyzing the frequency content of a mix or track, some spectrum analyzers also provide features such as real-time frequency analysis, spectral editing, and the ability to generate and apply EQ curves based on the analysis. Now let’s get to the main topic of discussion.
10 Tips to use a Spectrum with SPAN
SPAN is a real-time FFT-based spectrum analyzer plugin for digital audio workstations. It supports up to 8 channels of audio and provides a customizable display with different modes and color schemes. Spectral smoothing is also available to reduce spectral leakage and provide a smoother display.
A/B comparison allows easy comparison between two frequency spectrums and presets enable quick switching between different frequency analysis settings. Additionally, SPAN is free, making it a popular choice for producers and engineers on a budget. Here are ten tips for using it for spectrum analysis in mixing-mastering.
1) Start with a flat response
Starting with a flat frequency response is essential in mixing and mastering because it establishes a neutral baseline from which you can make further adjustments. A flat frequency response means the EQ settings are set to zero, with no boosts or cuts to any frequency range.
By analyzing the frequency response of a track or mix with a spectrum analyzer, you can identify frequency peaks or dips that might be causing problems in the mix, such as harsh high frequencies or boomy bass. Starting with a flat response allows you to identify these problem areas more easily because you have a neutral baseline to compare against.
Once you have identified problem areas in the frequency response, you can use EQ to adjust these areas as needed. These adjustments allow you to create a more balanced mix that sounds better on various playback systems.
Starting with a flat frequency response is good practice for mixing and mastering music and any audio application using EQ. By establishing a neutral baseline, you can make more informed decisions about how to shape the frequency content of the audio to achieve the desired results.
2) Identify problem frequencies
Identifying problem frequencies is a crucial step in mixing and mastering music, as it helps to address issues that could negatively impact the overall sound quality of your mix. The best way to identify problem frequencies is to listen critically to your mix or track and identify any frequency ranges that sound harsh, boomy, or muddy.
These are often the areas where problems lie. Additionally, using a spectrum analyzer can provide a visual representation of the frequency content of your mix or track, allowing you to identify any peaks or dips in the frequency response. You can also try using a frequency sweep to isolate problematic frequencies by boosting a narrow frequency range and sweeping it across the frequency spectrum.
If you hear any particularly unpleasant or jarring sounds, this may indicate a problem frequency. Once you have identified problem frequencies, you can use EQ to make adjustments and improve the overall sound quality of your mix.
3) Use the right resolution
The proper resolution is crucial when mixing and mastering music with a spectrum analyzer. The resolution refers to the number of frequency bands or bins analyzed by the spectrum analyzer. Higher resolution means more accuracy in the frequency analysis, but it also requires more processing power and can increase noise and artifacts.
On the other hand, lower resolution can lead to a smoother display but may not provide the level of detail needed to make accurate frequency adjustments. To find the right resolution for your mix or track, it’s important to consider the frequency content of the audio, and the specific frequency ranges that you need to analyze.
For example, if you are working with a mix with a lot of low-frequency content, you may want to use a higher resolution to analyze and adjust the bass frequencies accurately. Balancing the resolution with your computer’s processing power is also important.
If you are using a high-resolution spectrum analyzer and experiencing lag or other performance issues, you may need to lower the resolution or consider upgrading your computer’s processing power. Ultimately, finding the right resolution requires a balance between accuracy and practicality.
By selecting the appropriate resolution, you can ensure that you are accurately analyzing the frequency content of your mix or track and making informed adjustments to achieve the desired sound. Adjusting the resolution in SPAN is a straightforward process.
Click on the settings icon on the top-right corner of the plugin, and the Spectrum Mode Editor will open, in which you have to change the block size to change the resolution.

Further, click on the slider adjustments to adjust the resolution of the spectrum analyzer’s x- and y-axis. For example, we have zoomed into low and low-mid frequencies, between 80 and 600 Hz.
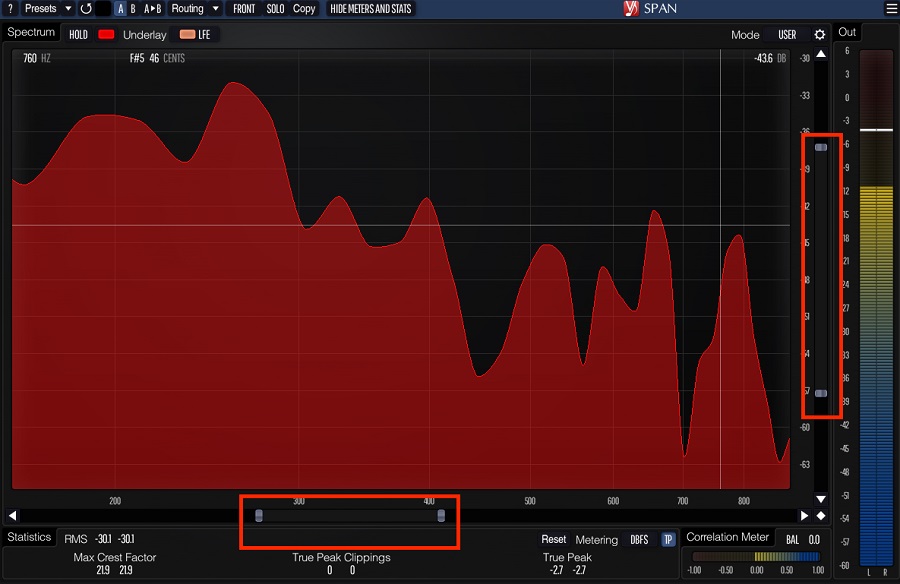
Once you have adjusted the resolution and overlap to your liking, continue using the plugin. Remember that higher resolution requires more processing power and may introduce more noise and artifacts. So it’s important to balance the resolution with your computer’s processing power and the specific needs of your mix or track.
4) Use multiple instances
Using multiple instances of SPAN on different tracks is a powerful technique for analyzing and comparing the frequency content of your mix. By placing a separate instance of SPAN on each track, you can quickly compare the frequency response of each track and identify any problem frequencies or inconsistencies.
To use multiple instances of SPAN, insert a separate instance of the plugin on each track you want to analyze. You can then adjust the settings of each SPAN instance to match the track’s specific needs. For example, you may want to adjust the resolution or color scheme of each instance of SPAN to provide a clear and detailed analysis of each track.
Once you have set up multiple instances of SPAN, you can use them to compare the frequency response of each track. Switching between each instance of SPAN allows you to identify any problem frequencies or inconsistencies between tracks quickly. This can be especially useful when mixing and mastering multiple tracks that must sound consistent and cohesive.
5) Analyze individual tracks
Analyzing individual tracks with a spectrum analyzer like SPAN is crucial in mixing and mastering. By analyzing each track individually, you can identify problem frequencies or inconsistencies in the frequency content and make informed adjustments to achieve a more balanced and cohesive mix.
To analyze an individual track with SPAN, insert the plugin on the track you want to analyze. You can then play the track and observe the frequency response displayed in the plugin window. Look for any problem frequencies that stand out, such as harsh or boomy sounds, and use the information provided by SPAN to make informed adjustments to the track.
For example, let’s say the kick is a few cents off or deviates from the key’s root note, disturbing the mix. SPAN allows you to see the frequency of your content, along with its key and deviation from the pitch.

One useful feature of SPAN is the ability to display a real-time audio signal spectrum. This allows you to observe the frequency content of the track as you make adjustments, making it easier to achieve a balanced and cohesive sound.
6) Compare with reference tracks
Comparing your mix with reference tracks is crucial in achieving a professional and polished sound. By comparing your mix with reference tracks, you can identify any problem frequencies or inconsistencies in the frequency content and make informed adjustments to achieve a more balanced and cohesive mix.
Another helpful technique when comparing with reference tracks is to match the overall loudness of the different frequency spectrums of your mix with the reference track. This can help you identify tonal imbalances or inconsistencies affecting the mix’s overall sound.
7) Analyze in context
Analyzing in context means simultaneously analyzing the frequency content of individual tracks and the overall mix to achieve a balanced and cohesive sound. By analyzing in context, you can identify any problem frequencies or inconsistencies that may be affecting the overall sound of the mix and make informed adjustments to achieve a more balanced and professional sound.
To analyze in context with a spectrum analyzer like SPAN, you can insert the plugin on the mix bus or master bus to observe the frequency response of the overall mix. You can then play the mix and observe the frequency response displayed in the plugin window.
Look for any significant differences between the frequency content of individual tracks and the overall mix and use the information provided by SPAN to make informed adjustments.
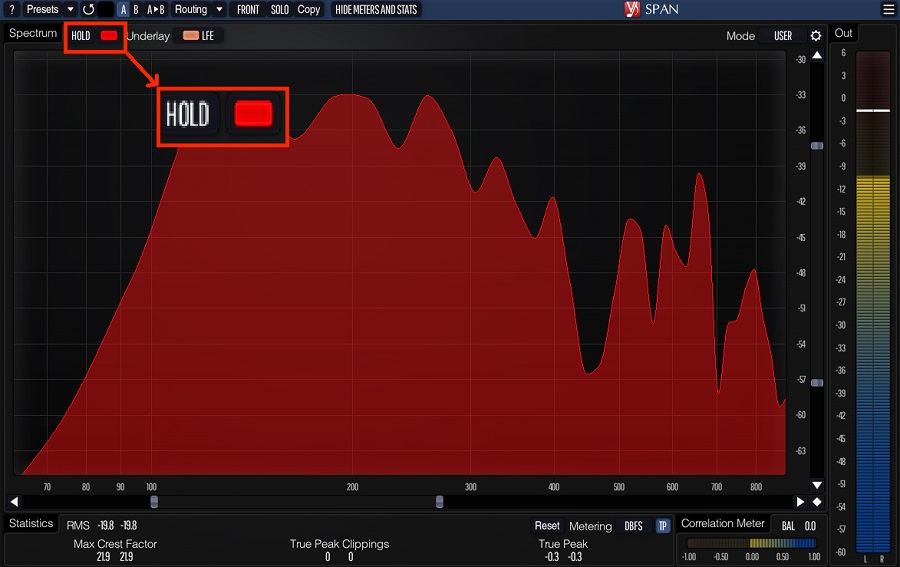
One useful feature of SPAN is the ability to overlay multiple frequency response curves, allowing you to simultaneously compare the frequency content of individual tracks and the overall mix. This can help you identify any problem frequencies or inconsistencies and make informed adjustments to achieve a more balanced and cohesive sound.
You can also click on the “Hold” button on the plugin to freeze the frequency spectrum of an instrument/mix and go in-depth into analyzing it.
8) Check for mono compatibility
Checking mono compatibility is an important step in the mixing process to ensure the mix sounds good on all playback systems, including mono systems. When a stereo mix is played back in mono, any differences in phase or panning can cause certain frequencies to cancel each other out, resulting in a loss of volume and clarity.
Using a spectrum analyzer like SPAN, you can check the mono compatibility of your mix by inserting the plugin on the mix bus or master bus and switching to mono mode. In mono mode, SPAN will display the mono frequency response of the mix, allowing you to observe any phase cancellation or frequency masking that may be occurring.
The correlation meter in SPAN will tell you if you have any phase issues. The closer the correlation to 1, the more resolved your phase is. When checking mono compatibility, look for any significant changes in frequency response when switching from stereo to mono mode. If you notice any frequency cancellation or masking, you may need to adjust individual tracks’ panning or phase relationships to improve mono compatibility.
9) Use different views
Using different views with a spectrum analyzer like SPAN can be a useful way to analyze different aspects of the frequency content of your mix. SPAN offers various views, including the spectrum analyzer view, the spectrogram view, the correlation meter, and the meter bridge.
The spectrum analyzer view displays the real-time frequency response of the audio signal, allowing you to observe the frequency content of individual tracks and the overall mix. This view is useful for identifying problem frequencies and making informed EQ adjustments.
The spectrogram view displays the frequency content of the audio signal over time, allowing you to observe any changes in the frequency content of the mix throughout the track. This view is useful for identifying frequency buildup or masking that may occur over time.
For example, you can use the Spectrogram without fill. Open the Spectrum Mode Editor and de-click the “Filled Display” button. That will change the view of the Spectrum.

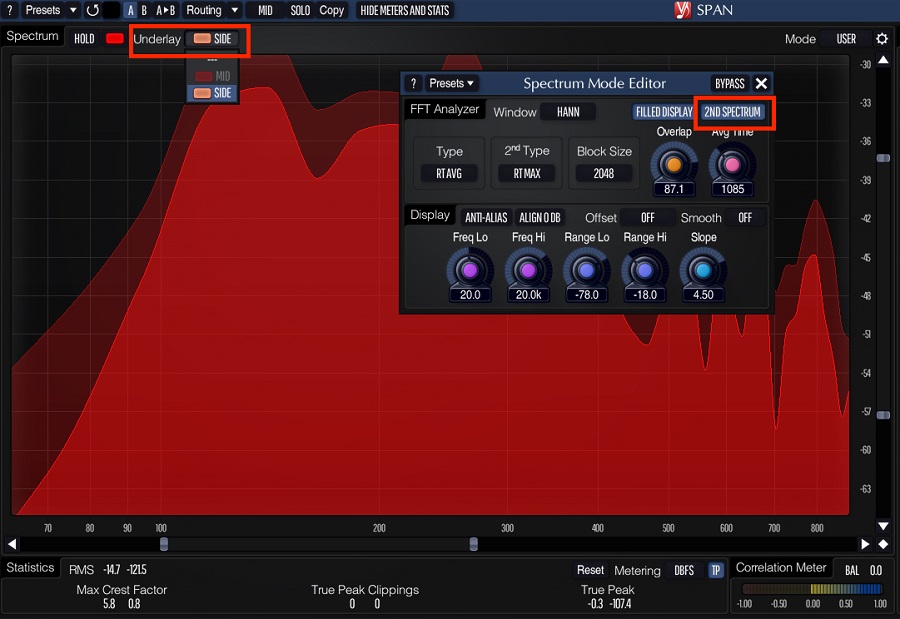
Similarly, you can use the Mid-side view. Go to Routing > Mid-Side Stereo. Then, open Underlay and select the Side channel to see the mid-side view.

The correlation meter displays the phase relationship between the left and right channels of the audio signal, allowing you to observe any differences in phase or stereo image that may be affecting the overall sound of the mix. The meter bridge view displays various meters, including peak and RMS level meters, allowing you to monitor the overall loudness of the mix and make informed adjustments to achieve a more balanced and dynamic sound.
10) Use presets
Using presets in a spectrum analyzer like SPAN can be a useful way to switch between different frequency analysis settings quickly. SPAN includes a range of presets for different analysis scenarios, such as mastering, mixing, and tracking, making it easy to quickly switch between different frequency analysis settings depending on the specific task.
Using presets with a spectrum analyzer like SPAN can save time and improve workflow by providing quick and easy access to different frequency analysis settings. By using these presets, you can make more informed and efficient adjustments to the frequency content of your mix and achieve a more professional and polished sound.
How to use Stereo Analyzer for mixing?
A stereo analyzer is a useful tool for mixing because it allows you to visualize the stereo image of your mix and make informed decisions about panning and stereo processing. Here are some tips for using a stereo analyzer for mixing:
- Choose a high-quality stereo analyzer plugin
Many stereo analyzer plugins are available, but not all are created equal. Look for a plugin with a clear and intuitive interface that provides detailed information about the stereo image of your mix. For example, you can use the free Ozone Imager V2, which we are using in this example.

- Use the stereo analyzer to check for phase issues
Phase issues can cause problems with the stereo image of your mix, resulting in a muddy or unclear sound. Use the stereo analyzer to check for phase issues and adjust as needed.
Phase issues occur when the audio signals of two or more tracks are not aligned correctly, resulting in the cancellation or reinforcement of certain frequencies, leading to a weak or unbalanced sound. To resolve phase issues using Ozone Imager, solo the track(s) and insert Ozone Imager on one of them.
Select the “Stereoize” mode, and adjust the width and correlation parameters until the stereo image is balanced, with no phase cancellation. Alternatively, use the “Vectorscope” view to visualize the phase relationship between the tracks and adjust their timing or polarity to align the signals correctly. Repeat this process for each pair of tracks in your mix, listening carefully to ensure the overall sound is clear and well-balanced.
- Use the stereo analyzer to check for mono compatibility
It’s important to ensure that your mix sounds good when played back in mono, as many systems and devices still use mono playback. Use the stereo analyzer to check for mono compatibility and adjust as needed. You can also use it to visualize the balance of your mix and adjust the panning of individual tracks as needed.
- Use the stereo analyzer to make informed decisions about stereo processing
The stereo analyzer can help you see the effect of stereo processing plugins such as stereo wideners, chorus, and reverb. Use the analyzer to make informed decisions about using these plugins in your mix.
Lastly, while the stereo analyzer is useful, it’s important to use your ears and listen to your mix in various contexts to ensure it sounds good on different systems and devices.
Conclusion
To summarize, this article has discussed the concept of a spectrum analyzer and its usefulness in analyzing the frequency content of a mix or individual tracks, particularly when using the plugin SPAN. SPAN has many customizations regarding its skin, presets, color codes, Routing, modes, etc. In addition, you can switch it to dBFS or TP, which makes it great for mastering.
Its correlation meter is a great tool for checking phase issues. Further, the display settings, FFT curve types, etc., help you fit the plugin into your workflow and make its best use. By following the tips mentioned above and utilizing the features of SPAN, producers and engineers can make informed frequency adjustments and achieve a more balanced and coherent sound in their mixes. I hope the article was of help. Thank you for reading.

Shaurya Bhatia, is an Indian Music Producer, Composer, Rapper & Performer, who goes by the stage name MC SNUB, and is also 1/2 of the Indian pop music duo, called “babyface”. A certified Audio Engineer & Music Producer, and a practicing musician & rapper for more than 6 years, Shaurya has worked on projects of various genres and has also been a teaching faculty at Spin Gurus DJ Academy.