
Premixed beats are popular among independent artists and those just starting in the music industry. They provide an affordable and convenient way to access high-quality instrumental tracks without creating them from scratch. Now let’s get to the main topic of discussion.
Producing vocals on a premixed beat involves gain staging both the beat and vocals, followed by level balancing, adding effects like auto-tune, EQ, compression, reverb, delay, etc., on the vocals. Further, you can also EQ the beat and create space in it. Finally, you can add mastering effects like a limiter.
Mixing vocals on a premixed beat is a common practice in the music industry, as it allows artists to create high-quality recordings with minimal equipment and resources.
This (image below) is how a session typically looks when you record a vocal over a beat. It’s always a good idea to arrange the vocals and organize your session by color-coding tracks, renaming them, etc., before starting the vocal mixing process.

The process involves taking a premixed beat, essentially a finished instrumental track, and layering recorded vocals over it. To achieve a balanced, cohesive sound, there are several key steps to follow when mixing vocals on a premixed beat:
- Import the beat
Import the premixed beat and vocals into a Digital Audio Workstation (DAW) software program. Most DAWs have a built-in mixer that allows you to adjust the levels of individual tracks and apply various effects and processing.
- Gain-staging and level-balancing the beat and vocals
Gaining staging vocals is setting the input gain level of a microphone preamp to achieve the best signal-to-noise ratio and avoid distortion. The goal is to get a strong, clean signal without clipping the input or adding too much noise.
To gain stage vocals, start by setting the preamp gain to the lowest level possible, then gradually increase it until the signal is strong and clear but not peaking or distorting. Use a peak meter or waveform display to monitor the signal level and adjust the gain accordingly. It’s important to gain stage before applying additional processing, such as EQ, compression, or effects, to ensure the best possible results.
I recommend that you gain stage the instrumental and the vocals at -9 dB or blow, then start balance of them against each other. Start by setting the volume level for the vocal track. You want the vocals to be prominent in the mix but not so loud that they overpower the instrumental track. Use the fader on the mixer to adjust the volume until the vocals sit comfortably on the beat.
In FL Studio, you can gain stage from the knob in the channel rack next to the sampler window.

Further, you can level-balance the tracks in the mixer window in FL Studio.

- Vocal Tuning
Vocal tuning is the process of correcting pitch errors in recorded vocal performances. This is typically done using pitch correction software, which analyzes the pitch of the vocal track and makes automatic adjustments to correct any out-of-tune notes.
The goal is to create a more polished, professional sound without sacrificing the natural character of the original performance. However, it’s important to use vocal tuning judiciously and not rely too heavily on technology to correct mistakes.
Vocal tuning can be a useful tool in mixing and production, but it’s important to preserve the authenticity and emotion of the original performance as much as possible. You can use plugins like Antares Autotune, Celemony Melodyne, and Waves Tune Real Time.
- Equalizer
Next, apply EQ to the vocal track to remove unwanted frequencies and improve clarity. Use a high-pass filter to cut out low-end rumble and a low-pass filter to remove harsh or shrill frequencies. You may also want to boost or cut certain frequency bands to enhance the character and tone of the vocals.
Many great EQ plugins are available, but some of the most popular options for mixing vocals include FabFilter Pro-Q 3, Waves SSL E-Channel, and iZotope Nectar 3. When it comes to types of EQs, there are a few to consider. Graphic EQs are great for making broad frequency adjustments, while parametric EQs allow for more precise adjustments to specific frequencies.

Additionally, dynamic EQs are useful for controlling problem frequencies that may change throughout a vocal performance. Ultimately, the best EQ for mixing vocals will depend on the project’s specific needs and the engineer’s preferences.
- Compression
Apply compression to the vocal track to even out the dynamic range and make the vocals more consistent in volume. Set the threshold, so the compressor kicks in when the vocals get too loud, and adjust the attack and release settings to create a smooth, natural sound.
Vocal compression is a common technique used in audio mixing to even out the dynamic range of recorded vocal performances. This involves applying a compressor to the vocal track, which reduces the volume of loud or peaky parts of the performance while leaving quieter parts unaffected.
To achieve the best results, it’s important to set the compression parameters carefully, including the threshold, ratio, attack, release, and makeup gain, and to use your ears to guide your adjustments. With the right compression settings and techniques, you can enhance the impact and emotion of the vocal performance while creating a more professional and cohesive sound overall.
Finally, many vocal compression plugins are available, each with unique features and sound. Some popular vocal compression plugins include Waves SSL G-Master Buss Compressor, FabFilter Pro-C 2, UAD LA-2A, Universal Audio 1176, and the Waves CLA-76. These plugins offer a range of compression styles and options, from vintage analog emulation to modern digital processing, and can help to enhance the dynamics and tone of recorded vocal performances.
Below is the image of FabFilter Pro-C2, a versatile compression plugin you can also use on vocals. Its vocal algorithm is especially great for getting an upfront vocal performance that stands out and stays upfront in the mix. This algorithm has a high ratio and does quite an aggressive compression.
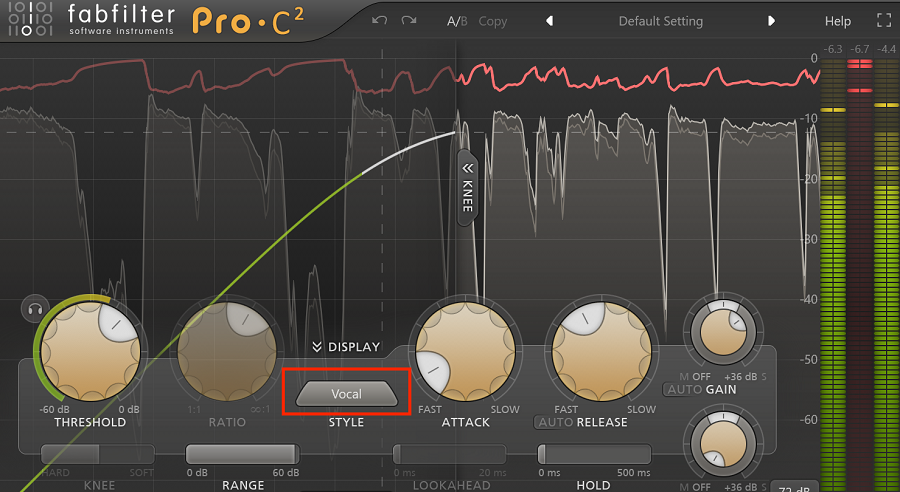
So, if the beat doesn’t have much dynamics and less headroom, use the plugin and its vocal algorithm to make the vocal stand out.
- Time-based effects
Time-based effects are a key element in many vocal mixes, helping to add depth and dimension to the sound. Several types of time-based effects are commonly used on vocals:
- Reverb
This effect simulates the natural reflections of a space, adding a sense of depth and spaciousness to the vocal. Reverb can be used to place the vocal in a specific environment, such as a large concert hall or a small room, or to add depth and dimension to the sound.
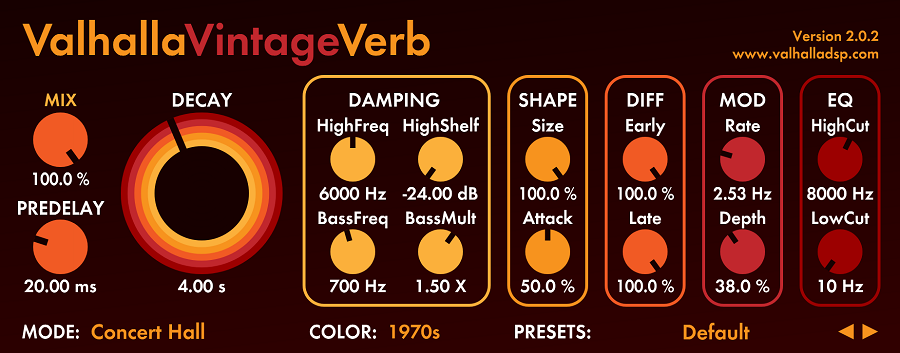
The ValhallaVintageVerb is a versatile and flexible reverb plugin that gives good space to your sounds. The best way to set reverb is to set the Decay time first, followed by the Pre-delay. A formula for setting a medium-sized Decay time is (60,000/BPM) x 8. Similarly, for setting a medium-sized pre-delay, use the formula: (60,000/BPM)/32.
Next, you can set the mix, low cut, high cut, early and late reflections, and bass multiplier per your taste and needs.
- Delay
This effect creates echoes of the vocal, adding a sense of repetition and rhythm to the sound. Delay can be used to create a sense of space and dimension or to add a rhythmic element to the vocal that complements the beat of the track.
Below is a screenshot of the H-Delay by Waves, which can sync to your BPM, and then all you have to do is set the delay time. 1/4, 1/8, or 1/8D are the most commonly used delay times. You can also modulate high- and low-pass filters on your delay voices in the plugin.

- Chorus
This effect creates a sense of doubling and thickening by creating multiple copies of the vocal and detuning them slightly. Chorus can add a sense of richness and depth to the vocal and is often used in pop and rock music to create a sense of vocal harmonies.

Chorus by Kilohearts - Flanger
This effect creates a sweeping and swooshing sound by delaying and modulating the delayed signal. Flanger can add a sense of movement and dimension to the vocal and is often used in electronic and experimental music.- Rate: Controls the speed of the flanging effect.
- Depth: Controls the intensity of the flanging effect.
- Feedback: Determines the amount of the output signal fed back into the input.
- Mix: Determines the balance between the dry (unprocessed) and wet (processed) signal.

When using time-based effects on vocals, it’s important to use them judiciously and purposefully. Too much reverb or delay can make the vocal sound distant and disconnected from the rest of the mix, while too much chorus or flanger can make it sound unnatural and artificial.
Experiment with different effects and settings, and listen carefully to how they affect the overall sound of the mix. By finding the right balance of time-based effects, you can create a vocal sound that is rich, dimensional, and perfectly suited to your music.
- Vocal automation
Finally, use automation to fine-tune the mix and ensure the vocals are balanced with the beat throughout the song. You may need to adjust the volume, EQ, and effects settings at different points in the song to ensure a cohesive and dynamic sound.

Alternatively, you can also use vocal adjustment plugins like the Vocal rider by Waves, which adjusts the gain as per the input you feed it, to give a consistent output. It automates the vocal automation process and saves time.

- Tweak the beat
There is a lot of stuff you can tweak in the instrumental. For example, you can do mid-side processing on the beat and cut the fundamental frequencies of the vocals from the beat’s mid-channel, so there is enough space for vocals. Similarly, you can boost the kick, hats, bass, and snare in the beat by EQing it or using a multi-band compression or dynamic EQ.
The image below shows how you can enhance the stereo width by differently treating the left and right channels. Similarly, you can make space in the beat for vocals by tweaking the mid/side channels in the beat.

- Master the final track.
Mastering involves applying the final effects before exporting the track for distribution and industrial use. This process involves using compressors to squash the dynamic range, a limiter to prevent the audio from exceeding -1 dB TP, which avoids distortion and clipping in the final track, equalization, multi-band compression, stereo imaging, and finally ensuring that the track follows the LUFS loudness standards of the platforms the track is being made to be consumed at.

For example, you need to master the track at -14 dB LUFS to be fit for consumption on Spotify and YouTube. You can use plugins like Youlean Loudness Meter or WLM meter by Waves. You have to check the Long Term LUFS ratings and ensure it follows the standard for music & radio streaming, and check the dB True Peak ratings and ensure it stays below 0 dB.

How to create space for vocals in a beat?
Creating space for vocals in a beat is an important part of mixing and producing music, as it allows the vocals to stand out and be heard clearly in the mix. Here are some tips on how to create space for vocals in a beat:
- Equalization
Use EQ to carve out space for the vocals. Identify the frequency ranges where the vocals and beat compete for space, and use EQ to cut those frequencies from the beat. For example, if the vocals have a lot of energy in the midrange, you may need to cut some of that frequency range from the instruments or other elements in the mix.
For example, cut down low-mids (200 Hz – 400 Hz) from the mid-channel in your beat, as the vocal’s fundamental frequency lies in this region. Further, you can also cut down the 3000 Hz area from the beat, as that’s where the crispness of the vocals lies, and that’s the most audible frequency in the entire spectrum.

- Panning effects
Use panning to separate the vocals from the beat. Pan the vocal track to the center of the stereo field, and pan the beat elements to the sides or between the vocals. This creates a sense of space and separation between the vocals and the beat, making it easier to hear and distinguish each element.

If you have a single instrumental track, you can use an L/R EQ to pan the element(s) frequencies in left or right. Similarly, you can pan the backing vocals in various directions.
- Reverb & Delays
Use reverb and delay effects to add depth and dimension to the vocals. Applying a subtle reverb or delay to the vocals can create a sense of space and distance, making it sound like they are coming from a specific location in the mix.

- Sidechaining
Use sidechain compression to create room for the vocals. Using a compressor on the beat elements triggered by the vocal track, you can create a “ducking” effect that lowers the beat volume when the vocals are present. This creates more space and clarity for the vocals to be heard.
- Volume Automation
Use volume automation to balance the levels between the vocals and beat. Sometimes the vocals can get lost in the mix simply because they’re not loud enough. By using volume automation to adjust the levels of both the vocals and beat elements, you can ensure that each part comes through clearly and at the right level.
Conclusion
Premixed beats or type beats are instrumental tracks produced by music producers for artists and performers to use as a foundation for their compositions. They are created in a particular genre, such as hip-hop, pop, or R&B, and are leased or sold to artists for commercial release or promotional purposes.
Mixing vocals on a premixed beat is a common practice in the music industry as it is an affordable and convenient way for artists to access high-quality instrumental tracks. It involves gain staging both the beat and vocals, followed by level balancing, adding effects such as EQ, compression, reverb, delay, etc., and finally mastering effects like a limiter.
A balanced and cohesive sound can be achieved by following these key steps. Time-based effects such as reverb and delay can add depth and dimension to the vocal sound. I hope the article was of help. Thank you for reading.

The Integraudio Editorial Team consists of experienced music producers, audio engineers, and plugin enthusiasts dedicated to providing in-depth reviews and guides for music production software.