Read on to learn how to remove breathing in REAPER recordings using built-in tools and effect plugins.
The sound of breathing, often called breath noise, can be annoying when you’re looking for a clean vocal recording. And if your job often involves recording vocals for a song, film, or podcast, it’s crucial to have effective and efficient methods to eliminate breath noise. Sure, you could manually chop up an audio recording to remove the noise, but that quickly becomes tedious and time-consuming.
How To Remove Breathing In REAPER?
You can remove breath noises in REAPER using a plugin like ReaGate or ReaFir. You can also use Dynamic Splitting to delete sections of breath noises. Alternatively, you can manually remove the noises using volume automation or spectral editing. Each method offers unique pros and cons to your use case.
ReaGate, ReaFir, and Dynamic Splitting are automatic. These methods involve analyzing an audio item for relatively quiet parts and either reducing the volume of such parts or deleting them. Conversely, automation and spectral editing are manual processes that may offer better or more effective results.
Now that we understand the basics of the process let’s talk about each method in detail.
Automatic Methods
In this section, I’ll describe the automatic ways to remove breath noise in REAPER. In most cases, these tools provide excellent results. However, if your audio recording is quite dynamic, involving very quiet parts and loud segments, you might have to supplement with the manual tools. That said, I’ll provide some tips to make each method as effective as possible. So, let’s check them all out:
ReaGate
ReaGate is a gate plugin that allows you to customize virtually every parameter involved in gating, a process that silences any sound below a user-specified volume level. This level is called the threshold, a term also used in other dynamics plugins like compressors, expanders, and limiters. So, if you set the threshold at -12 dB, any sound quieter than -12 dB in your recording becomes silent.

Let’s check out what each parameter does:
- Pre-open
ReaGate can look ahead at the upcoming audio to ensure the gating is done with the best efficiency. This parameter allows you to set how far ahead the plugin should look from 0 to 250ms. Typically, you will only want to use this parameter if your audio gets quiet and loud very suddenly, enough to cause issues with real-time analysis (0ms). Note that pre-open will add a latency of the same value to your track. Furthermore, it might cause a project-wide latency in some DAWs. - Attack
When your audio is quiet, ReaGate silences it, which we call the gate “closing.” Similarly, when the audio is louder, ReaGate “opens” the gate and lets it play. The attack parameter lets you control the length of time it takes to open the gate fully. So, it creates a fade-in when the gate opens. A small value like 3ms to 10ms helps avoid pops and clicks when the gate opens without making the attack obvious. - Hold
Hold keeps the gate open even after the audio level has dropped below the threshold. This parameter controls how long it should keep the gate open from 0 to 1,000ms. So, this feature is handy if your singer is particularly dynamic, enough to constantly confuse ReaGate into opening and closing. - Release
Release is the opposite of attack. It controls the length of fade-out when the gate closes, which also avoids pops and clicks. Furthermore, it can create smoothness if your vocal recording has a lot of fading out. - Hysteresis
When I talk about the threshold, we assume it to be the signal level where ReaGate closes and opens the gate. However, the hysteresis parameter allows you to offset the closing threshold relative to the opening threshold. Let’s understand it better with an example:
Suppose I have set the threshold at -10 dB, meaning any signal below this value gets silenced. If I set the hysteresis at -5 dB, the closing threshold changes to (-10) + (-5) = -15 dB. Now, any signal below -15 dB gets silenced. However, ReaGate doesn’t open the gate when the signal gets louder than -15 dB. Instead, it opens when the signal is louder than 10 dB, the original threshold we set.
We can also set a positive value in hysteresis, which means the closing threshold is higher than the opening threshold. If you think that makes no sense, you’re right — it doesn’t. However, if you turn down the release with a positive hysteresis, you will get some distortion, which could be used creatively. - Detector Input
ReaGate accepts sidechain input from another track, so the gating occurs when the second track’s signal exceeds the threshold. Select the sidechain by switching to Auxiliary Inputs in the Detector Input drop-down menu. Furthermore, you can enable the “Invert gate (duck)” option to open the gate when the sidechain signal is below the threshold. - Filters & RMS Size
The plugin features a low-pass and high-pass input filter. If you’re using the “Invert gate” option to duck your bass with a kick, try using the low-pass filter to keep the mid/high frequencies from interfering. Furthermore, the “Preview filter output” switch lets you conveniently listen to the filter.
The RMS Size slider lets you switch to RMS mode instead of the default peak mode. It averages the signal level over the selected millisecond value and makes ReaGate act slower, which can be handy if your audio has volume spikes that should be ignored.
Now that we know how the plugin works, here’s how to remove breathing in REAPER using ReaGate:
- How dynamic is your audio recording? If it has some quiet segments alongside loud ones, you should chop it up and add ReaGate to each item instead of the track:
- Separate the louder sections from the quieter ones. Note that you needn’t be too detailed with the slicing. For instance, separate the verse and chorus parts in a song.

Separate the quieter and louder parts. - Select the item.
- Press Shift + E to open the take FX selector. Find ReaGate and add it.

Adding ReaGate as a take FX.
- Separate the louder sections from the quieter ones. Note that you needn’t be too detailed with the slicing. For instance, separate the verse and chorus parts in a song.
- Conversely, if the signal level is fairly equal throughout the recording, add ReaGate to the track.
- Find the breath noise that is most noticeable in the recording.
- You can optionally increase the high-pass filter in ReaGate to around 200 Hz to avoid false signals. However, it’s rarely essential.
- Increase the threshold (the vertical slider on the left) in ReaGate so you can no longer hear the breath noise.

Use the input meter (left) to see if the threshold is above the noise. - I like to leave the attack at 3ms and increase the release to around 200 to make it sound smooth. You can also try increasing the pre-open to 3ms or even more if the plugin doesn’t seem as effective as it should be.
- Turn down the hysteresis to -5 dB or so. The idea is to make ReaGate silence the audio only after the vocalist has gone quiet, ensuring any soft tails are untouched. And a quiet, isolated sound like breath noise will not open the gate. It’ll need a louder signal (actual speech or singing, reaching the main threshold) to open the gate. Furthermore, you can increase the threshold slightly to make this process even more effective!
You can use the wet and dry output mix sliders to customize the sound. However, I prefer to turn down the dry slider fully and use the mix knob at the top right of the plugin instead:

Try setting it to around 70-90% if you record podcasts and dialogues. It’ll retain some of the noise, making the audio sound more natural when you compress it.
ReaFir
ReaFir is a multi-effect plugin with Fast Fourier Transform (FFT) processing, meaning the audio signal is separated into frequency bands and processed individually. This plugin can work as a linear EQ, gate, compressor, convolve L/R, and subtract. However, we are particularly interested in the gate mode.

The FFT feature allows you to select which frequencies get gated, allowing you to pinpoint the breath noise. Furthermore, you can use the subtract mode of ReaFir to select the frequencies automatically. Before we get into that, you can learn about all of ReaFir’s features in my article on noise reduction. Now, let’s get into how to remove breath noise using this plugin:
- Start by adding ReaFir either to your audio items or to the track. If the recording is very dynamic, I prefer adding it to the items by pressing Shift + E.
- Increase the FFT Size to at least 1024 but not higher than 4096 because a higher resolution slows down ReaFir’s detection. Try changing this value once you’ve followed the rest of the steps. Then, pick the best-sounding one; it can be different for every case.
- Move your edit cursor to the start of an audible breath noise.
- Switch to the Subtract mode.
- Enable “Automatically build noise profile.”
- Hit play, but stop the playback before any vocal starts playing. If the breath noise is too short, create a loop over the section. Similarly, if you have ReaFir in your track, you can slice the noise segment and mute the rest of the recording. I’ve even used a take or pre-FX volume envelope to isolate the noise.
- Uncheck “Automatically build noise profile.” If you’ve made an error in the previous step, uncheck and recheck this option to reset the noise profile.
- Now, you have the exact frequency curve of the breath noise, which will serve as the gate threshold. You can edit the curve to remove unnecessary spikes in the low end or top end by dragging them flat at the bottom. Furthermore, use Control/Command + Left-Mouse Drag to customize the overall level of the curve, essentially like changing the threshold level in ReaGate!

Holding Control/Command to adjust the threshold level. - Enable “Reduce Artifacts.” It can sometimes eliminate the side effects of the processing.
- Turn down the “Gate floor” slider until you’re satisfied with the gating. Fully turning it down silences the noise signal, whereas allowing some signal to pass through gives a more natural and subtler result.
I like to work with gating plugins only after the compressor is set up. You have probably noticed that compressors accentuate the breath noise since it’s smoothing all dynamics. So, editing ReaFir or ReaGate after you’ve set up the compressor makes sense. You can dial in the perfect “Gate floor” or wet mix to add a natural touch to your vocals without sounding annoying even when compressed!
Note that you should add any gate plugin before the compressor in your FX chain.
Dynamic Split
Dynamic Split is a feature in REAPER that processes an audio item by analyzing its dynamics. Its actions include splitting, adding stretch markers, and transient guide markers. However, I’ll talk about the splitting actions alone, though I recommend learning the other actions over time.
Dynamic Split will be familiar to ReaGate users. Both have similar parameters, although the labels might differ somewhat. However, while ReaGate is a plugin, Dynamic Split is a feature that either splits or deletes the segments of an audio item using a gate.
Before I go into using Dynamic Split, I’ll explain what each parameter in the feature does. Please note that I’m assuming you’ve read my description about ReaGate above.
- Split Points
Under this section, you’ll find three checkboxes: at transients, when gate opens, and when gate closes. These specify where you’d like the feature to split your audio item. Similarly, the “reduce splits” slider lets you control the number of splits despite the feature detecting split points.
Next, you’ll find two sliders. “Min slice length” controls the length of the segments with audio above the threshold (vocals). And “Min silence length” changes the length of the audio it should silence (breath noise). - Gate

This section features the threshold and hysteresis of the gate. Remember that hysteresis controls the closing threshold, while the main threshold controls both the opening and closing. Furthermore, the “Display gate threshold in media items” checkmark lets you visualize the gate. - Action To Perform
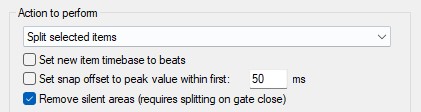
This section lets you specify what you’d like Dynamic Split to do: split selected items, split selected and grouped items, add stretch markers to selected items, add stretch markers to selected and grouped items, and add transient guide markers to selected items.
“Set new item timebase to beats” changes the processed items’ timebase to “Beats (position only)” in the media item properties. In my article about REAPER’s usability for electronic producers, you can learn more about timebases.
“Set snap offset to peak value within first” creates a snap offset in the audio item at the first peak transient within the specified time. A snap offset lets you snap an item to the grid at the specified snap offset position instead of the start of an item. So, having Dynamic Split add snap offsets is excellent for percussive samples.

“Remove silent areas” makes Dynamic Split act like a gate plugin, albeit destructively. - Attack & Release
The “Leading pad” and “Trailing pad” times are similar to ReaGate’s attack and release parameters. A 50 ms leading pad makes Dynamic Split leave 50 ms of audio ahead of its detected split on the audio item, whereas a trailing pad does so after the detected split. Furthermore, enabling the “Fade pad” adds a fade-in and fade-out curve in the leading and trailing pads. - Chromatic MIDI
The “Create chromatic MIDI item from slices” creates a MIDI item with a chromatic note for each slice. It’s great for drum replacement when using Dynamic Split to slice the recording at the transients of the drum hits. Furthermore, the dynamics of the slices are translated into velocity changes in the MIDI item. To move the chromatic notes to a single note (for kick or snare, for example), select all the notes, right-click, and open Event Properties to assign the note you want.
You should have a good grasp of how Dynamic Split works by now. While I certainly recommend experimenting to understand it further, here are the steps to eliminate breath noise using Dynamic Split:
- Select the item(s) you want to process. Set the zoom so you can clearly see the breath noises and a fairly large portion of the recording.
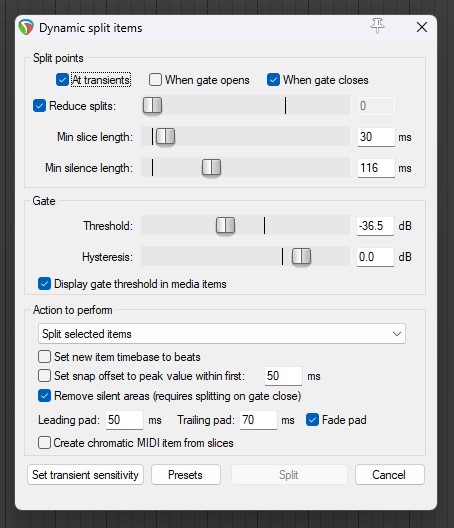
- Check “When gate closes,” and uncheck “At transients” and “When gate opens.”
- Under “Action to perform,” select “Split selected items” from the drop-down menu. And check “Remove silent areas (requires splitting on gate close).”
- In the Gate section, check “Display gate threshold in media items.” You will see some horizontal lines appear in your audio item. These lines represent the threshold and hysteresis.

The outer lines represent the threshold, and the inner ones represent the hysteresis. - Set the hysteresis to 0 dB to get a cleaner visualization. Then, adjust the threshold so that it covers the loudest breath noise.

- You should now see many splits in your audio item. Dynamic Split will keep the lighter slices and delete the darker slices. So, lower the hysteresis value until most of your vocals are untouched, leaving only the breath noises in the darker slices. Note that since it’s only splitting the audio item, you can always unroll the deleted slices by dragging the edge of each slice.
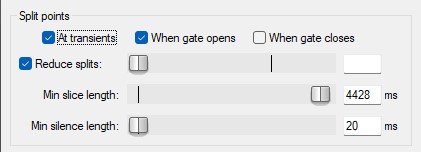
- Let’s move back up to the “Split points” section. You should generally uncheck “Reduce splits,” but it can be helpful sometimes. So, try it out and see if it works for your recording.
- If you see tiny lighter slices, increase the “Min slice length” to eliminate them. Conversely, if you find small, darker slices within your vocal recording, increase “Min silence length” so that Dynamic Split only removes actual breath noises. I usually have my “Min slice length” set to 50ms and “Min silence length” to 150ms.
- Under “Action to perform,” uncheck “Set new item timebase to beats” and “Set snap offset to peak value within first.” I mostly use these checkmarks for drum replacement.
- Uncheck “Create chromatic MIDI items from slices.” Like the previous checkmarks, this one is often used in drum replacement.
- I recommend adding some leading and trailing pads to ensure the edges of your vocals aren’t deleted. I like to use a 50 ms leading pad and a 75 ms trailing pad with the “Fade Pad” turned on. It should work for most vocals.
Manual Methods
So far, I’ve described the automatic ways to remove breath noise. However, they may not work in all cases. So, in this section, I’ll talk about the two manual methods to remove breathing that I use often. Sometimes, they might sound better or more natural than the automatic methods. Hence, I recommend the manual solutions for breath noises in vocal recordings isolated in a song or film dialogue, where gating is noticeable.
Automation Envelopes
If you’ve been using REAPER for a while, you’re undoubtedly familiar with envelopes. They automate the parameters of your track, item, and plugins to change the sound in real-time. However, we’ll focus on the volume envelopes for now.
REAPER provides multiple kinds of volume envelopes: regular, take, and pre-FX volume. The take volume envelope applies on a single take of your recording (or item), and the pre-FX volume adjusts the track’s volume before the audio enters the effect plugins. Hence, these two are appropriate for removing breathing and other noises.
I recommend using a take volume envelope if you need to move the vocal recording in your project. However, if the timing of the vocal items is fixed, you can use a pre-FX volume envelope. Still, I prefer using take volume envelopes anyway, unless there are too many small items, making the task tedious.
Now, let’s get into automation and how to remove breathing in REAPER. Here’s how to add and use a take volume envelope:
- Select the audio item(s) you want to process.
- Right-click one of the selected items and click “Take volume envelope” in the “Take” submenu. The envelope should appear on your items.
- Hold Shift and click on the envelope curve to add a node. Press Alt + S or Option + S to toggle grid snap.
- Find the breath noises, and use four nodes to turn down their volume as shown below:
- Press Alt or Option and drag between two nodes to adjust the curve’s shape. You can also right-click the curve, find “Set shape for selected points,” and select shapes like square, linear, etc.

Adjusting the envelope curve.
If you decide to use a pre-FX volume envelope instead of a take volume envelope, here’s how to add it:
- Find the “Track Envelope/Automation” button on the track control panel. If you haven’t modified the automation mode, it should have “trim” on the icon.
- If you can’t find the button on your track, go to Options > Themes and open Theme Adjuster/Color Controls. Switch the page to Track Control Panel and remove any “HIDE” from the “ENVELOPE” row.

- Right-click the “Track Envelope/Automation” button and click “Volume (Pre-FX).” The envelope should appear below your track.

- Follow the instructions from step 3 in the previous section to learn how to work with envelopes in REAPER.
Using envelopes to remove breathing manually lets you adjust how loud each breath should be. This freedom can add a polished touch to your work that automatic methods cannot provide. Furthermore, manual edits tend to have smoother transitions than gating. Hence, I like using envelopes to remove breath noises if I have the time.
Spectral Editing
Spectral editing is a REAPER feature that analyzes audio items using Fast Fourier Transform (FFT), divides the frequency spectrum into thousands of bands, and lets you process each band over user-specified time. It’s essentially like volume and dynamics processing automation for any range of frequencies you want. Furthermore, it’s a visual feature, letting you see which part of your audio’s signal is being processed.
I’ve used spectral editing in many ways, from boosting the volume of a certain guitar note to cleaning up dialogues. Learning spectral editing lets you step into an audio item and completely modify its frequency content, leaving listeners none the wiser. Moreover, I find spectral editing delivers the smoothest result of all for removing breath noise.
It’s technical magic to remove breath noise from a recording with other background noises. For example, you might be cleaning recordings from public interviews, speeches, or podcasts with multiple participants. Having said that, note that spectral editing is neither the quickest nor the easiest tool to use, hence why I placed it last on the list. I recommend using spectral editing if you have plenty of time or have no alternative.
Let’s understand how to remove breathing in REAPER, this time using spectral editing:
- Before we get into spectral editing, I’ll show you how to add a mouse modifier to make the task easier.
- Open the preferences by pressing Control + P or Command + Comma (,).
- Find “Mouse Modifiers” under “Editing Behavior” on the left pane.
- Open the Context drop-down menu and select “Media item.” In the drop-down menu next to it, find “left drag.”

- Now, you’ll see a list of modifiers available and what each does in the behavior tab. You can modify any of them, but I will use Control + Alt or Command + Option. If you decide to use another keyboard shortcut, replace it with your preferred one.
- Double-click the behavior for Control + Alt or Command + Option and click “Add spectral edit to all channels.” If your REAPER installation already has this behavior set up, skip to the next step.
- Click OK to apply the changes.
- Back in your arrangement page, find the audio item to edit. Adjust your zoom so that the breath noise is easily visible.

- Hold Control + Alt or Command + Option and drag over the breath noise with the left mouse button to create a spectral edit, which appears as a box with knobs.

- Now, you’ll notice that your track’s appearance has changed from peak view to spectral view. It displays the frequency spectrum vertically, and the brightness shows the dynamics.
- You can adjust the size and position of the spectral edit box by dragging its edges. Position the edit to cover the breath noise, lengthwise and frequency-wise. However, leaving some of the top-end gives a better result sometimes. You should be even more careful about positioning the spectral edit if other noises are playing with the breath noise. Note that you can reposition the edit any time later as well.

Resizing the spectral edit. - On the right of the spectral edit, find the knob labeled “Spectral Region Compression Ratio” and turn it up to somewhere between 5:1 to 10:1.
- Next, turn down the “Spectral Region Compression Threshold” knob until you see it starts affecting the breath noise. Match the color of the breath noise with the rest of the audio signal in that region by adjusting the threshold. Consequently, the breath noise will seamlessly blend into the background noise floor.
- Find the “Spectral Region High Frequency Fade” knob at the top of the spectral edit box. Turn it up to 50% to 75%, and adjust the height of the spectral edit to make the edit blend in even better.
- Similarly, turn up the “Spectral Region Fade In” and “Fade Out” knobs at the left and right of the edit. Adjust them and the length of the edit until the transition appears smooth.
You’ve now successfully removed a breath noise by spectral editing! However, remember that this tool isn’t merely for breath noises; you can use it for noise reduction, sound design, and even proximity correction.
Conclusion
We’ve discussed how to remove breathing in REAPER using five built-in tools. They all deliver excellent results. However, you might prefer one over the others in various use cases. So, let’s check out the best use cases for each tool:
- ReaGate
This plugin is perfect for live performance and when you don’t need the most polished results. While it usually delivers excellent results, it might not be accurate and create fades in the vocals. So, it’s most suitable for vocals that aren’t too dynamic, such as rap, EDM, pop, and metal vocals. - ReaFir
Combining FFT analysis with gating, ReaFir delivers accurate automatic breath noise reduction. It’s ideal for many types of vocals, including dynamic recordings in film dialogues, soft pop, podcasts, rock, etc. However, it won’t work well in live performances or time-limited projects. Likewise, recordings with loud breath noises close to the microphone don’t bode well for ReaFir. They create strange artifacts when processed. - Dynamic Split
Use Dynamic Split to permanently modify audio items and remove the breath noises rather than reduce them. However, don’t use Dynamic Split if you’re using ARA plugins like Melodyne or RePitch as take FX because all the changes made in the ARA plugins will be reset when you split an audio item. - Manual Automation
Automating the volume manually allows you to alter each breath noise selectively. It gives the smoothest and most accurate results. However, the biggest issue is it’s time-consuming. - Spectral Editing
Treat spectral editing as a supplementary feature to the other methods. I use it when the vocals are isolated and require unnoticeable processing. Besides, ReaFir offers virtually identical results in many use cases. So, save spectral editing for the few segments where the other methods failed.
I hope I’ve shared useful information and helped you eliminate those distracting breath noises. Each method I’ve described in this article has its own advantages and disadvantages. So, I invite you to experiment with them and find your preferred tool for a particular project. Happy music-making!

The Integraudio Editorial Team consists of experienced music producers, audio engineers, and plugin enthusiasts dedicated to providing in-depth reviews and guides for music production software.