If you’re looking for ways to change the pitch in Logic Pro and get more expression and exciting sound, you’re in the right place. Let’s dive in!
Logic Pro comes with three built-in plugins that allow you to manipulate the pitch. The first one is called Pitch Shifter and is pretty standard and straightforward to use. The second is Vocal Transformer, and the third is Pitch Correction, which is more of an autotune tool.
In addition, Logic Pro comes with Apple plugins, which also have the necessary software. So let’s take a closer look at them.
Pitch Shifter Plugin
This plugin will not burden you with many settings, as there are only three knobs, a few sliders, and modes of operation. Nevertheless, it’s a classic pitch shifting software that provides excellent sound quality. Next, we’ll show you how to use it.
- Load The Plugin Onto The Track
If you want to create a new additional texture for the vocal part, load this plugin on a copy of your track. Or put it on a track that needs a pitch shifter. You can do this for mono and stereo material.

Load the plugin onto the track
- Choose The Operation Mode
On the right side of the plugin, you will be able to choose between several modes of operation. In particular, the main ones are Drums, Speech, and Vocals. Select the desired option based on your material. There are also a few additional modes, such as Manual and Pitch Tracking.
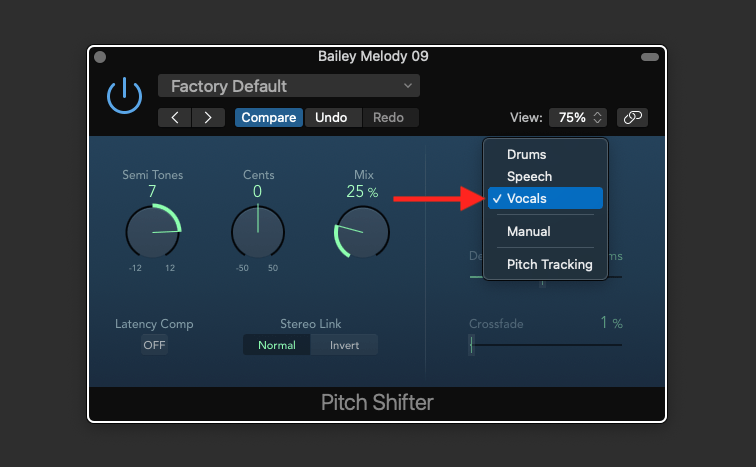
Choose what to work with
- Use Three Main Knobs
The center knobs for your work will be Semi-Tones, Cents, and Mix. With the first one, you can change the notes of your voice an octave up or down. Cents can be used for more detailed tuning. And, of course, Mix will adjust the ratio of the original and processed signal. That is, at 100 percent, it will be utterly wet audio.

Use Three Main Knobs - Manual Settings
You can also change a few additional settings in manual mode like Delay and Crossfade. With the first slider, you can adjust the pitch shifter more effectively, and the second is responsible for the analysis of the incoming signal and, accordingly, the quality of processing.

Use the manual settings
The built-in Pitch Shifter plugin can be your primary tool in pitch modification. It is straightforward software that will help you quickly achieve the desired result. Notably, you can use it on speech and drums in addition to vocals.
Vocal Transformer Plugin
If you want to get not just a pitch shift effect but to turn your vocals into a more sampled one, the Vocal Transformer plugin can help you with that. Thanks to it, your vocal tracks can sound more like musical instruments. Let us show you how it works.
- Put Vocal Transformer On Your Track
You will find Vocal Transformer also in the Pitch section, next to the previous plugin. Again, choose the version that fits your source – it can be either mono or stereo.

Load The Vocal Transformer
- Choose Your Pitch
The knob on the right side of the plugin will be responsible for changing the pitch. You can go up and down up to two octaves, more than the previous plugin we described. And this is not strange because the Vocal Transformer is designed for more extreme manipulation.
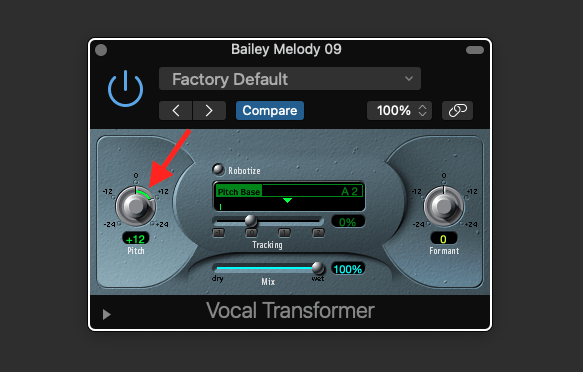
Choose The Pitch - Adjust the Formant Parameter
On the opposite side, you will see the Formant control. It is responsible for overtones, which give the voice a particular sound. So above, it will sound like a chipmunk, and below, it will sound more muscular and coarse. At the extreme positions of this control, the voice can lose all the human characteristics.

Adjust the Formant Knob
- Robotize Your Vocals
You can go crazy and Robotize your vocals by pressing a special button. This mode of operation will open some more additional functions for you. For example, you can select the Pitch Base note and tune tracking from -100 to 200 percent. Also, don’t forget about the vital Mix control at the bottom, which will help you find the proper dry and wet signals ratio.
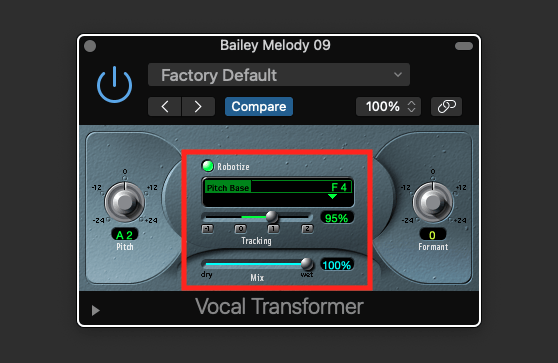
Get more features with advanced settings
The Vocal Transformer is a fantastic tool to bring your vocals outside your typical sound. You can easily use it to get new creative solutions, especially backing vocals. In addition, the plugin is pretty easy to use and won’t take you long to figure out the settings.
AUNewPitch Plugin
You will find another pitch shift plugin in the Apple plugins section, which also comes built into Logic Pro X. This software is called AUNewPitch and is as simple as possible. You only get one control, but the advantage is that you can tune the pitch shift precisely here.

How to find the AUNewPitch plugin
The primary tool for you will be the Pitch Scale slider, where cents are measured in thousands. So, you can enter the desired number or tune by ear. Then if you click the Parameters arrow, you get another Overlap slider and checkbox Peak Locking. In addition, the plugin has a choice of Rander Quality with options of Minimum, Low, Medium, High and Maximum.
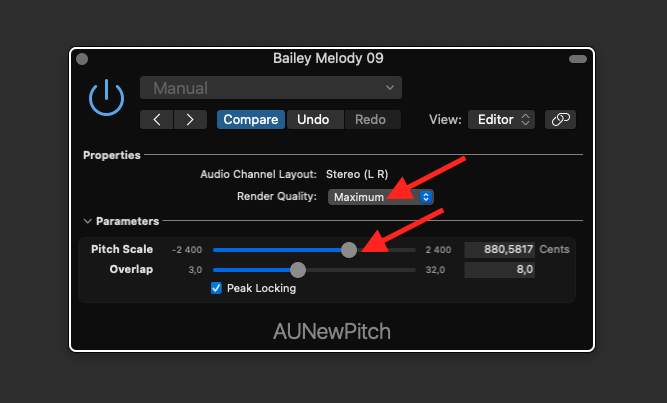
Use the simple settings
Pitch Shift Using Editing Tools In Logic Pro X
In addition to plugins, Logic allows you to change pitches with its editing tools. And since it’s a professional DAW, there are plenty of them. For example, you can do this quickly right in the Region window or use the Flex Pitch feature, which will give you a pretty expanded field of action.
Flex Pitch Function
Flex Pitch is a beautiful tool in the style of the famous Melodyne plugin. You will have a piano roll with detected notes that you can move as you like. In addition, you can also change their gain, duration, overtones, and much more. And now we will tell you in more detail how to do this.
- Let It Analyze The Notes
Open the Edit Track window and find the small Flex button on the left side. Click it and let Logic analyze the waveform. When it does, select the editing function you want. Logic will set it to Flex Time by default, but you need to switch to Flex Pitch.

Press the Flex button and select Flex Pitch mode
- Do With The Pitch Whatever You Want
After applying the Flex Pitch, you will see a window with the piano roll with all the notes that Logic has detected. Here you can change the vibrato and make a fine tune or pitch drift in both directions, which will change the overtones.

Manipulate the pitch as you please
- Drag All The Notes To Make a Pitch Shift
Now for the pitch shift. Let’s say you have a vocal part you want to change. Select all the notes and drag them up or down to the desired interval. You can go deeper into this process and experiment with what vocal overtones as well. Overall, there’s everything you need to get creative.

Drag all the notes to get a pitch shift
Besides the fact that Flex Pitch is designed more for vocals, you can apply it to almost any other instrument that produces notes. Or you figured out that the instrument is just outside the tune? Use this feature to bring it into tune. Or change entire vocal parts, gaining new textures and excitement.
The only thing is to be careful because any pitch manipulation can cause some artifacts that change the audio quality. And Flex Pitch is no exception to this. But if it’s a backing part, the problems may not be noticeable in the mix.
Transpose In Region Window
It is probably the fastest way to change the pitch in Logic Pro X. You’ll find the Transpose function in the Region box on the left side of the DAW. If you can’t see it, press the “i” button in the upper left corner, and this box will appear in front of you.

Press “i” to see the Region Box
Press the cursor on Transpose and drag up or down to change the pitch. That way you will be able to go up or down up to 36 steps, which is a pretty wide range.

Change the Transpose value
In addition to this, there is a Fine Tune function that allows you to adjust your pitch more precisely. For example, you can choose the number of cents from zero to +50 or -50.

Fine tune your pitch
The main advantage of this method is that you do not even need to open any plugin. If you have an additional track that needs a pitch shift, go to the upper left corner and change it immediately for the particular region. Or select all regions to change the pitch for them at once.
Conclusion
As you can see, the pitch shift options in Logic Pro X are pretty advanced. You can use both built-in plugins and editing tools. Just choose the method you’re comfortable with and go ahead.
If you need to change the pitch quickly, do it in the region box. If you need more options to change the vocal completely, use the Flex Pitch feature. Or do it with the stock plugins, which are remarkably easy to use.
If you don’t like how one of them works, don’t stop and try others. The fact is that their algorithms may be different. Therefore, you need to find the variant that will suit the particular situation. If you don’t like anything at all, try to find plugins from other manufacturers that may satisfy you.
Remember that music production is also about creativity. So, always experiment, and apart from the valuable experience, you will get the desired result. Good luck, and enjoy your mixing!

The Integraudio Editorial Team consists of experienced music producers, audio engineers, and plugin enthusiasts dedicated to providing in-depth reviews and guides for music production software.