Recently, many users claim they are having audio issues after upgrading the CPU. These issues include no audio or corrupted audio drivers.
The main reason your audio is not working after upgrading the CPU is an unsupported audio driver to the latest hardware. Audio drivers, like sound cards and GPUs, are specific to each CPU and hardware. If you have upgraded the CPU but forgot to upgrade the drivers, you won’t be able to listen to any audio.
There could also be more issues, like hardware or software issues. Some CPUs require additional audio manager support, like Realtek. These CPUs won’t work on the default Windows drivers. Here are a few possible reasons for no sound after the CPU change,
- Old Drivers: Latest CPUs don’t support old audio drivers. Sometimes, you have older audio drivers for your previous firmware, but now it’s time to upgrade them according to your CPU.
- CPU Requires Audio Manager: Audio managers are the best applications to manage all connected devices. All the latest CPUs require these managers to make it convenient for users to manage all devices from one place.
- Hardware Malfunctioning: Replacing the CPU is a challenging task. It could be more challenging for you if you are not a professional. You could damage other hardware like sound cards or sound pins. Sometimes, you also forget to insert the sound card after CPU installation.
Uninstall Drivers and Scan Hardware Changes
Each piece of hardware has its drivers, and you need to install them to make it function properly. If you have installed a new CPU, you must also install its drivers. These drivers are always available for free on the CPU manufacturer’s website, like Intel or AMD.
You have to select the right one according to your CPU generation. If you are unsure about the generation or model, you can use tools like CPU-z to learn more about your CPU. This method is a manual method to install your CPU drivers.
You can use another automatic driver update method, which is more convenient and takes no time. You just have to go to the device manager and scan for the hardware changes. But before that, you have to remove the previous audio driver. Here’s the whole process,
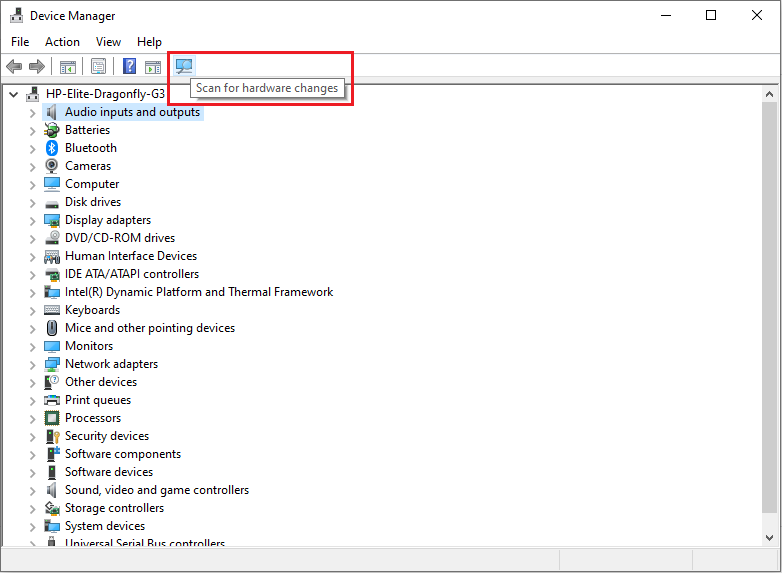
- Go to Device Manager by searching it in the Windows search menu.
- First, navigate to “Audio inputs and outputs.”
- Select your previous driver and right-click on it to open the file. Here, select “Uninstall” to remove the driver from the system.

- Now navigate to “Sound, Video, and game controller” and locate the same driver after expanding the file.
- Uninstall the driver from the list using the same procedure.
- Once both drivers are uninstalled, click “Scan for hardware changes.”
Install Realtek Audio Manager
The Realtek audio manager is widely considered the best audio manager available for Windows. It comes with various features and additional configuration options that can improve the quality of your audio experience. This application is available for free on the Realtek website. Here’s how you can download and install it,
- Go to the official Realtek website, and here you will find the drivers with compatible operating systems.
- Read the list carefully and select the exact driver that matches your operating system’s description.
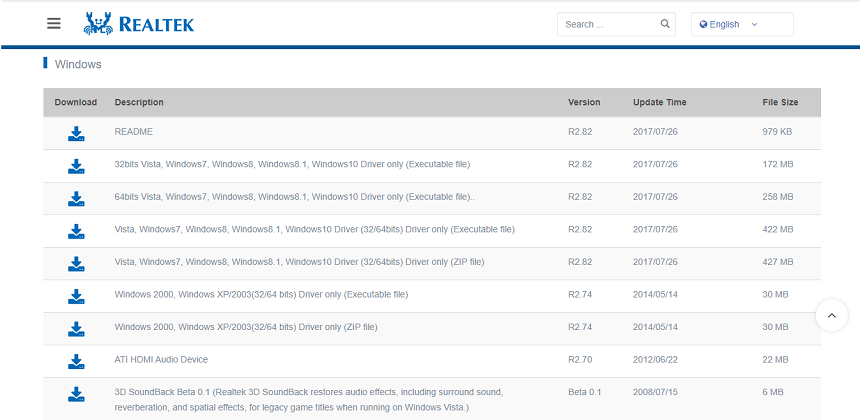
- Download the driver and install it on your system.
- Vola! Your audio driver is successfully installed. You can now access its manager by searching Realtek manager in the Windows search menu.
Note:First, confirm from the official website of your CPU that it supports Realtek audio drivers and managers.
Check All Hardware Components
Even after installing the drivers or supporting applications, you cannot bring back your audio, so I suggest you check all computer hardware components related to audio. This hardware includes a sound card, audio output pins, speaker jack, and GPU.
Check Sound Card
If you are using an external sound card, then it is possible that you forgot to insert it back after replacing the CPU, or your sound card is not seated properly in the PCI slot. You must open your computer case and check the sound card thoroughly. If you find any error, then now your problem has been solved.
Moreover, you should also clean the PCI slot and sound card’s connection port with a brush. After that, you must carefully reinstall your sound card and connect all the audio output ports. Now turn on your system; hopefully, your audio will work fine.
Check Audio Pins
Sometimes, our pins get damaged due to overuse. Look thoroughly around your headphones or speaker jack. If you change the CPU in a laptop, you might need to open it up again to ensure the audio wires are connected to the motherboard correctly.
You can also ensure the connection without opening the laptop. You just need to plug a headphone or hands-free into the laptop’s audio port, and if you can hear the sound, it means your speaker connections are disconnected from the motherboard.

Moreover, you can use any wireless device like Bluetooth headphones or AirPods to ensure it is not the faulty female headphone connector of your laptop or PC. If these work fine, your output hardware is causing the main problem. You have to contact any repair expert in this case.
Check your GPU connections, too. The latest GPUs can support audio outputs. These GPUs have audio chipsets in them. You can only use the HDMI cable to connect the GPU to monitors. If you are using the GPU’s audio output, then check your GPU first. Whether your GPU is properly seated or not.
Last, check all cables involved in the audio signal supply. Start with the cable attached to your sound card or the computer pin. Is it in the right port, or is it damaged or not? You can also check the wire by using any other device.
Conclusion
I have tried my best to provide all of the troubleshooting methods that are mostly used to fix the no audio output device installed problem. As I told you in the beginning, this is not a big issue, and you can easily fix it by following any of the methods given above.

The Integraudio Editorial Team consists of experienced music producers, audio engineers, and plugin enthusiasts dedicated to providing in-depth reviews and guides for music production software.