
Yep, nothing can be worse than crackling sounds while you focus on music creation. One of the worst thing is crackling noise out of your DAW. There are many reasons, let’s list them!
FL Studio’s audio makes crackling noise due to overloading the DAW with many third-party plugins or samples, buffer underruns, or setting a low buffer rate, buggy plugins, not having the correct audio settings, running the DAW with other software like OBS, Zoom, etc., or working on high sample rates.
Let’s explore all the reasons in-depth and find solutions to them. Firstly, let’s talk about buffer underruns. When you hear the output in FL Studio, the audio is rendered a few milliseconds before you hear it. So small segments of these renders are sent to the audio interface ahead of time.
The Length of these segments is called Buffer Length. The reason for doing so is that the CPU has enough time to manage any spikes in audio that it can’t handle in real time. So you will hear a crackling noise when the Buffer runs out before enough audio is made. It is primarily caused by CPU overload or system optimization issues.
Let’s now understand how you can resolve the buffer underruns issue. Firstly, you have to ensure that the correct audio device is selected. I recommend selecting ASIO devices as it makes the DAW interact directly with the interface, cutting many intermediary steps to make the process faster.
To do that, go to OPTIONS > Audio Settings > Input/output, click on the Device drop-down menu, and select an ASIO device.

Secondly, ensure that you have selected a buffer length long enough. However, a long buffer length means higher latency or delay in the audio. But it will cause the glitches and crackling noise to stop. To change the buffer length, go to OPTIONS > Audio Settings, click “Buffer length,” and select the highest buffer length that your setup allows.

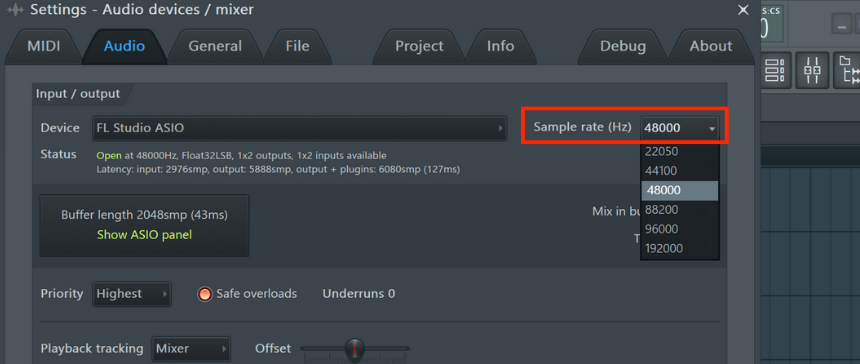
Next, you’re more likely to encounter the problem if you work on high sample rates. So I recommend setting a 44.1 or 48 kHz sample rate to avoid the issue. Working at sample rates like 96 kHz or 192 kHz is more likely to make your audio glitchy or noisy. You can select that by going to Audio Settings, opening the “Sample rate (Hz)” drop-down menu, and selecting the desired value.
Turn on multithreaded mixer processing and generator processing in your CPU settings. That will enable your plugins and sound generators to be multithreaded and run on different cores instead of one. To enable that, go to the CPU tab in Audio settings, and switch on “multithreaded mixer processing” and “multithreaded generator processing.”

Next, decrease your resampling quality, and set it to 24-point sinc. In Audio Settings, under the “Mixer” tab, select Resampling quality. Note that a higher resampling quality will mean higher quality samples but more load on the CPU. So set it to 24-point sync for an optimal audio response.

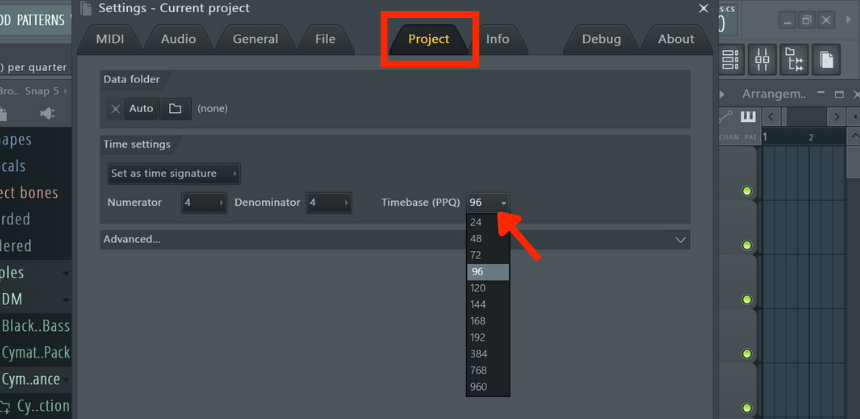
Another tip you can try is to decrease your ticks/pulses per quarter and turn down the resolution of the playlist window or turn up the nudge value. You can do that by decreasing the Timebase/PPQ. To do that, go to Option > Project Settings > Timebase (PPQ) and change the quantity from the default 96 value to something smaller.
Next, try using more stock plugins and fewer third-party plugins, as third-party plugins are less optimized with the DAW and load the CPU. Delete all unused samples. If you can, commit to audio files, convert your MIDI files into audio files, and print them in the DAW so that you can delete the plugins used for them.
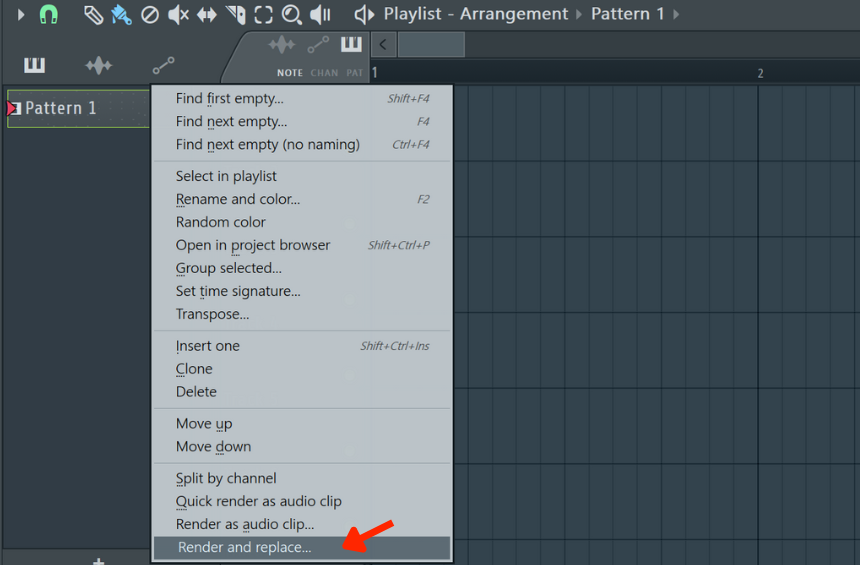
You can convert the MIDI pattern into an audio file by right-clicking on it and selecting “Render and replace” or “Render as audio clip…”.
Lastly, optimize your system. You can try upgrading your RAM and using SSDs to source samples instead of HDDs. Within the system, ensure that the audio drivers are installed correctly and are not corrupt. Ensure there aren’t any other background or startup applications running alongside the DAW.

Plugin Optimization
Ensure that you’re running the latest versions of the plugins, as upgraded versions have fewer bugs. Re-install the plugin(s) and check the developer site for the latest updates. Try swapping between the VST 2 and VST 3 versions (if you’re working on Windows) or the VST and AU versions (if you’re working on Mac).
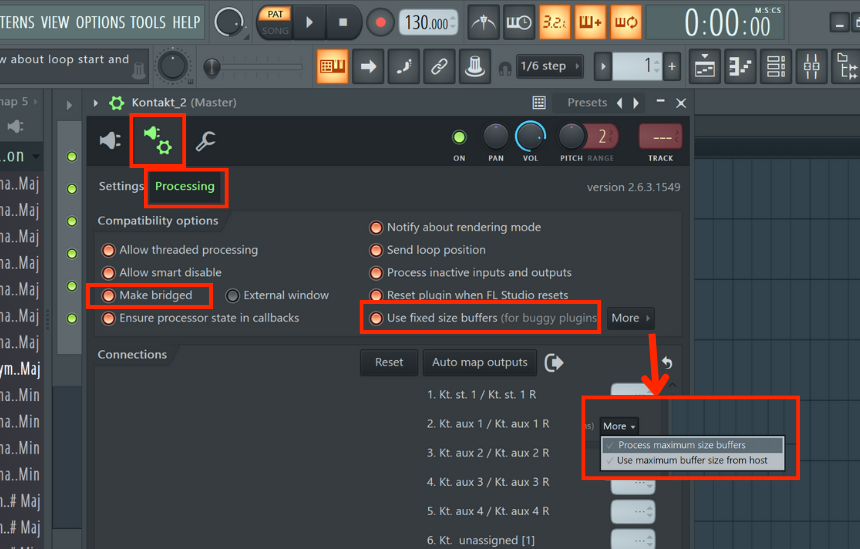
Within FL Studio, open the plugin, go to the VST wrapper settings, open the “Processing” tab, and select “Use fixed buffer size” and “Make bridged” under compatibility options. You can also click on the “More” drop-down menu beside the “Use fixed buffer size” switch and select “Process Maximum size buffer” and “Use maximum buffer size from the host.”
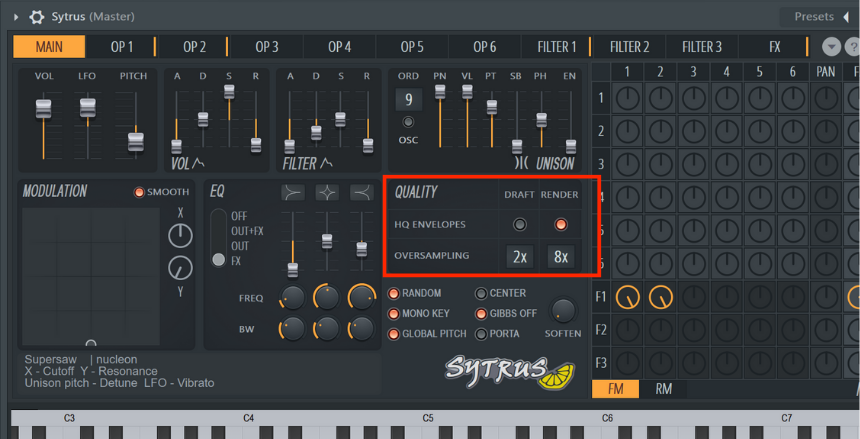
Some plugins allow you to upsample or downsample your plugin or run it at a lower or higher quality. While you’re in the session, turn down the quality and sample rate of the plugin, and change it to better quality settings before you render or export. That will optimize the plugin to weigh lighter on the CPU.
For example, in Sytrus by Image-Line, you can set different quality and oversampling parameters for draft/real-time instances of the plugin compared to render settings.
It would help if you also discuss any glitches around the plugin or the DAW with the developer(s). Lastly, optimize FL Studio and ensure that you installed its latest version, as upgrades are usually free of bugs. Do not use cracked versions or any illegal downloads of the plugin, as they have the risk of malware and other dangerous hazards.
Recommended Specs for FL Studio
A good and optimized machine ensures the software’s smooth operation and run time. The most important component is the CPU, which will determine the system’s performance. For FL Studio, Image-Line recommends 8-16 cores of CPU.
Image Line also recommends the following Intel processors: The i9-12900 (+K, +KF or T), i7-12700K (+KF), i9-11900, i9-11900K, and i7-11700K and AMD – The Ryzen 9 5950X, 9 5900X & 7 5800X, and the following ARM/Apple Silicon Processors: Apple ARM processors (M1, M1 Pro, and M1 Max).
FL Studio is compatible with Windows 8 (or higher) and macOS 10.13.6 or higher operating systems. Further, Image Line recommends 8 GB of RAM to be sufficient and using an SSD (Solid State Drive) as your primary disk on which your software and Windows/macOS are run.
Conclusion
We have seen plenty of reasons why FL Studio may create a crackling noise or, even worse, crash. We have also seen how you can resolve these issues. But it all comes down to the basic problem of buffer underruns and unoptimized software, and all solutions provided solve exactly that.
Knowing your machine and software is the best way to resolve the issues. There are many workflow hacks around the problem that we have covered. Hope the post answered your queries and was of help. Thank you for reading.

Shaurya Bhatia, is an Indian Music Producer, Composer, Rapper & Performer, who goes by the stage name MC SNUB, and is also 1/2 of the Indian pop music duo, called “babyface”. A certified Audio Engineer & Music Producer, and a practicing musician & rapper for more than 6 years, Shaurya has worked on projects of various genres and has also been a teaching faculty at Spin Gurus DJ Academy.