A Beginner’s Guide to Max for Live in Ableton Live
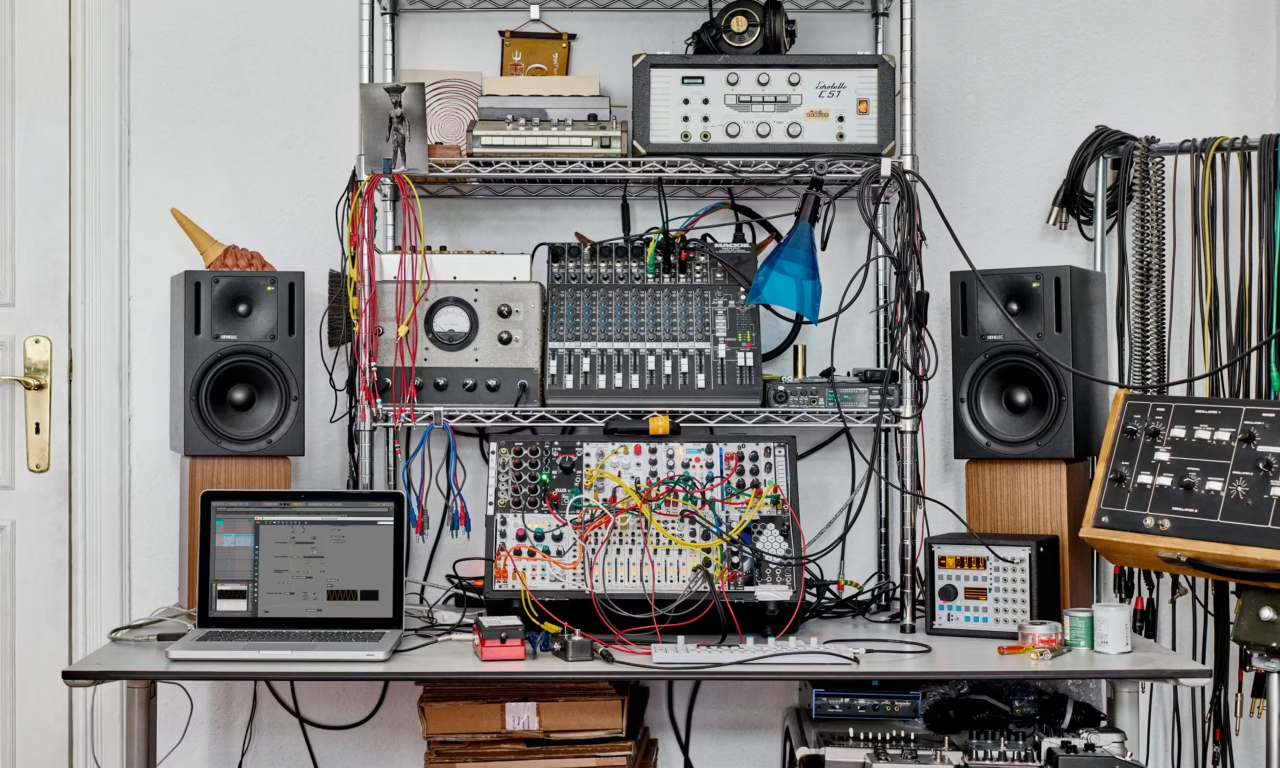
If you’re familiar with using Ableton Live Suite, you will have probably noticed a tab in the left-hand side bar that says Max for Live. You’ve probably seen that in this tab there are some devices labelled Max Audio Effect, Max MIDI Effect, or Max Instrument. If you’re like me, then you will have probably even tried to tinker with these devices, and then become completely overwhelmed by what even you’re supposed to do. Luckily, I have spent the time learning this and can now show you how to use this amazing tool in the simplest way possible.
This article is written for complete beginners of Max for Live. You don’t need any background in coding, programming, or Max itself. I will explain what Max for Live is, why and how it is used, how it fits into Ableton Live, and how you can start building your own devices step by step.
What Is Max for Live?
Max for Live is a visual programming environment built directly into Ableton Live. It comes automatically with Ableton Live Suite, or you can buy it separately for Ableton Live Standard. It doesn’t work with Ableton Live Lite. It allows you to create your own devices and effects completely from scratch that behave just like Live’s built-in instruments and effects.
Instead of writing lines of code, Max uses objects that you connect together with patch cables. Each object performs a specific task—such as generating sound, modifying audio, receiving MIDI, or responding to user input. If you’re familiar with modular synthesis, then you can definitely think of Max for Live as the effect and instrument building version of that.
Why Use Max for Live?
For many producers, Ableton Live already does almost everything they need. So why learn Max for Live?
1. Customization of Your Sounds And Workflow
Max for Live lets you create devices that don’t exist yet. It allows you to get creative with more aspects of the music making and performing process. If you ever think:
- “I wish this effect worked slightly differently”
- “I want a tool that does one very specific thing”
- “I want to automate something in a non-standard way”
Max for Live is designed for exactly that. You can create a whole new type of instrument or effect, or modify an instrument or effect that you want to have behave in a different way.
2. Deep Integration with Ableton Live
Unlike third-party plugins, Max for Live devices:
- Have full access to Live’s settings like tempo, and timing, so you can really get under the hood of Live with it
- Can control other devices and tracks
- Can react to clip launching, scenes, and automation, so it can be a great tool for live performance with Live
This level of integration is hard to achieve outside Max for Live.
3. Learning and Experimentation
Max for Live is also a learning tool. By opening Live’s own Max devices, you can see how they are built, which helps you understand:
- Audio signal flow
- MIDI processing
- Modulation and control systems
Learning this incredible tool is a way for you to further your knowledge in the production of music, which for me is one of the greatest aspects of music production and technology.
4. Controlling External Hardware And Devices
Max for Live isn’t just a software tool. You can use it to control your external hardware and devices by sending messages, such as MIDI, out from Live to these devices. The possibilities here are really limitless, but some examples are:
- Controlling hardware parameters, such as on a synth or drum machine
- Create a light show synced to your music for live performances
- Building custom patches for MIDI controllers to work in specific ways with specific hardware
You don’t need to become an expert programmer to benefit from all of these amazing aspects of Live, as you’ll see. You can do a lot with the basics.
How Max for Live Is Used in Practice
Max for Live devices fall into three main categories:
Max Audio Effects
The Max audio effects are similar in behavior to any other audio effect in Live. They process incoming audio in many different ways, just like using EQs, delays, reverbs, or distortion effects.
This means you can process audio in any way you can imagine. This can include custom filters, unusual delay or glitch effects. Max audio effects truly unlock the ability to create any sound you want.

Max MIDI Effects
These process MIDI data before it reaches an instrument, whether that’s a software or hardware instrument. Once again, they behave like the MIDI effects already in Live. But with Max for Live, you can create completely customized MIDI effects, such as arpeggiators, random note generators, and velocity or timing modifiers.
Max Instruments
These generate sound directly, often using synthesis or sampling. You can create your own instrument that no one else has, to have a completely original sound at your disposal. These instruments can be simple synthesizers, granular instruments, and experimental sound generators.
Understanding the Basics of Max
Before building anything, it’s important to understand how Max works conceptually.
Objects
Objects are the building blocks of Max. Each object performs a specific function, such as generating a signal, changing values, or receiving user input. How you use them and what you use them with, will define what your Max device does.
Objects are usually represented as rectangular boxes with text inside them and nodes around them to connect to other objects.
Patch Cables
Patch cables connect objects together and define how data flows through the system. These are what you connect an object’s nodes with. The signal flow logic generally goes from top to bottom, left to right.
Messages and Signals
Max works with two main types of data:
- Messages (control data, numbers, triggers)
- Signals (audio-rate data, marked with ~)
Understanding this distinction is crucial, especially when working with audio.
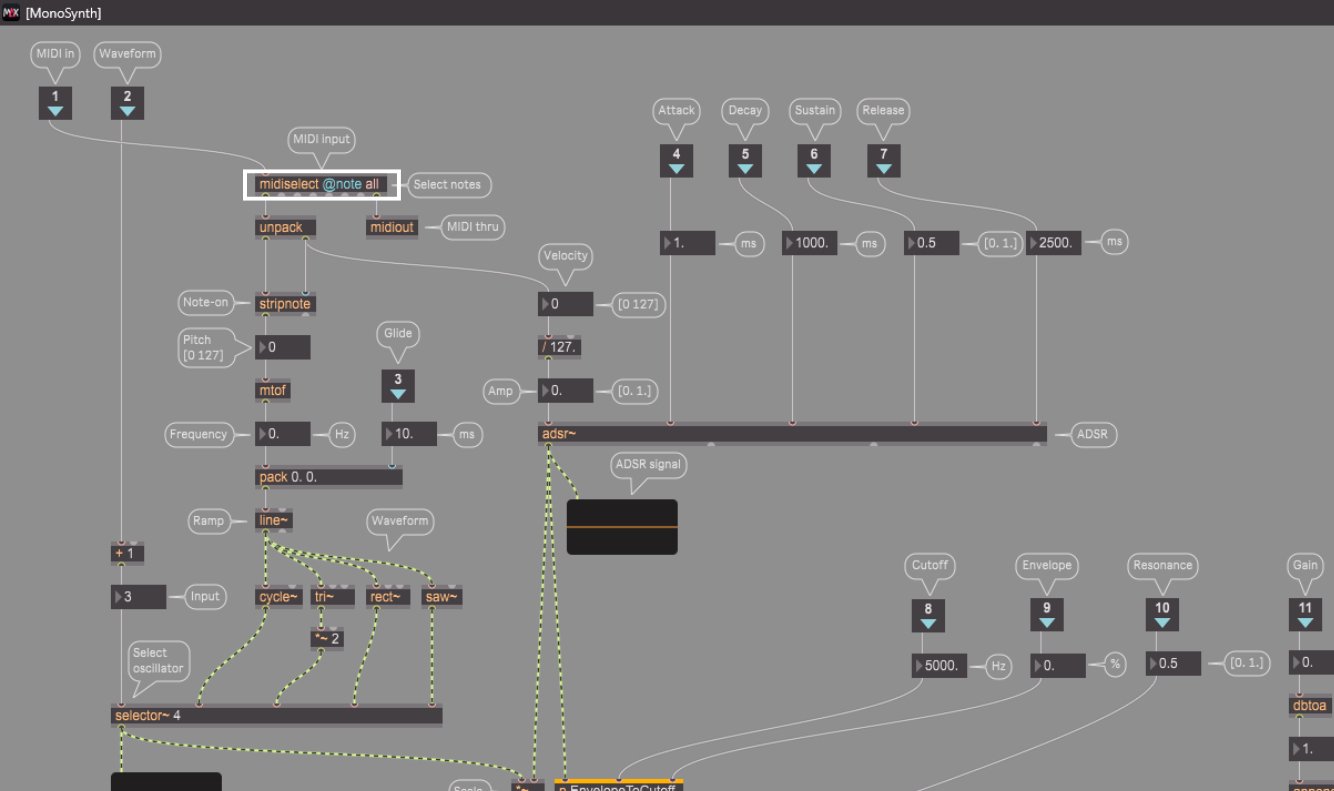
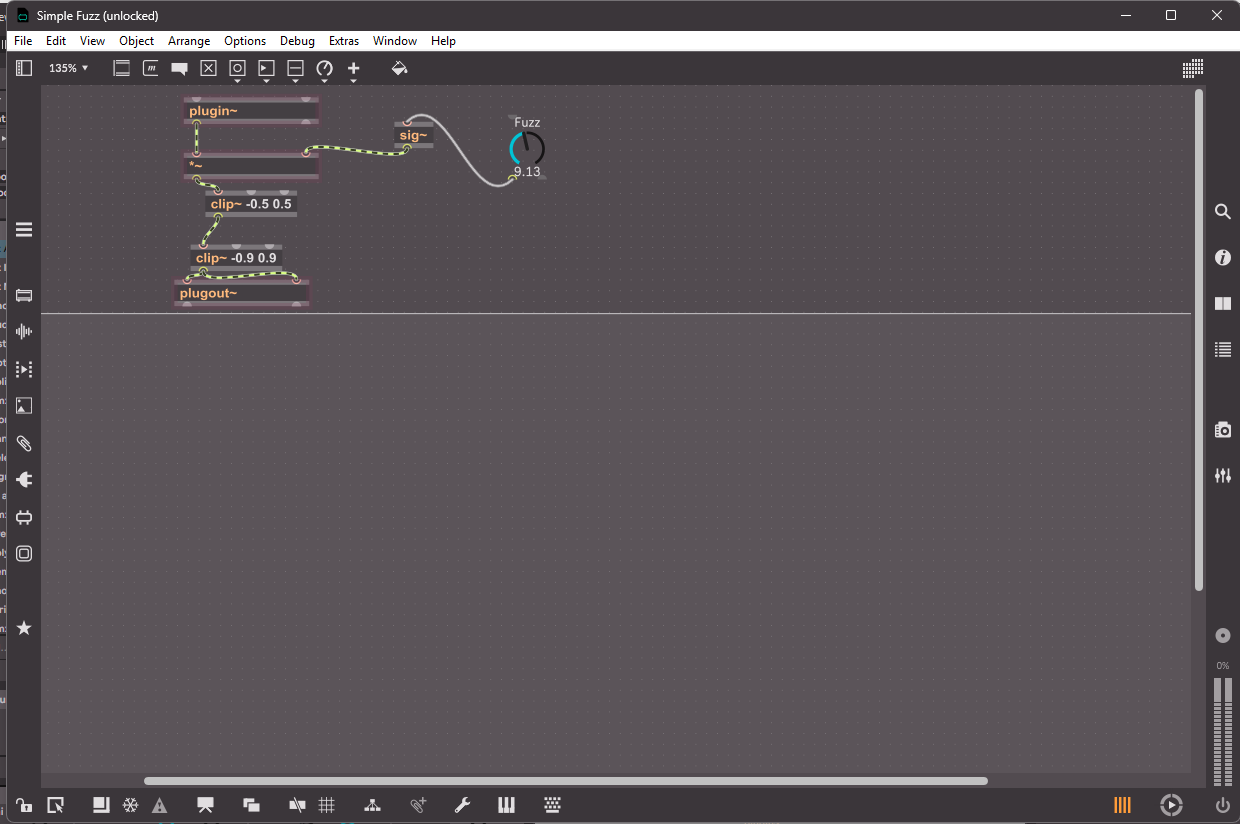
From here on out I will be using the ~ symbol to denote where the data is a signal.
Below you’ll see an example of a very simple fuzz audio effect I built in Max for Live. Since this is an audio effect, we are mostly dealing with signals, so all of the objects apart from the fuzz knob have the ~ symbol at the end of their name.
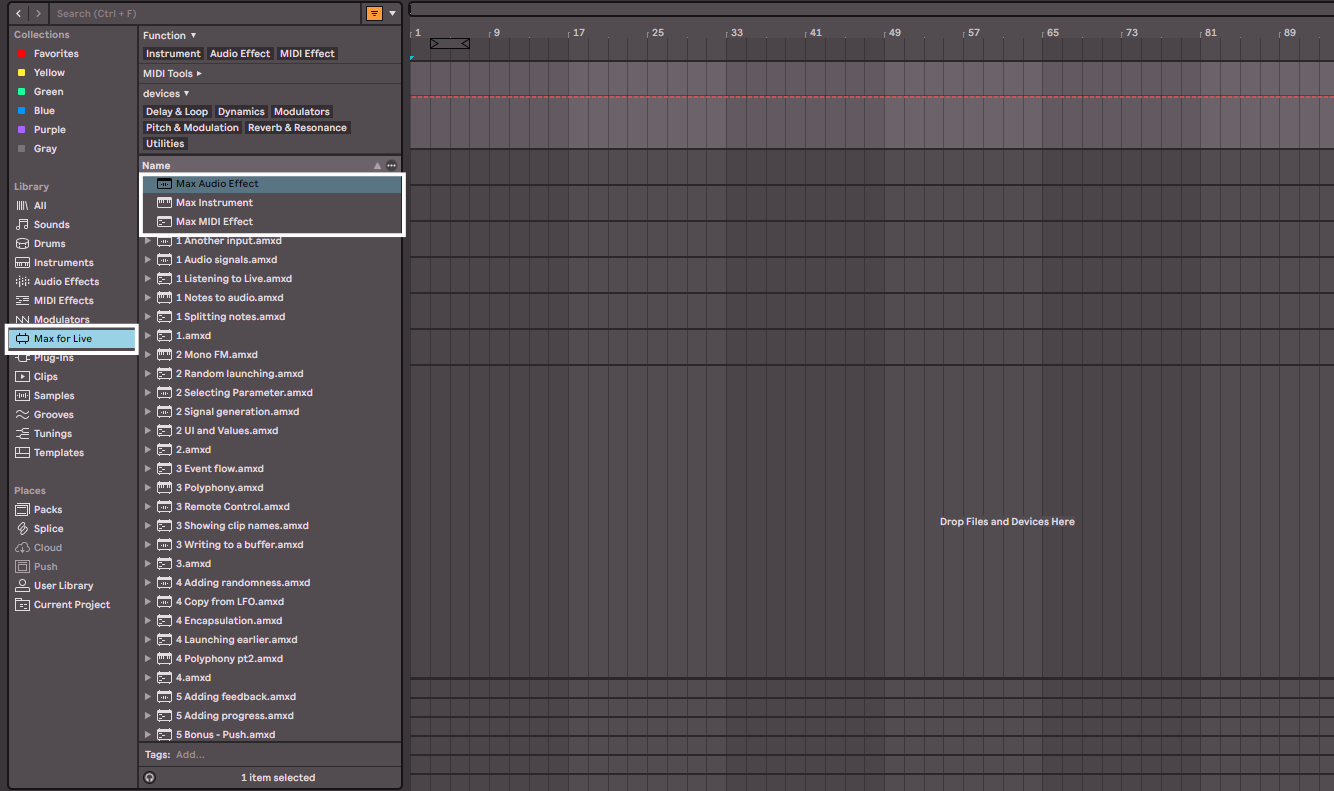
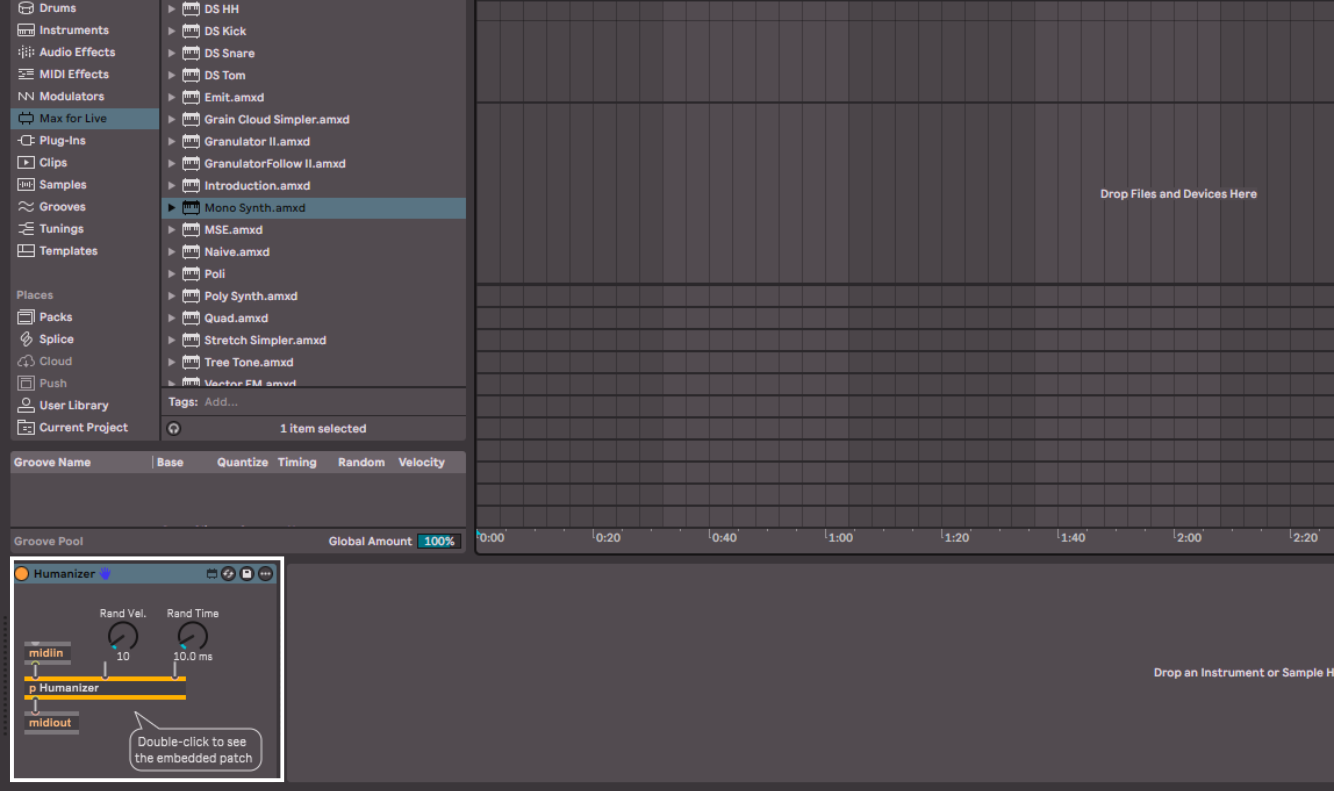
Exploring Live’s Built-In Max Devices
One of the best ways to learn Max for Live is by opening the devices that come with Live. They are already there, so use them. Plus, some of them even have notes with explanations of the devices functionality. A great place to start is the included Building Max Devices pack.
How to Open a Max Device
- Load a Max for Live device onto a track
- Click the the button in the right-hand corner of the device, which has three horizontal dots
- Click on Edit in Max
- The Max editor window will open

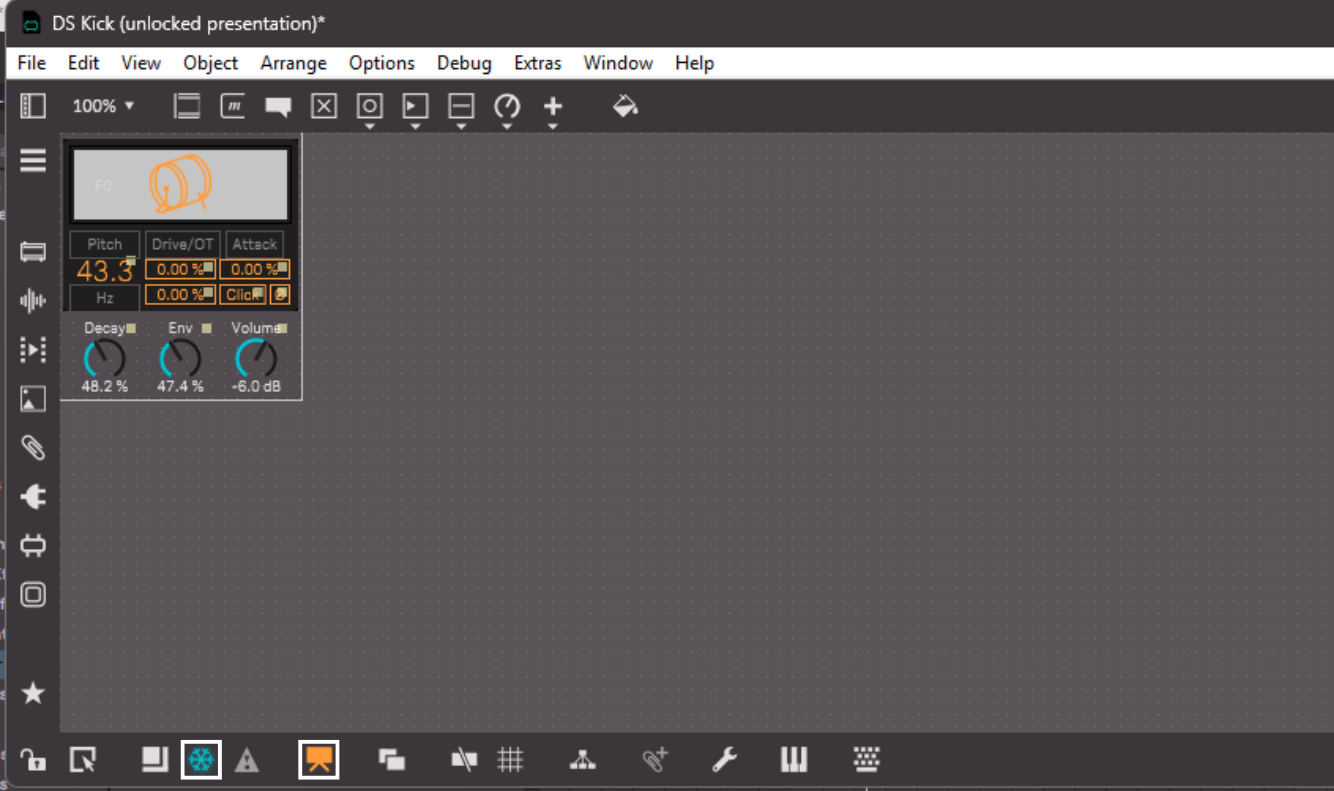
If, when you open the device editing window, it doesn’t show the patch and instead shows the user interface, then follow these steps:
- Check if the device is freezed by going to the bottom bar and looking at the snowflake icon
- If this is blue, then click it to unfreeze the device
- Then on the same bar at the bottom, click on the icon that is a square with two diagonal lines coming out of the bottom
- Now you can see the full patch
When you explore these devices initially, don’t worry about understanding everything at once. Follow signal flow visually and look for familiar concepts (filters, envelopes, LFOs). You can also use the inspector in the Max for Live window by pressing the i button in the right-hand tool-bar. Here you get some more information about each object.
Creating Your First Max Audio Effect
Now let’s actually create something!
We will start with building a simple gain control as an audio effect.
It’s important to note that if you hover over the inputs and outputs of an object, it will tell you what it is for.
Step 1: Create a New Max Audio Effect
- In Live’s browser, drag Max Audio Effect onto an empty audio track
- Click on the three-dot button as before to open the editing window.
![]()
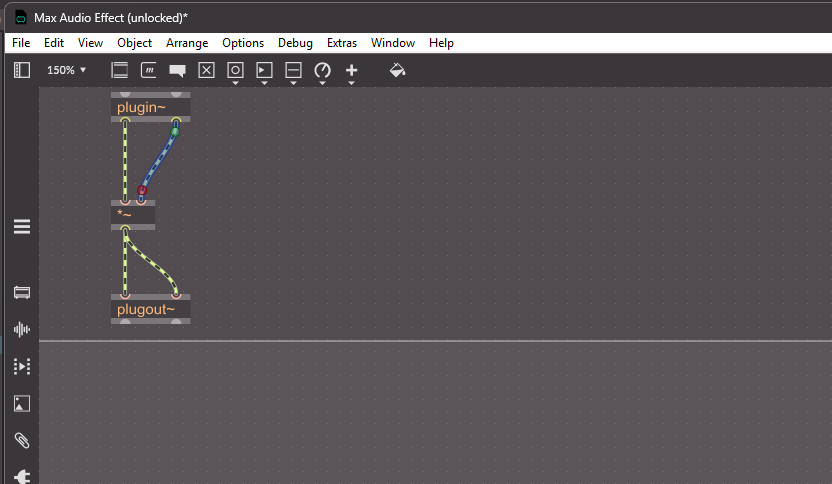
Step 2: Audio Input and Output
You’ll see two important objects already present:
- plugin~ (audio input from Live)
- plugout~ (audio output back to Live)
These objects create the bridge between Max and Live. Between these two objects is where we will build the effect.
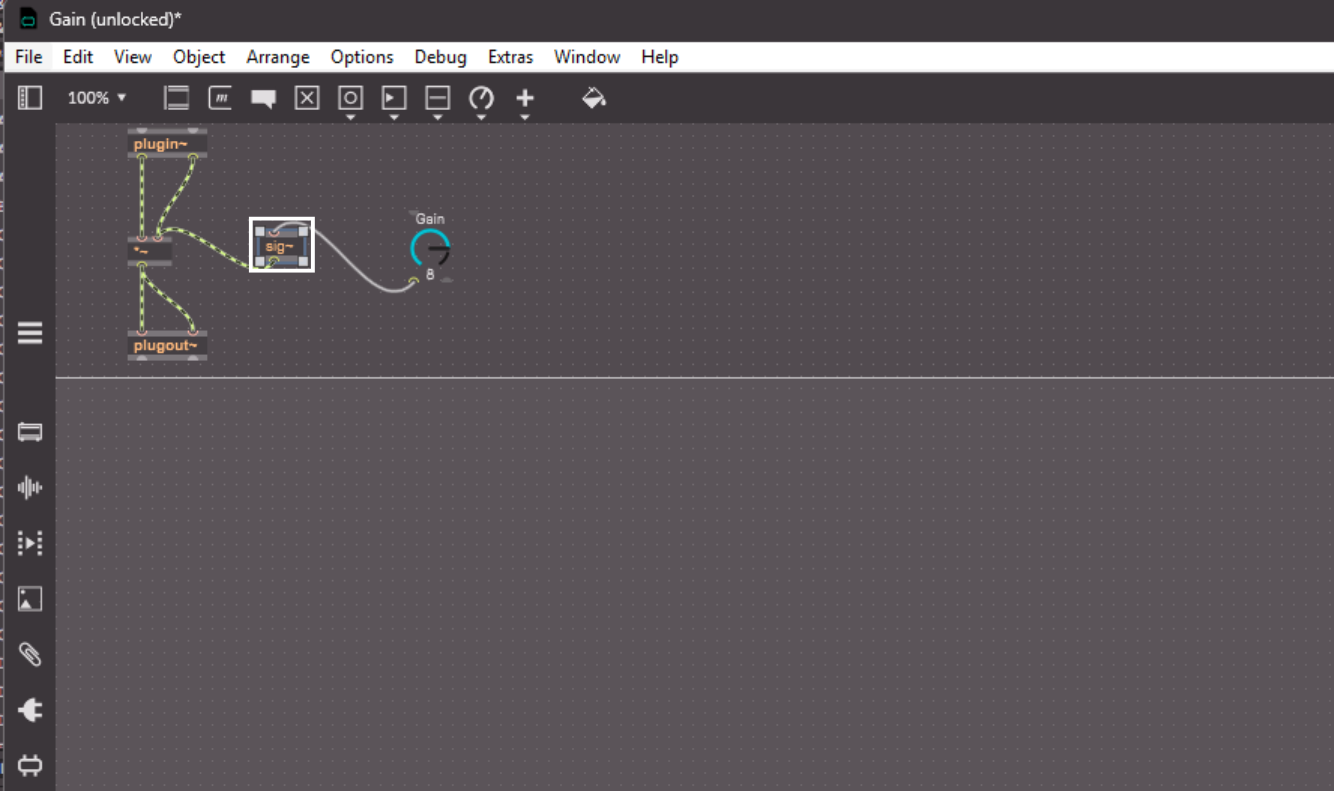
Step 3: Add a Gain Control
To add a new object you can either press n and search for it, or use the left-hand side-bar to find all of the objects in different categories.
- Add a *~ object (audio multiplier)
- Connect plugin~ to *~ by clicking one of the dots at the bottom of the plugin~ object and connect it to the dot at the top of the *~ object
- Connect *~ to plugout~
Now check that you can still hear the audio. The audio now passes through the multiplier.
Step 4: Add a Dial
- Add a live.dial object
- Set the live.dial parameters in the inspector side-bar, which here will be the Short Name, Range/Enum, and Unit Style
- For these parameters:
-
- Short Name is the name that appears on the dial
- Range/Enum is the minimum and maximum value of the dial
- Unit Style determines the way the dial adjusts the value
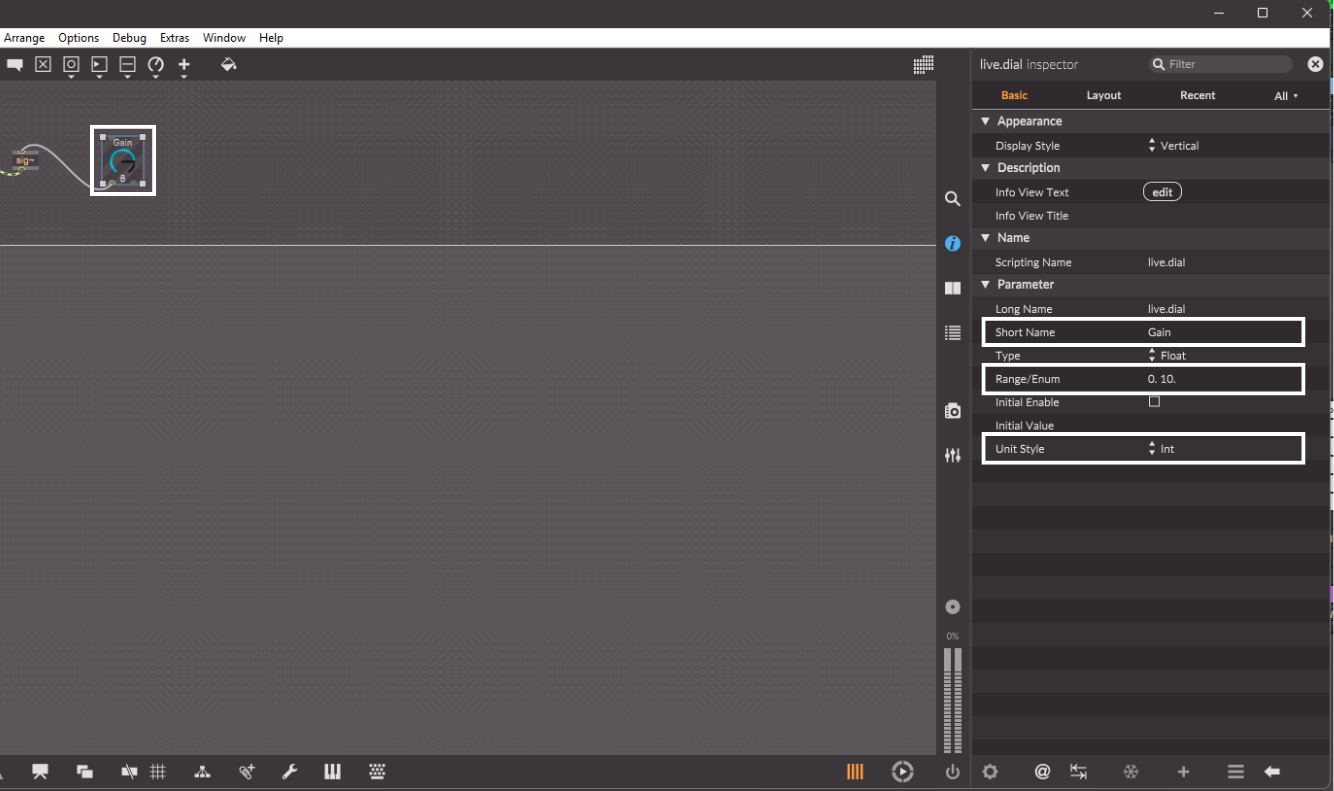
-
- Then add a sig~ object to convert the numerical data information from the dial to an audio signal, so that the *~ (audio multiplier) object can use this to adjust the gain
- Now connect the live.dial to the sig~ and then to the right input of *~
Now when you save this and leave the Max for Live window, you can use the dial to adjust the volume of the track.

Creating Your First Max MIDI Effect
Next, let’s create a simple MIDI effect that makes the MIDI play an octave up from what is written.
Step 1: Create a Max MIDI Effect
Drag Max MIDI Effect onto a MIDI track and open it.
![]()
Step 2: MIDI Input and Output
You’ll see:
- midiin (incoming MIDI)
- midiout (outgoing MIDI)
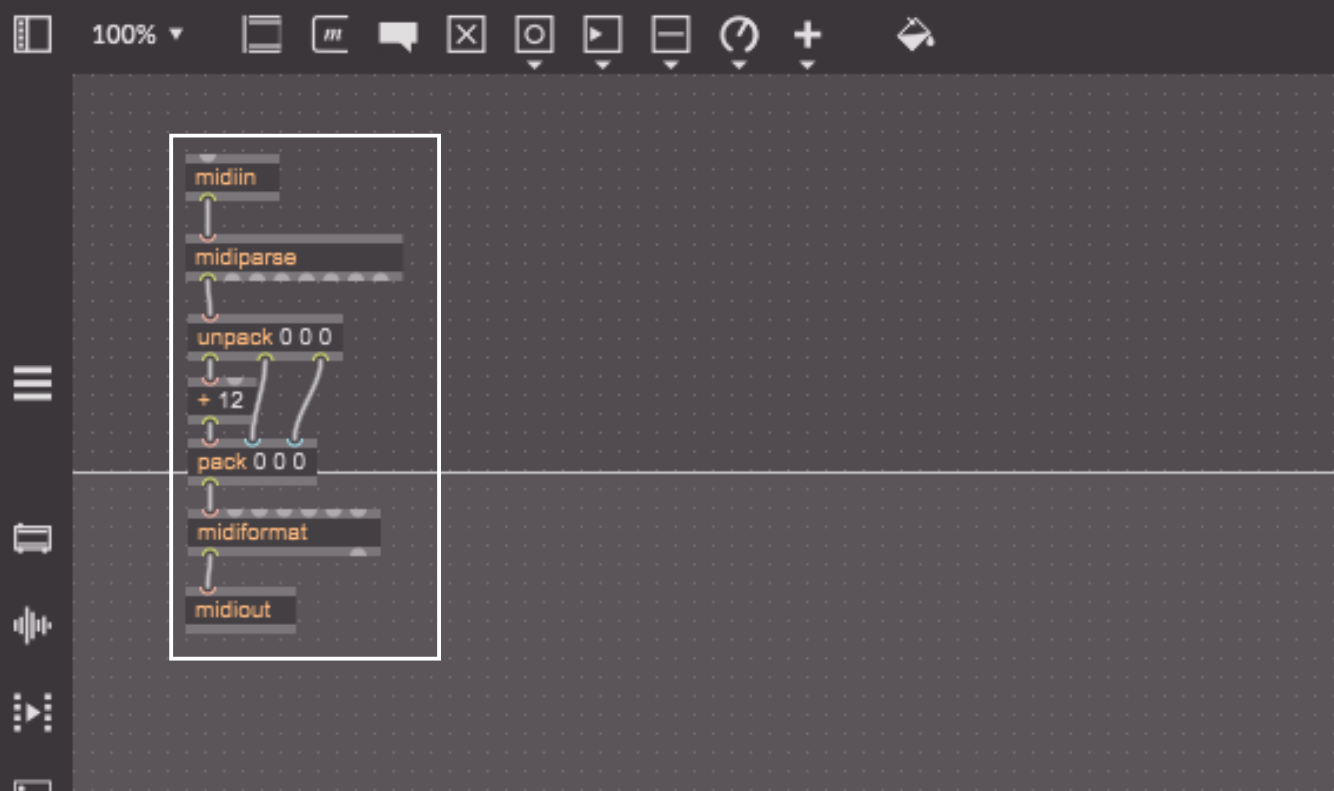
Step 3: Modify Velocity
I’ll go through the steps first, and then explain what is happening.
- We need to get the MIDI notes from the midiin object, and we do this with two objects:
- Add a midiparse object and connect midiin to it
- Add an unpack object with 3 outputs, by typing unpack 0 0 0, then connect the left-most output of midiparse to unpack
- Add a + 12 object, to get the pitch to be increased by 12 semitones (an octave), and connect the left-most output of unpack 0 0 0 to it
- Now we need to add a pack 0 0 0 object to repack what we unpacked before
- Connect the + 12 object to the left-most pack 0 0 0 input, and connect the other two unpack 0 0 0 outputs to the corresponding pack 0 0 0 inputs
- Add a midiformat object and connect the pack 0 0 0 output to the left-most midiformat input, and then connect the midiformat output to midiout
What we are basically doing here is taking the MIDI information (midiin) and splitting up that information (midiparse) to get only the note value, the velocity, and the channel in one output. Then we split that further into their own outputs (unpack) and apply mathematics (+ 12) to the note value only, in this case by adding 12. Then we put that information all back together to send out (pack and midiformat).
Creating Your First Max Instrument
Finally, let’s create a simple instrument that generates sound.
Step 1: Create a Max Instrument
Drag Max Instrument onto a MIDI track and open it.
![]()
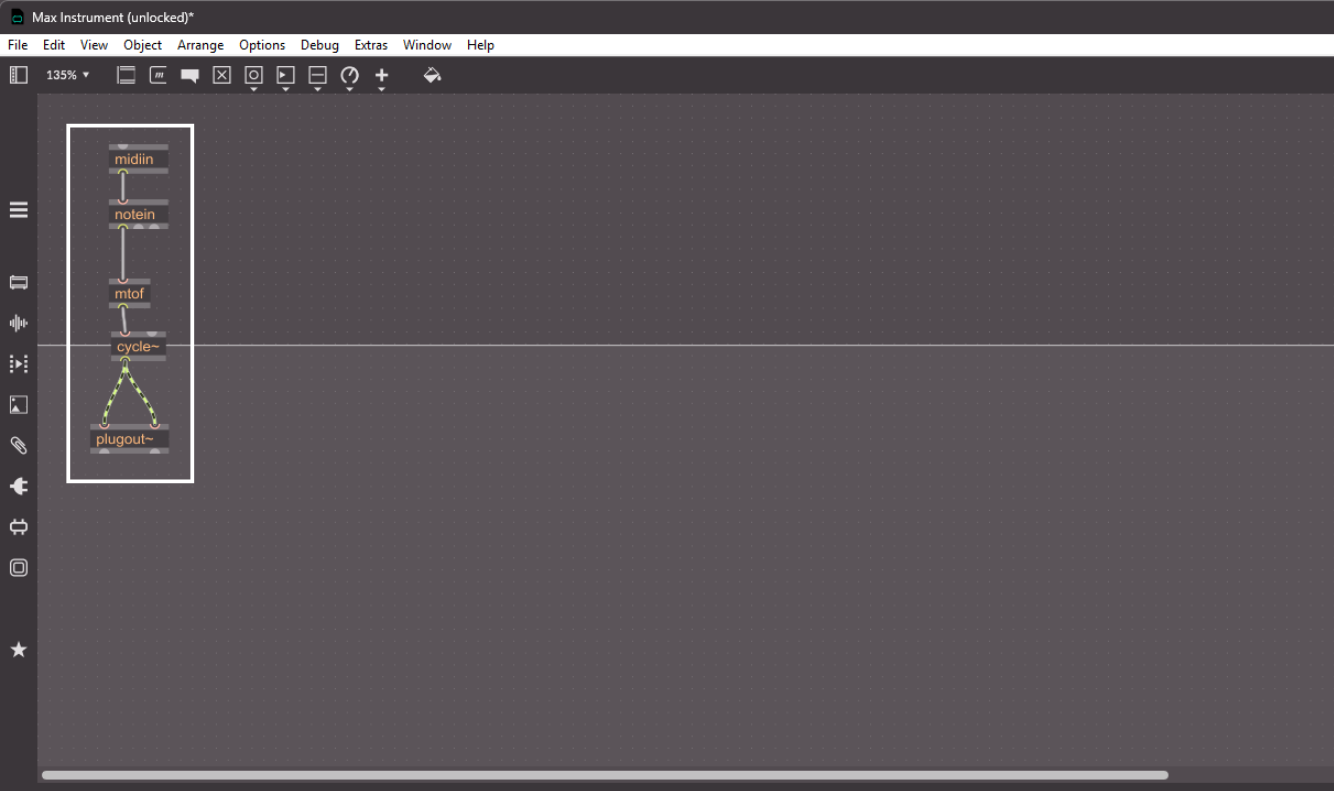
Step 2: Convert MIDI to Frequency
- Use notein to receive MIDI notes, which outputs the pitch, velocity, and MIDI channel
- Add an mtof object to change the pitch information into a frequency
Step 3: Generate Sound
- Create a cycle~ object, which is a sine wave oscillator that you can input the frequency into
- Feed frequency into cycle~ from mtof
- Connect output to plugout~
Now you will hear a constant tone that changes pitch based on what MIDI note you play/write.
Step 4: Make The Instrument Only Produce Sound When A MIDI Note Is Played
- Add a *~ object and connect the second output of notein (velocity) to the right output of *~
- Connect the output of cycle~ to the left input of *~
- Then connect the output of *~ to both inputs of plugout~
Now the instrument only puts out sound when the velocity is above 0, if it is 0 then it will multiply the output of cycles~ with 0, which is 0, so there’s no sound. In other words, you have to play a note to produce sound.

Where to Go Next
Once you’re comfortable with these basics, you can explore:
- Envelopes (line~, adsr~)
- Filters (filtergraph~, svf~)
- Modulation (LFOs, random sources)
- Live API integration
The key thing is, just experiment. It’s the best way to learn. Now you know how it works in a general sense, you can expand this out with experimenting with different objects.
Conclusion
Max for Live may look complex at first, but it’s built around simple ideas: connecting objects, passing data, and shaping sound. By starting with small projects and exploring Live’s own devices, you can gradually build confidence without feeling overwhelmed.
Whether you want to create custom effects, unique MIDI tools, or experimental instruments, Max for Live gives you a way to turn ideas into working tools directly inside Ableton Live.
I am a music producer, songwriter, mixing and mastering engineer, sound designer, composer, multi-instrumentalist, vocalist, and musical artist. Yeah, I know, it’s a mouthful. Basically, if it involves music, I am super into it. I recently became a full-time freelancer in the music space, having dabbled in it for around 10 years. I started playing guitar at 7 years old, and I am now almost 30 (almost!). Music has been a main part of my life since I formed memories. I literally cannot remember a time before music. I adore every aspect of creating and working on music, from starting a song to mastering and polishing the final piece. It’s all incredible.
I’ve worked on many projects over the years, including my own. I release pop/indie music where I do everything, from writing to recording to mixing to mastering, and I even create all the content around it. I do this under the name Mauve Shores. A big passion of mine is metal/alternative music, so I release music with my band Midnight Paradise. The band is literally me and my best mates, so it’s super fun. I do everything except for play drums and bass in that. The final project I release under is called Heavy Blink, and I put out LoFi Beats. I’ve even had tracks reach over 250k streams on Spotify.
Outside of my own projects, I have worked in a variety of genres. I’ve written, produced, mixed, and mastered pop songs for the artist No False Feelin’, one of which got in the UK Top 40 Spotify playlist and has almost 1 million streams. I currently create drum and bass remixes for a client, some of which have over 2 million streams. I’ve done mixes for events such as a dance recital and a business event. I’ve also done some audio cleanup and sound design for a live voice over group that do their anime in person. Right now I am working on a mixture of my own stuff, and with clients. For example, I am beginning to produce, mix, and master a death metal album, and also at the same time a teen pop style song. I love the variety that comes with this line of work.
I am also super nerdy about the gear and technology revolving around music. I could talk for days about my favorite plugins for specific things. Don’t even get me started on EQs. I began as just a guitar player, so my gear obsession has definitely been more towards pedals, but the more I got into production, the more this expanded to everything.
Outside of music, I am into a lot of different things. I love to connect with nature, whether this is through hikes or even making terrariums. I really enjoy skateboarding, playing rugby, and running. I’m also into creating things in general, I always have some DIY projects going, whether that is woodwork, or electronics. Before going full-time as a freelancer, I was a software developer for 6 years, so programming is something I still enjoy and do in my free time. Of course, we can’t forget about how much I enjoy spending time with my wife and my friends.