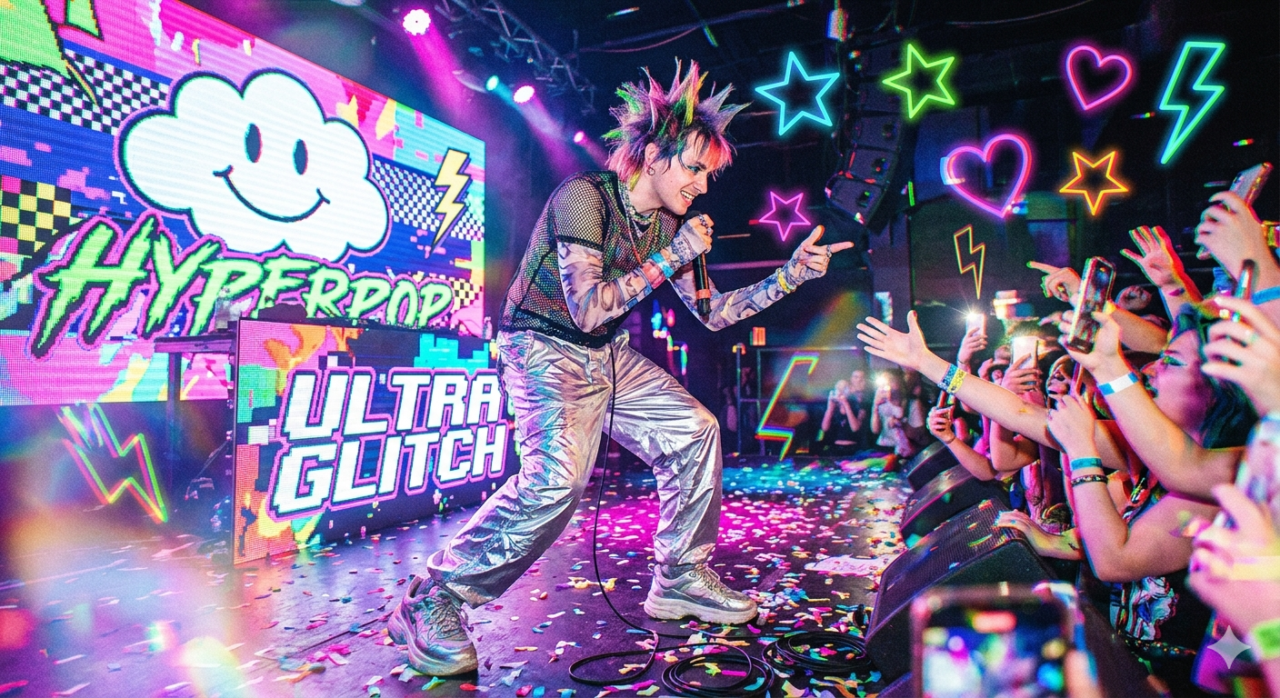
What Is Hyperpop?
Hyperpop is a pretty new genre and this article is about producing a Hyperpop beat. As you can imagine from the name, it’s pop that is super high energy. Hence, “hyper”. It has quite a few different inspirations. Of course Pop is a big part of it, but so is EDM, Punk, Hip-Hop (specifically more modern versions of this, leaning more towards Soundcloud Rap and Emo Rap), and it’s very experimental. It also uses a lot of sound effects in the production, like video game noises, glitches, and just about any weird noise you can think of.
Artists at the forefront of Hyperpop include:
To me, the thing that makes Hyperpop is the melodies and catchy elements of Pop, with the energy of Punk and Hip-Hop, then pushed to the edge of insanity. I’ll be using Ableton Live 12, but you can use any digital audio workstation that you prefer.
Producing A Hyperpop Song
Drums
When it comes to the drum sounds of Hyperpop, this is the area that really takes inspiration from Hip-Hop, namely trap. We want hard hitting drums, with lots of energy, lots of glitch and percussive noises, and is just distorted like crazy.
Kick
Let’s start with the kick. The big thump that drives the song. For Hyperpop, you don’t do anything in half measures, so we are going to get a huge kick sound.
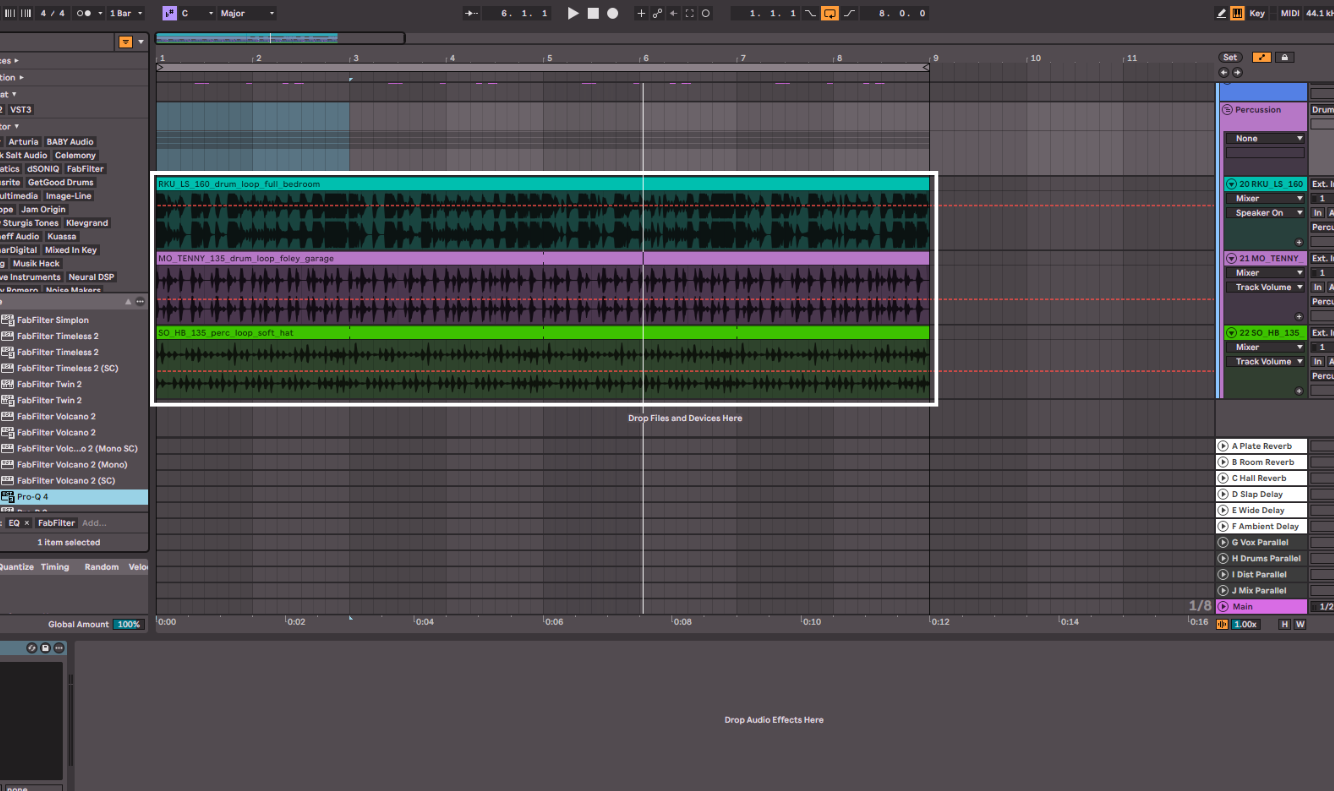
The way I start designing the kick sound is by choosing an electronic kick sample (usually from Splice for me, though you can use Loopcloud or Beatport) and getting that low-mid thump that I want. This is the sample I chose for my kick.
Kick Sample
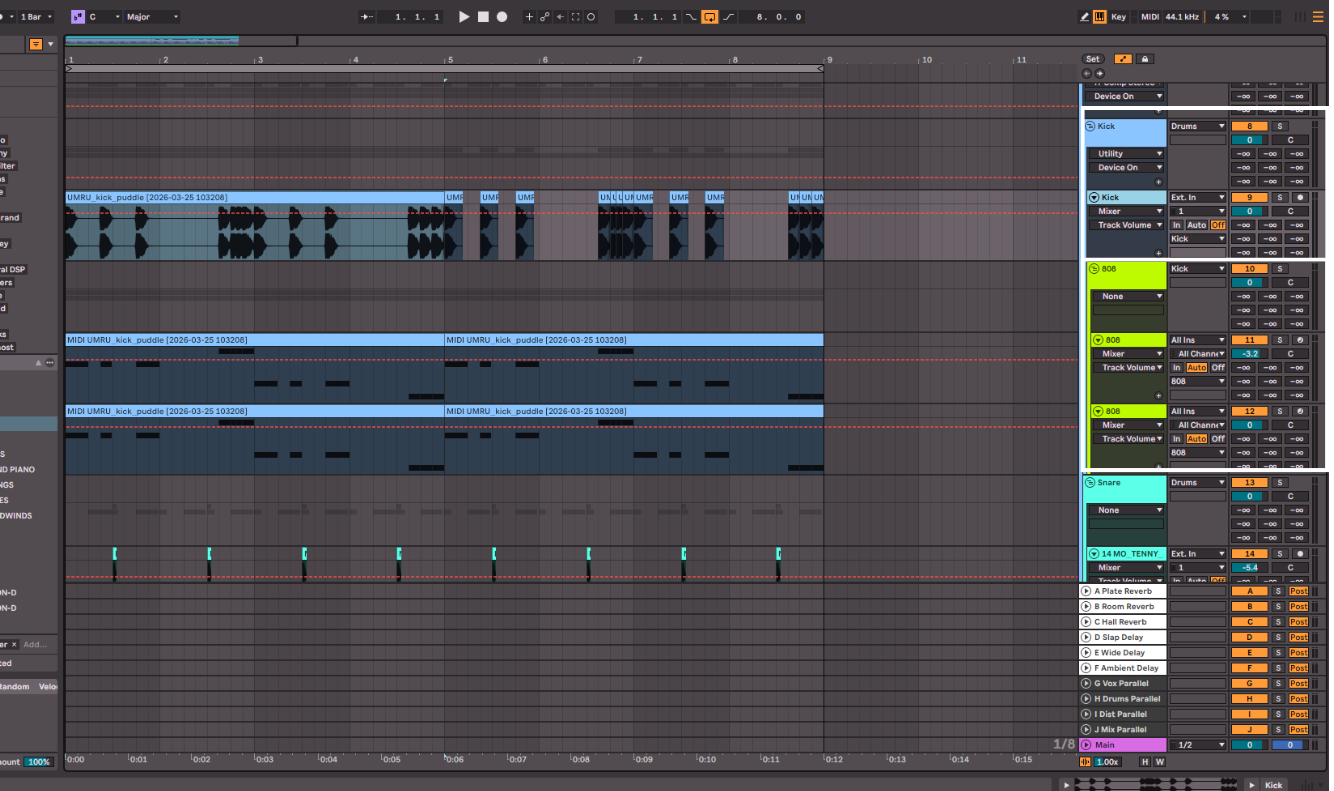
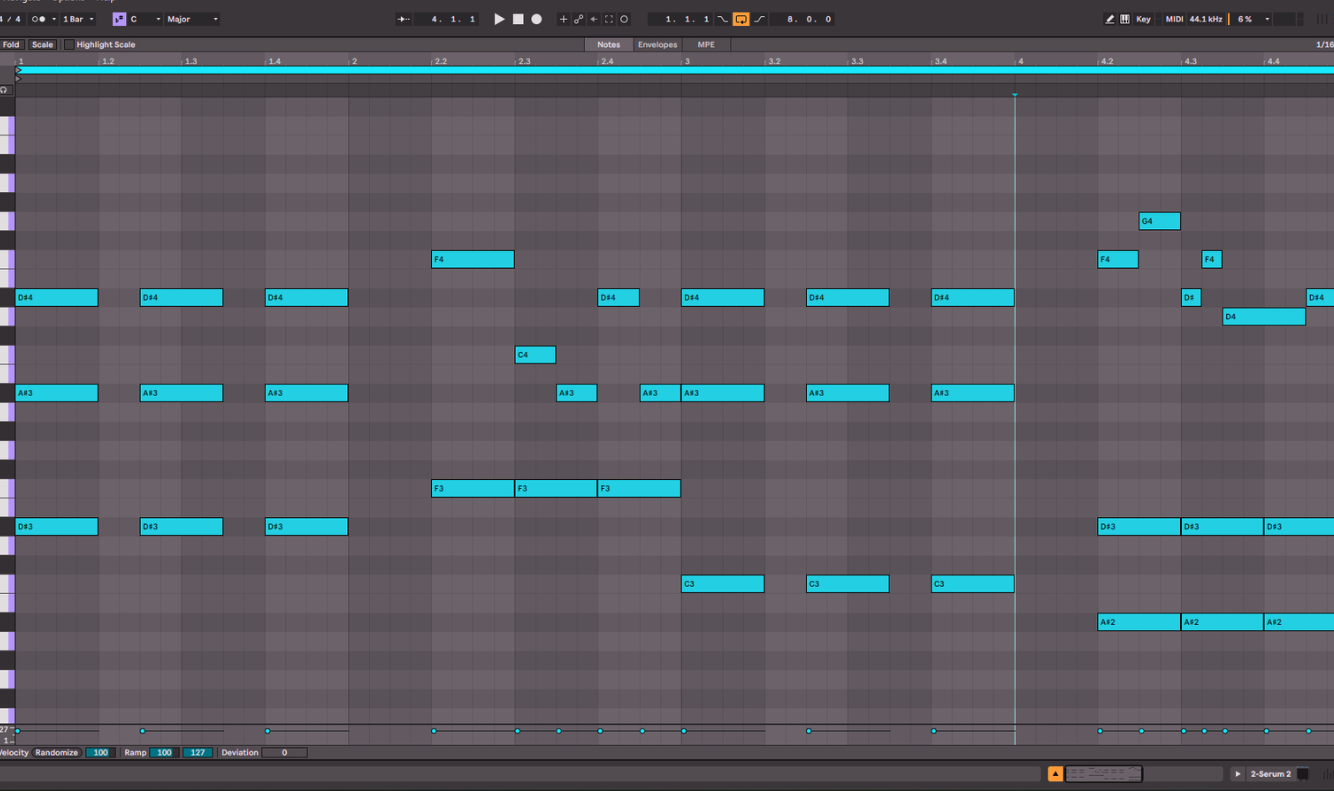
Then I will create the kick pattern with this sound. Something that hits hard, has some interesting variation, but still drives the beat and leaves space for other drum elements. This is what I have for the kick pattern.
Kick Pattern
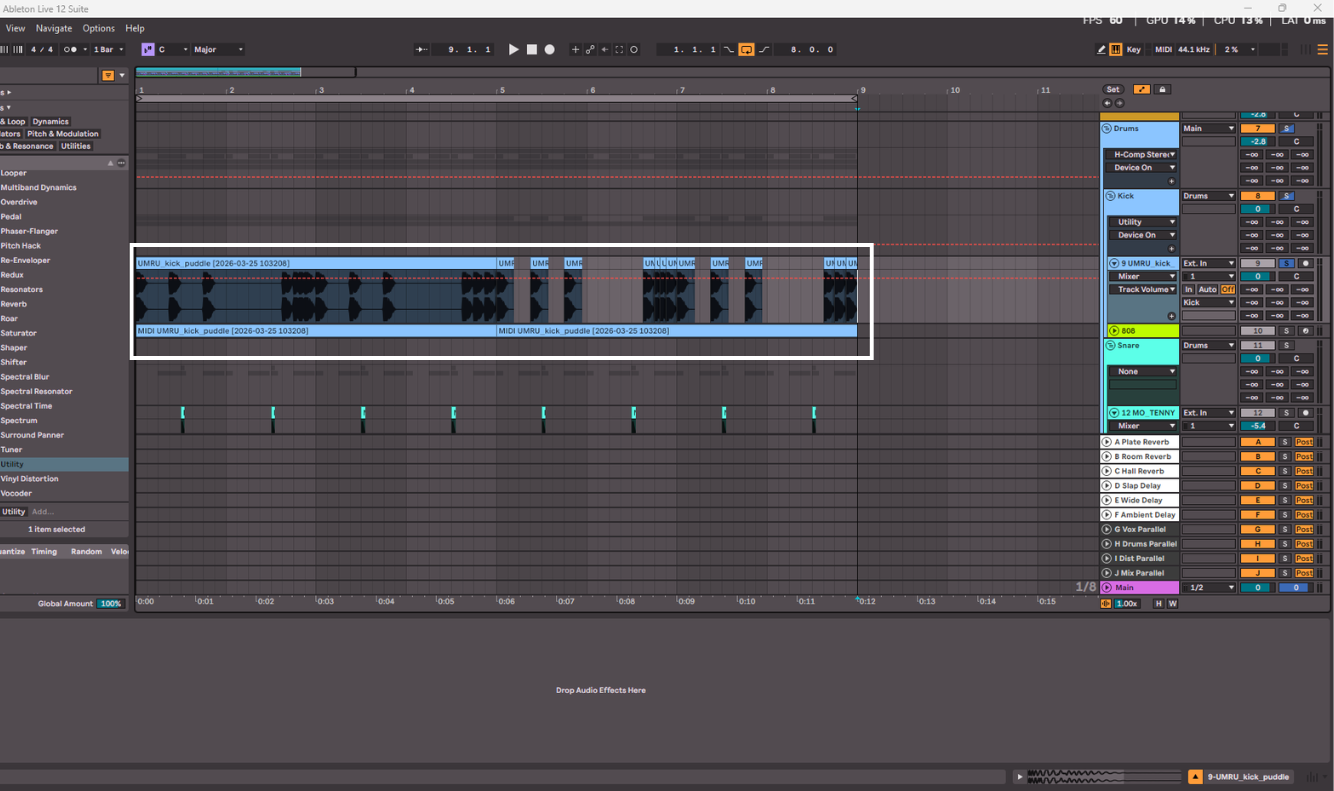
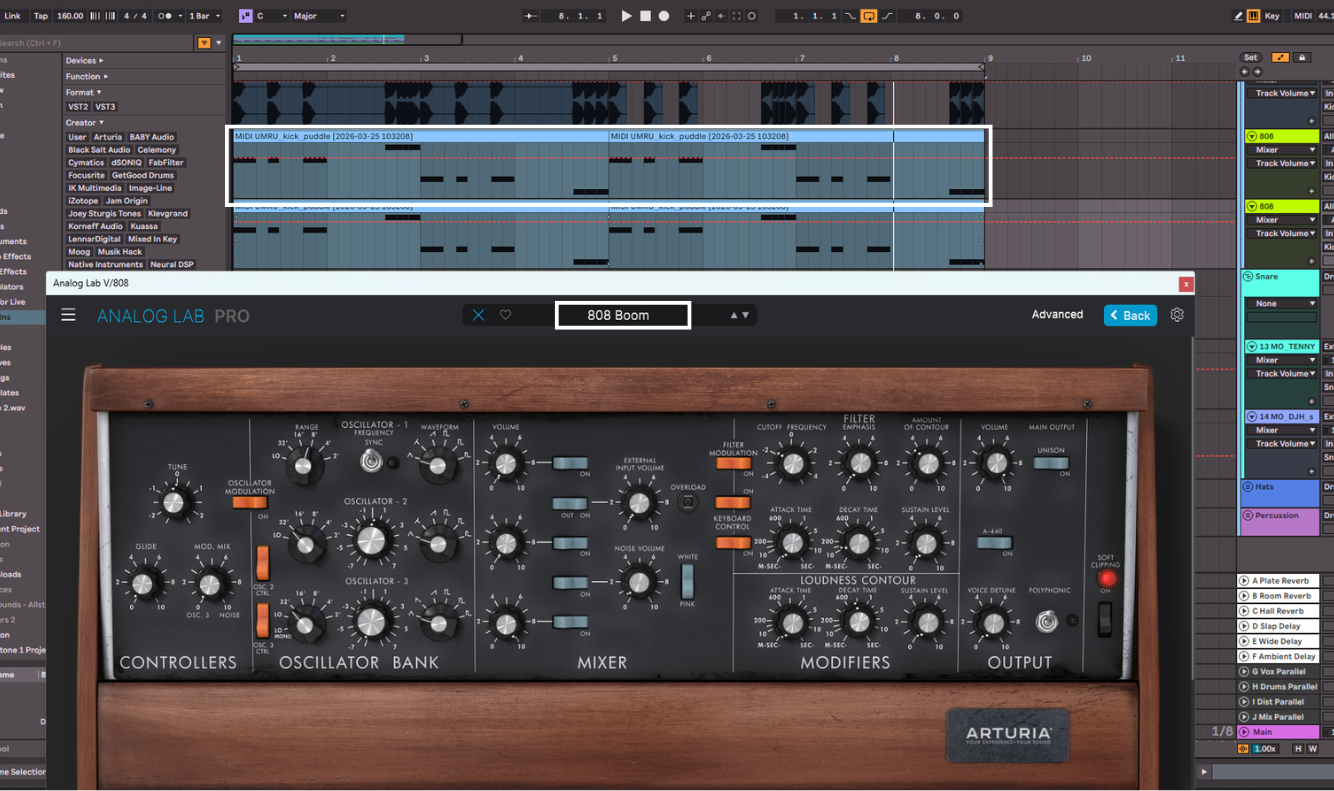
The second part of the kick sound is to use an 808, which once again borrows from Trap. This is a very bass-heavy synth with a fast attack to make it sound like a hybrid of a kick and bass sound. They are usually pretty simple sounds, you just want a lot of attack and a lot of low end. I used Analog Lab by Arturia for mine, with a preset called “808 Boom”. I actually doubled mine up with the same sound but an octave lower, to really get a full sounding 808.
808 Pattern
Now let’s blend these two sounds together to create one huge kick. We will start by grouping these together into a group (or bus), so we can process them together as well as individually. I will also group my two 808 tracks together to process them as one.
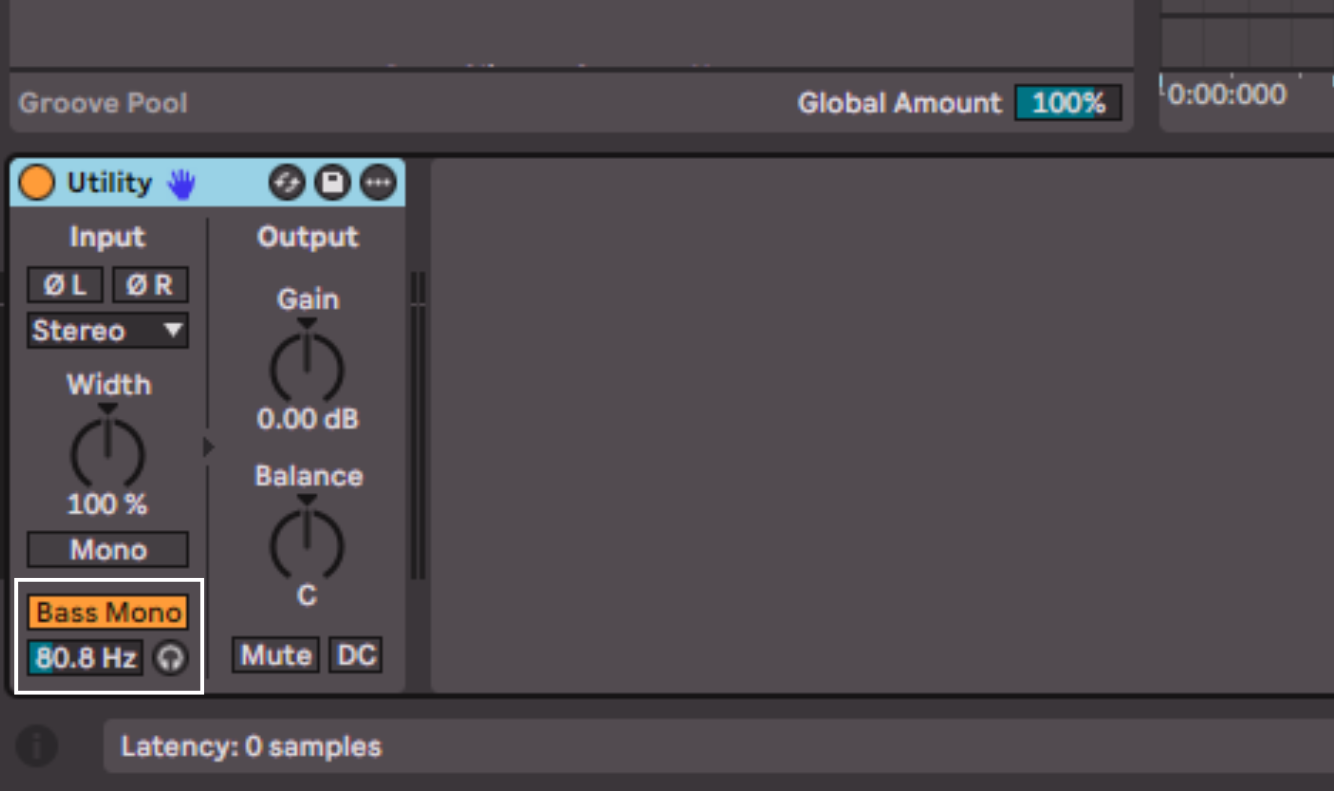
The first step is simple, let’s make sure the very low end of the sound is mono, meaning it’s only coming out of the center and not the sides of the stereo spectrum. To do this, there is a stock plugin in Ableton called Utility. There is a simple Bass Mono button and then the frequency slider below dictates at which frequency and down from there will be mono. Other DAWs have similar plugins too. I typically set the frequency at around 80Hz depending on the sounds I’ve chosen.
Next is EQ. I will EQ these sounds differently, to bring out the elements I want from each and remove parts I don’t want there, as well as remove conflicting frequencies, meaning the frequencies that are shared between the sounds. My personal favourite EQ for this is FabFilter Pro-Q 4, as it has a lovely user interface and has any EQ option you could ever need.
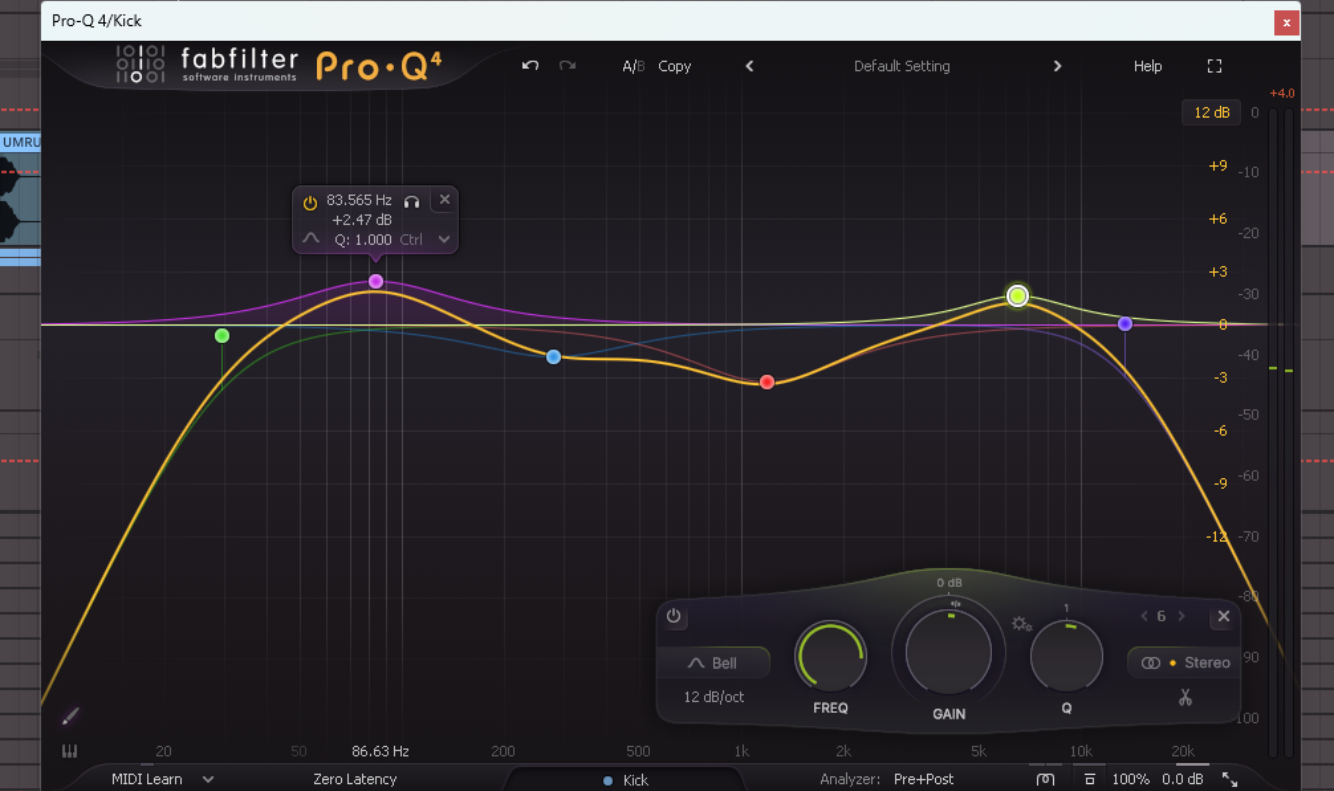
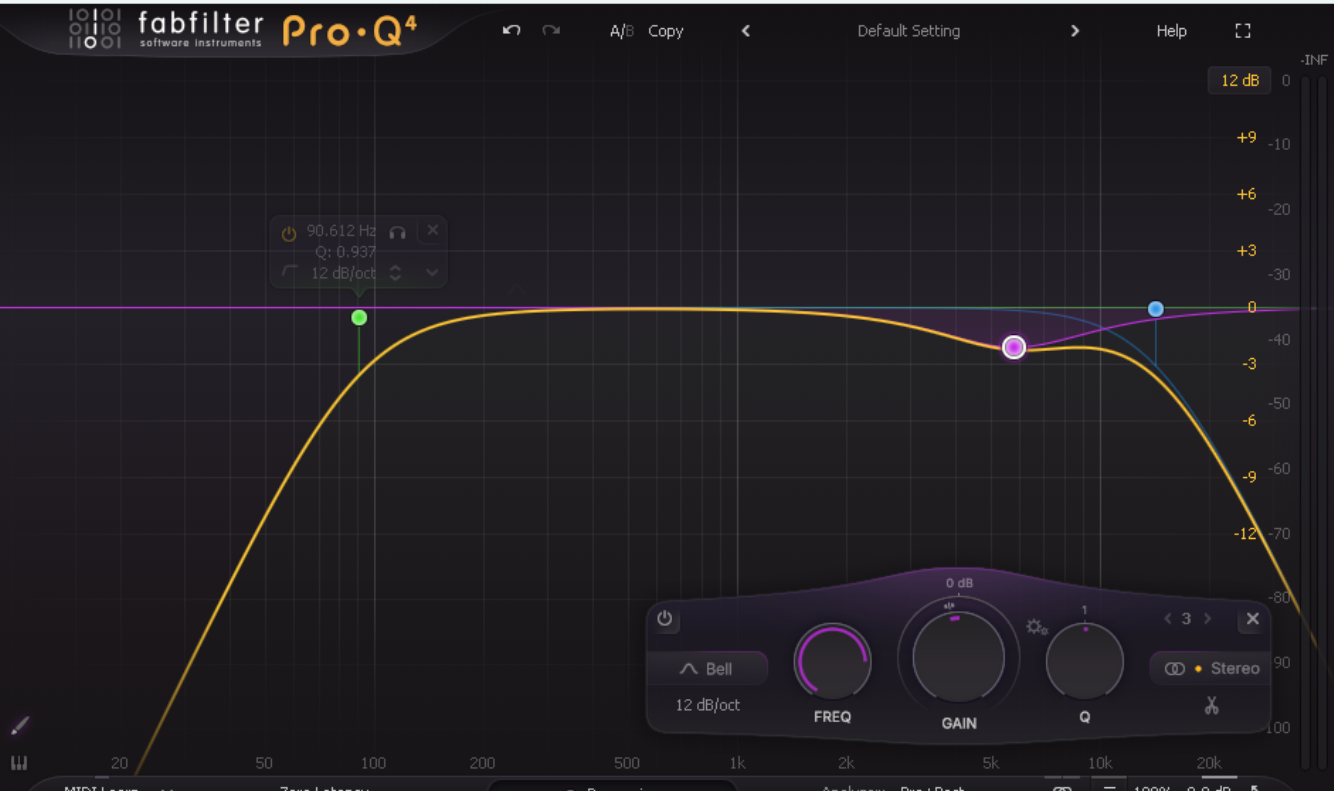
For the kick, I removed some of the very low end at around 30Hz, just to avoid cluttering up the low end. I also removed some of the ‘muddy’ frequencies at 280Hz, as they were taking away from the fundamental ‘umph’ of the kick. This is why I boosted around 85Hz, to bring out that thump even more. I cut frequencies around 1.2kHz, as it was unpleasant noise. Then I boosted at 6.5kHz to help the kick cut through the mix with that sharp attack sound and low-passed frequencies above 1.3kHz.
Kick After EQ
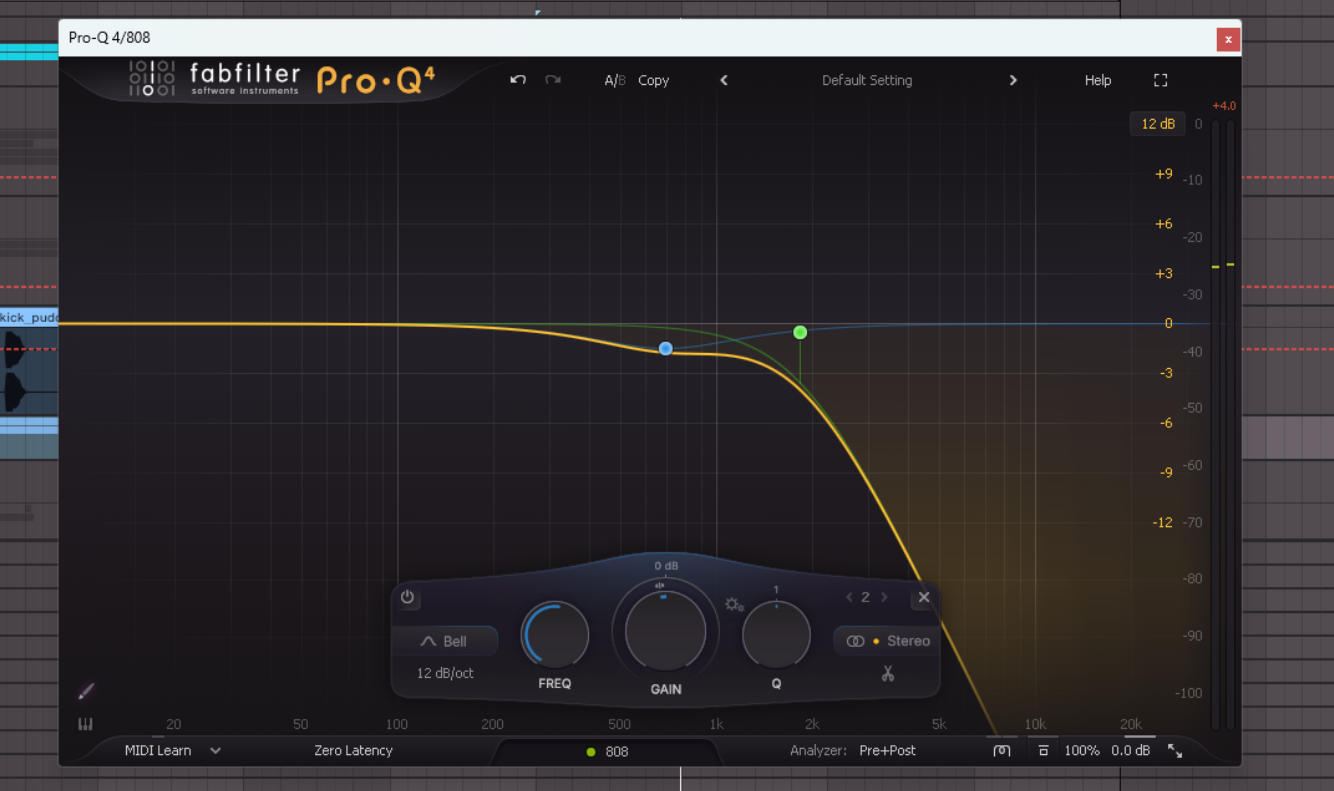
For the 808s, the EQ is a bit simpler. I just cut out all the frequencies above 1.8kHz and cut out a bit of 700Hz, as I didn’t want the attack of the 808 to overpower the attack of the kick. I like to think of this combination as the kick being the thump and hit, and the 808s being the rumble that you feel in your gut.
808 With EQ
Snare
For the snare, we want a quick, ‘choppy’ snare sound. Typically it’s high-pitched, short, and has a fair amount of high-end noise in it. It should really snap. The pattern for this is simple, it’s just on the third beat of each bar.
Snare Sample
Then I have another snare sound going at the first and third beat of the bar. This just adds some extra rhythm, and you can really use whatever type of snare you want here, but I went for a long, ringing, quite metallic sounding snare to offset the main snare.
Second Snare Sample
Processing wise I leave these completely alone. They fit right in with the kick and I don’t feel the need to change them.
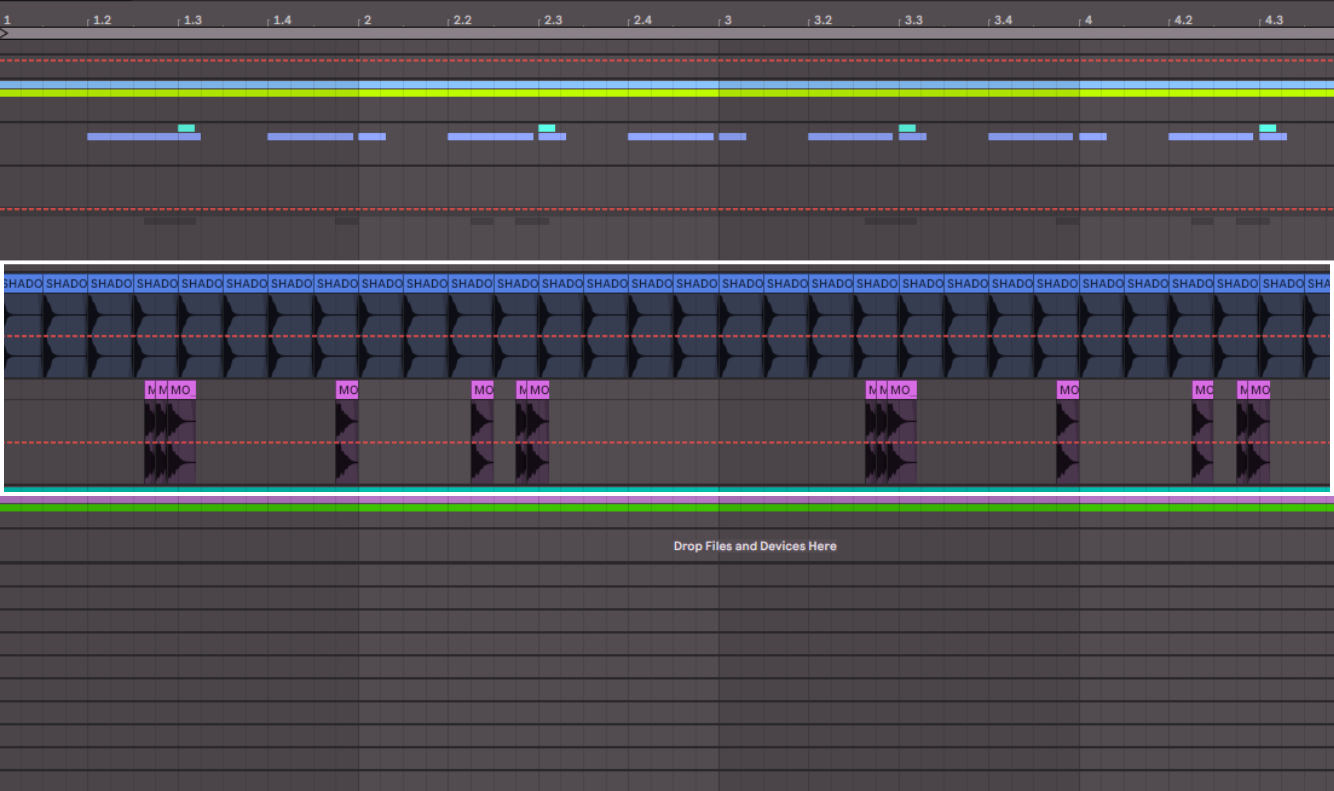
Hats
For the hats, or hi-hats if you’re familiar with drums, I have two sounds once again. Similar to the snare, I have one sound for the main hats part, and another for accenting moments in the beat and adding interest.
Hats Pattern
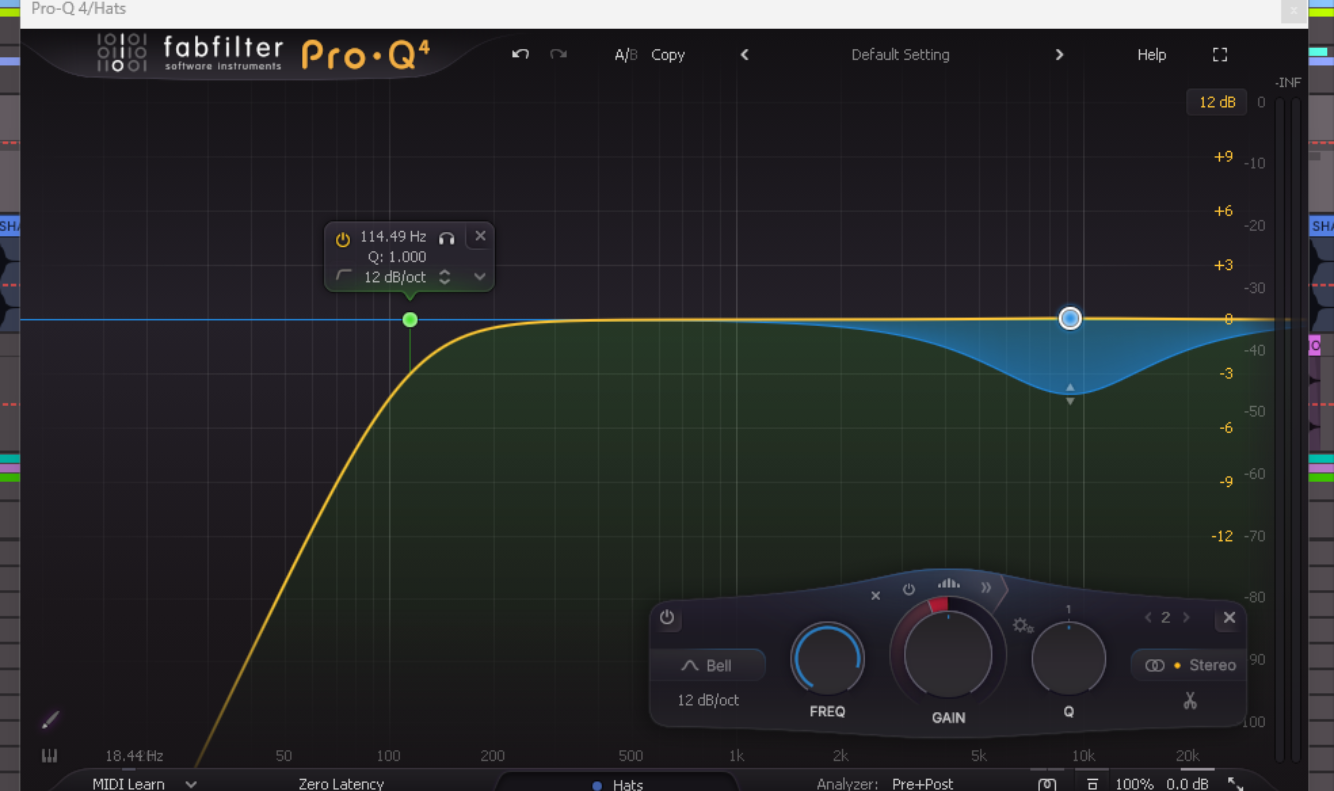
For processing, I also grouped these two tracks together and applied an EQ to the group. I rolled off unnecessary low-end below 110Hz, and I added a dynamic cut at around 9kHz. A dynamic cut means that it is compressing only those frequencies when they reach a particular volume. This just allows me to tame the really harsh high-frequencies when they are too prominent.
Hats After EQ
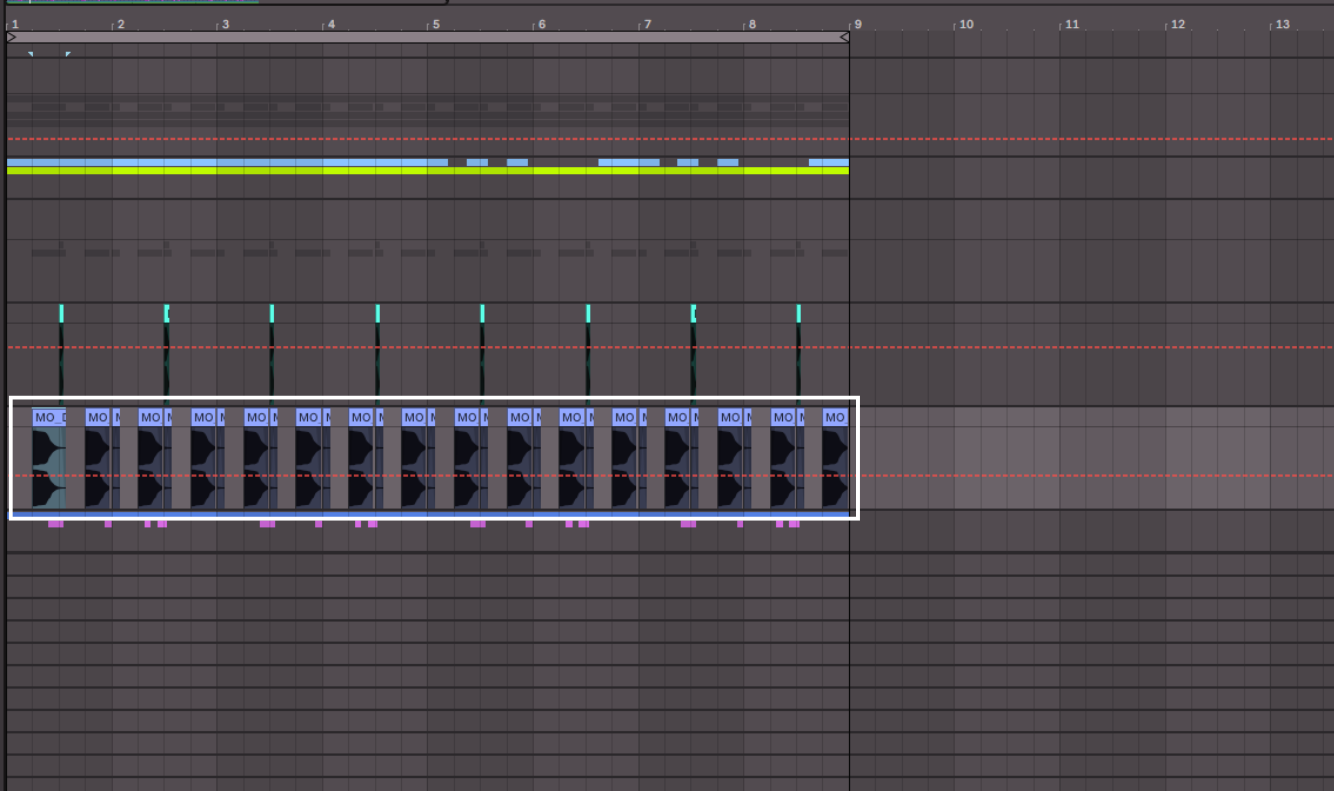
 Percussion
The final elements of the drums are percussion loops. These add some real life to the beat, and also add some of those glitchy sounds that Hyperpop typically has. I’ll show you the whole beat before and after the percussion to show you how much of an impact they make.
Drums Without Percussion
Drums With Percussion
For the EQ I am just removing frequencies below 90Hz and above 14kHz entirely, so they don’t compete with the kick or hats. I am also making a small cut around 5.7kHz as it just made them feel like more of a background element than upfront, which is what we want. The percussion should add interest and life to the beat, but not dominate the sound.
Drum Bus Processing
At the end I group all of the drum parts into one bus. Now I can process the drums as a whole group. Keep in mind that what I’m doing isn’t mixing, but shaping the overall sound and tone of the drums to get the vibe I want.
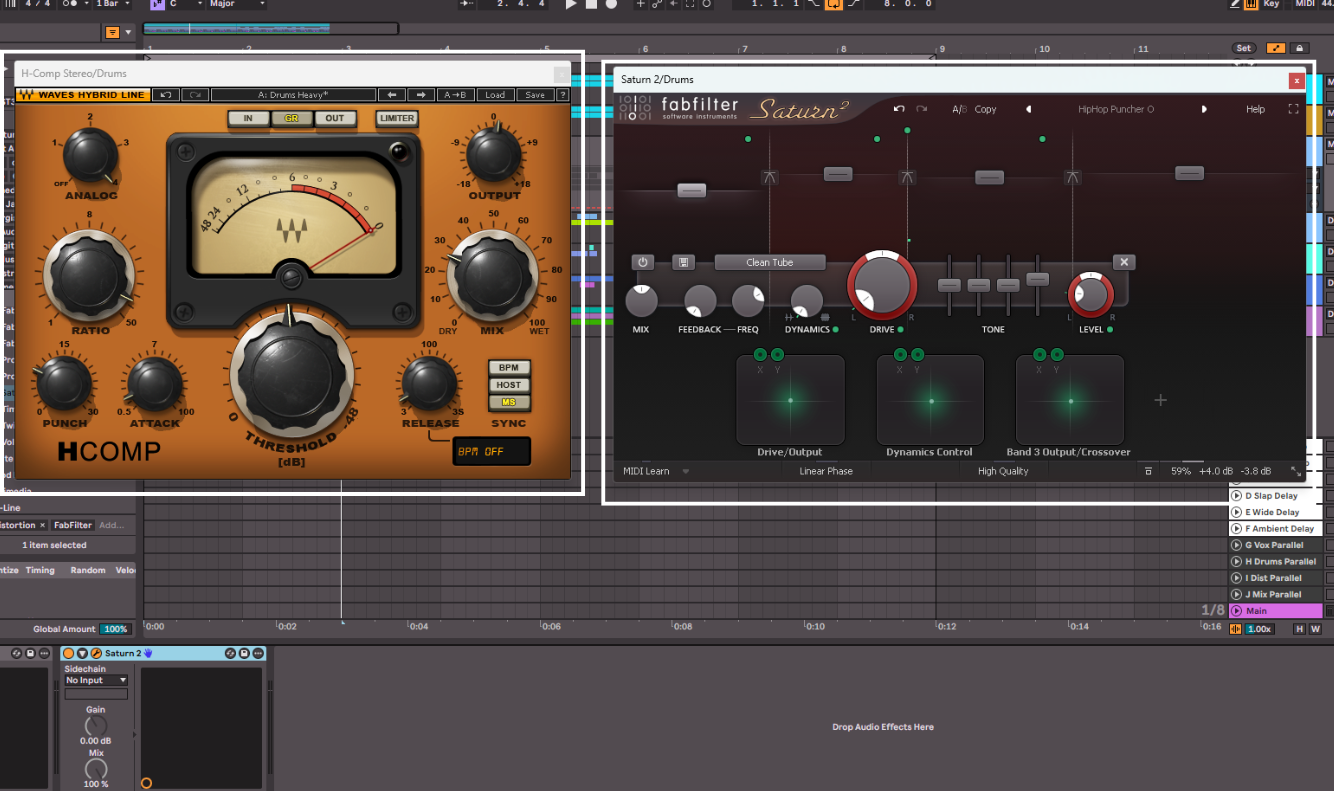
First I added H-Comp by Waves, which is an amazing compressor. I have the Analog setting at 4, which is just modelling a particular analog compressor’s character. I have the Attack and Release all the way down to create a pumping effect. Then I have dialed in the Punch setting to taste, which basically adds more attack to the sound. Then I’ve used the Mix knob to blend in the dry signal with the compressed signal. This creates a much bigger drum sound which is more dynamically evened out, but still has the character of the original drum sound.
Then I added Saturn 2 by FabFilter, which is a multi-band saturation plugin. This effect allows me to saturate different areas of the frequency spectrum with different amounts and types of saturation. I ended up slightly modifying the HipHop Puncher O preset that comes with the plugin.
With both of these the beat now sounds like this.
Drum Bus Processing
Bass
Now we can move on to the bass. We already have some of the low-end in the track with the 808s in the drums, so we will be creating another bass line that is more melodic and really fuzzed out. For this I found a preset on Splice for Serum 2. I wrote a bassline and doubled the track with the second one playing the octave above.
Bassline
This is really a mixture of a bass sound and a lead sound, which you’ll find a lot of in Hyperpop. And as you can hear it’s a mixture of a catchy melody and then some crazy fast notes at the end of each bar. It’s further blending the Pop style with absolute chaos. The sound also has an arcade/video game sort of sound to it, which as I mentioned is also an influence on Hyperpop.
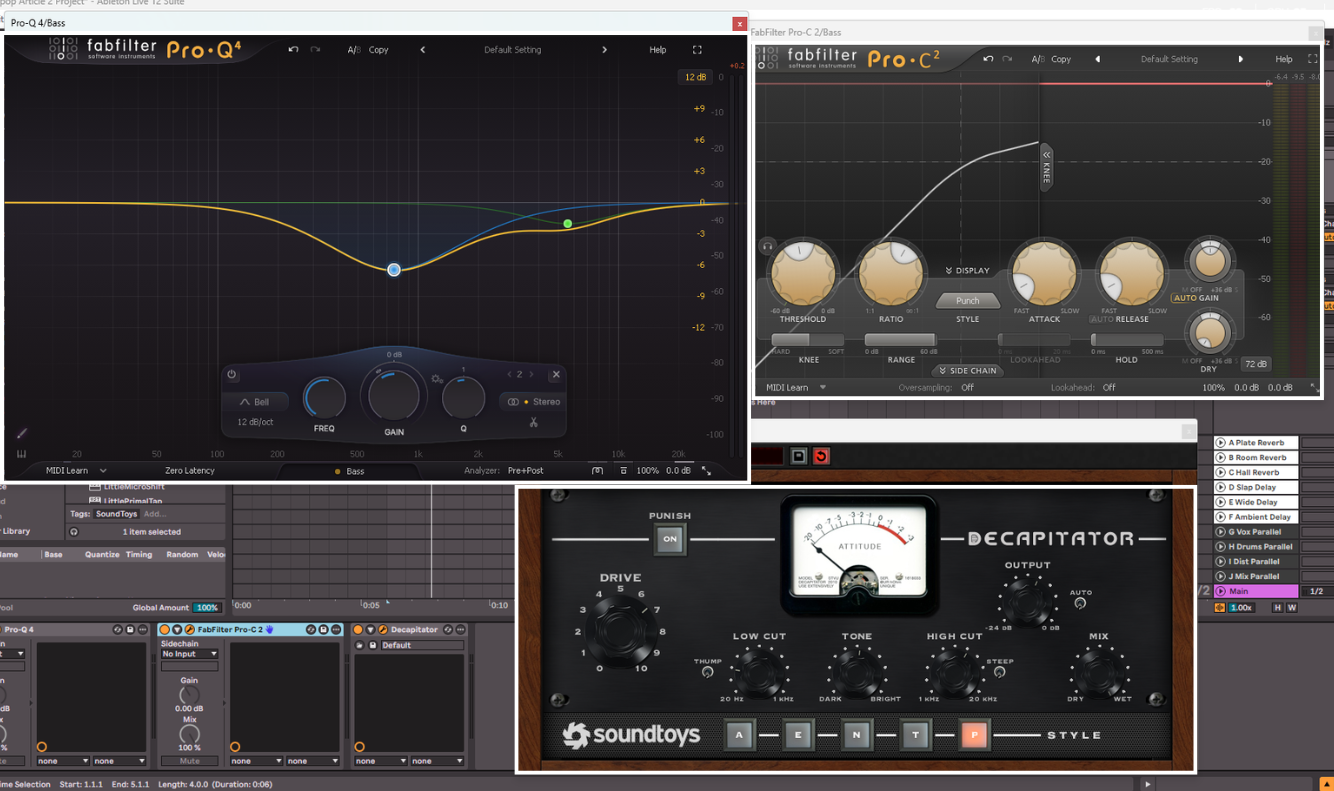
For the effects I added to the bass parts, I grouped the two tracks of the octaves together and processed them both as one in a group/bus. I first started with an EQ that’s mostly removing a decent amount of mid-frequency information, around 750Hz, and that is cutting some of the high-end at 5.5kHz. The reason for cutting around 750Hz is to remove some of the frequencies that were causing the bass to sound a bit muddy, and also to leave room for the keys/synth that we will add next. The cut at 5.5kHz was to tame some of those really high parts of the bass sound that was on the preset.
Then I used FabFilter Pro-C to really compress the bass and bring the sound right up front and in your face. I am using the Punch style compression, with a fast Attack and Release to do this. I left the Ratio at 4:1 as the preset itself is already compressed, so I am just tipping it over the edge. Then finally I dial in the Threshold to taste.
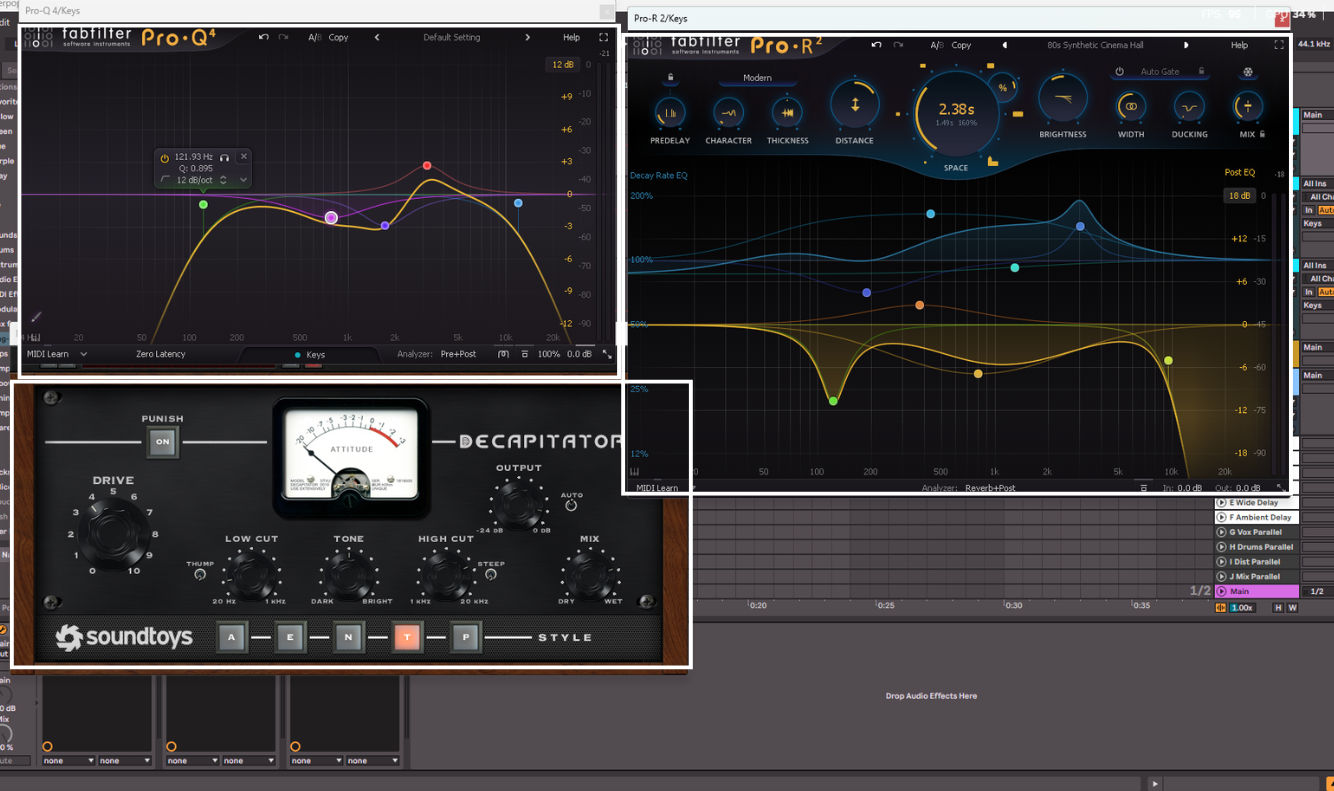
The last effect I am using is a distortion/saturation plugin. In this case, I am using my favourite one which is Decapitator by SoundToys, as it’s modeled off of analog saturation hardware and you can really push it. I have it on the P Style, with a generous amount of Drive, a slight Low Cut, which just lets the 808s predominantly occupy the sub-bass frequencies, and a High Cut that is once again just taming those harsher frequencies. The result is an absolutely blown out bass sound that is right up front, but you can still hear the notes clearly. This processing really brings out the Punk element of Hyperpop that I spoke about at the start.
Bassline Processing
So now with the drums and bass together, we have this.
Drums And Bass
Keys/Synths
The final part of making the core of a Hyperpop beat is the keys/synth sound. This can be chords, a melody, an arpeggio, just about anything. The thing that it should be though, is equally excitable as the rest of the elements. For the sound I chose another preset from Splice for Serum.
Since the bassline we have is already very melodic, I didn’t want to add another melody in there to clutter up the beat. So instead I wrote a part that uses some chords but also follows the bass sometimes. It filled in the gap that the beat had just sitting on top of everything. I also, once again, doubled the track and pitched it up an octave. When it comes to the melodic aspect of Hyperpop, there isn’t a lot of different parts going on, but there is a huge sound. One way to achieve this is by layering sounds with themselves but an octave up or down.
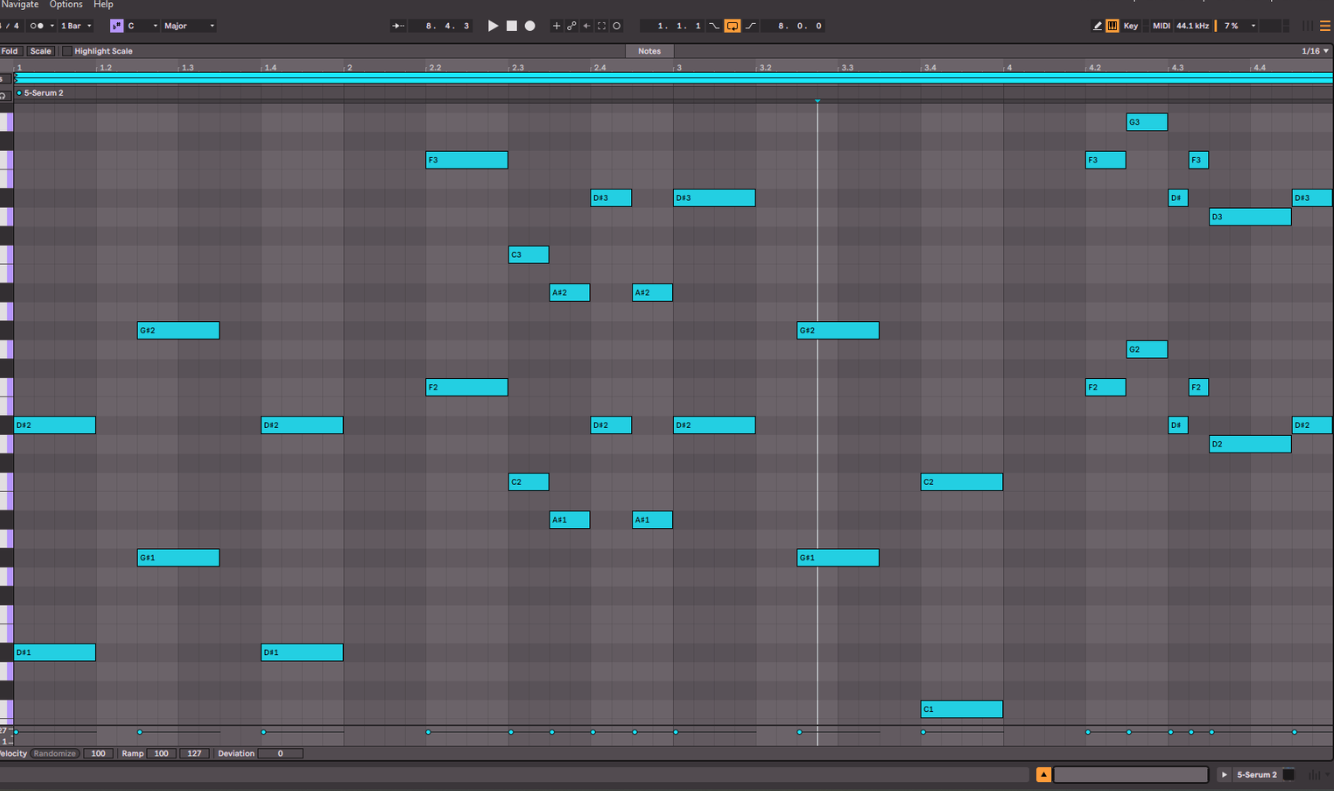
Keys Part
To process this part I grouped the octaves together and applied an EQ, saturation, and a reverb plugin. I am using FabFilter Pro-Q 4 as always as an EQ. Here I am cutting all the frequencies below 120Hz, cutting some of the frequencies around 770Hz and 1.7kHz, boosting at 3kHz, and then cutting everything above 11.8kHz. This results in a less boomy keys sound, with clarity but not harshness. Then I am using Decapitator by SoundToys again to add some distortion to the keys. It’s also cutting some lows and highs, with a more subtle distortion this time. I really just wanted to bring the energy up but not completely distort it like I did with the bass. Then finally, I am using FabFilter Pro-R 2 to add some reverb to the keys, making them feel even more like they are soaring above the other elements.
Keys Part Processing
Conclusion
At the very end, this is the Hyperpop beat that we have created.
With this you can then extend it out and use it to structure a song. Using extra glitch and video game noises will also go a long way, especially by using them to enhance particular moments of the song. But the key thing to remember about Hyperpop, if you take away anything from this article, is that it’s all about energy and being catchy. Once you’ve cracked that, you’re good to go.
I am a music producer, songwriter, mixing and mastering engineer, sound designer, composer, multi-instrumentalist, vocalist, and musical artist. Yeah, I know, it’s a mouthful. Basically, if it involves music, I am super into it. I recently became a full-time freelancer in the music space, having dabbled in it for around 10 years. I started playing guitar at 7 years old, and I am now almost 30 (almost!). Music has been a main part of my life since I formed memories. I literally cannot remember a time before music. I adore every aspect of creating and working on music, from starting a song to mastering and polishing the final piece. It’s all incredible.
I’ve worked on many projects over the years, including my own. I release pop/indie music where I do everything, from writing to recording to mixing to mastering, and I even create all the content around it. I do this under the name Mauve Shores. A big passion of mine is metal/alternative music, so I release music with my band Midnight Paradise. The band is literally me and my best mates, so it’s super fun. I do everything except for play drums and bass in that. The final project I release under is called Heavy Blink, and I put out LoFi Beats. I’ve even had tracks reach over 250k streams on Spotify.
Outside of my own projects, I have worked in a variety of genres. I’ve written, produced, mixed, and mastered pop songs for the artist No False Feelin’, one of which got in the UK Top 40 Spotify playlist and has almost 1 million streams. I currently create drum and bass remixes for a client, some of which have over 2 million streams. I’ve done mixes for events such as a dance recital and a business event. I’ve also done some audio cleanup and sound design for a live voice over group that do their anime in person. Right now I am working on a mixture of my own stuff, and with clients. For example, I am beginning to produce, mix, and master a death metal album, and also at the same time a teen pop style song. I love the variety that comes with this line of work.
I am also super nerdy about the gear and technology revolving around music. I could talk for days about my favorite plugins for specific things. Don’t even get me started on EQs. I began as just a guitar player, so my gear obsession has definitely been more towards pedals, but the more I got into production, the more this expanded to everything.
Outside of music, I am into a lot of different things. I love to connect with nature, whether this is through hikes or even making terrariums. I really enjoy skateboarding, playing rugby, and running. I’m also into creating things in general, I always have some DIY projects going, whether that is woodwork, or electronics. Before going full-time as a freelancer, I was a software developer for 6 years, so programming is something I still enjoy and do in my free time. Of course, we can’t forget about how much I enjoy spending time with my wife and my friends.