
Let’s discuss about the audio interfaces that works well with Neural DSP plugins/software. Being a guitar player, the world of guitar amp plugins must have tickled your fancy at some point during your musical journey. Such plugins are not only a cheaper solution but offer a wide array of tones through their user-friendly interfaces.
In a nutshell here is our list:
1. Focusrite Scarlett Solo 2i2
4. UAD Apollo Twin X Duo (Thunderbolt)
One such brand that specializes in guitar plugins and amp simulation software is Neural DSP, which provides incredibly realistic digital recreations of analog effects in a highly intuitive package to interact with without breaking the bank. However, an essential part of the setup that will help bring your guitar and your plugin together is an audio interface.
In simplified terms, an audio interface converts the signal coming from your guitars, line instruments, and microphones to a language that is easily understood by your computer. The most crucial aspect of such interfaces is their ability to reduce latency and provide pristine sound, which would otherwise be unachievable through mixers or built-in computer sound cards of the past.
Our list includes products from renowned brands, like Focusrite, Audient, SSL, Universal Audio, Apogee, and RME. Each audio interface packs a significant amount of features and does a great job of helping you reap the benefits of your Neural DSP plugins.
Top 7 Audio Interfaces For Neural DSP
1. Focusrite Scarlett Solo 2i2
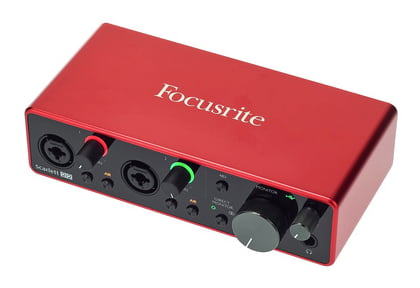
Audio interfaces from Focusrite are commonly seen in most recording studios today.
Part of this is how easy these units are to set up and use. I’ve been a proud owner of a Scarlett Solo for many years, as it perfectly fulfills the requirements of my small-scale studio setup. I’ve created a ton of guitar instrumentals with this tiny yet powerful unit.
The Scarlett Solo 2i2 3rd Gen takes things further with enhanced capabilities and much more control to have your setting just right. Measuring just 6.9″ x 1.9″ x 3.9″, the audio interface doesn’t take up too much space on your workstation. In addition, its deep scarlet-colored metallic exterior looks wicked cool and stands out in your workspace.
Key Features:
- Inputs
The audio interface has an easy to comprehend front panel. Starting from the left, the unit has two combo input jacks with identical controls. The combo jack allows connectivity with an instrument through a quarter-inch cable and can also accommodate a microphone using an XLR cable.
Having two combo jacks at your disposal will enable you to connect a guitar and a microphone simultaneously.
- Input Controls
Each input has a gain knob surrounded by LED rings to indicate the level of the signal. For example, green shows an input level of -24dBFS, orange indicates a level of -6dBFS showing that the signal is close to clipping, and red shows that the signal is, in fact, clipping.
Each input also has a couple of buttons labeled “INST” and “AIR” that change the behavior of each combo jack. When an instrument such as a guitar or bass is connected, the INST button adjusts the input level and impedance accordingly. The AIR mode replicates the classic transformer-based preamp from Focusrite.
- Monitoring
The following section, marked by a small horizontal line, gives you controls for monitoring your sound. The “DIRECT MONITOR” button is of the utmost importance here as it helps choose between off, mono, and stereo settings.
A nearby LED lights up to show the selected mode. The next button in this section is the “48V” phantom power button that directs phantom power to both combo jacks in case a mic needs it. The back of the audio interface has “LEFT” and “RIGHT” line outputs to connect studio monitors.
The level of the monitoring can be easily set by rotating the large “MONITOR” knob in the monitoring section.
- USB Connectivity & Headphone Output
Also on the back panel is a USB 2.0 port that can be used to establish a connection between your computer and the audio interface. The corresponding USB indicator on the front panel lights up when the Scarlett 2i2 uses bus power. Finally, you get a quarter-inch jack for your headphones with a dedicated knob to adjust the headphone level.
Pros:
The 2i2 from Focusrite is a great option when you’re looking to record a line instrument or microphone. You get a couple of combo jacks and plenty of controls to adjust the level and impedance depending on what is being connected. The unit can be great for bringing your electric/bass guitar and your Neural DSP guitar plugin together.
Cons:
The audio interface may not be compatible with AMD CPUs, so that is something you need to take into consideration before buying the unit. Also, if you’re an Apple enthusiast and wish to use the device with the Garage Band software on your iPad, you may face some random power issues.
2. Audient iD14 MKII
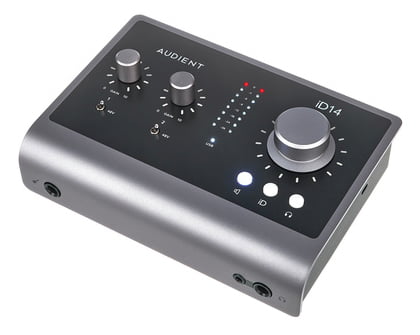
Audient’s audio interface is uniquely designed to support a multitude of controls and I/O options.
The unit sits nicely in your workspace with the controls facing upwards for easy access, while the inputs and monitoring connections at the back keep all your wires organize to avoid clutter. The user-facing panel, too, has some I/O connections for features that are readily used.
Many audio interfaces have their limitations. While they do what they’re supposed to, having controls to change different aspects of your DAW or guitar plugins, like software from Neural DSP, Shreddage 3, Ample Guitar M Lite, etc., is unheard of. However, as you’ll read below, the smartly engineered Audient iD14 takes things a step further.
Key Features:
- Combo Jacks
The controls on the user interface are adequately spaced to avoid clutter. Two combo input jacks on the iD14’s back panel support XLR and quarter-inch connectivity. Each input has a separate set of controls.
Firstly, the level can be adjusted by rotating the “Gain” knob between a range of 0 and 10. Secondly, if you’ve connected a passive mic to any of the inputs, you get a switch for each combo jack that activates the 48V phantom power. Finally, there’s also a quarter-inch jack on the front-facing panel to connect your electric guitar.
- Metering & Connectivity
It’s important to know when your signal is nearing clipping. For this purpose, most audio interfaces have some sort of metering mechanism to let the user know that the levels need adjustment. The iD14 has 8 pairs of LEDs, from 0 to -36, designed to indicate the signal level.
The unit also has an ADAT optical input for enhancing your input options and a very convenient USB-C port to connect to your computer.
- Output Leveling
The largest knob on the iD14’s user interface is programmed to control output levels. However, here is where things get interesting. The knob has a button strip below it which helps to select which output level it controls.
The back panel has 2 stereo outputs, the levels of which can be controlled by pressing the main output select button and rotating the large knob. The front panel has dual headphone outputs (quarter inch and 3.5mm), which can be controlled by selecting the headphone output mode.
Finally, when pressed, the “ID” button turns the knob into a scroller to adjust different parameters in your DAW or plugins like the Neural DSP.
Pros:
This versatile audio interface has a wealth of inputs and outputs for any type of situation. A couple of combo jacks, a separate guitar input, a couple of stereo outputs, a headphone output, you name it, and the iD14 has it. Not only that, but the unit also lets you scroll or control different features of your guitar plugin directly.
Cons:
The guitar input on the front panel seems too hot and will likely clip your signal even with the levels turned down unless your instrument has mellow single-coil pickups. Also, you’re likely to hear clips and pops due to buffering issues on some operating systems.
3. SSL 2+
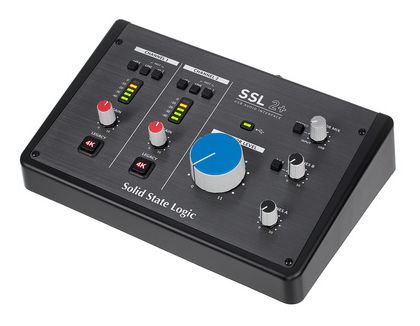
The SSL 2+ looks like a very high-end audio interface, even though it is quite affordable.
If you’re looking for multiple input/output options, the 2+ from SSL delivers in this regard. The user interface has a nice spread of controls, and the back panel is organized so you can determine, at a glance, what goes where.
This bus power-enabled unit connects to your computer through a C-type USB port. You’ll find a midi input/output on the back, two headphone outputs, 2 pairs of RCA stereo outputs, and a pair of quarter-inch outputs. The back panel also includes 2 combo inputs for XLR and quarter-inch connectivity.
Key Features:
- Input Channels
Featuring two combo jacks on the back panel, the SSL 2+ has detailed controls to adjust different variables pertaining to the inputs. Pressing the +48V button activates phantom power to juice your active microphones.
The input controls can be adjusted accordingly depending on which instrument you wish to connect. The “Line” mode is adequate for connecting keyboards and synthesizers to the audio interface. The “Hi-Z” mode, in combination with the Line, adjusts the input level and impedance to suit guitar and bass connectivity.
Each input has a gain knob ranging from 0 – 10 to adjust the gain level. A helpful LED metering strip (0 to -40) comes handy to know when your signal is in the clipping range.
- Legacy 4K
The 4K button for each combo input brings something unique to this audio interface. If you’re looking to add some harmonic distortion or a high-frequency EQ boost, the 4K feature can do both. Modeled after the infamous SSL 4000 unit, the 4K option is especially significant when used with acoustic and electric guitars.
In addition, it will surely add value when experimenting with your Neural DSP plugin.
- Output Leveling
An interesting feature of the monitoring section is the “MONITOR MIX” knob. Turning it to the far left lets you hear and control the levels of both input channels. Moving the knob to the far right delivers sound from a USB source. Keeping the pointer in between the two extremes will give you a blend of both sounds.
The neighboring “Stereo” button will be activated when stereo instruments like keyboards are connected to the audio interface.
- Headphones & Monitor Level
The audio interface has dedicated knobs to adjust the level of each headphone output on the back. Phones B also have a “3 & 4” button linked to it that feeds USB streams into the headphone output marked “B.” With the “3 & 4” button deactivated, two users can listen to the same mix via separate headphones.
Finally, the large “MONITOR LEVEL” knob sets the volume of your monitors.
Pros:
The 4K feature is especially great when connecting an acoustic/electric guitar with the audio interface. The HI-Z-powered inputs are ideal for guitar players looking to bridge the gap between their instrument and their Neural DSP plugins. In addition, two separate headphone jacks are quite helpful if you and a friend want to listen simultaneously.
Cons:
The circuitry under the hood is not the best, as the controls may get finicky after extended use. The headphone jacks seem too quiet and cannot drive some headphones. Even the I/O ports on the back seem to wiggle around a bit.
4. UAD Apollo Twin X Duo (Thunderbolt)

The Apollo Twin X Duo may look simple, but don’t judge this book by its cover.
If you’re not distracted by the big knob in the center of the user interface surrounded with fancy LEDs and the cluster of tiny buttons all over the place, you’ll be amazed by what the unit packs in terms of I/O options. There’s more to it than just the single guitar input and headphone output on the front.
The unit has two combo input jacks, a pair of outputs for your monitors, and stereo line outputs. The unit is bus powered, so you don’t need to have the power supply around when connecting the Apollo Twin X Duo to your computer. You’ll also find an optical ADAT/S/PDIF output to communicate with another unit with a similar port.
Key Features:
- Level Knob
The cornerstone of the UAD Apollo is the sizeable multipurpose knob that sits at the unit’s center. The behavior of the knob can be decided by pressing the “Preamp” or “Monitor” buttons. When in Preamp mode, it increases the preamp level when moved clockwise.
The Monitor button helps toggle between your monitors and headphones. Both levels can be controlled through the level knob.
- Button Strip
The button strip on the user interface features 6 dual function buttons depending on the selected mode. The corresponding LEDs light up above each button to make it easier for the user to understand which button functionality is currently activated.
- Preamp Mode
The first button helps toggle between a quarter-inch and XLR mode for both combo jacks. The second button acts as a high pass filter and eliminates unwanted rumble and noise around the 75Hz level. The self-explanatory +48V button activates phantom power, whereas the “Pad” button reduces the XLR signal by 20dB to control transients.
The button strip also has a phase inversion button, so you don’t have phase issues if your setup has multiple mics. Finally, the “Link” button pairs both input channels to act as stereo.
- Monitoring Mode
In monitoring mode, you can activate the talk back feature by pressing the first button and then “Dim” the sound coming from the monitors by pressing the nearby button so your voice can be heard over the mix. You can select another set of outputs or switch between different monitoring functions through the available controls.
Pressing the mono button merges both signals to help you identify leveling or phase-related issues. Finally, the “Mute” button silences the sound of the monitors. One thing to note is that the headphone volume cannot be muted by pressing the mute button.
Pros:
The button strip on the Apollo Twin X Duo is very well thought out and gives you a multitude of features in two separate modes without taking too much space on the interface. The high pass filtering and pad features make things exciting when using guitar plugins from Neural DSP. A ton of inputs and outputs at your disposal eliminate the need for an upgrade.
Cons:
Although this audio interface from UAD is feature-rich, the unit could’ve benefitted more from better preamps. However, if you’re planning to use the device to pair your guitar with a guitar plugin, you may overlook this flaw. Furthermore, considering the hefty price tag, the interface should have had better compatibility with Windows operating systems.
5. Apogee Duet
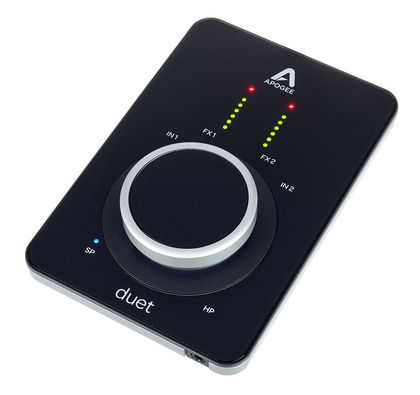
The people at Apogee have outdone themselves with this futuristic-looking audio interface.
Most straightforward in its design compared to the other audio interfaces discussed so far, you won’t see a lot of button controls or too many input/output options on the Apogee Duet 3. This 3rd generation interface relies much more on the proprietary app to showcase most of its features.
Being so sleek and compact, the device measures only 4″ x 5.9″ x 1.1″ and weighs a minuscule 1.4kg. The interface comes with a handy case that has enough space for the device and all the cables that comes with it. The Duet 3 is bus powered and connects to your computer via a USB C port.
Key Features:
- The Hidden I/Os
Apart from the solitary headphone jack on the front of the unit, there aren’t any other inputs or outputs to be seen. The Duet 3 owes its tiny size to the available breakout cable that connects to the back of the unit and offers two XLR connectors, two quarter-inch connectors, and a couple of outputs for studio monitoring.
- The Interface & Latency Free Monitoring
What stands out the most on the user interface is the large rotary knob in the center. The knob is clickable, so you can press it to toggle between the two inputs, monitoring speakers and headphones. Rotating the knob will adjust the level of whichever option is selected. Long pressing the knob will mute the desired input/output.
You’ll also find LED metering on the front panel to show recording and monitoring levels so you can prevent clipping by making the necessary adjustments. The Duet 3’s latency-free monitoring and ability to handle lag-free DSP processing while recording makes it a prime candidate for Neural DSP sotware and guitar-related plugins.
- Apogee Control 2
The majority of the magic occurs on the Apogee Control 2 app the audio interface comes with. The app allows you to activate/deactivate different features and adjust various parameters on the device. The inputs can be set to microphone, balanced/unbalanced line level, or instrument level.
Through the app, the two inputs can be paired together for studio recording. You can activate the phantom power of the Duet 3 through the software to drive your power-hungry microphones. Furthermore, you can also set the gain level of each input with ease. The polarity invert feature is great when you’re looking to correct phase issues of multiple microphones.
When it comes to monitoring, you get options like panning, setting monitoring levels, and soloing or muting different channels.
Pros:
The Duet 3 is incredibly compact, and the inclusion of a case adds to its portability. In addition, the preamps are exceptionally clean and powerful. Its latency-free operation and flawless sound delivery make the audio interface ideal for use with the Neural DSP plugins.
Cons:
Although the breakout cable keeps the audio interface small, the whole ordeal is a bit clumsy. With all the inputs and outputs plugged in, be ready to grab the interface as it slides off the edge of your workspace because of the added weight. Also, if you’re looking for more headphone options, the Duet 3 is a bit limiting.
6. RME Babyface Pro Fs
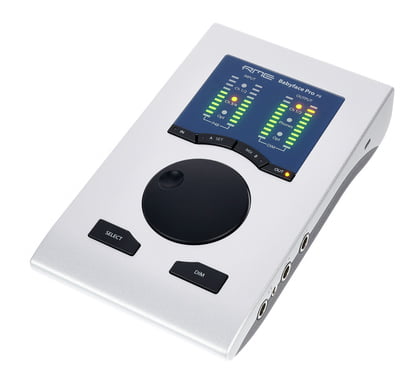
This offering from RME has a name that doesn’t do justice to what the Babyface Pro is capable of.
The unit is surrounded by I/O options. You get a whopping 12 inputs/outputs on this sleek device which is quite an achievement. The Pro Fs is made mainly of aluminum and measures just 1.4″ x 4.25″ x 7.1″. Its slightly slanted interface looks great on your desktop.
Another great thing about the Babyface Pro is that it houses dual DSP chips. So while you monitor or mix your sound, the other DSP chip can provide latency-free processing. This ability puts this RME interface on the list, as it will work seamlessly with guitar plugins like the Neural DSP.
Key Features:
- Panel 1
Hidden on the back panel are XLR inputs that accommodate microphones and line inputs. Next to these are a couple of XLR outputs. A hidden feature of the interface is that you can set these outputs to +4dBu or +19dBu through a recessed switch on the underside of the unit.
- Panel 2
On the right side of the device are 4 more jacks of different sizes and capabilities. Firstly, you’ll find two more inputs here labeled “IN 3” and “IN 4” in the shape of quarter-inch ports. Next to the inputs are a couple of headphone outputs, one in a quarter-inch representation with a higher impedance and a lower impedance 3.5mm output.
- Panel 3
The left side has more I/O options. Five of them, to be exact. The audio interface boasts optical inputs and outputs for ADAT or S/PDIF connectivity. You’ll also find a Midi I/O connector here, which can be fully utilized with the help of a breakout cable. Finally, the device has a USB type B port for connecting to a computer and a power input jack.
- User Interface
The interface has LED strips to indicate the selection of different inputs and outputs. This selection can be made easily by pressing the “IN” and “OUT” buttons multiple times. The corresponding LEDs light up to show this change. The large dial in the center of the unit can adjust the level of the selected input/output.
The large “Select” button lets you choose between left, right, or both channels, while the “Dim” button helps reduce the output level instantly.
- Total mix FX
The available buttons can be customized through the Totalmix FX app that comes with the audio interface. You can also access other features you don’t see on the interface, like the gain level, phase adjustment, pad feature to attenuate transients, an equalizer, and panning options, among other things.
Pros:
It is safe to say that no other audio interface of the Babyface Pro Fs’s dimensions will give you as many options in terms of outputs and inputs. In addition, the user interface is highly customizable to suit your needs, and the Totalmix FX app has several features that can help tap the full potential of the RME audio interface.
Cons:
The device isn’t a cheap audio interface by any means. But given the specifications and almost unlimited I/Os the unit brings into play, you’ll be all set to manage any situation you may find yourself in. Unfortunately, another silly shortcoming of the device is that you can only activate the phantom power through the app.
7. UAD Volt 2
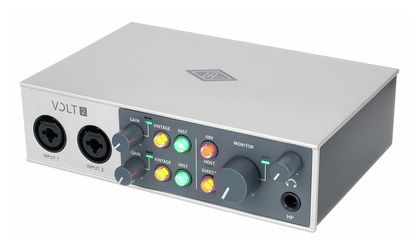
The Volt 2 is another great audio interface from the Universal Audio range of products.
With its easy-to-follow control layout and helpful buttons that light up to show different modes, the Volt 2 is a cinch to use, not to mention that it looks impressive on your workstation. The audio interface measures 8.9″ x 3.7″ x 6.8″ and weighs 2.2 lbs.
Another good thing about the Volt 2 is that it comes with a comprehensive software bundle that includes the lite version of Ableton Live, Celemony Melodyne Essential, Relab LX480, UJAM Virtual Drummer, and a lot more, so you’re ready to go as soon as you unbox the unit. Furthermore, your Neural DCP would be the ideal plugin to use the Volt 2 with.
Key Features:
- Input Controls
The front panel has two combo jacks, so you can choose any combination of line instruments and microphones to suit your needs. Both inputs have separate gain knobs. Also near the gain knob are a couple of LEDs that light up in red to show that the signal is clipping. If the LEDs turn green or yellow, there’s no need to panic.
- Vintage Setting
When the “Vintage” button is pressed, the preamp emulates an analog tube preamp inspired by Universal Audio’s 610 tube preamplifier console. The button lights up in orange when the mode is activated. The Vintage setting can be applied to mics, line instruments, and even guitars. Experimenting with this mode using the Neural DSP plugin brings some exciting results.
- Instrument Setting
If you wish to control the gain level and impedance of the combo inputs, pressing the “Instrument” button will do just that. You may need this feature to drive Hi-Z instruments, including bass or electric guitars. You may also enable Hi-Z input mode with keyboards if what you seek is more gain.
- Back Panel
On the back of the unit is a power switch to toggle between on/off states. Next to it is the power input and a USB-C port for computer connectivity and activation of bus power. The unit also has midi in and out ports. Finally, you’ll find a pair of balanced quarter-inch inputs for your studio monitors.
- Phantom Power
The Volt 2 also has a “48V” phantom power button. When pressed, the button will blink red till the phantom power activates fully or when it’s powering down. The solid red light indicates that both XLR inputs are ready to power condenser microphones when the blinking stops.
- Monitoring
The “Direct” button toggles between stereo and mono settings. When the button turns orange, you’ll notice the panning of both inputs to the left and right. When it is blue, the inputs are centered for mono sound delivery.
The unit also features a quarter-inch headphone output with a separate volume control. Finally, the larger “Monitor” knob controls the level of the speakers connected to the monitor outputs in the back.
Pros:
This offering from Universal Audio gives you lots of inputs and outputs so you can plug a range of devices to your heart’s content. The Vintage mode is helpful as it offers the classic tube preamp sound made famous by the 610-tube preamp console. In addition, you get a free trial of the UAD Spark plugin pack, which brings professional analog sounds to your studio.
Cons:
The audio interface doesn’t seem to have any cons; however, the UAD connect app appears to be a bit buggy. Furthermore, it would be good to have a full-fledged plugin pack rather than a trial version. However, you’re all set if you plan to use it with the Neural DSP sowtware.
Conclusion
Having an audio interface in your studio opens doors to many recording options. When picking out the best unit for your requirements, a few things to look at can be the input/output options, the user interface, the size of the unit, the sound quality, and latency handling.
All the interfaces on today’s list have been carefully selected as they work towards the same purpose, while each one bringing something extra to the table. The Focusrite Scarlett series is known for its stability and efficient processing.
The Audient iD14 MKII not only gives you a wide variety of I/O ports but can also manipulate some aspects of your DAW/plugins with the controls on board.
If you want to tap into the magic of harmonic distortion and EQ boosting, the 4K feature on the SSL 2+ is worth checking out, especially if you’re working with Neural DSP plugins. The Apollo Twin X Duo is another excellent interface, as it provides 6 dual function buttons that help you control every aspect of your sound in the available modes.
On the other hand, the Apogee Duet 3 not only looks wicked cool with its sleek design and handy carry case but can effortlessly provide a plethora of I/O options through its break-out cable.
No other interface is so well endowed with connectivity options than the RME Babyface Pro FS. The Volt 2 from Universal Audio offers a beautiful/user-friendly interface with exciting features like “Vintage” that gives you a taste of vintage tube preamp sounds. We’ve done all we could. It’s now up to you to choose the best option for yourself.

The Integraudio Editorial Team consists of experienced music producers, audio engineers, and plugin enthusiasts dedicated to providing in-depth reviews and guides for music production software.