
Audio plug-ins have always been a critical topic in music production because of their role in shaping sound. m Even though they have been in the industry for decades, their relevance has peaked only in the last few years. Advances in technology have made them become viable and good options for producing and mixing, with excellent results.
Audio plugins are tools that will help you create, enhance or analyze music within your Digital Audio Workstation (DAW). From a technical perspective, plugins just represent lines of code that process a given signal or information and return the desired output.
The incoming signal could be MIDI information (which stands for Musical Instrument Digital Interface. It is basically a form of communication with the DAW regarding performance) or any audio signal to be enhanced, re-shaped, or even analyzed.
Some of the most common types of plugins you will find are virtual synths, equalizers, compressors, reverbs, delays, samplers, analyzers, among others. Just as in the analog world, results may differ from plugin to plugin, depending on the developer.
If the components used by manufacturers differentiated the sound of gear, plugins responses are distinguished by the codes embedded in them by their developers. Despite all the advances in technology and the digital domain, analog gear is still widely used in record studios. Many of them have sonic characteristics that have been impossible to replicate in software accurately.
There are three main plugin categories:
- Instrument plugins
- Effect plugins
- Utility plugins (Analyzing, Metering)
Please note that many plugins can combine two or sometimes even the three of the functions above, but generally, their fundamental functions will be mainly related to only one.
1. Instrument Plugins
The primary role of these plugins is to create sound. It is generally done through virtual synths or samplers.
- Virtual Synths
Synthesizers have been vital in music production since their creation. They have shaped the sonics of many iconic records, giving them unique imprints that have lasted for more than decades. These were costly machines back in the day, and acquiring them implied making a significant investment.
Nowadays, we have the software or digital versions of Analog Synths. A digital synth works the same way as an analog one. The difference is that the process is done entirely in the box, emulating the sound of the actual hardware (sometimes they don’t even represent the hardware, as we will see later).
Synths all have more or less the same controls, but they are displayed in very different ways. Serum is, in my opinion, one of the best synths to make this as easy and interactive as possible without jeopardizing creativity for crazy patches. Here is a picture of what Xfer Serum looks like:
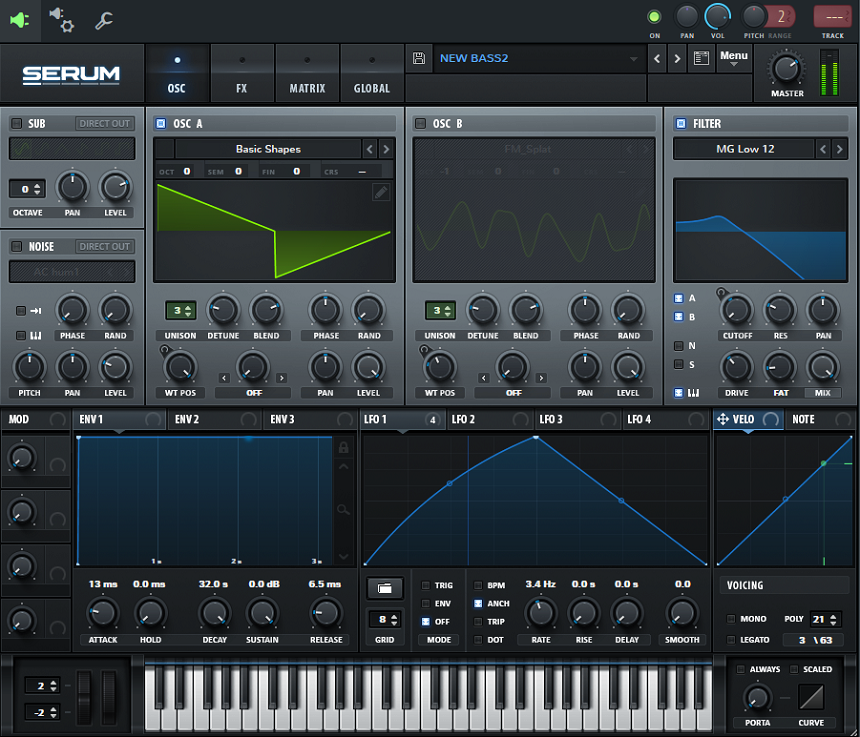
Basically, at the top, you can see “OSC A” and “OSC B,” which will show the waveform of each oscillator. Below each one of them, you have specific controls to tweak them. At the left of that, you have an additional sub-oscillator and a noise generator.
All of these four can be routed to the main filter, which is at the top right. In the lower part of the GUI, you have all the sections for routing different envelopes and LFO’s with their parameters (whether it’s attack, decay, rate, etc.).
Finally, on the left, you have a MACROS knob that allows for extra flexibility and routing. If you look at the top, you will see there is an “FX” tab. It adds effects to your sound (reverb, delay, chorus, distortion, etc.). The matrix tab will show you all the internal routings, whereas “global” is for general preferences of the synth.
- Samplers
On the other hand, samplers work based on pre-recorded audio signals triggered and can be tweaked to taste. A typical example of this type of plugin would be drum machine plugins.
When you need a snare sound, and you trigger it with this type of plugin, the snare will be a pre-recorded sample (which you can probably tweak to your taste). In synths, the sound is made from scratch by adding or subtracting different sound waves and adding effects.
One of the best sampler plugins in the market is called “Kontakt” by Native Instruments. It is the industry standard, and there is a vast amount of elite libraries for this plugin. You can find every type of sample, from the most underground techno, pop, hip hop, all the way up to the most realistic orchestral instruments for film scoring.
In this case, Kontakt uses a Persian Ney original sample and shows all the options available for you to tweak that sample to your taste. The key takeaway is that samplers work based on pre-recorded sounds. The options given to tweak these samples will change from library to library, but the primary sound source will always be a pre-recorded sample.
- Piano’s
Piano’s are definitively one of the most used instruments in music production. You will find piano plugins based on samples and based on the synthesis, and their sound is very different. If you listen to your favorite records carefully, you will start noticing those differences. None of them is “better” than the other. The key is to know the proper context for each one.
- Guitars
Guitars are similar to pianos because you will find virtual synths that recreate guitar sounds and sampled guitars. An added difficulty is all the kinds of guitar you have (acoustic, electric, 12 strings, etc.). Again, none of them is better than the other, but it is crucial to choose the right one.
- Bass
Bass is another one of the “hybrid” families. You will find plugins that work based on samples and others on synthesis. If you want to learn sound design, bass sounds are a good starting point since they have fundamental patches.
- Drums
It’s one of the most vital elements in modern music production across almost every genre. You will most of the time find samples or samplers for drums, but you can still synthesize a kick drum, and some incredible plugins do this.
My recommendation is to check out splice (one of the biggest online sample libraries). If you still want a plugin, I would go for “Addictive Drums 2” by XLN Audio.
Some of the best Instrument plugins in the market are:
- Xfer Serum: One of the best-sounding virtual synths. Extremely interactive and flexible GUI. Because of this, it is also an extraordinary tool to learn sound design too.
- Arturia Pigments: New synth released by Arturia that has a superb sound quality.
- Omnisphere: Probably one of the synths with the most extensive inner library in the market, with good quality. A standard industry across many popular genres.
- Arturia Mini: Emulation of the classic Moog synth.
- Sylenth 1: It was way more popular in the old EDM. If you like Avicii’s records (“Levels” type), then this is your go-to synth.
- Phase Plant (Kilohearts): Very good and one of the most flexible synths out there. Suitable for advanced sound designers to get unique sounding patches or textures.
- Trilian: Amazing acoustic-sounding basses.
- Sub-lab: Awesome plugin for 808’s.
- Keyscape: Great acoustic and electric piano and key’s collection. Perfect choice for R&B or “Jazzy” records.
- Diva: Another great-sounding quality synth. It is more prevalent in electronic music production like techno or tech-house, but it is always an excellent choice.
- TAL U-NO-LX: A great emulation of the classic Juno synth. If you want the 80’s sound, this is your go-to.
- AMPLE Guitar: AMPLE Sound offers a huge variety of guitar plugins that are tremendous and realistic.
2. Audio Processing Plugins
This type of plugin is intended to affect or completely re-shape any given audio signal. The most common type of audio plugins are:
- Filter
Its function is to attenuate or highlight frequencies or frequency ranges from a signal.
The way it does this will depend on how you set its parameters. They are probably one of the most simple yet common effects used in music production.
Type of filter: High shelf, High pass, Low Shelf, Low Pass, Bell, Notch, Bandpass.
Frequency: The “central” frequency or point where the filter will act.
Q: Sets how “wide” or “sharp” the action of the filter will be. The most typical example is in bell eq’s, where a bigger Q value will make the filter act on fewer frequencies, whereas a small Q will do the opposite. Try using large Q values to eliminate resonances and small Q to attenuate or highlight some signal frequencies.
Gain: Sets how much gain (or reduction) the filter will do. For the case of high pass and low pass filters, this value is understood as dB/octave. In other words, how steep the slope of the curve is, and therefore, how “strict” the filter will be. A simple example to illustrate this would be if you imagine two high-pass filters set at 100 Hz, but one at 12db/octave and the other at 24db/octave.
If your signal has information below 100hz, the slope of 24db/octave will suppress this part more (you will hear less of what is below 100hz) than the one with 12dB/octave. PLEASE note that this effect might be desired or not; it varies completely from case to case.
- Equalizer (EQs)
Its purpose is to affect the frequency content of a signal. It is done by combining different types of filters.
There are two main types of equalizers known as parametric equalizers and graphic equalizers. The main difference is that parametric equalizers allow more flexibility in terms of letting the parameters take values more continuously than graphic equalizers with fixed bands.
The excellent part of graphic equalizers, though, is that many of them have a unique tone to them (just like an analog gear) which is many times desired.
A typical example would be a vocal track. Vocals generally have content in the sub-bass area that, most of the time, is unwanted. It muddies up the sound but also takes away significant headroom from your master bus. In the same example, you might also want to boost the high end of your vocals to add crispiness and clarity. Both issues are a perfect job to be solved with an eq.
The most common parameters you will have to tweak in an equalizer plugin are:
Type of filter: Highpass, High Shelf, Lowpass, Low shelf, Bell, Bandpass, Notch.
Frequency: Reflects the central frequency of the filter.
Q: Used to determine how big the affected area will be. It acts inversely proportional, so, for example, at a frequency of 500Hz, if I set up a Q parameter of 0.1, it will affect the frequency spectrum below 100Hz and over 5K. On the other hand, If I set the Q to 18, I will only affect the 500Hz frequency. Again, just as in filters, generally bigger Q’s are used to eliminate resonances, while low Q’s are more often used in tone shaping.
Gain: This will determine how much of that area is affected in dB. You can either boost or cut.
Note**: There is another type of equalizer you will find in the market called “dynamic eq.” These are a combination of a compressor and an equalizer. More specifically, they will act on the signal once a certain level (threshold) is reached or surpassed. They are generally handy but definitively more advanced.
- Compressor
A compressor is an effect designed to affect the dynamic range of a signal.
The easiest way to understand a compressor is to imagine someone inside this box or unit that is “moving the volume” of the signal according to the parameters you set. Let’s use vocals again as an example.
A singer will usually sing the verses softer than the choruses and, even though this is completely fine and many times desired, sometimes the difference could be too much for a mix to sound right.
A compressor will help you with this problem by making the loudest parts softer and making the softer parts louder (through the make-up gain). The way it will do it, though, is critical in the results you will achieve, and thus, compression is one of the most challenging effects to master.
Many re-known engineers have said it took them at least three years to master these guys completely. This is not only because they are complex but also because hearing the subtle differences requires a lot of practice.
There are mainly five types of compressors:
- FET compressors: Field effect transistor compressors are characterized for coloring sound and are extremely fast. The most typical example of this type is known as “1176”. You can find different plugin brands like Waves or Slate.
- VCA compressors: Voltage-Controlled Amplifier compressors are known for a massive control on attack and release times, with little or less coloring of the sound. It makes them suitable for virtually any situation.
- Tube compressors: This type of compressor is very well known and used because of the unique color they add to the sound. They are known for this exceptional warmth but be careful; this is not always a desirable effect.
- Opto compressors: Optical compressors work based on the light in their resistors. The signal makes a literal light shine, based on the incoming energy, into a light-sensitive resistor, informing the compressor how to act. Because of this, Opto compressors have a less “sharp” response being ideal for vocals or bass. The “LA2A” is one of the most classic models of this type of compressor. So, the main difference between the first four is their tonal response due to their built-in circuit (or emulation for plug-ins). It also makes some compressors faster than other ones, and thus each one of them is generally better suited for different applications
- Multi-band compressors: Multi-band compressors are compressors designed to act only in a specific frequency range.
Imagine you have a drum bus, and you need to compress the high range because it sounds harsh. If you dial in a regular compressor, it is very likely that the compressor will get triggered by your kick drum and the low-frequency range, given that these waves have more energy.
A multi-band compressor solves this problem, allowing you to compress directly on the frequency range you want.
The main parameters you will have to set on a compressor are:
Threshold: It is measured in dB, and once the signal surpasses a specific value (threshold), the compressor will start acting, reducing the signal’s volume.
Ratio: It tells the compressor how much gain reduction to apply to the signal that surpassed the threshold. If the ratio is 2:1, it will reduce the signal to half.
Attack: Sets the amount of time it takes the compressor to start acting once the signal surpasses the threshold.
Release: Sets the amount of time it takes the compressor to stop acting once the signal has gone back below the threshold.
Knee: Determines how “strict” the compressor acts between compressed and uncompressed signals. A knee of 0dB will imply no compression for a signal below the threshold and full compression above the threshold.
Higher knee values will make the compressor act increasingly more in the signal that is further away from the threshold (coming from below) and take longer to reach its full potential for the signal above the threshold.
Makeup Gain: Sets up the gain to make up the reduction on the original signal.
- Limiters
Limiters are compressors that have a very high ratio. The exact definition varies among experts (some say it’s above a 10:1 ratio, others above 20:1, and so on until infinite:1). They are compressors that practically suppress the signal above the threshold.
They also have extremely fast attack and release times. Their most common use is mastering, even though they also are wildly used in the production process on certain occasions.

Fab Filter Pro L2
- Gate
This type of plugin, as its name says, acts as a gatekeeper to the signal. In short, the gate will not let pass (in other words, it will suppress) signal that is BELOW a certain threshold.
One of the most common applications for this could be a singer, or a podcast recording, where the signal has a lot of noise in the background while the singer or the person is not talking. DO NOT confuse with audio restoration plugins.
A gate will NOT remove the annoying sound while the singer sings. It will remove it while the singer is quiet and assuming the noise level is always way lower.
The main parameters you will have to set on a gate are:
Threshold: Sets the value that opens the gate. When the signal is below this value, the gate will not let it pass and therefore is like if the channel was silent
Attack: Sets the amount of time it takes to open the gate once the noise has surpassed the threshold.
Release: Sets the amount of time it takes to close the gate once the signal has gone below the threshold again.
- Saturation
Saturation plugins are designed to add harmonic content to a given signal.
As we might expect, this makes saturation plugins significantly different from one another since the algorithms they use to achieve this can be highly different. One of the most common uses of saturation is in the bass to give them more presence in a mix (especially in low-quality sound systems).
Still, honestly, nowadays, saturation plays a massive role in music production in general. Sometimes, mixing engineers will even add saturation to their final mix buss for a touch of warmth.
The main parameters you will have to set on a saturation plugin are:
Drive: which stands for how much you want to “distort” the signal.
Dry/Wet: This allows you to have flexibility in letting some dry signal pass through (i.e., utterly unprocessed signal). This parameter is handy, especially when doing parallel processing. Distortion effects are the same as saturation effects but in the extreme version.
- Bit-crush
This type of distortion/saturation is generated by reducing the resolution (or bits) of the original signal generating this so-called “low-fi” distortion effect.
- Reverb
The primary use of this effect is to place the signal in a particular space, trying to give depth and width to a sound as we naturally hear it in the real world.
More specifically, reverbs try to emulate the behavior of a sound in a specific environment and how we perceive those reflections. Imagine if you shout in a cathedral, the sound reflection you will hear is not the same as if you shout in a small room of wood. These spaces generate different types of reflections resulting in a very different sound.
There are two main types of reverb. The first one is called the algorithmic reverb. These use mathematical operations to emulate how a sound would behave in a given space. The second type is convolution reverbs. Their main difference is that instead of mathematical functions, they use impulse-response modeling to sample real acoustic reverbs (whether it’s gear or real space).
The main parameters you will have to fix on a reverb are:
- Pre-delay: It stands for the time it takes for the reverb to generate the first reflections (early reflections). It is one of the most overlooked parameters in reverbs as it plays a huge role in how far or close we perceive the sound. The higher the pre-delay, the closer the sound will feel, but be careful not to overdo it because it can quickly start feeling unnatural.
- Mode: It’s used to set up the type of reflection. Depending on the plugin, you will find different modes, but the most typical are halls, chambers, rooms, plates. It helps give a characteristic tone for the reflections.
- Decay time: Sets the amount of time it will take for the sound to be completely quiet. It is usually known as the “tail.” Larger decay times will imply longer tails.
- Size: As its name states, this changes the size of the room or place we locate the sound
- Early reflection: Sets the amount (or volume) of early reflections you will perceive. These are the first reflections that come back from the sound once it has interacted with space. They are generally “cleaner” (because they have usually had fewer reflections across the room before getting to your ears) and play a vital role in how your brain defines the size of the space you are in.
- Late reflection: As opposed to early reflection, these are the later reflections that will probably arrive in your ears after more bounces in the space. This type of reflection is more related to what we defined earlier as the “tail.”
- Dry/Wet: Same as before, this parameter will allow you to mix processed and unprocessed signals.

Valhalla Vintage Verb
- Delay
They have a similar purpose as reverb, giving depth and width to sounds as we hear them in the real world but done differently. They give echoes from a certain signal. Some plugins will allow for additional coloring for these echoes.
The main parameters you will see on a delay plugin are:
- Time: The time to reproduce the delayed signal. You can sync it to the song’s bpm (a half note, an eighth note, etc.) or through milliseconds.
- Feedback: Used to specify the number of echoes. A low feedback value will give just a few echoes, whereas a high value can make the plugin even saturate or collapse.
- Dry/Wet: As usual, it is to control the amount of dry and wet signals. In this case, you can interpret it as the volume of the echoes versus the dry signal.

Kilohearts Delay
- Phaser
This effect creates what is known as a comb-filtering effect around the desired frequency.
It is a modulation effect, and it gives a very distinctive character to the signal.
The main parameters you will have to set on a phaser are:
Frequency: Sets the frequency center for the comb-filter
Depth: States how far of that frequency the filter will move
Rate: How fast will that filter move
- Flanger
This effect is highly similar to a phaser, and you will generally see similar parameters. The main difference is how both effects create these notches (or comb-filtering), and therefore they sound different, but the fundamental idea is extremely similar.
- Chorus
As its name states, this effect intends to pretend that a unique signal is interpreted by more than one source, thus giving a “choir” effect.
The best way to understand this effect is to imagine a chorus singing the same melody. You will have this “choir” effect given because of slight delays in the different singers and minor differences in pitch. In the plugin version, this is done by duplicating the signal and altering the timing and/or pitch.
The main parameters you will have to set on a chorus are:
- Delay: Sets the delay between the original signal and its copies. Bigger delays will make the sound wider
- Depth: Similar to flanger and phaser, it sets how far the modulation will reach. You can think of it as “exaggerating” more the effect.
- Rate: Sets the frequency of the modulation.
- Feedback: Determines how much of the output signal will be re-fed into the plugin again, creating a more extreme version of the effect.
- De-esser
This type of plugin is mainly used in vocals. Its primary purpose is to tame some consonant sounds like the s’s or f’s of a singer that cause some high pitch frequencies that can be annoying for our listeners. In reality, they are just a multi-band compressor or dynamic equalizer specially designed for this.
The main parameters you will have to set on a De-Esser are:
- Threshold: As within a compressor, sets when it will start compressing
- Frequency: Gives the plugin a reference for where the annoying noises would be. S’s, even though they are the same letter, might have different frequencies from singer to singer or even from language to language.
- Vibrato
It consists of modulating the pitch of a given signal to gain more expression. It is a concept that comes from singing but can definitively be used in other instruments too.
- Tremolo
Very similar to Vibrato, but in this effect, the volume is modulated instead of the pitch.
- Granulizer
Slices a piece of audio into small grains so then you can loop/playback the sample(s) again according to the parameters you set in the plugin. It is perfect for creating different textures from the same sample.
- Ring Modulator
This type of plugin has this name because of how the original circuit looked like in the analog unit. The main idea is to generate a completely new sound wave based on two other initial ones.
To do this, you will always have one original sound wave and a second wave that will modulate the original one (generally a sine wave). The actual results of these combinations can vary a lot depending on the waves used and others parameters set.

- Transient Shaper
Transients are the initial burst of sound a signal has, and these plugins are designed to help amplify or tame transients. They can also work on the sustain of a sound. Definitively one of the most important effects, especially when mixing but still essential when producing.
The best example to illustrate this is the click of a kick drum. That very first snippet of sound, sometimes known as click, can be exaggerated or attenuated with these plugins.
The main parameters you will have to set on a Transient Shaper are:
- Attack: Main control for transient. Adding attack will add transient to your sound and vice-versa.
- Sustain: Same as the attack but with sustain of the sound
- Gain: Many times, as a result of moving the attack or sustain, your sound will end up being louder or softer. Gain is helpful to make up for that.
- Pitch Shifter
Use it to change the pitch of a signal.
Very useful if you want to see how something sounds in a different key (in other words, transpose a whole audio signal).
The main parameters you will have to set on a Pitch Shifter plugin are:
- Semi tones: States how many semi-tones you want to pitch the sound
- Cents: How many cents of a semi-tone. It is a subdivision.
- Preamp
Just as in the analog world, you use a preamp to pre-amplify low-volume signals. They will often raise the volume and add their tone or warmth to the signal. Generally used for guitars or bass but can definitively be helpful in other creative instances.
- Envelope Shaper /Sidechain Plugin
It’s designed to modulate, via LFO or envelope, pretty much any control that your DAW allows you to modulate or automate.
This effect is more advanced, but it is instrumental. It has a lot of uses in modern music production. Just to name one, you could use it to shape your side-chain between kick and base without the need of setting up a compressor to do the job.
The main parameters you will have to set on an Envelope Shaper plugin are:
- Shape: Gives the shape of the LFO.
- Rate: Can be synced or in ms, but states the rate at which your LFO will reset. When set to an envelope, it says how much the cycle will last once it is activated.
- Frequency Shifter
As its name states, this plugin is used to shift the frequency of the incoming signal. However, the difference with Pitch Shifter is that these plugins shift in Hz (as opposed to semi-tones).
You can achieve the most interesting effects with this plugin by modulating the shift with an LFO.
- Harmonizer
Harmonizers are mainly used in vocals to create harmonies on top of the original recording. The plugin will duplicate the incoming signal, pitch it to the desired value (imagine a major or minor third), and add it to the original signal.
- Audio Restoration plugins
They are used to recover and repair damaged or “dirty” signals.
For example, imagine recording for a podcast in an untreated room with a lousy microphone with inherent electric noise. Audio restoration plugins will help you to eliminate that noise from the signal, and some can even help you to isolate your dry voice from the reverb of your room too!
There are some more of these, and we will go through some of the most important out there. One of the best bundles for this purpose is Izotope Rx 8.
- De-noise: Helps delete noises from a signal (in our previous example, it was the microphone’s noise, but it can be anything as long as the sound is constant). These plugins can learn the profile of any sound to suppress it. The most important thing is that the annoying sound has to be constant (by constant, I refer to the same noise, not that it has to be all the time present). So, for example, if the sound that bothers you is the street sound where sometimes you hear people shouting, others horns, others kids, these plugins are not designed to deal with that.
- De-verb: Designed to remove reverb from a signal. Sometimes reverb is desired, but others definitively not, and a podcast recording is a perfect example where you might want your signal as dry as possible.
- De-plosive: Many times, singers or speakers can over-pronounce letter p’s or b’s, generating this burst of air that can be annoying to the final listener (something similar to de-essers but for low-end). This type of plugin helps mitigate this.
- De-click: Sometimes records have literal clicks or glitches in them because of several different reasons. This plugin will help you catch those.
- De-Breath: Used to control breaths. Very useful in signers and also in speech applications.
- De-Clip: Used to restore audio that has distortion! This one is by far one of the most amazing ones. So you can have a distorted signal, and this plugin will help you reconstruct in the best way possible how was the original signal without distortion.
3. Utility Plugins
The primary purpose of this type of plugin is to analyze specific characteristics of an audio signal (usually your mix or master bus). This characteristic can range from a numerical value (i.e., loudness, peak levels, etc.) or graphical (stereo width, frequency content, etc.).
The idea is to get objective knowledge about the audio you are reproducing, especially if you are not in a professional setup to listen with high fidelity. In this article, we will review some of them and how you can use them practically. However, professional audio and mixing/mastering engineers go way deeper and more technical in this topic.
- Spectrum Analyser
A spectrum analyzer is a graph that shows frequency against loudness in real-time.
Generally, they can be set up to different response times, and sometimes you can change the graphical response (i.e., MAX values, peaks, average, etc.). These are great tools to guide yourself when comparing your records to reference tracks.
For example, if you are not in a well-treated room with proper speakers, it is tough to tell whether you have too much sub-bass or not. With a spectrum analyzer, you can easily compare that with a reference track.
- Loudness metering (and others)
Audio signals have many measurable qualities (Peak levels, Energy, Crest factor, Loudness, etc.) that give us essential information about them and use for different purposes.
In particular, though, Loudness is a crucial topic because it plays a massive role in the impact of a final record. In fact, we are facing a global phenomenon called “The Loudness War.”
Loudness can be measured in many ways, but one of the most traditional ones is LUFS which stands for Loudness Unit Full Scale. Spotify and other streaming services say to their users what LUFS they should aim for, and if you upload something different, they will normalize it to the same loudness.
There are many plugins out there that will inform the LUFS from your signal, for example, Waves WLM Plus. With this type of tool, you can optimize your records for streaming platforms or broadcast and TV. Each one of these has different requirements when it comes to loudness.
- Stereo Imaging Plugins
These plugins help to graphically see how open a signal is in the stereo field or if maybe it is entirely mono. It is beneficial not only because you get a sense of the actual state of the signal but also because they are instrumental in detecting phase issues.
Audio Plugin Bundles/Companies I recommend (not in any specific order):
- Fab filter: In my opinion, this company is terrific. Many top engineers and producers use their plugins, and there is a reason for this. The clarity and flexibility position them as one of the best companies out there.
- Waves: Waves is a perfect bundle if you can only afford just one bundle. They sound outstanding, and many top records are made with these plugins. My personal opinion, though, as I mentioned earlier, is that they shine in how complete their full bundle is. With Waves, you will not need anything else. They have everything.
- Slate Digital: Another of my favorites. These guys do amazing plugins and are one of the best price/quality options in the market, in my opinion. They sound amazing, and they are only $9.99 a month. They work on a subscription basis. Definitively worth checking them out.
- Soundtoys: They’re another tremendous plugin company. Their plugin called “Decapitator” is one of the best saturation plugins out there. They also have one of the best-sounding plugins out there. This company is a little bit more expensive, but they are definitively worth it.
- Izotope: Last, but certainly not the least, is Izotope. This company has different bundles of plugins (Ozone, RX, and more) for various purposes. In my opinion, they are also one of the great-sounding plugins out there and used by many pro audio engineers.
- Your stock plugins: Every DAW comes with stock plugins, and don’t underestimate them. Some of them are excellent, especially because they use way less CPU than third-party ones!

The Integraudio Editorial Team consists of experienced music producers, audio engineers, and plugin enthusiasts dedicated to providing in-depth reviews and guides for music production software.