
Knowing how to mix drums is crucial when creating rock and metal. This instrument should be big and punchy and be the foundation for the rest of the tracks in the song. But mixing drums can be challenging because of all the different parts and the frequency ranges they occupy.
As you read this article, you’ll discover how to mix each part of the kit individually and together. With these tips and tricks, you can get heavy drums that will boost your entire song.
First Steps for Mixing Metal & Rock Drums
Once you’ve finished recording your drums, you may want to start processing them right away with EQ, compression, saturation, and more. But no amount of processing will sound good if the drums aren’t sitting correctly in the session. The first details you’ll need to pay attention to are:
- Polarity
- Phase
- Levels and Panning
- Editing and Gating
You won’t need to pay as much attention to these steps when using programmed drums with samples over recorded drums.
Polarity
When recording a drum kit, all the mics will pick up sounds from different sources. There will be traces of the snare in the kick track, hi-hat in the snare track, and crashes in the hi-hat track. This can create problems in terms of polarity, especially with low-end frequencies.
You’ll likely need to flip the polarity if you have multiple mics on one section of the kit. For example, if you have mics on the top and bottom of the snare, the polarity will be inverted because of how the skins move after being struck.
You might notice other inversions of polarity in the different elements of the kit, but mainly in the kick and snare. They can seem thin, making it difficult to achieve a thick, heavy sound.
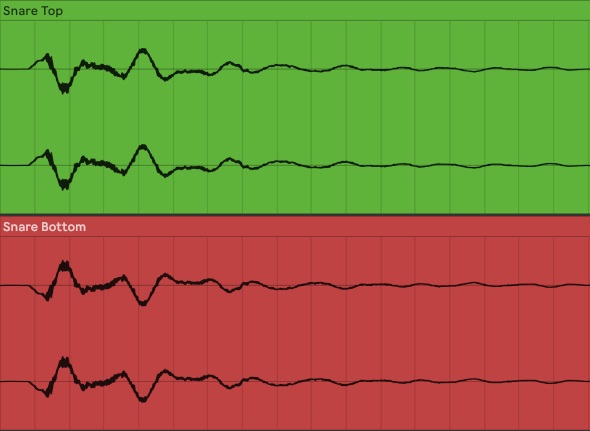
You can look at the waveforms and see if the peaks and valleys are lined up or inverted. If they’re inverted, try flipping the polarity on different tracks and see how the sound changes.
Phase
Using so many mics on so many drum parts will also influence the phase of the tracks. Some frequencies can be canceled out if the microphones aren’t aligned and measured to a particular element.
Overhead mics are generally aligned with the snare so that this issue doesn’t occur. However, slight mismeasurements can influence the overall sound. If you zoom in on the waveforms of the recorded tracks, you’ll see if some sounds were recorded a bit later than others. This is natural to a certain extent, as the microphones are at different distances from each part of the kit.
However, you’ll need to drag the track slightly back in some cases to keep it lined up with the others. Don’t go overboard though, as you can change the alignment too much and make the sound worse. Instead, make minor edits and listen back to see if the sound is becoming fuller.
We made post on the best phase alignmeng plugins, check it out.
Levels and Panning
Once you’ve figured out the polarity and phase of all the tracks, you should start adjusting the levels and panning to ensure everything fits into the overall sound. In general, the shells (kick, snare, and toms) should be slightly louder than the cymbals.
The kick and snare should be centered, while the toms and cymbals should be panned to the left and right. There are two standard panning techniques for drums. Here they are from the perspective of a right-handed drummer with a standard kit setup:
- Audience Perspective: pan the hi-hat and higher toms to the right and the ride and floor toms to the left. Make sure to match the overheads to the individual parts of the kit.
- Drummer Perspective: think of how the drummer hears the instrument. The hi-hat and higher toms should stay on the left, while the ride and floor toms should be on the right. The overheads should match this pattern.
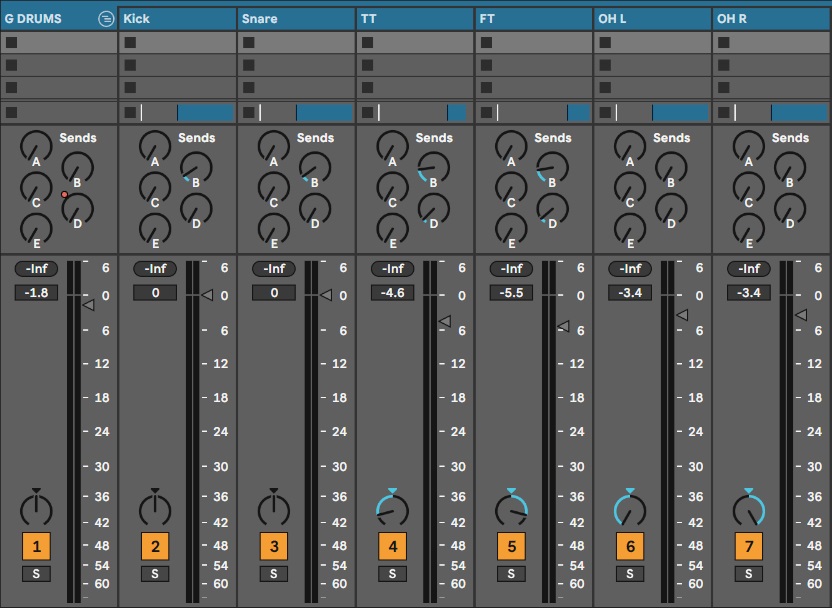
You can also base the panning on how you want the drums to interact with the other instruments. For example, if you want the lead guitar on the left, you could pan the leading cymbal or tom to the right so that there is balance.
Editing and Gating
You can control the sustain and bleed of the kit by editing each track. For example, if the kick is bleeding into the snare, cut the track into parts and remove the kick hits. Of course, this won’t work in every case, especially if both shells are being played simultaneously.

You can also use noise gates for the same effect. You can change the threshold and release to remove unwanted sounds while also controlling the sustain of the signal.
How to Equalize Rock & Metal Drums
Equalizing each part of the drum kit is going to be essential for attaining an incredible sound. You need to distribute the whole instrument over the entire frequency spectrum without letting the most important parts cover each other. Here are some tips for EQing your drums for rock and metal.
Important: Remember that the frequencies mentioned below are suggestions. Each signal will be different because of the drum’s materials, as well as the frequency response of the microphones.
EQing the Kick
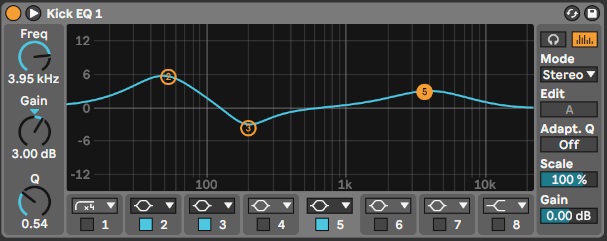
You can break the kick sound into two essential parts:
- Low-end
- Attack
The low-end is one of the kick’s defining sounds, so it must be present. If you feel it could be louder, use your EQ to boost the lower frequencies. Around 60Hz usually works well, but make sure it doesn’t interfere with the bass guitar. You should decide which is more important in what frequency space and go from there.
Your kick drum will also need the beater’s sound to give it some presence. The attack is usually heard in the mids. Some mics are built with a boost around 3kHz for this purpose. Use a bell curve to find the best beater sound for more presence.
There will be other areas of the spectrum that can make your kick sound better. For example, a boost around 100-200Hz can give the instrument a punchier and deeper sound.
Those were a few boosts, but you should also cut some frequencies that aren’t necessary. They might interact with other instruments or even make the kick itself sound muddy. Aim for around 250Hz on your EQ and see if removing that area clears up your kick drum sound.
EQing the Snare
The snare takes up a lot of space over the frequency spectrum. It can have some boxy low-end, mid presence and muddiness, and a snap in the mid-highs. You’ll need to EQ it carefully for the best sound.

The low-end is commonly filtered out with a low-pass filter. This can give space to the kick while also making the snare more present. Be careful not to filter out too much though, as you’ll make your snare sound thin. You might also want to remove some mids, which can sound muddy, and some higher-frequency ring.
If you want a fatter snare sound, boosting some low-mids can be a good idea. The attack will be in the mids to high-mids, and you can get an extra snap with a high-shelf around 7kHz. You’ll just need to see how much the cymbals will be boosted, as they might overpower the snare.
EQing the Toms
EQing toms is similar to working on both the kick and the snare. Again, you’ll want to filter out some of the low-end but not too much so that they keep their boom. You’ll also want to remove some of the low-mid muddiness while also boosting the attack in the mids.
Each tom will be different as they get deeper as you work your way across the kit, so don’t just copy the settings. It’s good to go back and forth between the various toms so that you can get a consistent feeling for fills while also retaining the individual character of each drum.
EQing the Cymbals
Whether you’re working on only the overheads or have mic’d the hi-hat and ride for extra clarity, you will want to filter out much of the low-end. This way, you can avoid the rumble from the shells as well as the muddiness of sustained crashes.
Cutting some of the mids can also help with bleed from the shells, but make sure you’re not removing some of the character from them. The overheads are supposed to give you a clear view of the entire kit, not just the cymbals.
The cymbals will already have a lot of high-end, so you probably won’t need to boost this area at all. You can sweep through the spectrum to find any resonances sticking out and negatively impacting the track.
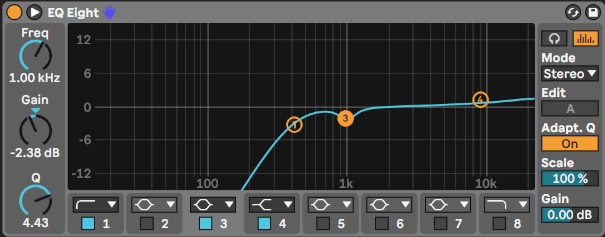
EQing the Room Mics

Room mics are great for compressing and adding character to your drums, but they can also gather low-end rumble and high-end resonances. Using low- and high-pass filters can be a great way to contain the main sound in the mids, giving more clarity to the highs and lows.
Boosting some of the midrange can give extra presence to the kick and snare, making them stick out in the mix and giving the whole kit a consistent feel. Once you’ve done that, you’re ready to start compressing.
Using Dynamic EQ on Drums
One of the best ways to mix your drums is with dynamic equalizers. They can cut and boost like a standard EQ but can be activated using different thresholds and sidechains. This can make it much easier to avoid masking issues between the different parts of the kit.
For example, you can use a dynamic EQ with a sidechain so that certain frequencies from the hi-hat are reduced when the snare hits. This can work better than a compression sidechain because you can still hear the hi-hat clearly as only some of the signal is cut rather than having a drop in its overall volume.
You don’t need to exclusively use a dynamic EQ with a sidechain. The cuts and boosts can occur when the signal surpasses the set threshold on certain frequencies. This can be useful on, for example, room mics. You may not want to remove too much of the low-mids to keep the overall sound stable, but the kick might be too strong when it hits. You can set the plugin to reduce the more obvious frequencies from the kick when they pass the threshold. They’ll return to the normal level after the release time.
Using the different types of EQs works best for mixing drums. You can use dynamic equalizers to work on the instrument’s dynamics and how all the parts work together while also using a parametric EQ to remove specific harsh or muddy frequencies and boost others to make your drums sound as good as they can.
How to Compress Metal & Rock Drums
Now that you’ve made the whole drum kit clear and consistent, you can add compression for extra punch, clarity, and energy. Let’s take a look at each part of the kit again for some tips.
Compressing the Shells
When compressing the kick, a good process is to use slower attack and faster release rates. Here’s why:
- Slow Attack: by keeping the attack time to a slower rate, the compressor will avoid crushing the first transient. This way, the beater will be present and punchy while the tail of the signal will be compressed and brought up.
- Fast Release: if the drummer is playing quickly, having a slow release will reduce the clarity of the hits, and the sound will become jumbled. With a fast release time, you can add some boominess from the tail without it becoming muddy.
These settings can be especially helpful for metal. If the drummer uses a double-pedal, the faster release times will allow the double hits to stay present in the mix.
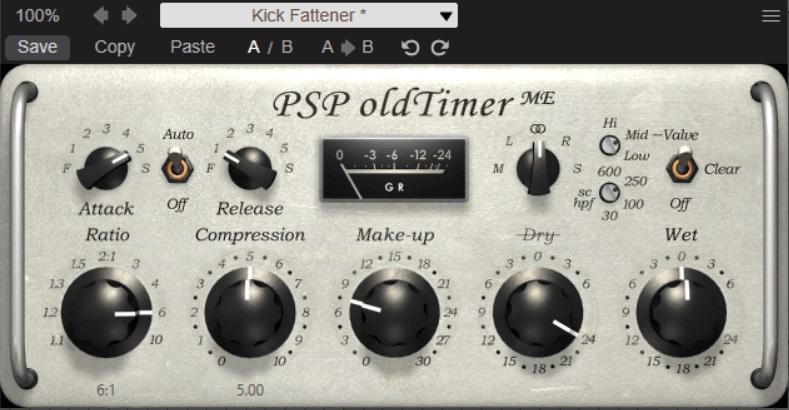
For extra punchiness, play around with the ratio knob. Using a 4:1 ratio is common, but don’t be afraid to raise that to 6:1 or even 10:1 for kick hits with lots of punch.
Compressing the snare and toms can be similar to compressing the kick. Slower attack rates can maintain the snap, and fast release rates will avoid muddiness, especially for faster styles. If you’re looking for a fatter snare or tom sound, try making the attack of the compressor a bit faster. It will level out the difference between the snap and the tail and bring up some of the lower mids.
Compressing the Cymbals and Room Mics
How you compress your cymbals can depend on different factors, like if you have room mics. Many engineers use the room mics to create a consistent sound for the drum kit while also adding lots of character. You can heavily compress these mics to bring up the room sound and make the drums sound punchy and large.

If you do decide to compress the room mics heavily, you probably won’t need to do anything to the overheads or cymbal mics. You can keep the original sound and clearer transients because the room sound can add grit.
Compressing the cymbals and overheads can lead to harsh resonances, so try to keep it light, unless a more aggressive sound is what you’re going for. Quick release times can help you avoid washy rumbling that goes on for too long, and quick attack times can catch the initial transients enough to remove any harshness that can feel piercing to the ears.
Extra Tip: Once you’ve finished compressing, you may need to go back to EQing to remove any harsh or unwanted frequencies the compressor has brought back up.
How to Use Transient Shapers for Mixing Rock and Metal Drums
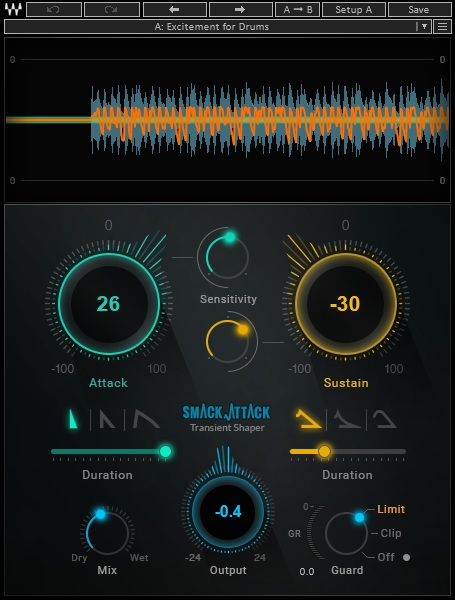
While using EQ, compression, and gates can make your drums punchier, you might still be lacking the intense, dry hits that are so common in rock and metal. A great way to enhance the intensity of the drum hits is by using a transient shaper.
The most basic transient shapers give you control over the attack and sustain of the signal. By using quick attack times and lowering the sustain, you can get fast and choppy hits with little background or room noise. This works really well on the shells (kick, snare, and toms), as you can make them drier than in the original recording.
Blending the shells in with the room mics and overheads will give you a solid overall sound with both space and punchy hits.
Many DAWs have Transient Shapers built-in, though if you want some extra features in it consider checking this post.
How to Use Reverb for Mixing Metal and Rock Drums
Using reverb can be a challenging practice, no matter the genre or style. But there are some recommendations that can quicken your process when mixing. When it comes to fast-paced rock and metal, reverbs with shorter decay times work best. This will keep the hits clear, as longer decay times can jumble up the rhythm. On the other hand, slower songs that deserve an epic sound can benefit from longer reverbs. 80s rock wouldn’t be what it is without a massive sound on the snare.
No matter which reverb you choose, a good rule of thumb is to focus most of it on the snare signal, with less on the toms and little on the kick. Filtering is a must, as the more lows that go through the plugin, the less clarity your mix will have.
Here are some of the best reverb types for mixing metal and rock drums:
- Room
- Plate
- Hall
- Chamber

As mentioned above, sticking to shorter decay times is essential for fast, punchy songs. Smaller rooms and plate reverbs are better for this, but they both have their own distinct sounds. Room reverbs are more natural sounding and can be added to a track without the room’s sound becoming too apparent. Plate reverbs have a stranger sound as they are created using electrical components and resonating metal plates.
Both of these reverbs can fit your drums well without being too obviously present. They are great for styles like punk rock, thrash metal, and funk.
Hall reverbs are much larger sounding, as they imitate the sound of larger spaces like concert halls. They can make your drums sound huge when used well, but can paradoxically make them sound weak when poorly mixed. You need to aim for the right amount of reverb on each part of the kit and use other processors like EQ, compression, and saturation to make them sound the best.
Chamber reverbs are similar to hall reverbs but with a denser sound. They have long decay times, though generally shorter than halls. Rather than imitating different rooms, they are used for placing the instrument in a unique environment like a stairwell or hallway. This makes them perfect for rock, especially if you’re looking for a large, dense drum sound like what you’d hear on Led Zeppelin records.
Depending on the style of the song you’re working on, you can choose the right reverb by understanding these different types. Using them on return tracks can work best as you can send different levels of each track to the reverb. You can also add more effects to bring out the best sound. For example, EQs can filter out the high- and low-end, compression can control the dynamics, and saturation can add harmonic content to make the space sound warmer or brighter.
Consider checking: Top 12 Reverb Plugins 2022 (And 5 Best FREE Plugins)
How to Process the Drum Bus
Creating a drum bus and doing some extra processing can be a great way to get a more consistent and punchier sound. You can use equalization and compression again to remove unwanted sounds and to boost the best-sounding components.

If you prefer parallel processing, you can use sends and returns. However, you can take advantage of the advancements in digital technology and just use the Mix knob on your plugins. This is a fantastic way to crush your kit with compression for added punch, then dial it back a bit so that the drums are still clear.

Adding saturation can also bring up the best parts of the kit. The shells will have more clarity while also sounding more aggressive, and the room mics will add tonnes of character. You can even go for extreme saturation to distort the sound of your kit, which for slower and more epic songs can sound great.
Consider checking: Top 12 Saturation Plugins In 2022 (Best Mixing & Mastering Tools)
How to Mix Programmed Samples
The process is the same but easier if you’re using samples instead of recording a drum kit. You’ll avoid bleed between parts of the kit, and the samples will already be fine-tuned to sound great. You won’t need to EQ and compress them as much because the unwanted sounds will already be gone. You’ll mostly need to focus on getting a consistent sound from the whole kit that will fit into the mix.
Final Tip: Use a Reference Plugin
There’s no better way to figure out a professional sound for your mixes than by listening and comparing your songs to others in a similar style. An easy way to do this is with reference plugins. These processors let you compare your track to one you admire so you can better understand the differences between the two.
Once you have worked on your drums and have them sitting comfortably in the mix, you can import another track you want yours to sound like. The reference plugin will compare both and give you information regarding the frequency responses, dynamics, loudness levels, and more so that you can make any necessary changes to your mix.
Conclusion
Metal and rock drums tend to be heavy, punchy, and big. The best way to get your sound to this point is by carefully using EQ, compression, transient shaping, and drum bus processing. You can add saturation, reverb, and other effects depending on your tastes, but the main consistent sound needs to be done by gluing the sound of the kit and focusing on the dynamics of all the parts of the kit.
With these tips, you can easily get the drum sound you’re looking for when mixing rock and metal drums.

The Integraudio Editorial Team consists of experienced music producers, audio engineers, and plugin enthusiasts dedicated to providing in-depth reviews and guides for music production software.