

Let’s talk about how to connect an amplifier to an audio interface and what we will need for this! Let’s see how we can connect these two devices to each other and what we should pay special attention to.
To connect your audio interface to an amp, you will need one 1/4-inch TRS cable. You should plug one end of the cable into the Line Input on the audio interface and insert the second connector into the output channel of our amplifier.
At first glance, everything is quite simple. However, we need to take a closer look at what types of input and output connectors there are in audio interfaces and amplifiers. Let’s see what types of connectors we need and figure out how to connect them properly.
What types of inputs in the audio interface will we need?
In the audio interface, we are interested in inputs without preamps. They are usually labeled as “line input.” However, most modern audio cards allow us to turn off the preamps on their input channels. It is worth noting that a switch of enabling the preamp on each audio interface can be named differently.
For example, on the Focusrite 2i2 1st Generation audio interfaces under the “Gain” controller, we can see the “Line/Inst” switch.
If we connect to a channel with a preamp, then our signal will have an additional gain, and it can distort the signal.

“Line/Inst” switch under the “Gain” controller on Focusrite 2i2 1st Generation audio interface.
Some audio interfaces have both combined inputs and separate line inputs. For example, the Steinberg UR44 audio interface (like the earlier UR44 model) has a combined channel on the front panel.
Since line input inputs do not need any additional controls, they are usually located on the back panel of audio interfaces.
The built-in preamps can be turned off programmatically, and line inputs can be obtained. Also, on the back panel, there are two separate line inputs without any preamps.
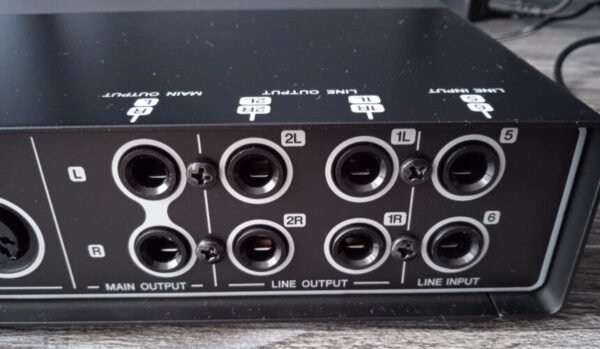
Line inputs on the back panel Steinberg UR44 audio interface.
About the line-level signal
Let’s figure out why this is so. There are several types of audio signals. Consider, for example, an instrument-level, microphone-level, and line-level signal. A line-level signal is a signal that has a maximum allowable volume and does not need additional amplification. The volume of this signal is a professional standard.
The microphone-level and instrument-level signals are weak enough by themselves and need to be amplified to a linear level, which is why the inputs in the audio interfaces for the microphone and guitar have built-in preamps. That is why it does not need additional reinforcement.
This type of strong signal is transmitted from one audio device to another.
What type of output on the amp do we need?
For the right connection, we are supposed to use Line-outputs. Most guitar amplifiers have a line output. If your amp has that output, just plug a jack cable into it, but you have to be sure that your amp is turned out and the volume settings on your audio interface are set to zero.
The line output transmits a signal of a certain power to the line input, which is the volume standard for the line signal.
If your amplifier does not have an output that is signed as “line out,” you can use headphone outputs or special combined outputs to connect to the audio interface.

Suitable for connecting the “Record out/Phones” connector in the upper left corner on the back of the Roland 40XL guitar combo.
The “Headphones/Record Out” connector on your amplifier can be a 3.5 jack jack. This is not a problem because to connect your cable at such a time, you should use an adapter from 1/4 Jack to 3.5 Jack.
Connection to combined input
If, however, we need to insert a cable into the combined input of the audio interface, you should turn the gain knob to zero because the line signal by the amp doesn’t need any power increase.
It’s not a good idea to make the signal volume higher than the linear level because it can damage the built-in preamp of your audio interface.
Remember! If the signal from the line input of the amplifier goes to the combined input, the gain knob must be set to zero.
Attention! Remember this important information.
Carefully read the following information; it is very, very important because when connecting an amplifier to an audio interface, it is quite easy to make critical mistakes that will lead to the failure of your equipment.
- Don’t Connect the Speaker Output to the Audio Interface. In no case do you turn on a cable from the speaker out of your amp to combined or line inputs of the audio interface because there is a significant difference between the line-out signal and speaker-out signal’s power.
- The power of the speaker-out signal is categorically not suitable for linear and combined inputs. It is strictly forbidden to plug a cable connected to the speaker out in them because this is most likely to disable your equipment without the possibility of recovery.
- It is also worth adding that, in any case, you should not turn on the amplifier without a speaker because it can break your amplifier.
- You should always remember that an improper connection can easily break your audio interface.
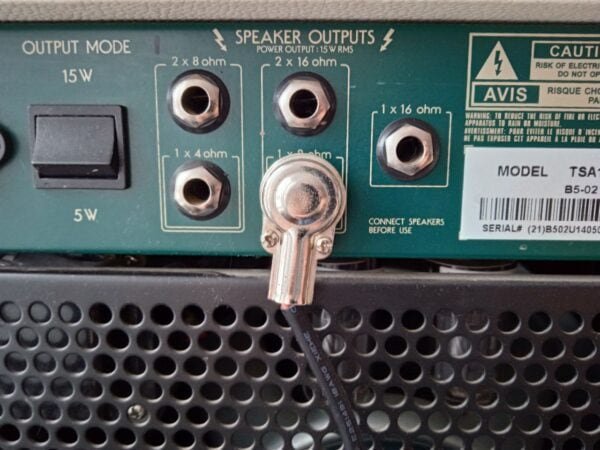
These are the speaker outputs of the Ibanez TSA15H amplifier that we should avoid.
What type of cable do I need?
To connect the line output of the amplifier to the line input of your audio interface, both a balanced and non-balanced 1/4 jack-jack cable is suitable. If you insert the cable into the combined audio interface input, you can use the XLR male – 1/4 Jack wire.
Instruments such as guitars, bass guitars, or keyboards transmit a weak instrument-level signal to the amplifier, which, after processing by the amplifier, turns into a strong line-level signal suitable for transmission between audio devices.
Remember that the choice of the instrument cable that connects the instrument to the amplifier is also very important for recording. When connecting the instrument to the amplifier, an unbalanced 1/4 Jack – 1/4 Jack cable should be used.
Use a long cable to record distorted guitar sounds. A long cable lowers the resonance of the pickup and slightly reduces the high frequencies, which has a good effect on the sound of distortioned sound. The sound becomes more dense at medium frequencies.
Use a short cable to record a clear guitar sound. Due to the reduced number of high frequencies, it is not necessary to use a long cable when recording pure guitar sound. A short cable will provide a good sound of high frequencies, which are needed for the natural sound of a pure guitar sound.
Is it necessary to connect an amplifier to an audio interface if I want to record a guitar?
No, it’s not necessary at all. The level of technology development today allows us not to use an amplifier to record a guitar at all. If you do not have an amplifier or your amplifier does not have suitable outputs for recording, you can always do without it.
Most audio interfaces have built-in instrumental preamps that increase the weak instrument-level signal to the line-level signal, which is the standard in terms of volume. After recording the signal, you will be able to use virtual pre-amplifiers and cabinet emulators in your DAW to saturate the sound with the necessary harmonic distortions and set the tone color of the sound. Keep this in mind, as modern guitar plugins allow you to get very different versions of the sound of the instrument without leaving your workplace.
If you decide to connect the guitar directly to your audio interface, you should use an instrument unbalanced 1/4 Jack- 1/4 Jack or 1/4 Jack- XLR male cable if you want to connect the instrument to a combined input on the audio interface.
Remember that in case of direct connection of the instrument to the audio interface, we need to switch the built-in preamps of the audio interface to the “Inst” or “Instrument” position. However, the name of this mode may differ on different audio interfaces. Remember that before connecting, you should carefully read the instructions for your audio interface.
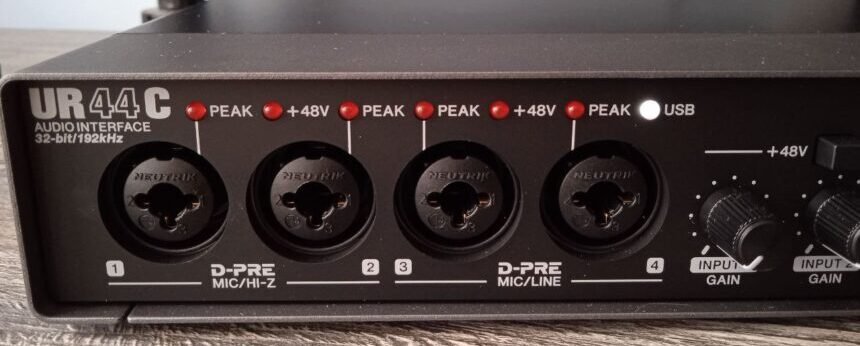
Inputs 1-2 with instrumental preamps on the front panel of the Steinberg Ur44 are called “mic\hi-z.” On this audio interface, the preamps are switched on and off programmatically.
Why does it turn out that I’m used to hearing from the combo?
When recording a guitar signal through an amplifier connected to the card, you will not get the same sound that you hear from the speaker of your amplifier. The speaker is one of the important elements in the signal transmission chain and gives the sound a characteristic color.
When you connect the amplifier directly to the audio interface, you bypass the speaker, and this affects the sound. However, this is not a problem since you can always use speaker emulation in your daw.
What is the best way to connect to a guitar recording?
The best way to connect your amplifier to a guitar is to use the connection of your amplifier to the audio interface using line-level inputs and outputs, as well as recording the sound of the speaker itself using a microphone.
Recording the sound of your amplifier with a microphone will ensure the most accurate transmission of the sound of your amplifier’s timbre. By recording the sound from the microphone and the linear signal at the same time, you will get very great opportunities for post-processing your signal.
For example, you will be able to process a linear signal using VST plugins that emulate the sound of a certain amplifier model and will be able to mix this sound with the sound of your amplifier in the right proportions.
This approach provides a very large variability of the final sound of your part on the record. Most modern records use this approach. If you have all the necessary conditions for such a recording, you should try to record your instrument in this way.
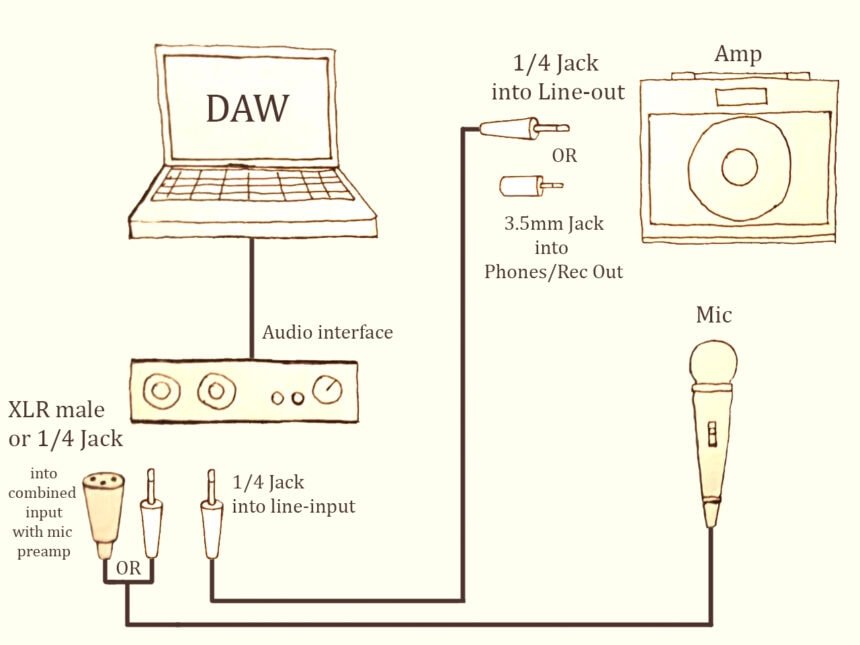
The scheme of the “best” connection for recording guitar.
What should I do after a successful connection?
When recording a signal, you must make sure that the inputs to the recording channels inside your DAW are correctly assigned. Make sure that the routing is configured properly to avoid further confusion. At first – you should set all of the volume knobs that you have found to zero for the safety of your equipment.
Many audio cards have a direct monitoring function that allows you to listen to the signal that enters your audio interface directly from the speakers. In order to hear the signal, you do not need to open a DAW or any third-party applications. This is very convenient because you can adjust the signal level to be suitable for volume by adjusting it on your amplifier.
The direct monitoring function is enabled in different ways on different audio interfaces. If you look at Focusrite 2i2 1st generation and Steinberg Ur44, then on Focusrite, this function is activated by an analog switch located on the front panel of the audio interface. In UR44c, the direct monitoring function is enabled and disabled programmatically using a special driver program.
Remember, before turning on the direct monitoring function, you should set the volume level on your amplifier to the minimum level and only then turn on the direct monitoring function. This sequence of actions will protect you from a sudden and too loud signal from the amplifier, which can harm your equipment and hearing.
Add the volume level gradually until the sound starts to clip. If the waveform is clipping, you should reduce the volume to such a level that there is no clipping on the loudest parts of the signal. It is advisable to check very carefully that there is no clipping since if this happens during recording, there is always a possibility that this distortion of the recording will be critical for further work with it. Remember – incorrect setting of volume levels can ruin your recording. After all the preparatory procedures are completed, you can start recording.
Conclusion
As you may have noticed, connecting the amplifier to the audio interface is not difficult at all. However, if you are doing this for the first time, you should exercise maximum caution and be extremely careful to avoid damage to your equipment.
If you have any doubts during the connection, you should check several times what you are going to do and make sure that you are doing it correctly.
Now that you have connected the amplifier to your audio interface, it’s time to start trying to create your own recordings in DAW. If you don’t use the effects pedals when recording, you can always add the effects you need, such as chorus or vibrato, after recording. Now is the time to create!

The Integraudio Editorial Team consists of experienced music producers, audio engineers, and plugin enthusiasts dedicated to providing in-depth reviews and guides for music production software.