
This article will discuss twelve tips for optimizing Windows 10/11 for music production, DAW/Digital Audio Workstation, audio engineering, and sound design.
Windows 10 and 11 are popular and reliable music production operating systems. They offer a stable and efficient platform for running digital audio workstations (DAWs), virtual instruments, and plugins. These operating systems are widely compatible with music production software, including popular DAWs such as Ableton Live, FL Studio, and Cubase.
Windows 10/11 is designed to run efficiently and perform well, which is essential when working with large audio files and running multiple plugins simultaneously. Moreover, Windows 10/11 supports a wide range of audio interfaces and MIDI controllers, making it easy to connect and use different types of hardware with your music production setup.
Now let’s get to the main topic of discussion.
12 Tips To Optimize Windows 10 For Music Production/DAW
1) Update your drivers
Updating drivers is important in optimizing your Windows 10 computer for music production/DAW. Drivers are software components that allow your computer’s hardware devices to communicate with the operating system and other software. Keeping your drivers up-to-date ensures your computer runs smoothly and efficiently and can help resolve performance or compatibility issues.
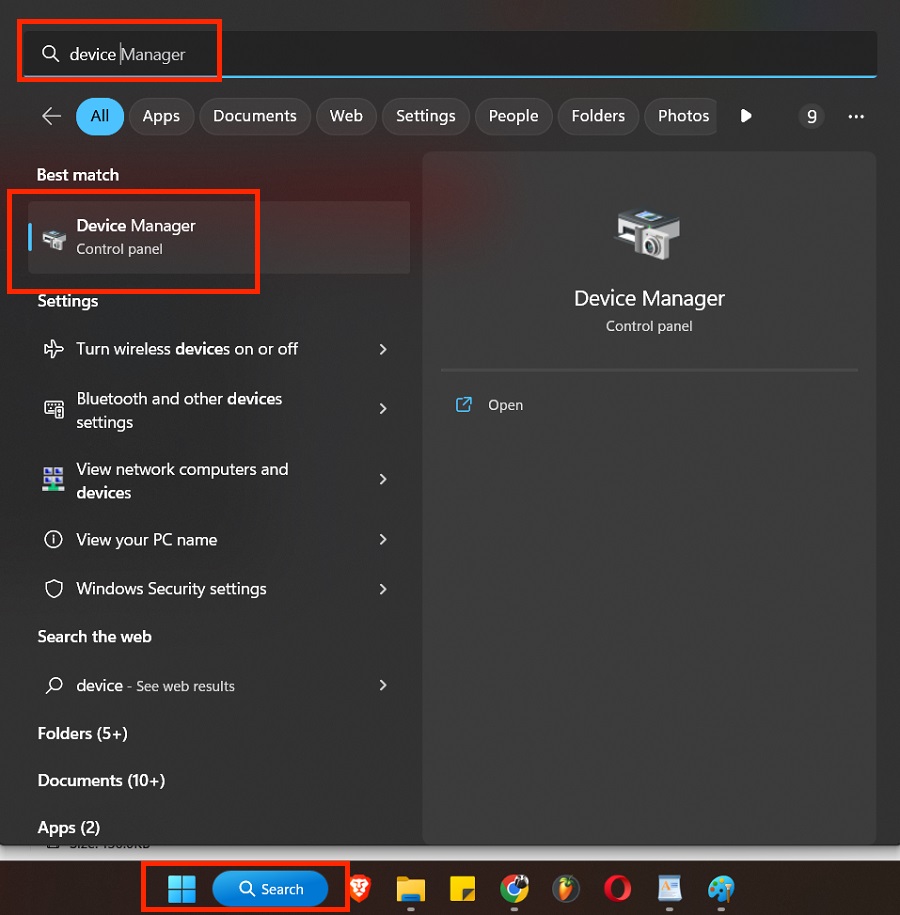
There are several ways to update your drivers in Windows 10. One option is the Device Manager, a built-in Windows tool that allows you to view and manage your computer’s hardware devices. To update a driver using Device Manager, right-click on the device and select “Update Driver.”
You can also download and install drivers directly from the manufacturer’s website or use third-party driver update software to scan your system for outdated drivers and automatically download and install the latest versions. It’s important to note that not all driver updates are necessary or beneficial. Sometimes, updating a driver can cause more issues than it solves.
Before updating any drivers, it’s a good idea to research the specific driver and the update to ensure it’s necessary and compatible with your system. Additionally, creating a system restore point or backing your system before making any significant changes to your computer’s drivers is recommended.
To install the right drivers, look for “Device Manager” in the Windows search bar and open the Device Manager.


Disabling automatic updates is a step that some music producers/DAW users may take to ensure that their computer does not experience any interruptions or slowdowns during music production sessions. By default, Windows 10/11 automatically downloads and installs updates, including security patches, bug fixes, and feature updates, in the background without user intervention.
While automatic updates are important for maintaining the security and stability of your computer, they can sometimes interfere with music production sessions by causing system slowdowns or requiring a restart.
To disable automatic updates in Windows 10/11, you can use the Settings app or the Group Policy Editor. Select “Update & Security” in the Settings app and select “Windows Update.” From there, on Windows 10, you can click on “Advanced options” and choose how updates are delivered and when they are installed.
On the other hand, on Windows 11, go to Settings > Windows Updates, and click on Pause for one week. Alternatively, you can also open “Windows Update Settings” by looking for it in the search bar.
Further, click “Pause for 1 week,” and all automatic updates will be stopped for a week.

It’s not advisable to permanently disable updates on Windows 11 because updates often include critical security patches and bug fixes that can help protect your computer from vulnerabilities and improve its performance. Disabling updates can leave your computer at risk of being compromised by hackers or malware, resulting in the loss of personal data or damage to your system.
Many updates may also include new features or improvements to your computer’s functionality, which can enhance your overall experience. While it’s true that updates can sometimes cause compatibility issues or other problems with music production software, these issues are usually addressed in subsequent updates or can be resolved by adjusting settings or configurations.
For these reasons, it’s generally recommended to keep your computer up-to-date with the latest updates and to only disable updates temporarily if necessary for specific tasks. You can also pause updates for a certain amount or specify a specific date and time for installation updates.
If you have Windows 10 Pro or Enterprise, you can use the Group Policy Editor to disable automatic updates or configure more granular settings completely. It’s important to note that disabling automatic updates can leave your computer vulnerable to security threats and may prevent you from receiving important updates and bug fixes.
Hence, a safer alternative to not be interrupted while producing or recording is to turn notifications off for any restart for updates and to fix the timings of the update outside your working hours. To do that, go to Windows Update, and go to Advanced options.

Then, turn the toggle switch next “Notify me when a restart is required to finish updating” off. Next, just below it, click “Active hours,” and set the time to when you’re not working.

If you choose to disable automatic updates, it’s recommended to regularly check for and install updates manually to ensure that your computer stays up-to-date and secure. Additionally, create a system restore point or back your system before significantly changing the computer’s update settings.
3) Disable startup programs
Disabling startup programs is a step that can help to optimize your Windows computer for music production/DAW. When your computer starts up, it may automatically launch several programs and applications, many of which may not be necessary for music production.
These startup programs can use valuable system resources and slow down your computer, especially if you have many of them. Disabling unnecessary startup programs can free up system resources and improve the performance of your computer.
To disable startup programs in Windows 10, you can use the Task Manager or the Startup folder. In the Task Manager, go to the “Startup” tab, and see a list of all the programs that start when your computer boots. You can right-click on any program and select “Disable” to prevent it from starting up automatically.
In Windows 11, right-click the taskbar, click Task Manager, and the Task manager window will appear.

Go to the Startup Apps tab as shown in the image below, right-click on the app you want to disable, and click on disable.

Alternatively, you can open the Startup folder by pressing Win+R and typing “shell:startup” in the Run dialog box. From there, you can delete shortcuts to programs you don’t want to start up automatically. It’s important to note that disabling startup programs can have unintended consequences and may prevent certain programs from functioning properly.
Before disabling any programs, it’s a good idea to research their purpose and determine whether or not they are necessary for your music production workflow. Additionally, creating a system restore point or backing your system before making any significant changes to your computer’s startup programs is recommended. Disabling unnecessary startup programs can help ensure your computer runs at peak performance during music production sessions.
4) Disable Visual Effects
Disabling visual effects is a step that can help to optimize your Windows 10 computer for music production/DAW. Windows 10 includes several visual effects, such as animations, shadows, and transparency, that can make the operating system look more visually appealing.
However, these effects can use valuable system resources and slow down your computer, especially if you have an older or less powerful computer. Disabling unnecessary visual effects can free up system resources and improve the performance of your computer.
To disable visual effects in Windows 10, you can use the System Properties dialog box or the Performance Options dialog box. In the System Properties dialog box, right-click “This PC” and select “Properties.” From there, click on “Advanced system settings,” then click on “Settings” under the Performance section.
In the Performance Options dialog box, select “Adjust for best performance” to disable all visual effects or choose which specific effects you want to disable. In Windows 11, look for “Advanced system settings,” open “View advanced system settings,” and go to Advanced > Performance Settings.

Then, in the Performance Options window, under the Visual Effects tab, select “Adjust for best performance.”

It’s important to note that disabling visual effects can make your computer look less visually appealing, but it can also improve the performance of your computer during music production sessions. Additionally, some visual effects may be necessary for certain software programs to function properly.
Before disabling any visual effects, it’s a good idea to research their purpose and determine whether or not they are necessary for your music production workflow. Additionally, it’s recommended to create a system restore point or backup your system before making any significant changes to your computer’s visual effects settings.
Disabling unnecessary visual effects, you can help ensure your computer runs at peak performance during music production sessions.
5) Adjust CPU power settings
Adjusting your CPU power settings is a step that can help to optimize your Windows computer for music production/DAW. By default, Windows 10 is configured to balance power usage and performance, which may not be ideal for music production sessions.
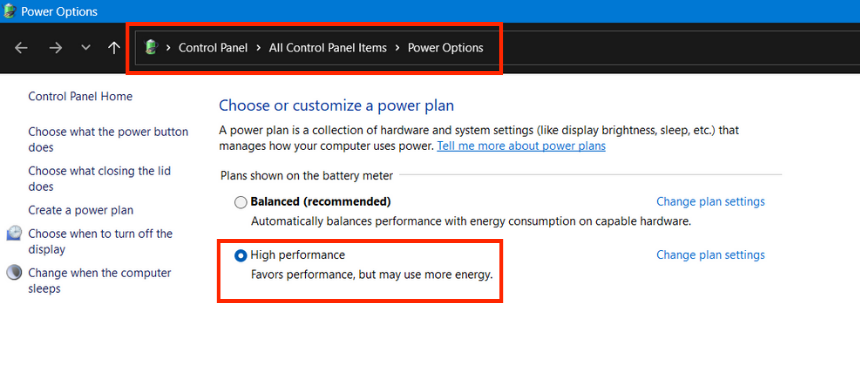
Adjusting your CPU power settings can ensure that your computer is using the maximum amount of processing power available, which can help to improve the performance of your music production software. You can use the Power Options control panel to adjust your CPU power settings in Windows 10. To access the Power Options control panel, right-click the battery icon in the taskbar and select “Power Options” from the context menu.
You can select the “High performance” power plan from there, prioritizing performance over power savings. You can also create a custom power plan by clicking “Create a power plan” and selecting the “High performance” option. In Windows 11, look for Control Panel in the search bar, and open it.

Further, go to Control Panel > All Control Panel Items > Power Options, and select “High Performance.”
It’s important to note that using the “High performance” power plan can increase the power consumption of your computer, which may not be ideal for laptops or other portable devices. Additionally, it’s recommended to monitor the temperature of your CPU while using the “High performance” power plan, as it can generate more heat than the default power plan.
It’s also important to ensure that your computer is properly ventilated and the fans are working properly to prevent overheating. Adjusting your CPU power settings can help ensure that your computer uses the maximum amount of processing power available during music production sessions.
6) Use an SSD
Using an SSD (Solid State Drive) is a step that can significantly optimize your Windows 10 computer for music production/DAW. An SSD is a storage device that uses NAND-based flash memory to store data instead of the spinning disks used in traditional hard drives. SSDs are much faster than traditional hard drives, which means that they can significantly improve the performance of your music production software.
When you use an SSD for music production, your software will load much faster, so you can start working on your projects immediately. Additionally, SSDs can greatly reduce the time it takes to save and load large audio files, so you can work more efficiently and complete your projects faster. They can also improve your computer’s responsiveness, making it easier to multitask and switch between different applications.
To use an SSD for music production, you can either replace your existing hard drive with an SSD or install an SSD as a secondary drive. It’s important to note that SSDs can be more expensive than traditional hard drives, so it’s important to consider your budget when making this decision.
Additionally, using an SSD with a capacity of at least 256GB is recommended to ensure you have enough space to store your music production files and software.
7) Disable system sounds
Disabling system sounds is crucial in optimizing your Windows 10 computer for music production/DAW. While system sounds can be helpful for general computer usage, they can be distracting and disruptive when creating music. For instance, a notification sound or an error beep can interrupt your creative flow and break your concentration, harming your productivity.
To disable system sounds, you can access the Sound settings control panel in Windows 10. Once there, you can turn off all the sounds by selecting “No sounds” in the Sound scheme drop-down menu. Alternatively, you can customize the settings by disabling the most disruptive sounds you find. For example, you might want to disable the sound when you adjust the volume or mute your computer.
In Windows 11, go to Control Panel > All Control Panel Items > Sound > “Sounds” tab.

Select “No Sounds” under Sound Scheme. Lastly, click on Apply and OK.

It’s important to note that some music production software uses system sounds to indicate certain events or changes. Before disabling all system sounds, you should research your software to ensure that you’re not disabling sounds important for your music production workflow.
Additionally, if you need to use certain sounds for your workflow, you can create custom sounds that are less distracting or use headphones to block out the system sounds while you work. Overall, disabling system sounds is essential in creating an optimized environment for music production. It can help you maintain your focus, minimize interruptions, and ensure your computer runs smoothly during your creative process.
8) Use a dedicated hard drive for audio files
Using a dedicated hard drive for audio files is another step that can help to optimize your Windows 10 computer for music production/DAW. When you create music, you generate a lot of audio files, including samples, recordings, and project files. These files can take up a lot of space and slow down your computer if stored on the same drive as your operating system and other applications.
By using a dedicated hard drive for audio files, you can improve the performance of your music production software and ensure that your computer runs more smoothly. That is because the hard drive is optimized for handling large files and is designed to provide faster read and write speeds than a traditional hard drive.
When choosing a hard drive for audio files, looking for a high capacity and a fast read/write speed is recommended. An SSD can be a good option, as it provides fast read and write speeds and can handle large files. However, a traditional hard drive can be cost-effective if you need much storage space. Additionally, you can use an external hard drive to move your audio files between different computers.
9) Disable wireless connection
Disabling wireless connections is another step that can help to optimize your Windows 10 computer for music production/DAW. Wireless connections, such as Wi-Fi and Bluetooth, can cause interference and add latency to your music production workflow. Wireless connections are more prone to signal dropouts and other issues than wired connections.
Disabling Wi-Fi and Bluetooth can be done by navigating to the Network and Internet settings in the Windows 10 Control Panel. Once there, you can select the “Wi-Fi” or “Bluetooth” option and toggle the switch to turn off the connection. Alternatively, you can use the airplane mode option to turn off all wireless connections.
In Windows 11, first, go to settings. You can open Settings by clicking the Windows icon and selecting Settings.

Then, go to Settings > Bluetooth & devices > Devices, and disable the on/off switch.

By disabling wireless connections, you can help to reduce the risk of signal dropouts and latency during music production sessions. Additionally, by reducing the number of active connections on your computer, you can help to free up system resources and improve the performance of your music production software.
It’s important to note that if you need to use wireless connections for other tasks, such as downloading updates or browsing the internet, you should re-enable the connections after you’ve finished your music production session. Additionally, using a laptop or other mobile device, you may need wireless connections to maintain your mobility while creating music.
Overall, disabling wireless connections can be a helpful step in creating an optimized environment for music production, but it’s important to consider your specific needs and workflow before making changes.
10) Adjust your Audio Settings
Adjusting your audio settings is another important step in optimizing your Windows 10 computer for music production/DAW. The audio settings can affect the performance and quality of your music production software and your overall listening experience.
One important setting to consider is the sample rate and bit depth. The sample rate refers to the number of samples per second used to represent the audio signal, while the bit depth refers to the number of bits used to represent each sample. A higher sample rate and bit depth can provide better audio quality but require more processing power and storage space.
Another set is the audio buffer size, which determines how much audio data is processed. A smaller buffer size can reduce latency and cause audio dropouts and other performance issues if your computer doesn’t have enough processing power.
In Windows 10/11, go to Control Panel > Sound, then under the Playback tab, select the device (your interface) and click ‘Properties.’

Under the Properties window, open the Advanced tab, select the desired sample rate and bit depth, and click Apply and OK.

You can adjust these settings in the interface or the interface settings on your Windows system. Further, it’s also important to note that different music production software may have audio settings that you’ll need to adjust separately. Additionally, you should ensure that your audio device is properly configured and updated with the latest drivers to ensure optimal performance.
11) Optimize your DAW settings
Optimizing your Digital Audio Workstation (DAW) is crucial in creating an optimized environment for music production on your Windows 10 computer. Here are some tips for optimizing your DAW.
Firstly, adjust the buffer size. The buffer size determines how much audio data is processed at a time. A smaller buffer size can reduce latency but cause audio dropouts if your computer does not have enough processing power. Adjust the buffer size to find your computer’s and DAW’s optimal setting.
Next, disable new features. Most DAWs come with many features that you may not need. Disabling unused features can help free up system resources and improve the performance of your DAW.
Another tip is to use the 64-bit version of the software. Many DAWs come in both 32-bit and 64-bit versions. If your computer has a 64-bit operating system, using the 64-bit version of your DAW is recommended. This can improve performance and allow you to access more memory, which can be especially helpful when working on large projects.
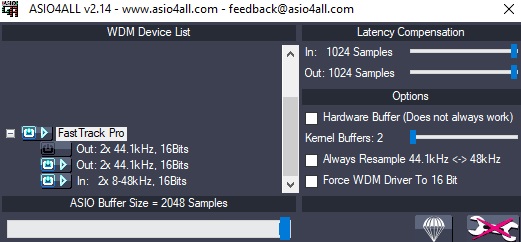
Another very important tip is to use ASIO drivers. ASIO (Audio Stream Input/Output) drivers are designed to provide low-latency and high-quality audio playback and recording. Many DAWs support ASIO drivers, and using them can help improve the performance of your DAW.
Lastly, optimize plugins. Plugins can be a significant drain on system resources. Consider disabling or removing plugins you don’t use, and use optimized ones for performance. For example, in FL Studio, you can adjust how much processing and CPU core a plugin uses to optimize its performance.
Optimizing your DAW can help create a more efficient and optimized environment for music production on your Windows 10 computer. By following these tips, you can improve the performance of your DAW and ensure that you’re getting the best possible results from your music production workflow.
Alternatively, you can also use the WASAPI (Windows Audio Session API), which is a low-latency audio driver model that was introduced in Windows Vista and is available in all subsequent versions of Windows, including Windows 7, Windows 8, and Windows 10.
It provides a way for audio applications to communicate directly with the audio hardware in the computer, bypassing the system mixer and providing lower latency and better audio quality. WASAPI provides two modes of operation: shared mode and exclusive mode.
Shared mode allows multiple applications to share the audio device, while exclusive mode gives an application exclusive access to the audio device. Many digital audio workstations (DAWs) and audio interfaces support WASAPI. It is often recommended for real-time applications with critical low latency, such as recording, mixing, and monitoring.
To use WASAPI in a music production application, ensure that your audio interface supports WASAPI and has the correct driver installed.
Many audio interfaces come with their own WASAPI drivers, but you can also download and install generic WASAPI drivers from the Microsoft website. Once you have the driver installed, you can select the WASAPI driver as your audio device in your music production application.
12) Disable Windows Defender
Disabling Windows Defender can be controversial, leaving your computer vulnerable to viruses and malware. However, some music producers may find that it interferes with their DAW or music production software, causing performance issues or false positives with their plugins.
However, I recommend turning off Windows Defender only if you have another antivirus installed. Else, it’s a risk to do so.
To disable Windows Defender, go to the Start menu, type “Windows Security,” and select “Virus & threat protection.” Click “Manage settings” from there and toggle off the “Real-time protection” option.


Remember that disabling Windows Defender comes with risks, so install and regularly update a reputable third-party antivirus program to help keep your computer safe. Additionally, you may want to re-enable Windows Defender once you’ve finished your music production tasks.
Bonus
1. Regularly clean your computer
Regularly cleaning your computer is an important step in optimizing it for music production/DAW. Over time, dust and debris can accumulate inside your computer, which can cause it to overheat and slow down. Here are some tips for cleaning your computer.
Firstly, turn off and unplug your computer. Before cleaning, ensure your computer is turned off and unplugged. This will help to prevent any damage or injury.
Next, using compressed air is an effective way to remove dust and debris from your computer. You can purchase cans of compressed air at most electronics stores or online. Compressed air blows out dust or debris from your computer’s vents, fans, and other components.
The next tip is to use a soft cloth. For more stubborn dirt or grime, use a soft or microfiber cloth to wipe down your computer’s surfaces gently. Avoid using water or cleaning solutions, as this can damage your computer.
Also, clean your keyboard and mouse, as they can accumulate dust and dirt over time. Use a soft cloth or compressed air to clean these components.
Next, remove any unnecessary files or programs. As mentioned earlier, removing unnecessary files and programs can help free up space on your hard drive and improve the performance of your computer.
The last piece of advice is to defragment your hard drive. Over time, your hard drive can become fragmented, slowing down your computer. Use the built-in Windows Disk Defragmenter tool to defragment your hard drive and improve its performance.
2. Disk Cleanup
Disk cleanup can be important for music production. It can help free up space on your computer’s hard drive, essential for storing your music production projects, sample libraries, and other files. However, it’s important to use disk cleanup cautiously and ensure you don’t accidentally delete any important files.
Also, you can clear up more space in your system by deleting temp files, junk files, and cache and clearing up the recycle bin. You can do that using the Disk Cleanup feature in Windows 11, shown in the video below.
In addition to running disk cleanup, it’s also important to regularly organize your files and delete any unused or unnecessary files to keep your computer’s hard drive from becoming too cluttered. This can help ensure that your music production software runs smoothly and you have enough space to work on new projects.
Conclusion
In summary, optimizing a Windows 10 or 11 computer for music production/DAW involves several steps, including updating drivers, disabling automatic updates, disabling unnecessary startup programs and visual effects, adjusting CPU power settings, using an SSD, disabling system sounds, using a dedicated hard drive for audio files, disabling wireless connections, adjusting audio settings, optimizing the DAW software, and regularly cleaning the computer.
These tips can help to free up system resources, reduce latency, and prevent performance issues that could negatively impact the music production workflow. However, it’s important to note that some tips, such as disabling Windows Defender, can come with risks and should be taken cautiously or avoided altogether.
Ultimately, optimizing a computer for music production requires a balance between performance and security, and each user should carefully consider their individual needs and preferences before making any changes. I hope the article was of help. Thank you for reading.

The Integraudio Editorial Team consists of experienced music producers, audio engineers, and plugin enthusiasts dedicated to providing in-depth reviews and guides for music production software.