Channel Strip plugins are great tools you can use when mixing. You can use them in any audio track you have in your project and pretty much be the only thing that you will need in that track to get a great sound out of it.
There is just a lot that you can do with just one plugin.
What is a Channel Strip Plugin?
They are virtual mixing console channels, such as an SSL, API, or Neve. These were built with four main sections: first, a gain knob to adjust the audio level getting into the channel. Second: A Dynamic section with a gate and compressor, the third: is an EQ to balance things out, and lastly, the output knob or fader to adjust the level after all the processing.
Some are emulating classic consoles to give us a vintage, and others are new and transparent. But, all of them work the same way. You will have the same four sections in general, and some plugins allow you to add some other modules for saturation, stereo imaging, and more.
Channel strips are great tools to get your audio up and running, even though this is something you can do with a bunch of individual plugins. They simplify and condensate all the processes you may want in an audio track in just one interface.
How To Use Channel Strip Plugins in Your Mix Using SSL Channel Strip 2
Many DAW’s come with stock channel strip plugins that can do the job just fine. Today, I will show you the one I love, the SSL channel strip 2, and the DAW I will use is Pro Tools. The SSL channel strip 2 gives you the classic sound of an SSL 9000k console with the possibility to have the classic G or E channels.
Loading the plugin onto our track
Before we start tweaking things, we need to load our plugin to the track we want to take effect on. You can do this for mono and stereo signals.
Mix tip: before inserting the channel strip, I always add an EQ to eliminate unwanted frequencies.
Sections of the channel strip
As mentioned, channel strips usually have four sections: The input section (orange) will allow us to control the input level of the signal we feed to the plugin. With the input knob, you can turn the gain up or down until you get to the right level.
Mix tip: Most plugins that emulate vintage gear have a sweet spot where they will work like a charm. (Usually around -18dBfs or 0dBVU. check the manual)
In the dynamic section (red), we will always find a gate/expander and a compressor. The compressor has three knobs. Ratio: is the relation that tells us how much the compressor will compress the signal once it hits the threshold. Release: is how long will it take for the compressor to stop compressing the signal, and it is in seconds. Threshold: It tells the compressor when to start compressing, which is in dB. We also have a fast attack button that adjusts the attack time to match the audio and a peak button to engage peak detection mode.
The gate/expander has four knobs. Range: how much will reduce the signal if it falls below the threshold. It is in dB. Release: controls how quickly the level then reduces. It is in seconds. Threshold: It tells the gate/expander when to start reducing the signal, which is in dB. Hold: controls the delay before the output signal level starts reducing again. It is in seconds.
We also have a fast attack button that adjusts the attack time to match the audio and an expand button to engage expander mode.
The EQ section 4-band parametric EQ, switchable between E- and G-Series tonal characteristics. Two filters: high pass filter (HP) and a low pass filter (LP). Low Frequency (LF) can be either shelf or bell. You can select the frequency you want to boost or dip from 40 to 600Hz. Low Mid Frequency (LMF) with a knob to select the frequency from 200 to 2000Hz, the gain knob, and a Q knob to select the width of the bell. High Mid Frequency (HMF) with a knob to select the frequency from 600 to 7000Hz, the gain knob, and a Q knob to select the width of the bell. High Frequency (HF): that can be either shelf or bell. You can select the frequency you want to boost or dip from 1.5 to 22kHz.
With the output knob (yellow), you can control the signal level that gets out of the plugin. Sometimes, after all the processing, the level rises or ends lower than the input. In this section, you can adjust it to the same level. This way, you can have your fader at 0 and have their full range to make fine-tuning in your mix.
Some Channel strips also allow you to change the order of how the EQ and compression go. Most of these plugins will have dynamic before EQ because that was how it was arranged in mixing desks, but with plugins, you can switch to EQ first or other setups that suit your current signal.
Also, we can make sidechained compression to any other audio source in our sessions; and we have a flip phase button to invert the polarity of the signal.
Now let’s go to our session and start mixing!
Drums:
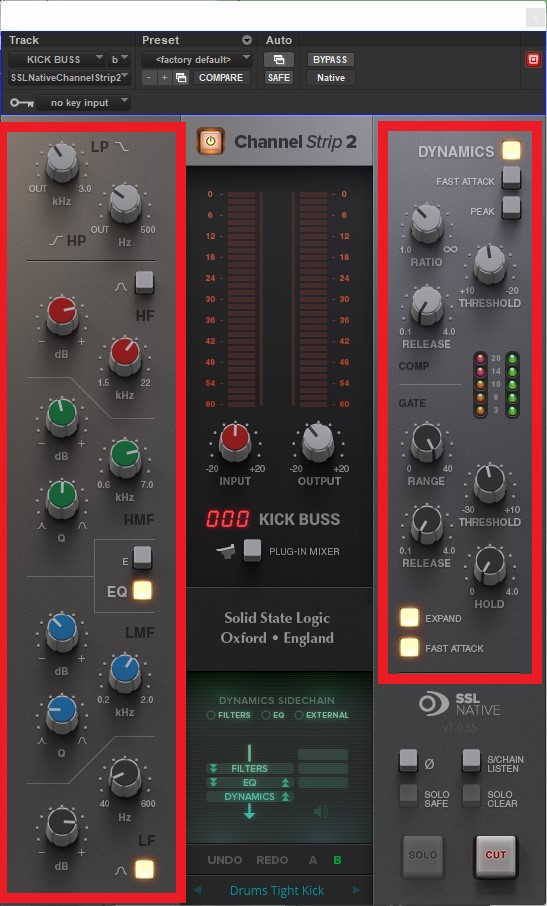
Let’s focus on the kick first; for this recording, I have two microphones, one on the inside and the out. So I create an aux track to get both in the same track and then insert the plugin.
We will start by adding an HP to get rid of anything below 35Hz; then, we’ll give it a boost of 10dB with our LF band on a shelf at 48Hz to add that bottom end. In this particular recording, I wouldn’t say I liked the way it sounded at 1kHz, so I’ll dip that down 6dB with a small Q using the LMF band, also dip a little bit more at 4.5kHz with the HMF band and then add more click boosting the top end 10dB at 10kHz. Next, let’s move to the dynamic section.
We will add a bit of compression with a ratio of 4:1, a threshold at -4dB, and the expander to get more punch with a fast attack.
Then I’ll A/B to decide if I like the E channel better than the G channel. And turn down the output knob to have almost the same level between input and output.
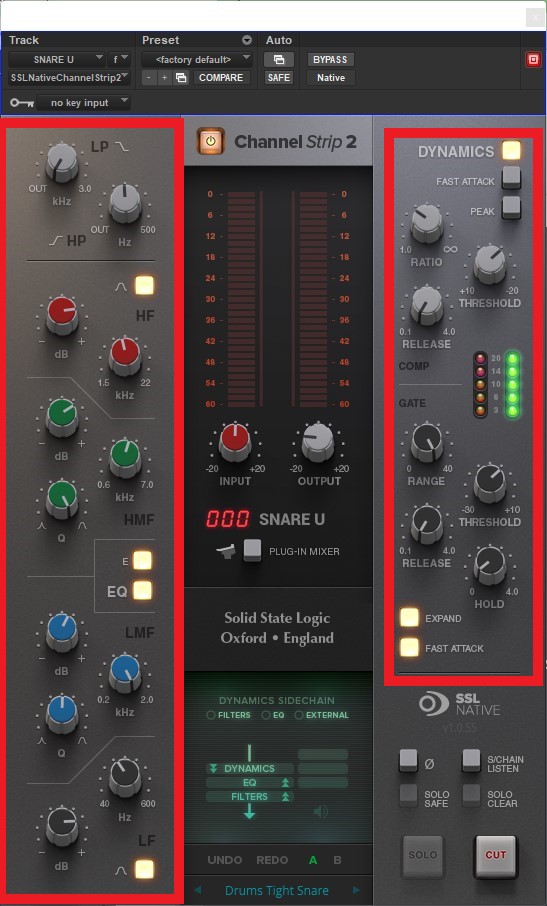
For the snare, we’ll do almost the same process, but before our channel strip, I added a gate to clean the track a little bit and only let the snare pass through and a saturator to get more harmonics to make it feel a lot livelier.
With the Channel strip, I’m starting by removing the low end that we don’t need with the HP at 73Hz. Then boost 9dB at 127Hz, another 3.5dB at 2kHz and 7.5 at 3kHz to get more snap, and 6dB at 7kHz to make it cut effortlessly through the mix.
We will add a little bit of compression with a ratio of 3:1, threshold at -10dB, and the expander to get more punch as with the kick with a fast attack.
Then select the E channel – I liked that one better for this one – And turn down the output knob to have almost the same level between input and output.
For the Toms, we will do pretty much the same thing. The only differences will be that, depending on what tom we are working on, we move the HP filter to let only the desired frequencies pass through and change the frequency we boost with our LF.
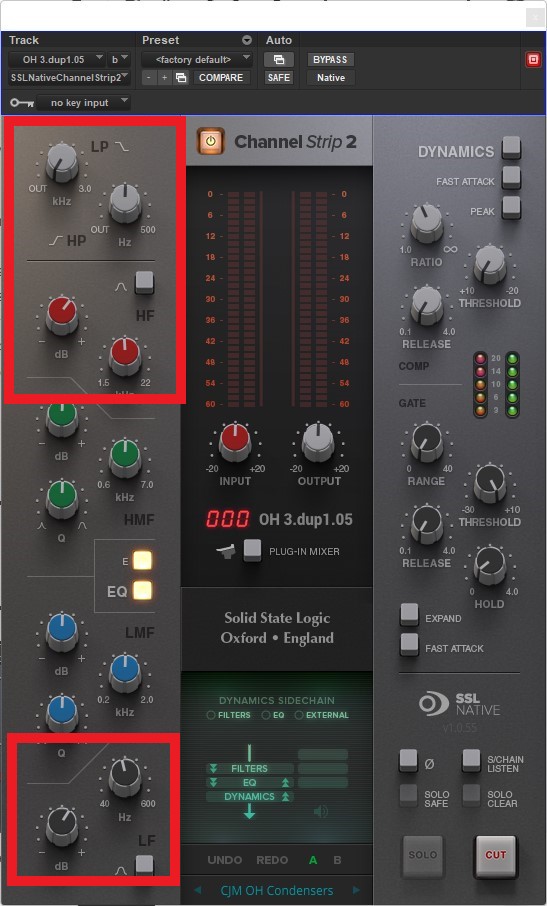
On the Overheads track, let’s add another instance of the plugin, but now it will be in stereo.
In this track, as before, we will roll the HP to 80Hz and then boost around 160Hz to keep the bottom on the snare and at 7kHz to get more top end to those cymbals. Then select the E channel.
After finishing with the drums let’s listen to the difference.
Raw Drums:
After SSL Channel strip 2:
The Bass:
I recorded a bass guitar with a clean preamp, and it has an excellent sound, but I hear a lot of the fingering and the frets, so let’s try to correct that.
We add the SSL Channel strip 2, and just like that, we can hear the sound getting more character without tweaking anything. First, we will eliminate any rumble by rolling the HP to 32Hz. Then let’s boost 3dBat 90Hz selecting bell instead of shelf. Now, a 4dB boost at 1000Hz, and 3dB at 2.5kHz with a wide Q, and finally add a bit top end boosting 4dB to a shelf at 10.5kHz.
Moving to the compressor, we will compress just the peaks, so we enable peak detection, dial in a 4:1 ratio, and the expander enabled.
Let’s hear it.
Raw Bass:
After SSL Channel strip 2:
Mix tip: when mixing the bass, always listen to the interaction between kick and bass to give each element its own space in the low end.
Guitars:
We got the sound we aimed for using direct guitars, incredible amp simulation, and the direct signal, but we needed to boost some frequencies to get a crisp sound. So let’s dive into it!
We will get rid of any rumble by rolling the HP to 50Hz. Then let’s boost 3dBat 95Hz. Then reduce 8dB at 370Hz to remove muddiness, a boost of 6.5dB at 1.6kHz, and a shelf boost of 5.5dB around 10kHz.
The compressor will be set to fast attack at a 4:1 ratio and a –3.5dB threshold.
Raw Guitar:
After SSL Channel strip 2:
Now let’s get the final touches to the master bus with the EQ just a boost in the top and bottom end of the frequency range and add some reverbs, delay, and an SSL Bus compressor.
Master bus no Channel Strip:
Master bus with SSL Channel Strip 2:
Conclusion
If you are looking for optimized workflow or come from the analog realm, perhaps this is the best way. As we usually hear in the audio, there is no right or wrong in these, only what works best for your purpose.
The best is that you have many different options that will work just as well as this plugin. You can either select one that gives you a taste of vintage gear like this SSL (there are many different console channels in the market) or go with a channel strip that doesn’t add color to the signal like the native plugins in your DAW.
Remember always to use your ears when making music. So many plugins have flashy and fancy interfaces, but when making the right decision for your production, listen. Listen to the subtle changes a channel strip can make by adding it to your track; if you don’t like what you hear, try another, then start tweaking as you see fit the different parameters. Good luck!

Shaurya Bhatia, is an Indian Music Producer, Composer, Rapper & Performer, who goes by the stage name MC SNUB, and is also 1/2 of the Indian pop music duo, called “babyface”. A certified Audio Engineer & Music Producer, and a practicing musician & rapper for more than 6 years, Shaurya has worked on projects of various genres and has also been a teaching faculty at Spin Gurus DJ Academy.


